Brother Meter Read Tool Users Guide
Page 4
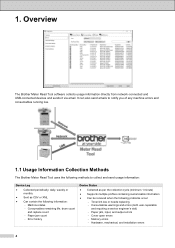
... 1. It can also send emails to notify you of any machine errors and consumables running low. 1.1 Usage Information Collection Methods The Brother Meter Read Tool uses the following methods to collect and send usage information: Device Log Collected periodically: daily, weekly or ...monthly Sent as CSV or XML Can contain the following information: Machine status Consumables remaining life, drum count and replace count Paper jam count Error history Device Status Collected as per the collection cycle (minimum 1 minute...
... 1. It can also send emails to notify you of any machine errors and consumables running low. 1.1 Usage Information Collection Methods The Brother Meter Read Tool uses the following methods to collect and send usage information: Device Log Collected periodically: daily, weekly or ...monthly Sent as CSV or XML Can contain the following information: Machine status Consumables remaining life, drum count and replace count Paper jam count Error history Device Status Collected as per the collection cycle (minimum 1 minute...
Users Guide
Page 6
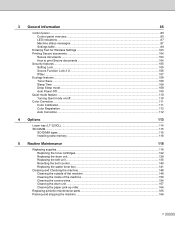
...DIMM...115 SO-DIMM types ...115 Installing extra memory ...116 5 Routine Maintenance 118 Replacing supplies...118 Replacing the toner cartridges...122 Replacing the drum unit...128 Replacing the belt unit ...135 Resetting the belt counter...140 Replacing the waste toner box ...141 Cleaning and Checking the machine ...148... Cleaning the outside of the machine 148 Cleaning the inside of the machine 150 Cleaning the corona wires ...154 Cleaning the drum unit ...157 Cleaning the paper pick-up roller...164 Replacing periodic maintenance parts 165 Packing and shipping the machine ...166 v
...DIMM...115 SO-DIMM types ...115 Installing extra memory ...116 5 Routine Maintenance 118 Replacing supplies...118 Replacing the toner cartridges...122 Replacing the drum unit...128 Replacing the belt unit ...135 Resetting the belt counter...140 Replacing the waste toner box ...141 Cleaning and Checking the machine ...148... Cleaning the outside of the machine 148 Cleaning the inside of the machine 150 Cleaning the corona wires ...154 Cleaning the drum unit ...157 Cleaning the paper pick-up roller...164 Replacing periodic maintenance parts 165 Packing and shipping the machine ...166 v
Users Guide
Page 13
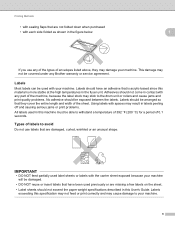
...your machine. 6 Adhesives should not come in contact with any part of the machine, because the label stock may cause damage to the drum unit or rollers and cause jams and print quality problems. No adhesive should be arranged so that they cover the entire length and width of...;F (200 C) for a period of envelopes listed above, they may damage your machine. Using labels with spaces may not be covered under any Brother warranty or service agreement. IMPORTANT • DO NOT feed partially used previously or are damaged, curled, wrinkled or an unusual shape. This damage may result...
...your machine. 6 Adhesives should not come in contact with any part of the machine, because the label stock may cause damage to the drum unit or rollers and cause jams and print quality problems. No adhesive should be arranged so that they cover the entire length and width of...;F (200 C) for a period of envelopes listed above, they may damage your machine. Using labels with spaces may not be covered under any Brother warranty or service agreement. IMPORTANT • DO NOT feed partially used previously or are damaged, curled, wrinkled or an unusual shape. This damage may result...

Users Guide
Page 96
Print NetSetting Print WLANReport - (HL-L8350CDW and HL-L8350CDWT) - - Prints the test page. Prints the demonstration sheet. Prints the font list and samples of BR-Script. Displays the machine's ...- Color - - Displays the total monochrome printed pages. Demo Print - - - Serial No. - - - Sub4 Version - - General Information Machine Info. Prints the Network Configuration Report. - - Drum Dot Print - - - BR-Script 3 - - Prints the font list and samples of HP LaserJet. Displays the sub firmware version. Displays the total color printed pages. Displays...
Print NetSetting Print WLANReport - (HL-L8350CDW and HL-L8350CDWT) - - Prints the test page. Prints the demonstration sheet. Prints the font list and samples of BR-Script. Displays the machine's ...- Color - - Displays the total monochrome printed pages. Demo Print - - - Serial No. - - - Sub4 Version - - General Information Machine Info. Prints the Network Configuration Report. - - Drum Dot Print - - - BR-Script 3 - - Prints the font list and samples of HP LaserJet. Displays the sub firmware version. Displays the total color printed pages. Displays...

Users Guide
Page 97
...Displays the pages left to print with an asterisk. 90 PF Kit MP Life - BK oonnnnnnnn - PF Kit 2 Life - Resets the drum unit life. Appears when you replace the drum unit. - Fuser Life - PF Kit 1 Life - - Laser Life - - Resets the belt unit life. Cyan(C) - Displays the ...Options Descriptions Black(BK) - Belt Life - Displays the pages left to print with the PF kit 2. - Reset Parts Life Drum Unit - (Appears only when the drum unit or belt Belt Unit - unit has exceeded its rated life.) - Appears when you replace the belt unit.
...Displays the pages left to print with an asterisk. 90 PF Kit MP Life - BK oonnnnnnnn - PF Kit 2 Life - Resets the drum unit life. Appears when you replace the drum unit. - Fuser Life - PF Kit 1 Life - - Laser Life - - Resets the belt unit life. Cyan(C) - Displays the ...Options Descriptions Black(BK) - Belt Life - Displays the pages left to print with the PF kit 2. - Reset Parts Life Drum Unit - (Appears only when the drum unit or belt Belt Unit - unit has exceeded its rated life.) - Appears when you replace the belt unit.
Users Guide
Page 125
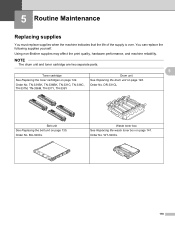
See Replacing the drum unit on page 141. Order No. BU-320CL Waste toner box See Replacing the waste toner box on page 128. 5 Routine Maintenance 5 Replacing supplies 5 You ... unit See Replacing the belt unit on page 122. Using non-Brother supplies may affect the print quality, hardware performance, and machine reliability. Order No. WT-320CL 118 NOTE The drum unit and toner cartridge are two separate parts. 5 Toner cartridge Drum unit See Replacing the toner cartridges on page 135. TN-331BK...
See Replacing the drum unit on page 141. Order No. BU-320CL Waste toner box See Replacing the waste toner box on page 128. 5 Routine Maintenance 5 Replacing supplies 5 You ... unit See Replacing the belt unit on page 122. Using non-Brother supplies may affect the print quality, hardware performance, and machine reliability. Order No. WT-320CL 118 NOTE The drum unit and toner cartridge are two separate parts. 5 Toner cartridge Drum unit See Replacing the toner cartridges on page 135. TN-331BK...
Users Guide
Page 126
...-331C 4 M = Magenta Y = Yellow BK = Black (Cyan, Magenta, Yellow) 1,500 pages 1 2 4 3,500 pages 1 2 5 TN-336C 5 TN-331M 4 TN-336M 5 5 TN-331Y 4 TN-336Y 5 Drum End Soon Belt End Soon Drum unit Belt unit 25,000 pages 1 3 50,000 pages (5 pages per job) 1 3 See page 129 See page 135 DR-331CL BU-320CL WT...
...-331C 4 M = Magenta Y = Yellow BK = Black (Cyan, Magenta, Yellow) 1,500 pages 1 2 4 3,500 pages 1 2 5 TN-336C 5 TN-331M 4 TN-336M 5 5 TN-331Y 4 TN-336Y 5 Drum End Soon Belt End Soon Drum unit Belt unit 25,000 pages 1 3 50,000 pages (5 pages per job) 1 3 See page 129 See page 135 DR-331CL BU-320CL WT...

Users Guide
Page 127
...Replace Toner (The second line of the LCD) Toner cartridge, Magenta TN-331M 4 TN-336M 5 Open the Front Cover, replace Toner Cartridge. Replace Drum Drum Stop Replace Belt Drum unit Drum unit Belt unit 25,000 pages 1 3 25,000 pages 1 3 50,000 pages (5 pages per job) 1 3 See page 129 See page...Fuser unit 50,000 pages 1 3 100,000 pages 1 3 Replace PF KitMP Paper feeding kit 50,000 pages 1 3 See page 141 WT-320CL Call Brother Customer Service for a replacement PF kit MP. 120 Cyan (C). Magenta (M). TN-331BK 4 TN-336BK 5 Open the Front Cover, replace Toner Cartridge. Black (...
...Replace Toner (The second line of the LCD) Toner cartridge, Magenta TN-331M 4 TN-336M 5 Open the Front Cover, replace Toner Cartridge. Replace Drum Drum Stop Replace Belt Drum unit Drum unit Belt unit 25,000 pages 1 3 25,000 pages 1 3 50,000 pages (5 pages per job) 1 3 See page 129 See page...Fuser unit 50,000 pages 1 3 100,000 pages 1 3 Replace PF KitMP Paper feeding kit 50,000 pages 1 3 See page 141 WT-320CL Call Brother Customer Service for a replacement PF kit MP. 120 Cyan (C). Magenta (M). TN-331BK 4 TN-336BK 5 Open the Front Cover, replace Toner Cartridge. Black (...

Users Guide
Page 130
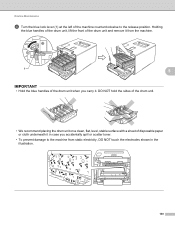
Pull the drum unit out until it stops. 5 5 123 Routine Maintenance Replacing the toner cartridges a Make sure that the machine is turned on. c Hold the blue handle of the drum unit. b Press the front cover release button and pull open the front cover.
Pull the drum unit out until it stops. 5 5 123 Routine Maintenance Replacing the toner cartridges a Make sure that the machine is turned on. c Hold the blue handle of the drum unit. b Press the front cover release button and pull open the front cover.
Users Guide
Page 131
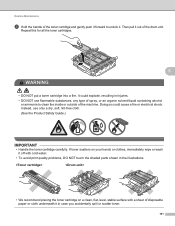
Routine Maintenance d Hold the handle of the drum unit. Then pull it out of the toner cartridge and gently push it . Instead, use flammable substances, any type of spray, or an organic solvent/...
Routine Maintenance d Hold the handle of the drum unit. Then pull it out of the toner cartridge and gently push it . Instead, use flammable substances, any type of spray, or an organic solvent/...
Users Guide
Page 132
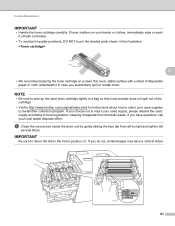
...; Be sure to local regulations, keeping it off with a sheet of the cartridge. • Visit to http://www.brother.com/original/index.html for instructions about how to the Brother collection program. If you do not, printed pages may have questions, call your used supply according to seal up the used...or clothes, immediately wipe or wash it separate from left to right and right to the home position (1). e Clean the corona wire inside the drum unit by gently sliding the blue tab from domestic waste. IMPORTANT Be sure to return the tab to left several times. If you have a...
...; Be sure to local regulations, keeping it off with a sheet of the cartridge. • Visit to http://www.brother.com/original/index.html for instructions about how to the Brother collection program. If you do not, printed pages may have questions, call your used supply according to seal up the used...or clothes, immediately wipe or wash it separate from left to right and right to the home position (1). e Clean the corona wire inside the drum unit by gently sliding the blue tab from domestic waste. IMPORTANT Be sure to return the tab to left several times. If you have a...
Users Guide
Page 133
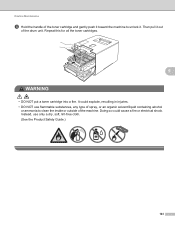
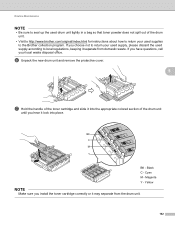
Use or attempted use of potentially incompatible toner and/or cartridges in the Brother machine may cause damage to the machine and/or may be shortened. • If an unpacked drum unit is caused by the use of time), the unit may result in unsatisfactory print quality. To protect your... DO NOT touch the shaded parts shown in the illustration. 126 Routine Maintenance f Repeat step e to clean each of Genuine Brother Supplies. • Put the toner cartridge in the drum unit immediately after you are ready to install it. g Unpack the new toner cartridge, then pull off the protective cover. ...
Use or attempted use of potentially incompatible toner and/or cartridges in the Brother machine may cause damage to the machine and/or may be shortened. • If an unpacked drum unit is caused by the use of time), the unit may result in unsatisfactory print quality. To protect your... DO NOT touch the shaded parts shown in the illustration. 126 Routine Maintenance f Repeat step e to clean each of Genuine Brother Supplies. • Put the toner cartridge in the drum unit immediately after you are ready to install it. g Unpack the new toner cartridge, then pull off the protective cover. ...
Users Guide
Page 134
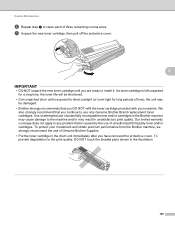
... the front cover of the toner cartridge and slide the toner cartridge into place. Black C - Yellow NOTE Make sure you hear it lock into the drum unit then gently pull it toward you until you installed the toner cartridge correctly or it stops. Routine Maintenance h Hold the handle of the machine.... Make sure that you match the toner cartridge color to the same color label on the drum unit. NOTE After replacing the toner cartridge, DO NOT turn off the machine's power switch or open the front cover until it may separate from...
... the front cover of the toner cartridge and slide the toner cartridge into place. Black C - Yellow NOTE Make sure you hear it lock into the drum unit then gently pull it toward you until you installed the toner cartridge correctly or it stops. Routine Maintenance h Hold the handle of the machine.... Make sure that you match the toner cartridge color to the same color label on the drum unit. NOTE After replacing the toner cartridge, DO NOT turn off the machine's power switch or open the front cover until it may separate from...
Users Guide
Page 135
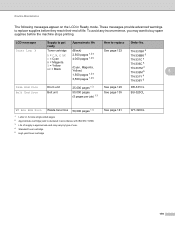
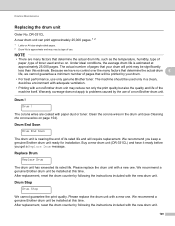
...print quality. The actual number of pages that your drum. • For best performance, use only genuine Brother toner. We recommend you get a Replace Drum message. Please replace the drum unit with the new drum unit. We recommend a genuine Brother drum unit be installed at this time. Clean the corona... not only the print quality but also the quality and life of a non-Brother drum unit. Drum End Soon 5 Drum End Soon The drum unit is estimated at this time. Replace Drum 5 Replace Drum The drum unit has exceeded its rated life and will print may be used and so ...
...print quality. The actual number of pages that your drum. • For best performance, use only genuine Brother toner. We recommend you get a Replace Drum message. Please replace the drum unit with the new drum unit. We recommend a genuine Brother drum unit be installed at this time. Clean the corona... not only the print quality but also the quality and life of a non-Brother drum unit. Drum End Soon 5 Drum End Soon The drum unit is estimated at this time. Replace Drum 5 Replace Drum The drum unit has exceeded its rated life and will print may be used and so ...
Users Guide
Page 136
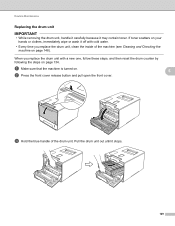
...on your hands or clothes, immediately wipe or wash it may contain toner. When you replace the drum unit with cold water. • Every time you replace the drum unit, clean the inside of the drum unit. c Hold the blue handle of the machine (see Cleaning and Checking the machine on ...page 148). Routine Maintenance Replacing the drum unit 5 IMPORTANT • While removing the drum unit, handle it carefully because it off with a new one, follow these steps, and then reset the drum counter by following the steps on page 134. a Make sure that the ...
...on your hands or clothes, immediately wipe or wash it may contain toner. When you replace the drum unit with cold water. • Every time you replace the drum unit, clean the inside of the drum unit. c Hold the blue handle of the machine (see Cleaning and Checking the machine on ...page 148). Routine Maintenance Replacing the drum unit 5 IMPORTANT • While removing the drum unit, handle it carefully because it off with a new one, follow these steps, and then reset the drum counter by following the steps on page 134. a Make sure that the ...
Users Guide
Page 137
DO NOT hold the sides of the drum unit. • We recommend placing the drum unit on a clean, flat, level, stable surface with a sheet of disposable paper or cloth underneath it in the illustration. 130 Routine Maintenance d Turn the blue ... machine counterclockwise to the machine from the machine. 2 1 5 IMPORTANT • Hold the blue handles of the drum unit when you carry it. Holding the blue handles of the drum unit, lift the front of the drum unit and remove it from static electricity, DO NOT touch the electrodes shown in case you accidentally...
DO NOT hold the sides of the drum unit. • We recommend placing the drum unit on a clean, flat, level, stable surface with a sheet of disposable paper or cloth underneath it in the illustration. 130 Routine Maintenance d Turn the blue ... machine counterclockwise to the machine from the machine. 2 1 5 IMPORTANT • Hold the blue handles of the drum unit when you carry it. Holding the blue handles of the drum unit, lift the front of the drum unit and remove it from static electricity, DO NOT touch the electrodes shown in case you accidentally...
Users Guide
Page 138
.... • We recommend placing the toner cartridge on a clean, flat, level, stable surface with a sheet of disposable paper or cloth underneath it out of the drum unit. Instead, use flammable substances, any type of spray, or an organic solvent/liquid containing alcohol or ammonia to clean the inside or outside of...
.... • We recommend placing the toner cartridge on a clean, flat, level, stable surface with a sheet of disposable paper or cloth underneath it out of the drum unit. Instead, use flammable substances, any type of spray, or an organic solvent/liquid containing alcohol or ammonia to clean the inside or outside of...
Users Guide
Page 139
...it may separate from domestic waste. If you have questions, call your used supply, please discard the used supplies to the Brother collection program. Cyan M - Routine Maintenance NOTE • Be sure to seal up the used drum unit tightly in a bag so that toner powder does not spill out of the... drum unit until you hear it lock into the appropriate colored section of the drum unit. • Visit to http://www.brother.com/original/index.html for instructions about how to return your used supply according to local regulations,...
...it may separate from domestic waste. If you have questions, call your used supply, please discard the used supplies to the Brother collection program. Cyan M - Routine Maintenance NOTE • Be sure to seal up the used drum unit tightly in a bag so that toner powder does not spill out of the... drum unit until you hear it lock into the appropriate colored section of the drum unit. • Visit to http://www.brother.com/original/index.html for instructions about how to return your used supply according to local regulations,...

Users Guide
Page 140
2 2 2 Routine Maintenance h Make sure the blue lock lever (1) is in the release position as shown in the illustration. 1 5 i Gently slide the drum unit into the machine until it stops at the blue lock lever. j Turn the blue lock lever (1) clockwise to the lock position. 1 133
2 2 2 Routine Maintenance h Make sure the blue lock lever (1) is in the release position as shown in the illustration. 1 5 i Gently slide the drum unit into the machine until it stops at the blue lock lever. j Turn the blue lock lever (1) clockwise to the lock position. 1 133
Users Guide
Page 141
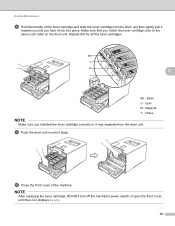
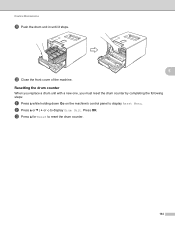
Press OK. b Press a or b ( + or -) to display Reset Menu. Routine Maintenance k Push the drum unit in until it stops. 5 l Close the front cover of the machine. Resetting the drum counter 5 When you replace a drum unit with a new one, you must reset the drum counter by completing the following steps: a Press a while holding down Go on the machine's control panel to display Drum Unit. c Press a for Reset to reset the drum counter. 134
Press OK. b Press a or b ( + or -) to display Reset Menu. Routine Maintenance k Push the drum unit in until it stops. 5 l Close the front cover of the machine. Resetting the drum counter 5 When you replace a drum unit with a new one, you must reset the drum counter by completing the following steps: a Press a while holding down Go on the machine's control panel to display Drum Unit. c Press a for Reset to reset the drum counter. 134

