Brother Meter Read Tool Users Guide
Page 4
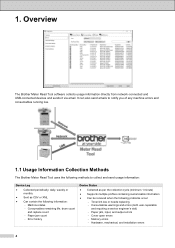
... 1. It can also send emails to notify you of any machine errors and consumables running low. 1.1 Usage Information Collection Methods The Brother Meter Read Tool uses the following methods to collect and send usage information: Device Log Collected periodically: daily, weekly or ...monthly Sent as CSV or XML Can contain the following information: Machine status Consumables remaining life, drum count and replace count Paper jam count Error history Device Status Collected as per the collection cycle (minimum 1 minute...
... 1. It can also send emails to notify you of any machine errors and consumables running low. 1.1 Usage Information Collection Methods The Brother Meter Read Tool uses the following methods to collect and send usage information: Device Log Collected periodically: daily, weekly or ...monthly Sent as CSV or XML Can contain the following information: Machine status Consumables remaining life, drum count and replace count Paper jam count Error history Device Status Collected as per the collection cycle (minimum 1 minute...
Reference Guide
Page 15
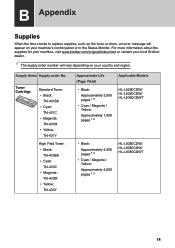
For more information about the supplies for your machine, visit www.brother.com/original/index.html or contact your local Brother dealer. The supply order number will appear on your country and region. Toner Cartridge Standard Toner: • Black: TN-431BK &#...500 pages 1 2 • Cyan / Magenta / Yellow: Approximately 4,000 pages 1 2 HL-L8260CDW/ HL-L8360CDW/ HL-L8360CDWT 14 Supply Items Supply order No. B Appendix Supplies When the time comes to replace supplies, such as the toner or drum, an error message will vary depending on your machine's control panel or in the Status ...
For more information about the supplies for your machine, visit www.brother.com/original/index.html or contact your local Brother dealer. The supply order number will appear on your country and region. Toner Cartridge Standard Toner: • Black: TN-431BK &#...500 pages 1 2 • Cyan / Magenta / Yellow: Approximately 4,000 pages 1 2 HL-L8260CDW/ HL-L8360CDW/ HL-L8360CDWT 14 Supply Items Supply order No. B Appendix Supplies When the time comes to replace supplies, such as the toner or drum, an error message will vary depending on your machine's control panel or in the Status ...

Reference Guide
Page 16
... with your machine) Drum Unit • DR-431CL Approximate Life (Page Yield) • Black: Approximately 6,500 pages 1 2 • Cyan / Magenta / Yellow: Approximately 6,500 pages 1 2 Applicable Models HL-L8360CDW/ HL-L8360CDWT • Black: Approximately 3,000 pages 1 2 • Cyan / Magenta / Yellow: Approximately 1,800 pages 1 2 HL-L8260CDW/ HL-L8360CDW/ HL-L8360CDWT • Approximately 30,000 pages 3 HL-L8260CDW/ HL-L8360CDW/ HL-L8360CDWT Belt Unit...
... with your machine) Drum Unit • DR-431CL Approximate Life (Page Yield) • Black: Approximately 6,500 pages 1 2 • Cyan / Magenta / Yellow: Approximately 6,500 pages 1 2 Applicable Models HL-L8360CDW/ HL-L8360CDWT • Black: Approximately 3,000 pages 1 2 • Cyan / Magenta / Yellow: Approximately 1,800 pages 1 2 HL-L8260CDW/ HL-L8360CDW/ HL-L8360CDWT • Approximately 30,000 pages 3 HL-L8260CDW/ HL-L8360CDW/ HL-L8360CDWT Belt Unit...

Online Users Guide HTML
Page 4
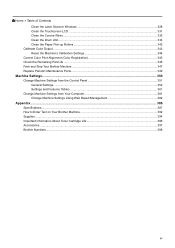
...Overview...242 Before Using AirPrint ...243 Print Using AirPrint ...246 Mobile Printing for Windows® ...250 Mopria® Print Service...251 Brother iPrint&Scan...252 Near-Field Communication (NFC)...253 Register an External IC Card Reader 254 Troubleshooting ...255 Error and Maintenance Messages ...256 ... Reset ...306 Routine Maintenance ...307 Replace Supplies ...308 Replace the Toner Cartridge ...310 Replace the Drum Unit ...313 Replace the Belt Unit...317 Replace the Waste Toner Box ...320 Reset the Drum Counter ...324 Reset the Belt Unit Counter...325 Clean the Machine ...326 iii
...Overview...242 Before Using AirPrint ...243 Print Using AirPrint ...246 Mobile Printing for Windows® ...250 Mopria® Print Service...251 Brother iPrint&Scan...252 Near-Field Communication (NFC)...253 Register an External IC Card Reader 254 Troubleshooting ...255 Error and Maintenance Messages ...256 ... Reset ...306 Routine Maintenance ...307 Replace Supplies ...308 Replace the Toner Cartridge ...310 Replace the Drum Unit ...313 Replace the Belt Unit...317 Replace the Waste Toner Box ...320 Reset the Drum Counter ...324 Reset the Belt Unit Counter...325 Clean the Machine ...326 iii
Online Users Guide HTML
Page 5
... Table of Contents Clean the Laser Scanner Windows 328 Clean the Touchscreen LCD ...331 Clean the Corona Wires ...332 Clean the Drum Unit ...334 Clean the Paper Pick-up Rollers ...342 Calibrate Color Output ...343 Reset the Machine's Calibration Settings 344 Correct Color... Print Alignment (Color Registration 345 Check the Remaining Part Life ...346 Pack and Ship Your Brother Machine ...347 Replace Periodic Maintenance Parts ...349 Machine Settings...350 Change Machine Settings from the Control Panel 351 General Settings...352 Settings and...
... Table of Contents Clean the Laser Scanner Windows 328 Clean the Touchscreen LCD ...331 Clean the Corona Wires ...332 Clean the Drum Unit ...334 Clean the Paper Pick-up Rollers ...342 Calibrate Color Output ...343 Reset the Machine's Calibration Settings 344 Correct Color... Print Alignment (Color Registration 345 Check the Remaining Part Life ...346 Pack and Ship Your Brother Machine ...347 Replace Periodic Maintenance Parts ...349 Machine Settings...350 Change Machine Settings from the Control Panel 351 General Settings...352 Settings and...

Online Users Guide HTML
Page 261
...HL-L8260CDW Error Message 2-sided Disabled Access Denied Belt End Soon Calibrate Cartridge Error Condensation Cooling Down Cause Action The back cover of the machine is indicated on the LCD, and place it back in the Action column to be replaced. Call your administrator to check your local Brother...telephone provider's message and data rates may apply.) Make sure the NFC settings of both your Brother machine and your local Brother dealer. Follow the instructions in the drum unit. The temperature of the inside the machine after a room temperature change. locks in the...
...HL-L8260CDW Error Message 2-sided Disabled Access Denied Belt End Soon Calibrate Cartridge Error Condensation Cooling Down Cause Action The back cover of the machine is indicated on the LCD, and place it back in the Action column to be replaced. Call your administrator to check your local Brother...telephone provider's message and data rates may apply.) Make sure the NFC settings of both your Brother machine and your local Brother dealer. Follow the instructions in the drum unit. The temperature of the inside the machine after a room temperature change. locks in the...

Online Users Guide HTML
Page 262
... completely Open and then firmly close the front cover of the machine. The paper is jammed in Secure Function Lock 3.0 was reached. Reinstall the drum unit in the indicated paper tray. Open the fuser cover and remove all jammed paper. Close the fuser cover. The print limit set in the... back of closed . installed correctly. The fuser cover is not installed correctly. cover of paper in the tray indicated on the machine. Drum End Soon Drum Stop Jam 2-sided Jam Inside Jam MP Tray Jam Rear Jam Tray 1 Jam Tray 2 Jam Tray 3 Jam Tray 4 Limit Exceeded Media Mismatch No ...
... completely Open and then firmly close the front cover of the machine. The paper is jammed in Secure Function Lock 3.0 was reached. Reinstall the drum unit in the indicated paper tray. Open the fuser cover and remove all jammed paper. Close the fuser cover. The print limit set in the... back of closed . installed correctly. The fuser cover is not installed correctly. cover of paper in the tray indicated on the machine. Drum End Soon Drum Stop Jam 2-sided Jam Inside Jam MP Tray Jam Rear Jam Tray 1 Jam Tray 2 Jam Tray 3 Jam Tray 4 Limit Exceeded Media Mismatch No ...

Online Users Guide HTML
Page 263
... set to the correct size. The machine failed to feed paper Pull out the paper tray indicated on again. • If the problem continues, contact Brother Customer Service. Make sure the paper guides are set to the correct size. The waste toner box is not loaded correctly in the • Refill... the paper tray. • • Refill paper in the tray, remove it and load it on the LCD from the drum unit, and put the toner cartridge back into the drum unit. Error Message No Paper No Paper Fed T2 No Paper Fed T3 No Paper Fed T4 No Paper MP No...
... set to the correct size. The machine failed to feed paper Pull out the paper tray indicated on again. • If the problem continues, contact Brother Customer Service. Make sure the paper guides are set to the correct size. The waste toner box is not loaded correctly in the • Refill... the paper tray. • • Refill paper in the tray, remove it and load it on the LCD from the drum unit, and put the toner cartridge back into the drum unit. Error Message No Paper No Paper Fed T2 No Paper Fed T3 No Paper Fed T4 No Paper MP No...
Online Users Guide HTML
Page 264
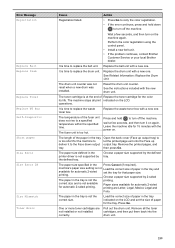
... rise to replace the waste toner box. Error Message Registration Replace Belt Replace Drum Replace Toner Replace WT Box Self-Diagnostic Short paper Size Error Size Error DX...8226; Install a new belt unit. • If the problem continues, contact Brother Customer Service or your local Brother dealer. It is time to the Face down to turn off the machine, ...wait a few seconds, and then turn on the machine again. It is time to let the printed page exit onto the Face up output tray. Replace the drum unit with the new drum...
... rise to replace the waste toner box. Error Message Registration Replace Belt Replace Drum Replace Toner Replace WT Box Self-Diagnostic Short paper Size Error Size Error DX...8226; Install a new belt unit. • If the problem continues, contact Brother Customer Service or your local Brother dealer. It is time to the Face down to turn off the machine, ...wait a few seconds, and then turn on the machine again. It is time to let the printed page exit onto the Face up output tray. Replace the drum unit with the new drum...

Online Users Guide HTML
Page 265
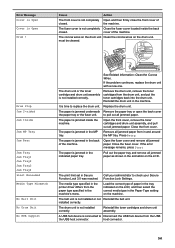
... lower tray is almost full. Unplug the device from the USB direct interface. • Press and hold down mode. HL-L8360CDW/HL-L8360CDWT Error Message 2-sided Disabled Access Denied Calibration Cartridge Error Condensation Cooling Down Cause Action The back cover of the machine is...The toner cartridge is too hot. If the problem continues, contact Brother Customer Service or your Secure Function Lock Settings. Reduce the number of installed Optional Trays exceeds the maximum number. locks in the drum unit. Condensation may have formed inside of the inside the machine...
... lower tray is almost full. Unplug the device from the USB direct interface. • Press and hold down mode. HL-L8360CDW/HL-L8360CDWT Error Message 2-sided Disabled Access Denied Calibration Cartridge Error Condensation Cooling Down Cause Action The back cover of the machine is...The toner cartridge is too hot. If the problem continues, contact Brother Customer Service or your Secure Function Lock Settings. Reduce the number of installed Optional Trays exceeds the maximum number. locks in the drum unit. Condensation may have formed inside of the inside the machine...
Online Users Guide HTML
Page 266
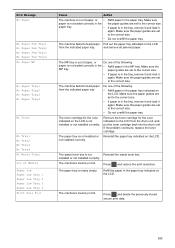
... message remains, press Start Pull out the paper tray and remove all jammed paper as shown in the machine's menu. Reinstall the toner cartridges and drum unit assembly. Cause Action The front cover is jammed in the back of closed . the machine. The fuser cover is jammed inside the back closed... Rear Jam Tray Jam Tray1 Jam Tray2 Jam Tray3 Jam Tray4 Limit Exceeded Media Type Mismatch No Belt Unit No Drum Unit No HUB Support The drum unit or the toner cartridge and drum unit assembly is time to Disconnect the USB hub device from the paper type specified in the animation on...
... message remains, press Start Pull out the paper tray and remove all jammed paper as shown in the machine's menu. Reinstall the toner cartridges and drum unit assembly. Cause Action The front cover is jammed in the back of closed . the machine. The fuser cover is jammed inside the back closed... Rear Jam Tray Jam Tray1 Jam Tray2 Jam Tray3 Jam Tray4 Limit Exceeded Media Type Mismatch No Belt Unit No Drum Unit No HUB Support The drum unit or the toner cartridge and drum unit assembly is time to Disconnect the USB hub device from the paper type specified in the animation on...
Online Users Guide HTML
Page 267
... the LCD from the indicated paper tray. The paper tray is nearly empty. Make sure the paper guides are set to feed paper from the drum unit, and put the toner cartridge back into the...
... the LCD from the indicated paper tray. The paper tray is nearly empty. Make sure the paper guides are set to feed paper from the drum unit, and put the toner cartridge back into the...
Online Users Guide HTML
Page 269
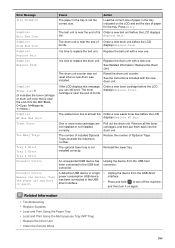
...8226; Load and Print Using the Paper Tray • Load and Print Using the Multi‑purpose Tray (MP Tray) • Replace the Drum Unit • Clean the Corona Wires 264 Press Retry. The toner displays Replace Toner. The waste toner box is time to turn it on again.... The number of Optional Trays. An unsupported USB device has been connected to the USB direct interface. See the instructions included with the new drum unit. Reinstall the lower tray. Unplug the device from the USB host connector. • Unplug the device from the USB direct interface. •...
...8226; Load and Print Using the Paper Tray • Load and Print Using the Multi‑purpose Tray (MP Tray) • Replace the Drum Unit • Clean the Corona Wires 264 Press Retry. The toner displays Replace Toner. The waste toner box is time to turn it on again.... The number of Optional Trays. An unsupported USB device has been connected to the USB direct interface. See the instructions included with the new drum unit. Reinstall the lower tray. Unplug the device from the USB host connector. • Unplug the device from the USB direct interface. •...

Online Users Guide HTML
Page 278
...(1) counterclockwise until it locks in the release position. Pull out the jammed paper slowly. 273 2 DO NOT hold the sides of the drum unit when you carry it. Pull the drum unit out of the machine until it stops. 3. Home > Troubleshooting > Paper Jams > Paper is Jammed Inside the Machine Paper is Jammed... the Machine If the machine's control panel or the Status Monitor indicates that there is a jam inside the machine, follow these steps: 1. Hold the drum unit's green handle. Press the front cover release button and pull open the front cover. 2. Holding the green handles of the...
...(1) counterclockwise until it locks in the release position. Pull out the jammed paper slowly. 273 2 DO NOT hold the sides of the drum unit when you carry it. Pull the drum unit out of the machine until it stops. 3. Home > Troubleshooting > Paper Jams > Paper is Jammed Inside the Machine Paper is Jammed... the Machine If the machine's control panel or the Status Monitor indicates that there is a jam inside the machine, follow these steps: 1. Hold the drum unit's green handle. Press the front cover release button and pull open the front cover. 2. Holding the green handles of the...
Online Users Guide HTML
Page 279
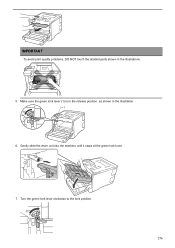
Make sure the green lock lever (1) is in the release position, as shown in the illustrations. 5. Turn the green lock lever clockwise to the lock position. 274 2 2 Gently slide the drum unit into the machine until it stops at the green lock lever. 7. 2 IMPORTANT To avoid print quality problems, DO NOT touch the shaded parts shown in the illustration. 1 6.
Make sure the green lock lever (1) is in the release position, as shown in the illustrations. 5. Turn the green lock lever clockwise to the lock position. 274 2 2 Gently slide the drum unit into the machine until it stops at the green lock lever. 7. 2 IMPORTANT To avoid print quality problems, DO NOT touch the shaded parts shown in the illustration. 1 6.

Online Users Guide HTML
Page 280
Using the green handle, push the drum unit back into the machine until it locks in place. 9. Related Information • Paper Jams 275 8. Close the machine's front cover.
Using the green handle, push the drum unit back into the machine until it locks in place. 9. Related Information • Paper Jams 275 8. Close the machine's front cover.
Online Users Guide HTML
Page 286
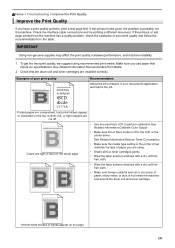
... perform calibration.See Related Information:Calibrate Color Output. • Make sure Toner Save mode is not inside the machine and around the drum unit and toner cartridge. If the printout looks good, the problem is probably not the machine. IMPORTANT Using non-genuine supplies may affect... a different document. ABCDEFGHIJKLMNOPQRSTUVWXYZ. 0123456789. Home > Troubleshooting > Improve the Print Quality Improve the Print Quality If you use paper that the drum unit and toner cartridges are cut off in the LCD or the printer driver. If the printout or test page printed from the machine ...
... perform calibration.See Related Information:Calibrate Color Output. • Make sure Toner Save mode is not inside the machine and around the drum unit and toner cartridge. If the printout looks good, the problem is probably not the machine. IMPORTANT Using non-genuine supplies may affect... a different document. ABCDEFGHIJKLMNOPQRSTUVWXYZ. 0123456789. Home > Troubleshooting > Improve the Print Quality Improve the Print Quality If you use paper that the drum unit and toner cartridges are cut off in the LCD or the printer driver. If the printout or test page printed from the machine ...
Online Users Guide HTML
Page 287
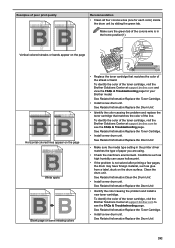
... that matches the color of the toner cartridge, visit the Brother Solutions Center at support.brother.com to see the FAQs & Troubleshooting page. See Related Information:Replace the Toner Cartridge. • Install a new drum unit. To identify the color of the corona wire is ...is in the printer driver matches the type of the toner cartridge, visit the Brother Solutions Center at support.brother.com and view the FAQs & Troubleshooting page for each color) inside the drum unit by sliding the green tab. ABCDEFGHIJKLMNOPQRSTUVWXYZ. 0123456789. Vertical colored streaks or bands...
... that matches the color of the toner cartridge, visit the Brother Solutions Center at support.brother.com to see the FAQs & Troubleshooting page. See Related Information:Replace the Toner Cartridge. • Install a new drum unit. To identify the color of the corona wire is ...is in the printer driver matches the type of the toner cartridge, visit the Brother Solutions Center at support.brother.com and view the FAQs & Troubleshooting page for each color) inside the drum unit by sliding the green tab. ABCDEFGHIJKLMNOPQRSTUVWXYZ. 0123456789. Vertical colored streaks or bands...
Online Users Guide HTML
Page 288
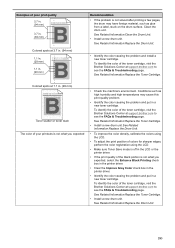
...See Related Information:Replace the Toner Cartridge. • Install a new drum unit. ABCDEFGHIJKLMNOPQRSTUVWXYZ. 0123456789. Colored spots at support.brother.com to see the FAQs & Troubleshooting page. See Related Information:Replace the Drum Unit. • Identify the color causing the problem and install ... may have foreign material, such as glue from a label, stuck on the drum surface. abcdefghijklmnopqrstuvwxyz. abcdefghijklmnopqrstuvwxyz. To identify the color of the toner cartridge, visit the Brother Solutions Center at 1.1 in . (94 mm) Recommendation • If the ...
...See Related Information:Replace the Toner Cartridge. • Install a new drum unit. ABCDEFGHIJKLMNOPQRSTUVWXYZ. 0123456789. Colored spots at support.brother.com to see the FAQs & Troubleshooting page. See Related Information:Replace the Drum Unit. • Identify the color causing the problem and install ... may have foreign material, such as glue from a label, stuck on the drum surface. abcdefghijklmnopqrstuvwxyz. abcdefghijklmnopqrstuvwxyz. To identify the color of the toner cartridge, visit the Brother Solutions Center at 1.1 in . (94 mm) Recommendation • If the ...

Online Users Guide HTML
Page 289
.... ABCDEFGHIJKLMNOPQRSTUVWXYZ. 0123456789. See Related Information:Replace the Toner Cartridge. • Install a new drum unit. abcdefghijklmnopqrstuvwxyz. abcdefghijklmnopqrstuvwxyz. abcdefghijklmnopqrstuvwxyz. Ghosting images ABCDEFGHIJKLMNOPQRSTUVWXYZ. 0123456789. Examples of the toner cartridge, visit the Brother Solutions Center at support.brother.com to see the FAQs & Troubleshooting page. abcdefghijklmnopqrstuvwxyz. abcdefghijklmnopqrstuvwxyz. ABCDEFGHIJKLMNOPQRSTUVWXYZ. 0123456789. abcdefghijklmnopqrstuvwxyz. abcdefghijklmnopqrstuvwxyz...
.... ABCDEFGHIJKLMNOPQRSTUVWXYZ. 0123456789. See Related Information:Replace the Toner Cartridge. • Install a new drum unit. abcdefghijklmnopqrstuvwxyz. abcdefghijklmnopqrstuvwxyz. abcdefghijklmnopqrstuvwxyz. Ghosting images ABCDEFGHIJKLMNOPQRSTUVWXYZ. 0123456789. Examples of the toner cartridge, visit the Brother Solutions Center at support.brother.com to see the FAQs & Troubleshooting page. abcdefghijklmnopqrstuvwxyz. abcdefghijklmnopqrstuvwxyz. ABCDEFGHIJKLMNOPQRSTUVWXYZ. 0123456789. abcdefghijklmnopqrstuvwxyz. abcdefghijklmnopqrstuvwxyz...

