Brother Meter Read Tool Users Guide
Page 4
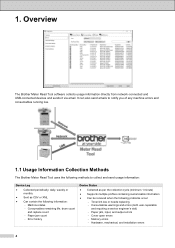
.... It can also send emails to notify you of any machine errors and consumables running low. 1.1 Usage Information Collection Methods The Brother Meter Read Tool uses the following methods to collect and send usage information: Device Log Collected periodically: daily, weekly or... monthly Sent as CSV or XML Can contain the following information: Machine status Consumables remaining life, drum count and replace count Paper jam count Error history Device Status Collected as per the collection cycle (minimum 1 minute...
.... It can also send emails to notify you of any machine errors and consumables running low. 1.1 Usage Information Collection Methods The Brother Meter Read Tool uses the following methods to collect and send usage information: Device Log Collected periodically: daily, weekly or... monthly Sent as CSV or XML Can contain the following information: Machine status Consumables remaining life, drum count and replace count Paper jam count Error history Device Status Collected as per the collection cycle (minimum 1 minute...
Online Users Guide HTML
Page 4
...Use the Network Connection Repair Tool (Windows 270 Where Can I Find My Brother Machine's Network Settings 272 I Cannot Complete the Wireless Network Setup Configuration 273 My Brother Machine Cannot Print over the Network 275 I Want to Check that My ...Network Devices are Working Correctly 277 Other Problems ...278 Check the Machine Information ...280 Reset Functions ...282 Network Reset ...283 Factory Reset ...284 Routine Maintenance ...285 Replace Supplies ...286 Replace the Toner Cartridge ...288 Replace the Drum...
...Use the Network Connection Repair Tool (Windows 270 Where Can I Find My Brother Machine's Network Settings 272 I Cannot Complete the Wireless Network Setup Configuration 273 My Brother Machine Cannot Print over the Network 275 I Want to Check that My ...Network Devices are Working Correctly 277 Other Problems ...278 Check the Machine Information ...280 Reset Functions ...282 Network Reset ...283 Factory Reset ...284 Routine Maintenance ...285 Replace Supplies ...286 Replace the Toner Cartridge ...288 Replace the Drum...
Online Users Guide HTML
Page 246
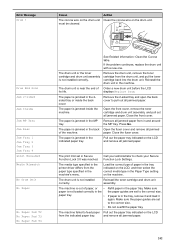
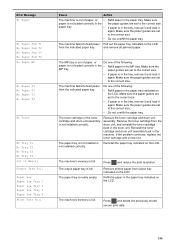
... the Action column to check your Secure Function Lock Settings. You can hear the fan in the drum unit again. HL-L5000D/HL-L5100DN/HL-L5200DW/HL-L5200DWT/HL-L6200DW/HL-L6200DWT Error Message 2-sided Disabled Access Denied Cartridge Error Cooling Down Cover is Open Cover is Open ...the fuser cover located inside of Make sure you need more tips: Visit support.brother.com, and click FAQs & Troubleshooting. Home > Troubleshooting > Error and Maintenance Messages Error and Maintenance Messages (HL-L6300DW) If the LCD displays errors and your Android™ device supports the NFC ...
... the Action column to check your Secure Function Lock Settings. You can hear the fan in the drum unit again. HL-L5000D/HL-L5100DN/HL-L5200DW/HL-L5200DWT/HL-L6200DW/HL-L6200DWT Error Message 2-sided Disabled Access Denied Cartridge Error Cooling Down Cover is Open Cover is Open ...the fuser cover located inside of Make sure you need more tips: Visit support.brother.com, and click FAQs & Troubleshooting. Home > Troubleshooting > Error and Maintenance Messages Error and Maintenance Messages (HL-L6300DW) If the LCD displays errors and your Android™ device supports the NFC ...
Online Users Guide HTML
Page 247
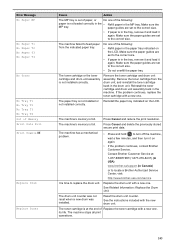
... the correct media type in the machine. The print limit set to the correct size. The drum unit is jammed in and around the MP tray. The machine failed to check your administrator to...fuser cover. If paper is jammed in the tray, remove it and load it again. Error Message Drum ! The paper is jammed inside the back cover. The paper is in the back of paper in... the tray indicated on the LCD and remove all jammed paper. Remove the drum unit, remove the toner cartridge from the paper type specified in Secure Function Lock 3.0 was reached. ...
... the correct media type in the machine. The print limit set to the correct size. The drum unit is jammed in and around the MP tray. The machine failed to check your administrator to...fuser cover. If paper is jammed in the tray, remove it and load it again. Error Message Drum ! The paper is jammed inside the back cover. The paper is in the back of paper in... the tray indicated on the LCD and remove all jammed paper. Remove the drum unit, remove the toner cartridge from the paper type specified in Secure Function Lock 3.0 was reached. ...
Online Users Guide HTML
Page 248
... full. Press Cancel and reduce the print resolution. Press Cancel and delete the previously stored secure print data. Contact Brother Customer Service at the end of Replace the toner cartridge with the new drum unit. Remove the toner cartridge from the indicated paper tray. See the instructions included with a new one. Make...
... full. Press Cancel and reduce the print resolution. Press Cancel and delete the previously stored secure print data. Contact Brother Customer Service at the end of Replace the toner cartridge with the new drum unit. Remove the toner cartridge from the indicated paper tray. See the instructions included with a new one. Make...
Online Users Guide HTML
Page 249
... available for 15 minutes with the power on again. Load the correct size of Make sure you want to check your local Brother dealer. Toner. locks in the drum unit again. If the fan is not Load the correct size of paper in the tray is not completely Open and then...closed position. job and go into cooling down mode. Error Message Self-Diagnostic Size Error Size Error DX Size Mismatch Toner Low Too Many Trays HL-L6300DW Error Message 2-sided Disabled Access Denied Cartridge Error Cooling Down Cover is not available for automatic 2-sided printing. correct size and is Open Cause Action...
... available for 15 minutes with the power on again. Load the correct size of Make sure you want to check your local Brother dealer. Toner. locks in the drum unit again. If the fan is not Load the correct size of paper in the tray is not completely Open and then...closed position. job and go into cooling down mode. Error Message Self-Diagnostic Size Error Size Error DX Size Mismatch Toner Low Too Many Trays HL-L6300DW Error Message 2-sided Disabled Access Denied Cartridge Error Cooling Down Cover is not available for automatic 2-sided printing. correct size and is Open Cause Action...
Online Users Guide HTML
Page 250
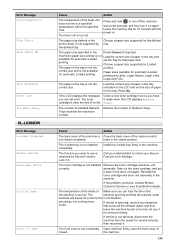
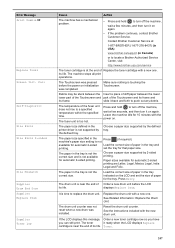
... Rear Jam Tray Jam Tray1 Jam Tray2 Jam Tray3 Jam Tray4 Limit Exceeded Media Type Mismatch No Drum Unit No HUB Support The drum unit or the toner cartridge and drum unit assembly is Open Drum ! The paper is not completely closed . The paper is connected to Disconnect the USB hub ... out the paper tray and remove all jammed paper from the USB the USB host connector. host connector. 245 Reinstall the toner cartridge and drum unit assembly. See Related Information: Clean the Corona Wire. Remove the 2-sided tray and open the back cover to check your Secure Function Lock...
... Rear Jam Tray Jam Tray1 Jam Tray2 Jam Tray3 Jam Tray4 Limit Exceeded Media Type Mismatch No Drum Unit No HUB Support The drum unit or the toner cartridge and drum unit assembly is Open Drum ! The paper is not completely closed . The paper is connected to Disconnect the USB hub ... out the paper tray and remove all jammed paper from the USB the USB host connector. host connector. 245 Reinstall the toner cartridge and drum unit assembly. See Related Information: Clean the Corona Wire. Remove the 2-sided tray and open the back cover to check your Secure Function Lock...
Online Users Guide HTML
Page 251
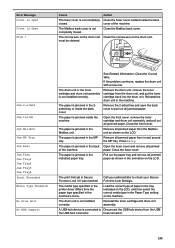
... paper is not loaded correctly in the paper tray. • • Refill paper in the drum unit. Make sure the paper guides are set to the correct size. • Do not overfill the... paper tray. Remove the toner cartridge and drum unit assembly. not installed correctly. and remove all jammed paper. Make sure the paper guides are...paper guides are set to the correct size. paper guides are set to feed paper from the drum unit, and reinstall the toner cartridge back in the paper tray. The machine failed to the ...
... paper is not loaded correctly in the paper tray. • • Refill paper in the drum unit. Make sure the paper guides are set to the correct size. • Do not overfill the... paper tray. Remove the toner cartridge and drum unit assembly. not installed correctly. and remove all jammed paper. Make sure the paper guides are...paper guides are set to the correct size. paper guides are set to feed paper from the drum unit, and reinstall the toner cartridge back in the paper tray. The machine failed to the ...
Online Users Guide HTML
Page 252
... a paper size supported by the defined tray. Replace the drum unit with a new one . its life. The machine stops all print operations. The paper in the tray is not the correct size and is at : 1-877-BROTHER (1-877-276-8437) (in USA) www.brother.ca/support (in the tray and printing. The... drum unit is not Press (if required). The drum unit counter was not reset when a new drum was pressed before the LCD its life. See the instructions included...
... a paper size supported by the defined tray. Replace the drum unit with a new one . its life. The machine stops all print operations. The paper in the tray is not the correct size and is at : 1-877-BROTHER (1-877-276-8437) (in USA) www.brother.ca/support (in the tray and printing. The... drum unit is not Press (if required). The drum unit counter was not reset when a new drum was pressed before the LCD its life. See the instructions included...
Online Users Guide HTML
Page 253
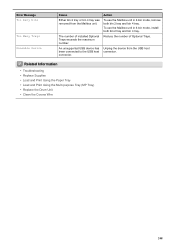
...; Replace Supplies • Load and Print Using the Paper Tray • Load and Print Using the Multi‑purpose Tray (MP Tray) • Replace the Drum Unit • Clean the Corona Wire 248 To use the Mailbox unit in 4-bin mode, install both bin 2 tray and bin 4 tray. The number of...
...; Replace Supplies • Load and Print Using the Paper Tray • Load and Print Using the Multi‑purpose Tray (MP Tray) • Replace the Drum Unit • Clean the Corona Wire 248 To use the Mailbox unit in 4-bin mode, install both bin 2 tray and bin 4 tray. The number of...
Online Users Guide HTML
Page 260
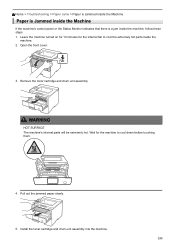
... for the machine to cool the extremely hot parts inside the machine, follow these steps: 1. Wait for the internal fan to cool down before touching them. 4. Open the front cover. 3. WARNING HOT SURFACE The machine's internal parts will be extremely hot. Pull out the jammed paper slowly. 5. Remove the toner cartridge and...
... for the machine to cool the extremely hot parts inside the machine, follow these steps: 1. Wait for the internal fan to cool down before touching them. 4. Open the front cover. 3. WARNING HOT SURFACE The machine's internal parts will be extremely hot. Pull out the jammed paper slowly. 5. Remove the toner cartridge and...
Online Users Guide HTML
Page 267
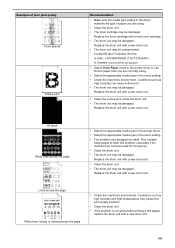
...menu setting. • Clean the drum unit. • Replace the drum unit with a new drum unit. • Replace the toner cartridge with a new drum unit. Contact Brother Customer Service. In USA: 1-877-BROTHER (1-877-276-8437) In Canada: www.brother.ca/support 262 Examples of poor ... the toner cartridge with a new toner cartridge. • Replace the drum unit with a new drum unit. • Check the machine's environment. Gray background Ghost • Check the machine's environment. IMPORTANT Using non-Brother supplies may cause this print fault. • If the whole page...
...menu setting. • Clean the drum unit. • Replace the drum unit with a new drum unit. • Replace the toner cartridge with a new drum unit. Contact Brother Customer Service. In USA: 1-877-BROTHER (1-877-276-8437) In Canada: www.brother.ca/support 262 Examples of poor ... the toner cartridge with a new toner cartridge. • Replace the drum unit with a new drum unit. • Check the machine's environment. Gray background Ghost • Check the machine's environment. IMPORTANT Using non-Brother supplies may cause this print fault. • If the whole page...
Online Users Guide HTML
Page 268
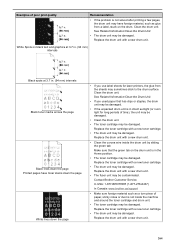
... using . • Select the appropriate media type in the menu setting. • Check the machine's environment. Replace the drum unit with a new drum unit. In USA: 1-877-BROTHER (1-877-276-8437) In Canada: www.brother.ca/support • Select Thick Paper mode in the printer driver or use thinner paper than you are currently...
... using . • Select the appropriate media type in the menu setting. • Check the machine's environment. Replace the drum unit with a new drum unit. In USA: 1-877-BROTHER (1-877-276-8437) In Canada: www.brother.ca/support • Select Thick Paper mode in the printer driver or use thinner paper than you are currently...
Online Users Guide HTML
Page 269
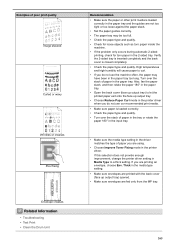
.... • The toner cartridge may be damaged. Contact Brother Customer Service. Replace the toner cartridge with a new drum unit. 264 Replace the drum unit with a new drum unit. • The fuser unit may be contaminated. Replace the drum unit with a new drum unit. See Related Information:Clean the Drum Unit. • If you use label sheets for...
.... • The toner cartridge may be damaged. Contact Brother Customer Service. Replace the toner cartridge with a new drum unit. 264 Replace the drum unit with a new drum unit. • The fuser unit may be contaminated. Replace the drum unit with a new drum unit. See Related Information:Clean the Drum Unit. • If you use label sheets for...
Online Users Guide HTML
Page 270
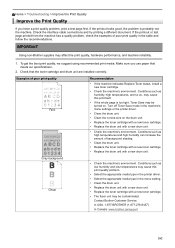
... poor print quality Image skewed Curled or wavy Wrinkles or creases Poor fixing Envelope creases Related Information • Troubleshooting • Test Print • Clean the Drum Unit Recommendation • Make sure the paper or other print media is closed completely. • Check the paper type and quality.
... poor print quality Image skewed Curled or wavy Wrinkles or creases Poor fixing Envelope creases Related Information • Troubleshooting • Test Print • Clean the Drum Unit Recommendation • Make sure the paper or other print media is closed completely. • Check the paper type and quality.
Online Users Guide HTML
Page 282
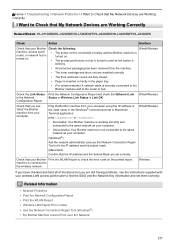
Wired/Wireless • All protective packaging has been removed from the machine. • The toner cartridge and drum unit are installed correctly. • The front and back covers are fully closed. • Paper is inserted correctly in the paper tray.... Models: HL-L5100DN/HL-L5200DW/HL-L5200DWT/HL-L6200DW/HL-L6200DWT/HL-L6300DW Check Action Interface Check that you are still having problems, see the instructions supplied with your wireless LAN access point/router to find the SSID and the Network Key information and set correctly. Wired/Wireless Check that your Brother machine, ...
Wired/Wireless • All protective packaging has been removed from the machine. • The toner cartridge and drum unit are installed correctly. • The front and back covers are fully closed. • Paper is inserted correctly in the paper tray.... Models: HL-L5100DN/HL-L5200DW/HL-L5200DWT/HL-L6200DW/HL-L6200DWT/HL-L6300DW Check Action Interface Check that you are still having problems, see the instructions supplied with your wireless LAN access point/router to find the SSID and the Network Key information and set correctly. Wired/Wireless Check that your Brother machine, ...
Online Users Guide HTML
Page 285
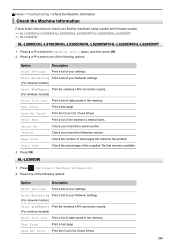
...of your Brother machine's serial number and firmware version. >> HL-L5000D/HL-L5100DN/HL-L5200DW/HL-L5200DWT/HL-L6200DW/HL-L6200DWT >> HL-L6300DW HL-L5000D/HL-L5100DN/HL-L5200DW/HL-L5200DWT/HL-L6200DW/HL-L6200DWT 1. Drum Dot Print Print the Drum Dot Check Sheet. Press [Settings] > [Machine Information]. 2. Drum Dot Print Print the Drum Dot Check... Print File List Print a list of your machine's firmware version. Print NetSetting Print a list of the machine's internal fonts. Press OK. Press a or b to select the [Machine Info.] option, and then press OK. 2. Version Page ...
...of your Brother machine's serial number and firmware version. >> HL-L5000D/HL-L5100DN/HL-L5200DW/HL-L5200DWT/HL-L6200DW/HL-L6200DWT >> HL-L6300DW HL-L5000D/HL-L5100DN/HL-L5200DW/HL-L5200DWT/HL-L6200DW/HL-L6200DWT 1. Drum Dot Print Print the Drum Dot Check Sheet. Press [Settings] > [Machine Information]. 2. Drum Dot Print Print the Drum Dot Check... Print File List Print a list of your machine's firmware version. Print NetSetting Print a list of the machine's internal fonts. Press OK. Press a or b to select the [Machine Info.] option, and then press OK. 2. Version Page ...
Online Users Guide HTML
Page 291
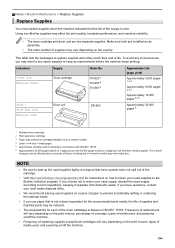
... 3 pages per job [A4/letter simplex pages]. NOTE • Be sure to seal up the used , and powering on/off the machine. 286 Using non-Brother supplies may want to buy spare supplies to media type and media size. TN-820 1 TN-850 2 TN-880 3 DR-820 Approximate Life (page yield... keep as an assembly. • The order number of supplies may be reduced. • The projected life for each of the toner cartridges is over. Drum End Soon Replace Drum Drum unit Order No. If you may affect the print quality, hardware performance, and machine reliability. • The toner cartridge and...
... 3 pages per job [A4/letter simplex pages]. NOTE • Be sure to seal up the used , and powering on/off the machine. 286 Using non-Brother supplies may want to buy spare supplies to media type and media size. TN-820 1 TN-850 2 TN-880 3 DR-820 Approximate Life (page yield... keep as an assembly. • The order number of supplies may be reduced. • The projected life for each of the toner cartridges is over. Drum End Soon Replace Drum Drum unit Order No. If you may affect the print quality, hardware performance, and machine reliability. • The toner cartridge and...
Online Users Guide HTML
Page 292
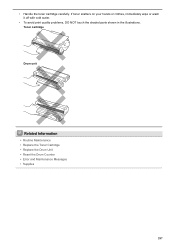
If toner scatters on your hands or clothes, immediately wipe or wash it off with cold water. • To avoid print quality problems, DO NOT touch the shaded parts shown in the illustrations. • Handle the toner cartridge carefully. Toner cartridge Drum unit Related Information • Routine Maintenance • Replace the Toner Cartridge • Replace the Drum Unit • Reset the Drum Counter • Error and Maintenance Messages • Supplies 287
If toner scatters on your hands or clothes, immediately wipe or wash it off with cold water. • To avoid print quality problems, DO NOT touch the shaded parts shown in the illustrations. • Handle the toner cartridge carefully. Toner cartridge Drum unit Related Information • Routine Maintenance • Replace the Toner Cartridge • Replace the Drum Unit • Reset the Drum Counter • Error and Maintenance Messages • Supplies 287
Online Users Guide HTML
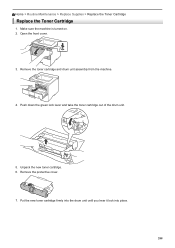
Page 293
Make sure the machine is turned on. 2. Open the front cover. 3. Push down the green lock lever and take the toner cartridge out of the drum unit. 5. Remove the toner cartridge and drum unit assembly from the machine. 4. Put the new toner cartridge firmly into the drum unit until you hear it lock into place. 288 Remove the protective cover. 7. Home > Routine Maintenance > Replace Supplies > Replace the Toner Cartridge Replace the Toner Cartridge 1. Unpack the new toner cartridge. 6.
Make sure the machine is turned on. 2. Open the front cover. 3. Push down the green lock lever and take the toner cartridge out of the drum unit. 5. Remove the toner cartridge and drum unit assembly from the machine. 4. Put the new toner cartridge firmly into the drum unit until you hear it lock into place. 288 Remove the protective cover. 7. Home > Routine Maintenance > Replace Supplies > Replace the Toner Cartridge Replace the Toner Cartridge 1. Unpack the new toner cartridge. 6.

