Users Manual - English
Page 9
...82 Control panel buttons...84 Print a test page ...85 Print the Printer Settings page...86 Print Fonts ...87 Default settings...88 5 Options 89 Lower tray (LT-5300) ...89 SO-DIMM (memory module)...90 SO-DIMM types ...90 Installing extra memory ...91 6 Routine Maintenance 93 Replacing the consumable items...93 Consumables...93 ...Jam MP tray / Tray1 / Tray2 / Tray3 / Inside 120 Jam Rear / Duplex...125 Improving the print quality...129 Solving print problems ...136 Network problems (For HL-5350DN and HL-5370DW 137 Other problems ...137 For Macintosh with USB ...137 BR-Script 3 ...138 viii
...82 Control panel buttons...84 Print a test page ...85 Print the Printer Settings page...86 Print Fonts ...87 Default settings...88 5 Options 89 Lower tray (LT-5300) ...89 SO-DIMM (memory module)...90 SO-DIMM types ...90 Installing extra memory ...91 6 Routine Maintenance 93 Replacing the consumable items...93 Consumables...93 ...Jam MP tray / Tray1 / Tray2 / Tray3 / Inside 120 Jam Rear / Duplex...125 Improving the print quality...129 Solving print problems ...136 Network problems (For HL-5350DN and HL-5370DW 137 Other problems ...137 For Macintosh with USB ...137 BR-Script 3 ...138 viii
Users Manual - English
Page 14
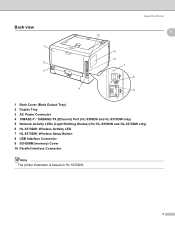
Back view 1 2 3 About this Printer 1 1 10 9 8 7 6 4 5 1 Back Cover (Back Output Tray) 2 Duplex Tray 3 AC Power Connector 4 10BASE-T / 100BASE-TX (Ethernet) Port (HL-5350DN and HL-5370DW only) 5 Network Activity LEDs (Light Emitting Diodes) (For HL-5350DN and HL-5370DW only) 6 HL-5370DW: Wireless Activity LED 7 HL-5370DW: Wireless Setup Button 8 USB Interface Connector 9 SO-DIMM (memory) Cover 10 Parallel Interface Connector Note The printer illustration is based on HL-5370DW. 4
Back view 1 2 3 About this Printer 1 1 10 9 8 7 6 4 5 1 Back Cover (Back Output Tray) 2 Duplex Tray 3 AC Power Connector 4 10BASE-T / 100BASE-TX (Ethernet) Port (HL-5350DN and HL-5370DW only) 5 Network Activity LEDs (Light Emitting Diodes) (For HL-5350DN and HL-5370DW only) 6 HL-5370DW: Wireless Activity LED 7 HL-5370DW: Wireless Setup Button 8 USB Interface Connector 9 SO-DIMM (memory) Cover 10 Parallel Interface Connector Note The printer illustration is based on HL-5370DW. 4
Users Manual - English
Page 51
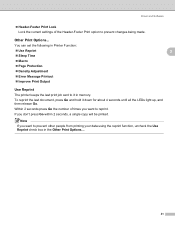
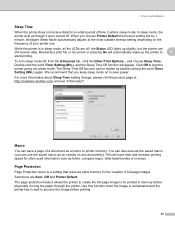
... printed. Driver and Software „ Header-Footer Print Lock Lock the current settings of times you want to reprint. You can set the following in Printer Function: „ Use Reprint „ Sleep Time „ Macro „ Page Protection „ Density Adjustment „ Error Message Printout „ Improve Print Output 3 3 ... made. If you want to prevent other people from printing your data using the reprint function, uncheck the Use Reprint check box in memory. Other Print Options... To reprint the last document, press Go and hold it in the Other Print Options.... 41
... printed. Driver and Software „ Header-Footer Print Lock Lock the current settings of times you want to reprint. You can set the following in Printer Function: „ Use Reprint „ Sleep Time „ Macro „ Page Protection „ Density Adjustment „ Error Message Printout „ Improve Print Output 3 3 ... made. If you want to prevent other people from printing your data using the reprint function, uncheck the Use Reprint check box in memory. Other Print Options... To reprint the last document, press Go and hold it in the Other Print Options.... 41
Users Manual - English
Page 52
...Time setting change, please visit the product page at http://solutions.brother.com/ and see "Information". This will automatically wake up slightly, but the printer can be 1 minute. Use this function when the image is in memory before printing. 42 Macro 3 You can use . Receiving ...3 start printing. Selections are off, the Status LED lights up the printer to printer memory. In sleep mode, the printer acts as an overlay on any documents). While the printer is complicated and the printer has to wait to the most suitable timeout setting depending on to stop...
...Time setting change, please visit the product page at http://solutions.brother.com/ and see "Information". This will automatically wake up slightly, but the printer can be 1 minute. Use this function when the image is in memory before printing. 42 Macro 3 You can use . Receiving ...3 start printing. Selections are off, the Status LED lights up the printer to printer memory. In sleep mode, the printer acts as an overlay on any documents). While the printer is complicated and the printer has to wait to the most suitable timeout setting depending on to stop...
Users Manual - English
Page 88
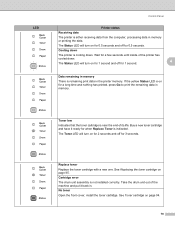
...and nothing has printed, press Go to print the remaining data in the printer memory. Replace toner Replace the toner cartridge with a new one. No toner Open the front cover, install the toner cartridge. Data remaining in memory There is not installed correctly. The Toner LED will turn on for 3... is either receiving data from the computer, processing data in . LED Control Panel Printer status Receiving data The printer is near the end of its life. Buy a new toner cartridge and have it back in memory or printing the data. The Status LED will turn on page 95. Wait for...
...and nothing has printed, press Go to print the remaining data in the printer memory. Replace toner Replace the toner cartridge with a new one. No toner Open the front cover, install the toner cartridge. Data remaining in memory There is not installed correctly. The Toner LED will turn on for 3... is either receiving data from the computer, processing data in . LED Control Panel Printer status Receiving data The printer is near the end of its life. Buy a new toner cartridge and have it back in memory or printing the data. The Status LED will turn on page 95. Wait for...
Users Manual - English
Page 91
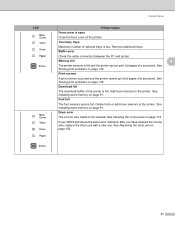
... on page 113. Download full The download buffer of a document. Drum error The corona wire needs to the printer. Add more memory to the printer. See Installing extra memory on page 102. 81 If your LED's still shows the same error indication after you have cleaned the corona wire...one. See Replacing the drum unit on page 91. Font full The font memory area is full. Delete fonts or add more memory to be cleaned. See Installing extra memory on page 136. LED Control Panel Printer status Front cover is open Close the front cover of a document. Buffer ...
... on page 113. Download full The download buffer of a document. Drum error The corona wire needs to the printer. Add more memory to the printer. See Installing extra memory on page 102. 81 If your LED's still shows the same error indication after you have cleaned the corona wire...one. See Replacing the drum unit on page 91. Font full The font memory area is full. Delete fonts or add more memory to be cleaned. See Installing extra memory on page 136. LED Control Panel Printer status Front cover is open Close the front cover of a document. Buffer ...

Users Manual - English
Page 94
... on page 41. 84 Within 2 seconds press Go the number of times you want to use the printer. „ Form feed If the yellow Status LED is in the printer memory. „ Reprint To reprint the last document, press Go for a long time, press Go. Cancel all the received jobs: 4... 4 seconds until all the LEDs light up and go to reprint. If you want to the Advanced tab, select the Other Print Options... The printer will then eject the paper. on for about 4 seconds. Control Panel Control panel buttons 4 The control panel buttons have the following functions: „...
... on page 41. 84 Within 2 seconds press Go the number of times you want to use the printer. „ Form feed If the yellow Status LED is in the printer memory. „ Reprint To reprint the last document, press Go for a long time, press Go. Cancel all the received jobs: 4... 4 seconds until all the LEDs light up and go to reprint. If you want to the Advanced tab, select the Other Print Options... The printer will then eject the paper. on for about 4 seconds. Control Panel Control panel buttons 4 The control panel buttons have the following functions: „...
Users Manual - English
Page 99
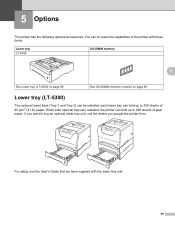
See SO-DIMM (memory module) on page 89. each lower tray can hold up to buy an optional lower tray unit, call the dealer you want to 800 sheets of the printer with the lower tray unit. 89 When both optional trays are installed, the printer can hold up to 250 sheets of 80... (21 lb) paper. Lower tray (LT-5300) 5 Two optional lower trays (Tray 2 and Tray 3) can increase the capabilities of plain paper. If you bought the printer from. You can be installed; For setup, see the User's Guide that we have supplied with these items. Lower tray LT-5300 SO-DIMM...
See SO-DIMM (memory module) on page 89. each lower tray can hold up to buy an optional lower tray unit, call the dealer you want to 800 sheets of the printer with the lower tray unit. 89 When both optional trays are installed, the printer can hold up to 250 sheets of 80... (21 lb) paper. Lower tray (LT-5300) 5 Two optional lower trays (Tray 2 and Tray 3) can increase the capabilities of plain paper. If you bought the printer from. You can be installed; For setup, see the User's Guide that we have supplied with these items. Lower tray LT-5300 SO-DIMM...
Users Manual - English
Page 100
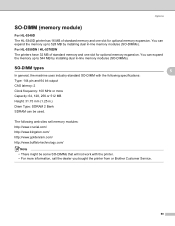
... the printer from or Brother Customer Service. 90 You can expand the memory up to 544 MB by installing dual in -line memory modules (SO-DIMMs). For HL-5350DN / HL-5370DW The printers have 32 MB of standard memory and one slot for optional memory expansion. Options SO-DIMM (memory module) 5 For HL-5340D The HL-5340D printer has 16 MB of standard memory and...
... the printer from or Brother Customer Service. 90 You can expand the memory up to 544 MB by installing dual in -line memory modules (SO-DIMMs). For HL-5350DN / HL-5370DW The printers have 32 MB of standard memory and one slot for optional memory expansion. Options SO-DIMM (memory module) 5 For HL-5340D The HL-5340D printer has 16 MB of standard memory and...

Users Manual - English
Page 101
Disconnect the interface cable from static electricity, DO NOT touch the memory chips or the board surface. d Hold the DIMM by its edges. IMPORTANT Be sure to the printer from the printer. Insert the DIMM diagonally (1), then tilt it toward the interface board until it by the edges and... Remove the DIMM cover. 5 c Unpack the DIMM and hold it clicks into place (2). 1 2 91 CAUTION To prevent damage to turn off the printer power switch, and then unplug the printer. Options Installing extra memory 5 a Turn off the printer power switch before you install or remove the DIMM.
Disconnect the interface cable from static electricity, DO NOT touch the memory chips or the board surface. d Hold the DIMM by its edges. IMPORTANT Be sure to the printer from the printer. Insert the DIMM diagonally (1), then tilt it toward the interface board until it by the edges and... Remove the DIMM cover. 5 c Unpack the DIMM and hold it clicks into place (2). 1 2 91 CAUTION To prevent damage to turn off the printer power switch, and then unplug the printer. Options Installing extra memory 5 a Turn off the printer power switch before you install or remove the DIMM.
Users Manual - English
Page 102
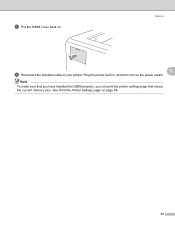
e Put the DIMM cover back on the power switch. Plug the printer back in, and then turn on . Note To make sure that you have installed the DIMM properly, you can print the printer settings page that shows the current memory size. Options 5 f Reconnect the interface cable to your printer. See Print the Printer Settings page on page 86. 92
e Put the DIMM cover back on the power switch. Plug the printer back in, and then turn on . Note To make sure that you have installed the DIMM properly, you can print the printer settings page that shows the current memory size. Options 5 f Reconnect the interface cable to your printer. See Print the Printer Settings page on page 86. 92
Users Manual - English
Page 126
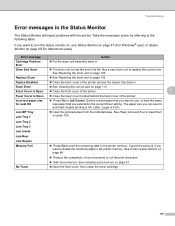
...63(For Macintosh users). See Paper jams and how to delete the remaining data in . Cancel the print job if you selected in the printer memory. Buy a new drum unit to the following table. Take the necessary action by referring to replace the current one. Error message Action ...Cartridge Position Error „ Put the drum unit assembly back in the printer memory. Set the correct paper that you want to print the remaining data in the current driver setting. See Control panel buttons on page 120...
...63(For Macintosh users). See Paper jams and how to delete the remaining data in . Cancel the print job if you selected in the printer memory. Buy a new drum unit to the following table. Take the necessary action by referring to replace the current one. Error message Action ...Cartridge Position Error „ Put the drum unit assembly back in the printer memory. Set the correct paper that you want to print the remaining data in the current driver setting. See Control panel buttons on page 120...
Users Manual - English
Page 127
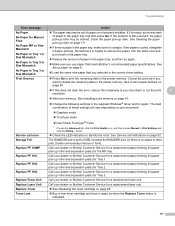
... mode „ TrueType mode „ Use Printer TrueType® Fonts Service call indications on your document or cut the print 7 resolution. „ Add more memory. button. „ Check the LED indication to store jobs. Replace PF Kit2 Call your dealer or Brother Customer Service for a replacement laser unit. „ See Replacing the toner cartridge...
... mode „ TrueType mode „ Use Printer TrueType® Fonts Service call indications on your document or cut the print 7 resolution. „ Add more memory. button. „ Check the LED indication to store jobs. Replace PF Kit2 Call your dealer or Brother Customer Service for a replacement laser unit. „ See Replacing the toner cartridge...

Users Manual - English
Page 128
... printout on page 91. „ Press Go to print the remaining data in the printer memory. Cancel the print job if you want to prevent automatic reduction in the printer memory. Cancel the print job if you print to delete the remaining data in the supplied Windows... Print Overrun Resolution Adapted Action „ Press Go to print the remaining data in the printer memory. See Installing extra memory on your document: „ Graphics 1 „ TrueType Mode 1 „ Use Printer TrueType® Fonts 1 Choose the Basic tab, choose Manual in Print Settings, and then click Manual...
... printout on page 91. „ Press Go to print the remaining data in the printer memory. Cancel the print job if you want to prevent automatic reduction in the printer memory. Cancel the print job if you print to delete the remaining data in the supplied Windows... Print Overrun Resolution Adapted Action „ Press Go to print the remaining data in the printer memory. See Installing extra memory on your document: „ Graphics 1 „ TrueType Mode 1 „ Use Printer TrueType® Fonts 1 Choose the Basic tab, choose Manual in Print Settings, and then click Manual...
Users Manual - English
Page 146
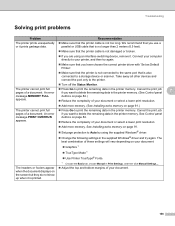
... same port that you are using the supplied Windows® driver. „ Change the following settings in the printer memory. See Installing extra memory on page 91.) The printer cannot print full pages of a document. An error message PRINT OVERRUN appears. „ Press Go to Auto ...the supplied Windows® driver and try again. „ Make sure that you want to delete the remaining data in the printer memory. (See Control panel message MEMORY FULL buttons on page 84.) appears. „ Reduce the complexity of your document: „ Graphics 1 „ TrueType Mode 1...
... same port that you are using the supplied Windows® driver. „ Change the following settings in the printer memory. See Installing extra memory on page 91.) The printer cannot print full pages of a document. An error message PRINT OVERRUN appears. „ Press Go to Auto ...the supplied Windows® driver and try again. „ Make sure that you want to delete the remaining data in the printer memory. (See Control panel message MEMORY FULL buttons on page 84.) appears. „ Reduce the complexity of your document: „ Graphics 1 „ TrueType Mode 1...
Users Manual - English
Page 148
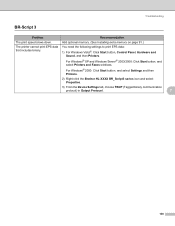
... Vista®: Click Start button, Control Panel, Hardware and Sound, and then Printers. For Windows® 2000: Click Start button, and select Settings and then Printers. 2) Right-click the Brother HL-XXXX BR_Script3 series icon and select Properties. 3) From the Device Settings tab, ...choose TBCP (Tagged binary communication protocol) in Output Protocol. 7 138 Add optional memory. (See Installing extra memory on page 91.) The printer cannot print EPS...
... Vista®: Click Start button, Control Panel, Hardware and Sound, and then Printers. For Windows® 2000: Click Start button, and select Settings and then Printers. 2) Right-click the Brother HL-XXXX BR_Script3 series icon and select Properties. 3) From the Device Settings tab, ...choose TBCP (Tagged binary communication protocol) in Output Protocol. 7 138 Add optional memory. (See Installing extra memory on page 91.) The printer cannot print EPS...
Users Manual - English
Page 150
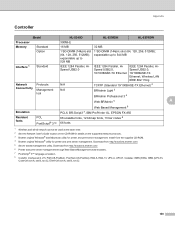
...CD-ROM. 4 Brother original Windows® utility for printer and print server management. Appendix Controller 0 Model HL-5340D HL-5350DN HL-5370DW Processor 300MHz Memory Standard 16 MB 32 MB Option 1 SO-DIMM (144pin) slot (64, 128, 256, 512MB); Install from http://solutions.brother.com/. 6 Printer and print server ... See the Network User's Guide locator on the CD-ROM for details on the supported network protocols. 3 Brother original Windows® and Macintosh utility for printer and print server management. expandable up to 528 MB 1 SO-DIMM (144pin) slot (64, 128, 256,...
...CD-ROM. 4 Brother original Windows® utility for printer and print server management. Appendix Controller 0 Model HL-5340D HL-5350DN HL-5370DW Processor 300MHz Memory Standard 16 MB 32 MB Option 1 SO-DIMM (144pin) slot (64, 128, 256, 512MB); Install from http://solutions.brother.com/. 6 Printer and print server ... See the Network User's Guide locator on the CD-ROM for details on the supported network protocols. 3 Brother original Windows® and Macintosh utility for printer and print server management. expandable up to 528 MB 1 SO-DIMM (144pin) slot (64, 128, 256,...
Users Manual - English
Page 171
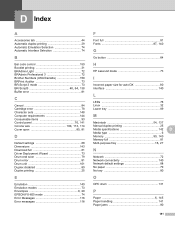
... printing 29 Automatic Emulation Selection 74 Automatic Interface Selection 74 B Bar code control 150 Booklet printing 31 BRAdmin Light 72 BRAdmin Professional 3 72 Brother Numbers (USA/Canada 159 BRPrint Auditor 73 BR-Script 3 mode 73 BR-Script3 48, 64, 138 Buffer error 81 C Cancel 84 Cartridge... 140 L LEDs 76 Linux 32 Lower tray 89 M Macintosh 54, 137 Manual duplex printing 25 Media specifications 142 D Media type 6 Memory 90, 140 Memory full 81 Multi-purpose tray 16, 27 N Network 72 Network connectivity 140 Network default settings 88 No paper 79 No tray 80 O ...
... printing 29 Automatic Emulation Selection 74 Automatic Interface Selection 74 B Bar code control 150 Booklet printing 31 BRAdmin Light 72 BRAdmin Professional 3 72 Brother Numbers (USA/Canada 159 BRPrint Auditor 73 BR-Script 3 mode 73 BR-Script3 48, 64, 138 Buffer error 81 C Cancel 84 Cartridge... 140 L LEDs 76 Linux 32 Lower tray 89 M Macintosh 54, 137 Manual duplex printing 25 Media specifications 142 D Media type 6 Memory 90, 140 Memory full 81 Multi-purpose tray 16, 27 N Network 72 Network connectivity 140 Network default settings 88 No paper 79 No tray 80 O ...

Network Users Manual - English
Page 134
These self-running .EXE files can also be saved to the network, copied to a CD-ROM, USB memory or even E-mailed to create a self-running executable file for other users. Click OK. 1 win2kxpvista folder for 32-bit OS users and winxpx64vista64 folder for ...
These self-running .EXE files can also be saved to the network, copied to a CD-ROM, USB memory or even E-mailed to create a self-running executable file for other users. Click OK. 1 win2kxpvista folder for 32-bit OS users and winxpx64vista64 folder for ...

Network Users Manual - English
Page 164
... IP address, node name or domain name to activate the configuration. b Enter a Common Name and a Valid Date, then click Submit. e Restart the printer to use when accessing this printer through SSL/TLS communication. To use the IPPS or HTTPS protocol and enter a different name in your computer. Note • The length of... configure the other security settings. d Follow the on-screen instructions to create and install a self-signed certificate 14 a Click Create Self-Signed Certificate on your printer memory.
... IP address, node name or domain name to activate the configuration. b Enter a Common Name and a Valid Date, then click Submit. e Restart the printer to use when accessing this printer through SSL/TLS communication. To use the IPPS or HTTPS protocol and enter a different name in your computer. Note • The length of... configure the other security settings. d Follow the on-screen instructions to create and install a self-signed certificate 14 a Click Create Self-Signed Certificate on your printer memory.


