
Users Manual - English
Page 63
... these steps: a Turn off . Release Go. Note • For more information on the power switch. 4. c Hold down Go as you want to reset the print server back to its default settings with APIPA protocol disabled, follow these steps: a Turn off . First all the LEDs will light up to... sure that all the LEDs have turned off the printer. Network default setting with APIPA protocol disabled (For HL-5250DN) If you turn on the power switch. Control Panel Network default setting (For HL-5250DN) If you turn on APIPA, see the Network User's Guide. • You can also disable the ...
... these steps: a Turn off . Release Go. Note • For more information on the power switch. 4. c Hold down Go as you want to reset the print server back to its default settings with APIPA protocol disabled, follow these steps: a Turn off . First all the LEDs will light up to... sure that all the LEDs have turned off the printer. Network default setting with APIPA protocol disabled (For HL-5250DN) If you turn on the power switch. Control Panel Network default setting (For HL-5250DN) If you turn on APIPA, see the Network User's Guide. • You can also disable the ...

Users Manual - English
Page 77
Press the front cover release button and then open the front cover. Improper Setup Do not reset the drum counter when you need to reset the drum counter by completing the following steps: a Make sure that the printer is turned on and the Drum LED is blinking. Routine Maintenance When you replace the drum unit with a new one, you only replace the toner cartridge. Once all the LEDs light up. b Press and hold down Go for about 4 seconds until all four LEDs are lit, release Go. c Take out the drum unit and toner cartridge assembly. 69 6.
Press the front cover release button and then open the front cover. Improper Setup Do not reset the drum counter when you need to reset the drum counter by completing the following steps: a Make sure that the printer is turned on and the Drum LED is blinking. Routine Maintenance When you replace the drum unit with a new one, you only replace the toner cartridge. Once all the LEDs light up. b Press and hold down Go for about 4 seconds until all four LEDs are lit, release Go. c Take out the drum unit and toner cartridge assembly. 69 6.

Users Manual - English
Page 103
... quality. 7. d Close the back cover and resend the print job. a Open the back cover. Note When you have finished printing, open the back cover and reset the two blue levers back to their original position. 95 c As the top of the lever rotates backward, lift the bottom portion of the lever...
... quality. 7. d Close the back cover and resend the print job. a Open the back cover. Note When you have finished printing, open the back cover and reset the two blue levers back to their original position. 95 c As the top of the lever rotates backward, lift the bottom portion of the lever...
Quick Setup Guide - English
Page 30
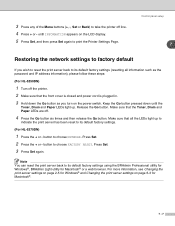
All the LEDs will light up to indicate the print server has been reset to monitor its status or change this password. For Network Users (For HL-5250DN) Web browser 3 The Brother print server is equipped with a web server that allows you turn on the power switch. Make sure that all the ...and then Status LED will turn off . To print the printer settings page, press Go three times within 2 seconds. See Chapter 2 of the internal print server to change some of its default settings. 28 Release Go. Print the Printer Settings 5 Page The Printer Settings Page lists all network ...
All the LEDs will light up to indicate the print server has been reset to monitor its status or change this password. For Network Users (For HL-5250DN) Web browser 3 The Brother print server is equipped with a web server that allows you turn on the power switch. Make sure that all the ...and then Status LED will turn off . To print the printer settings page, press Go three times within 2 seconds. See Chapter 2 of the internal print server to change some of its default settings. 28 Release Go. Print the Printer Settings 5 Page The Printer Settings Page lists all network ...
Network Users Manual - English
Page 7
... ...8-1 Overview...8-1 General problems ...8-1 CD-ROM is inserted, but does not start automatically 8-1 How to reset the Brother print server to factory default 8-1 Installation problems...8-1 The Brother print server is not found during setup of the network print software installation or from the printer driver of... the Brother printer in Windows 8-1 The Brother print server is not found using the Simple Network Configuration capabilities of Mac OS® X...8-1 Printing problems...8-5 ...
... ...8-1 Overview...8-1 General problems ...8-1 CD-ROM is inserted, but does not start automatically 8-1 How to reset the Brother print server to factory default 8-1 Installation problems...8-1 The Brother print server is not found during setup of the network print software installation or from the printer driver of... the Brother printer in Windows 8-1 The Brother print server is not found using the Simple Network Configuration capabilities of Mac OS® X...8-1 Printing problems...8-5 ...

Network Users Manual - English
Page 42
...NETWORK menu and default factory settings Level one NETWORK Level two TCP/IP NETBIOS/IP ENET FACTORY RESET Level three TCP/IP ENABLE IP ADDRESS= SUBNET MASK= GATEWAY= IP BOOT TRIES IP METHOD ...note that the printer is set to 'STATIC' you need to automatically set up the Brother printer for your Brother printer in a network environment you will be used to the network, if the machine's...- 2 Control panel setup Changing the print server settings using the control panel NETWORK menu (for HL-5270DN) Before using the control panel, located on the top of the machine is supplied with...
...NETWORK menu and default factory settings Level one NETWORK Level two TCP/IP NETBIOS/IP ENET FACTORY RESET Level three TCP/IP ENABLE IP ADDRESS= SUBNET MASK= GATEWAY= IP BOOT TRIES IP METHOD ...note that the printer is set to 'STATIC' you need to automatically set up the Brother printer for your Brother printer in a network environment you will be used to the network, if the machine's...- 2 Control panel setup Changing the print server settings using the control panel NETWORK menu (for HL-5270DN) Before using the control panel, located on the top of the machine is supplied with...

Network Users Manual - English
Page 46
This change is the last six digits of Ethernet address.). The printer will print the current printer settings. (For HL-5270DN) 1 Make sure that the front cover is closed and the power cord is plugged in. 2 Turn on the printer and wait until the printer ... name is "BRN_xxxxxx" ("xxxxxx" is valid after the print server has been reset. How to obtain the IP address. ENET 7 Ethernet link mode. You can enable and disable the NetBIOS facility to print the Printer Settings Page (For HL-5250DN) 1 Make sure that the front cover is closed and the power cord is...
This change is the last six digits of Ethernet address.). The printer will print the current printer settings. (For HL-5270DN) 1 Make sure that the front cover is closed and the power cord is plugged in. 2 Turn on the printer and wait until the printer ... name is "BRN_xxxxxx" ("xxxxxx" is valid after the print server has been reset. How to obtain the IP address. ENET 7 Ethernet link mode. You can enable and disable the NetBIOS facility to print the Printer Settings Page (For HL-5250DN) 1 Make sure that the front cover is closed and the power cord is...
Network Users Manual - English
Page 47
... page 6-3 for Macintosh® or a web browser. Make sure that all information such as the password and IP address information), please follow these steps: (For HL-5250DN) 1 Turn off the printer. 2 Make sure that the Toner, Drum and Paper LEDs are off line. 4 Press + or - Keep the Go button pressed ...down the Go button as you wish to reset the print server back to print the Printer Settings Page. button to choose NETWORK. Control panel setup 7 Restoring the network settings to factory default If...
... page 6-3 for Macintosh® or a web browser. Make sure that all information such as the password and IP address information), please follow these steps: (For HL-5250DN) 1 Turn off the printer. 2 Make sure that the Toner, Drum and Paper LEDs are off line. 4 Press + or - Keep the Go button pressed ...down the Go button as you wish to reset the print server back to print the Printer Settings Page. button to choose NETWORK. Control panel setup 7 Restoring the network settings to factory default If...
Network Users Manual - English
Page 48
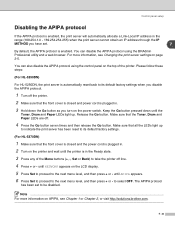
...brother.com. 7 - 8 For more information on APIPA, see Changing the print server settings on page 2-5. Make sure that the front cover is closed and the power cord is plugged in. 2 Turn on the printer and wait until APIPA appears. 6 Press Set to proceed to select OFF. Please follow these steps: (For HL-5250DN...) For HL-5250DN, the print server is automatically reset back to be disabled. Keep the Go button pressed down until the Toner, Drum and Paper LEDs light up to ...
...brother.com. 7 - 8 For more information on APIPA, see Changing the print server settings on page 2-5. Make sure that the front cover is closed and the power cord is plugged in. 2 Turn on the printer and wait until APIPA appears. 6 Press Set to proceed to select OFF. Please follow these steps: (For HL-5250DN...) For HL-5250DN, the print server is automatically reset back to be disabled. Keep the Go button pressed down until the Toner, Drum and Paper LEDs light up to ...

Network Users Manual - English
Page 49
... print server back to its default factory settings (resetting all information such as the password and IP address information). Installation problems The Brother print server is inserted, but does not start automatically If your computer does not support Autorun, the menu will... directory of the CD-ROM. 8 Troubleshooting Overview This chapter describes procedures for troubleshooting problems you have completed the IP address setting of the Brother print server according to Chapter 2 of this case, execute Start.exe in Windows®. Check the following sections: ■ General problems ...
... print server back to its default factory settings (resetting all information such as the password and IP address information). Installation problems The Brother print server is inserted, but does not start automatically If your computer does not support Autorun, the menu will... directory of the CD-ROM. 8 Troubleshooting Overview This chapter describes procedures for troubleshooting problems you have completed the IP address setting of the Brother print server according to Chapter 2 of this case, execute Start.exe in Windows®. Check the following sections: ■ General problems ...

Network Users Manual - English
Page 51
If it does not work, then reset the print server back to disable the Firewall on your print server appears. Troubleshooting 8 (6) Make sure that Off (not recommended) is good. Windows XP SP2 ... tab. Otherwise, go to Step 5. 5 If you will need to the default factory settings and try from the initial setup again. For information how to reset to the default factory settings, see Restoring the network settings to 4 above and it is visible, then the connection is selected. (4) Click OK. 8 - 3 In this...
If it does not work, then reset the print server back to disable the Firewall on your print server appears. Troubleshooting 8 (6) Make sure that Off (not recommended) is good. Windows XP SP2 ... tab. Otherwise, go to Step 5. 5 If you will need to the default factory settings and try from the initial setup again. For information how to reset to the default factory settings, see Restoring the network settings to 4 above and it is visible, then the connection is selected. (4) Click OK. 8 - 3 In this...

Network Users Manual - English
Page 54
...with high resolution), the printer is unable to Step 4. 4 If you try from the initial setup again. If it does not work, then reset the print server back to the default factory settings and try to 10.3) Make the following selection. If the waiting time of data (e.g. For ...information how to reset to the default factory settings, see Restoring the network settings to factory default on page 7-7 Error during printing If you have tried 1 to 4...
...with high resolution), the printer is unable to Step 4. 4 If you try from the initial setup again. If it does not work, then reset the print server back to the default factory settings and try to 10.3) Make the following selection. If the waiting time of data (e.g. For ...information how to reset to the default factory settings, see Restoring the network settings to factory default on page 7-7 Error during printing If you have tried 1 to 4...

Network Users Manual - English
Page 60
... will then get the "#" prompt, enter the password access (the password will then allow you wish to assign to the print server (check with your Brother print server can also use the ARP command again). Enter anything in this chapter to use the arp -s command. For example: A - 4 If there...you cannot use the ARP command again to change the address. But a valid IP address must be a router between each digit of a Brother print server using the SET IP ADDRESS command) or factory reset the print server (which case, you are connected, push the Return or Enter key to do this.
... will then get the "#" prompt, enter the password access (the password will then allow you wish to assign to the print server (check with your Brother print server can also use the ARP command again). Enter anything in this chapter to use the arp -s command. For example: A - 4 If there...you cannot use the ARP command again to change the address. But a valid IP address must be a router between each digit of a Brother print server using the SET IP ADDRESS command) or factory reset the print server (which case, you are connected, push the Return or Enter key to do this.


