
Users Manual - English
Page 4
Carefully clean the toner dust with volatile liquids such as thinner or benzine will damage the outside of the printer: • Make sure that contain ammonia. Cleaning with a dry, ...; Use neutral detergents. Doing this might cause a fire or electrical shock. iii DO NOT use flammable substances near the printer. Doing this might cause the toner dust to ignite inside the vacuum cleaner, potentially starting a fire. CAUTION Cleaning the outside surface of it according to clean up scattered...
Carefully clean the toner dust with volatile liquids such as thinner or benzine will damage the outside of the printer: • Make sure that contain ammonia. Cleaning with a dry, ...; Use neutral detergents. Doing this might cause a fire or electrical shock. iii DO NOT use flammable substances near the printer. Doing this might cause the toner dust to ignite inside the vacuum cleaner, potentially starting a fire. CAUTION Cleaning the outside surface of it according to clean up scattered...
Users Manual - English
Page 7
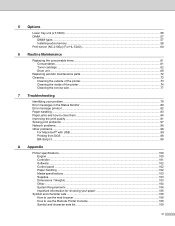
... tray unit (LT-5300) ...56 DIMM ...57 DIMM types ...57 Installing extra memory ...58 Print server (NC-2100p) (For HL-5240 60 6 Routine Maintenance Replacing the consumable items...61 Consumables...61 Toner cartridge ...62 Drum unit ...68 Replacing periodic maintenance parts...72 Cleaning ...73 Cleaning the outside of the printer...73 Cleaning...
... tray unit (LT-5300) ...56 DIMM ...57 DIMM types ...57 Installing extra memory ...58 Print server (NC-2100p) (For HL-5240 60 6 Routine Maintenance Replacing the consumable items...61 Consumables...61 Toner cartridge ...62 Drum unit ...68 Replacing periodic maintenance parts...72 Cleaning ...73 Cleaning the outside of the printer...73 Cleaning...
Users Manual - English
Page 9
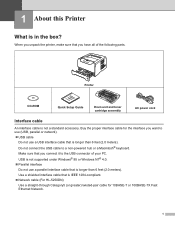
... (2.0 meters). Buy the proper interface cable for 10BASE-T or 100BASE-TX Fast Ethernet Network. 1 Make sure that is IEEE 1284-compliant. „ Network cable (For HL-5250DN) Use a straight-through Category5 (or greater) twisted-pair cable for the interface you want to a non-powered hub or a Macintosh® keyboard. Use a shielded interface... cable that you have all of your PC. 1 About this Printer What is not a standard accessory. Printer CD-ROM Quick Setup Guide Drum unit and toner cartridge assembly AC power cord Interface cable An interface cable is in the box?
... (2.0 meters). Buy the proper interface cable for 10BASE-T or 100BASE-TX Fast Ethernet Network. 1 Make sure that is IEEE 1284-compliant. „ Network cable (For HL-5250DN) Use a straight-through Category5 (or greater) twisted-pair cable for the interface you want to a non-powered hub or a Macintosh® keyboard. Use a shielded interface... cable that you have all of your PC. 1 About this Printer What is not a standard accessory. Printer CD-ROM Quick Setup Guide Drum unit and toner cartridge assembly AC power cord Interface cable An interface cable is in the box?
Users Manual - English
Page 33
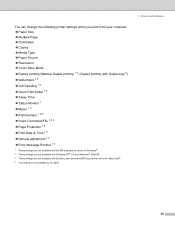
... when you print from your computer. „ Paper Size „ Multiple Page „ Orientation „ Copies „ Media Type „ Paper Source „ Resolution „ Toner Save Mode „ Duplex printing (Manual Duplex printing 1 3 / Duplex printing with Duplex tray 4) „ Watermark 1 3 „ Job Spooling 1 3 „ Quick Print Setup 1 3 ...Windows®. 2 These settings are not available with Windows NT® 4.0 and Windows® 2000/XP. 3 These settings are not available with Brother Laser driver and BR-Script printer driver for Macintosh®. 4 This setting is not available for...
... when you print from your computer. „ Paper Size „ Multiple Page „ Orientation „ Copies „ Media Type „ Paper Source „ Resolution „ Toner Save Mode „ Duplex printing (Manual Duplex printing 1 3 / Duplex printing with Duplex tray 4) „ Watermark 1 3 „ Job Spooling 1 3 „ Quick Print Setup 1 3 ...Windows®. 2 These settings are not available with Windows NT® 4.0 and Windows® 2000/XP. 3 These settings are not available with Brother Laser driver and BR-Script printer driver for Macintosh®. 4 This setting is not available for...

Users Manual - English
Page 36
...Printing „ Use Duplex Unit (For HL-5250DN) If you have created. Driver and Software „ Toner Save Mode You can change the font, darkness and angle settings. Note • We do not recommend Toner Save for printing Photo or Gray Scale images. • Toner Save Mode is not available for 1200... the middle, when using the booklet printing function. „ Binding Offset If you check the Binding Offset option, you like on the Toner Save Mode, which reduces the print density. You can change the size of duplex binding directions available for binding in inches or millimeters....
...Printing „ Use Duplex Unit (For HL-5250DN) If you have created. Driver and Software „ Toner Save Mode You can change the font, darkness and angle settings. Note • We do not recommend Toner Save for printing Photo or Gray Scale images. • Toner Save Mode is not available for 1200... the middle, when using the booklet printing function. „ Binding Offset If you check the Binding Offset option, you like on the Toner Save Mode, which reduces the print density. You can change the size of duplex binding directions available for binding in inches or millimeters....
Users Manual - English
Page 38
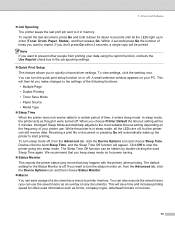
... seconds until all the LEDs are off, but the printer can turn sleep mode off . The default setting for the Status Monitor is in order (Toner, Drum, Paper, Status), and then release Go. You can be 5 minutes. 3. To reprint the last document, press Go and hold it down ... printer going into sleep mode. A small selection window appears on the frequency of the following functions: • Multiple Page • Duplex Printing • Toner Save Mode • Paper Source • Media Type „ Sleep Time When the printer does not receive data for power saving. „ Status Monitor...
... seconds until all the LEDs are off, but the printer can turn sleep mode off . The default setting for the Status Monitor is in order (Toner, Drum, Paper, Status), and then release Go. You can be 5 minutes. 3. To reprint the last document, press Go and hold it down ... printer going into sleep mode. A small selection window appears on the frequency of the following functions: • Multiple Page • Duplex Printing • Toner Save Mode • Paper Source • Media Type „ Sleep Time When the printer does not receive data for power saving. „ Status Monitor...

Users Manual - English
Page 44
c You can change settings by choosing the setting in the Printer Features list (3): „ Print Quality „ Media Type „ Toner Save You can save running costs by turning on the Toner Save, which reduces the print density. „ Sleep Time See Device Options on page 29. „ Halftone Screen Lock „ BR-Script Level 36 Driver and Software 1 2 3 a Choose the Paper Size and Copy Count (1). b Set the Scaling and TrueType Font settings (2). Advanced options 3.
c You can change settings by choosing the setting in the Printer Features list (3): „ Print Quality „ Media Type „ Toner Save You can save running costs by turning on the Toner Save, which reduces the print density. „ Sleep Time See Device Options on page 29. „ Halftone Screen Lock „ BR-Script Level 36 Driver and Software 1 2 3 a Choose the Paper Size and Copy Count (1). b Set the Scaling and TrueType Font settings (2). Advanced options 3.

Users Manual - English
Page 46
... Thicker Paper • Bond Paper • Transparencies • Envelopes • Env.Thick • Env.Thin • Recycled Paper „ Toner Save Mode You can change settings by turning on Toner save running costs by choosing the setting in the Print Settings list: Basic tab 3. Note • We do not recommend... Toner Save for printing Photo or Gray Scale images. • Toner Save Mode is not available for 1200 dpi or HQ 1200 resolution. 38 Print Settings You can save , which ...
... Thicker Paper • Bond Paper • Transparencies • Envelopes • Env.Thick • Env.Thin • Recycled Paper „ Toner Save Mode You can change settings by turning on Toner save running costs by choosing the setting in the Print Settings list: Basic tab 3. Note • We do not recommend... Toner Save for printing Photo or Gray Scale images. • Toner Save Mode is not available for 1200 dpi or HQ 1200 resolution. 38 Print Settings You can save , which ...
Users Manual - English
Page 53
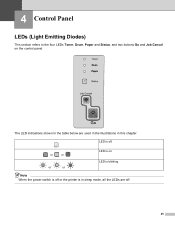
LED is in sleep mode, all the LEDs are used in the illustrations in the table below are off . LED is on the control panel. The LED indications shown in this chapter. Note When the power switch is off or the printer is off . 45 or or or or LED is blinking. 4 Control Panel LEDs (Light Emitting Diodes) This section refers to the four LEDs Toner, Drum, Paper and Status, and two buttons Go and Job Cancel on .
LED is in sleep mode, all the LEDs are used in the illustrations in the table below are off . LED is on the control panel. The LED indications shown in this chapter. Note When the power switch is off or the printer is off . 45 or or or or LED is blinking. 4 Control Panel LEDs (Light Emitting Diodes) This section refers to the four LEDs Toner, Drum, Paper and Status, and two buttons Go and Job Cancel on .
Users Manual - English
Page 55
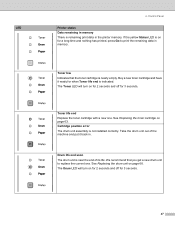
... unit to print the remaining data in memory There is not installed correctly. The Toner LED will turn on for 3 seconds. 47 Control Panel Printer status Data remaining in...life. Cartridge position error The drum unit assembly is remaining print data in . We recommend that the toner cartridge is nearly empty. See Replacing the drum unit on page 63. LED 4. The Drum LED ...put it ready for 3 seconds. See Replacing the toner cartridge on page 68. Drum life end soon The drum unit is indicated. Toner life end Replace the toner cartridge with a new one . If the yellow Status...
... unit to print the remaining data in memory There is not installed correctly. The Toner LED will turn on for 3 seconds. 47 Control Panel Printer status Data remaining in...life. Cartridge position error The drum unit assembly is remaining print data in . We recommend that the toner cartridge is nearly empty. See Replacing the drum unit on page 63. LED 4. The Drum LED ...put it ready for 3 seconds. See Replacing the toner cartridge on page 68. Drum life end soon The drum unit is indicated. Toner life end Replace the toner cartridge with a new one . If the yellow Status...
Users Manual - English
Page 57
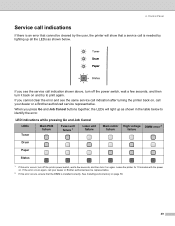
LED indications while pressing Go and Job Cancel LEDs Toner Main PCB failure Fuser unit failure 1 Laser unit failure Main motor ...turn off the printer power switch, wait a few seconds, and then turn it on , call your dealer or Brother authorized service representative. 2 If this error occurs, turn off the power switch, wait a few seconds, and then...on page 58. 49 If you cannot clear the error and see the service call your dealer or a Brother authorized service representative. 4. Control Panel Service call is installed correctly. See Installing extra memory on . If ...
LED indications while pressing Go and Job Cancel LEDs Toner Main PCB failure Fuser unit failure 1 Laser unit failure Main motor ...turn off the printer power switch, wait a few seconds, and then turn it on , call your dealer or Brother authorized service representative. 2 If this error occurs, turn off the power switch, wait a few seconds, and then...on page 58. 49 If you cannot clear the error and see the service call your dealer or a Brother authorized service representative. 4. Control Panel Service call is installed correctly. See Installing extra memory on . If ...
Users Manual - English
Page 59
Within 2 seconds press Go the number of times you don't press Go within 2 seconds, a single copy will print any remaining data in order (Toner, Drum, Paper, Status), and then release Go. 4. If you want to reprint. The printer will be printed. 51 Control Panel Control panel buttons The control ...
Within 2 seconds press Go the number of times you don't press Go within 2 seconds, a single copy will print any remaining data in order (Toner, Drum, Paper, Status), and then release Go. 4. If you want to reprint. The printer will be printed. 51 Control Panel Control panel buttons The control ...

Users Manual - English
Page 69
...in cold water to avoid stains. • Be careful not to replace the consumable items regularly. Replacing the consumable items You will need to inhale toner. • After you open the front cover or back cover of the printer will need to replace certain parts and clean the printer regularly. ...See Drum unit on page 62. When you have just used the printer, some internal parts of the printer, DO NOT touch the shaded parts shown in Improving the print quality on page 91. 6 Routine Maintenance You will be ...
...in cold water to avoid stains. • Be careful not to replace the consumable items regularly. Replacing the consumable items You will need to inhale toner. • After you open the front cover or back cover of the printer will need to replace certain parts and clean the printer regularly. ...See Drum unit on page 62. When you have just used the printer, some internal parts of the printer, DO NOT touch the shaded parts shown in Improving the print quality on page 91. 6 Routine Maintenance You will be ...
Users Manual - English
Page 70
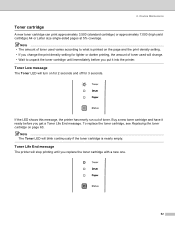
...yield cartridge) A4 or Letter size single-sided pages at 5% coverage. Note • The amount of toner used will turn on page 63. Toner Life End message The printer will blink continuously if the toner cartridge is printed on the page and the print density setting. • If you change . &#...8226; Wait to unpack the toner cartridge until you get a Toner Life End message. Toner Low message The Toner LED will change the print density setting for 3 seconds. If the LED shows this message, the printer has nearly...
...yield cartridge) A4 or Letter size single-sided pages at 5% coverage. Note • The amount of toner used will turn on page 63. Toner Life End message The printer will blink continuously if the toner cartridge is printed on the page and the print density setting. • If you change . &#...8226; Wait to unpack the toner cartridge until you get a Toner Life End message. Toner Low message The Toner LED will change the print density setting for 3 seconds. If the LED shows this message, the printer has nearly...

Users Manual - English
Page 71
...piece of disposable paper or cloth in the illustration. 63 6. When you want to the printer from or Brother Customer Service. • We recommend that you put the drum unit and toner cartridge assembly on page 73. a Press the front cover release button and then open the front cover. ...b Take out the drum unit and toner cartridge assembly. CAUTION We recommend that you use only genuine Brother toner cartridges. To prevent damage to buy toner cartridges, call the dealer you bought the printer from static electricity, DO NOT touch the...
...piece of disposable paper or cloth in the illustration. 63 6. When you want to the printer from or Brother Customer Service. • We recommend that you put the drum unit and toner cartridge assembly on page 73. a Press the front cover release button and then open the front cover. ...b Take out the drum unit and toner cartridge assembly. CAUTION We recommend that you use only genuine Brother toner cartridges. To prevent damage to buy toner cartridges, call the dealer you bought the printer from static electricity, DO NOT touch the...

Users Manual - English
Page 72
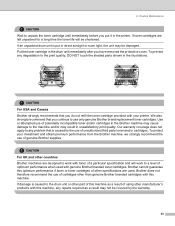
...print quality problems, DO NOT touch the shaded parts shown in injuries. Note • Be sure to seal up the toner cartridge tightly in a bag so that toner powder does not spill out of the drum unit. If you have questions, call your hands or clothes, wipe or wash... domestic waste. CAUTION DO NOT put a toner cartridge into a fire. d Unpack the new toner cartridge. Routine Maintenance c Push down the blue lock lever and take the toner cartridge out of the cartridge. • Discard the used toner cartridge according to spread the toner evenly inside the cartridge. 64 It could explode...
...print quality problems, DO NOT touch the shaded parts shown in injuries. Note • Be sure to seal up the toner cartridge tightly in a bag so that toner powder does not spill out of the drum unit. If you have questions, call your hands or clothes, wipe or wash... domestic waste. CAUTION DO NOT put a toner cartridge into a fire. d Unpack the new toner cartridge. Routine Maintenance c Push down the blue lock lever and take the toner cartridge out of the cartridge. • Discard the used toner cartridge according to spread the toner evenly inside the cartridge. 64 It could explode...
Users Manual - English
Page 73
... recommends that you continue to the drum unit or other specifications are left unpacked for a long time the toner life will work with genuine Brother branded toner cartridges. We also strongly recommend that is put it in the drum unit immediately after you have removed the protective... cover. If damage is caused to use of cartridges other manufacturer's products with this optimum performance if toner or toner cartridges of genuine Brother supplies. Our warranty coverage does not apply to the machine and/or may be covered by the warranty. 65...
... recommends that you continue to the drum unit or other specifications are left unpacked for a long time the toner life will work with genuine Brother branded toner cartridges. We also strongly recommend that is put it in the drum unit immediately after you have removed the protective... cover. If damage is caused to use of cartridges other manufacturer's products with this optimum performance if toner or toner cartridges of genuine Brother supplies. Our warranty coverage does not apply to the machine and/or may be covered by the warranty. 65...
Users Manual - English
Page 74
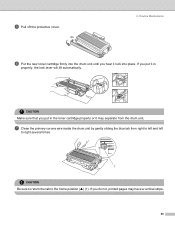
CAUTION Make sure that you put in the toner cartridge properly or it in properly, the lock lever will lift automatically. If you hear it lock into the drum unit until you do not, ... wire inside the drum unit by gently sliding the blue tab from the drum unit. e Pull off the protective cover. 6. Routine Maintenance f Put the new toner cartridge firmly into place.
CAUTION Make sure that you put in the toner cartridge properly or it in properly, the lock lever will lift automatically. If you hear it lock into the drum unit until you do not, ... wire inside the drum unit by gently sliding the blue tab from the drum unit. e Pull off the protective cover. 6. Routine Maintenance f Put the new toner cartridge firmly into place.
Users Manual - English
Page 75
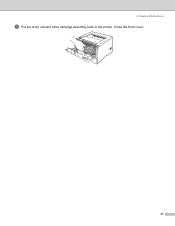
Close the front cover. 67 Routine Maintenance h Put the drum unit and toner cartridge assembly back in the printer. 6.
Close the front cover. 67 Routine Maintenance h Put the drum unit and toner cartridge assembly back in the printer. 6.

Users Manual - English
Page 76
...party drum unit. Every time you replace the drum unit with a third-party drum unit may contain toner. See Cleaning on . Change Drum message If the LED shows the message below, it may reduce... not only the print quality but also the quality and life of toner used only in the print quality. Note • There are many factors that determine the actual drum... job and so on page 73. 68 The printer should be printed by the use only genuine Brother toner. Routine Maintenance Drum unit A new drum unit can print approximately 25,000 A4 or Letter size...
...party drum unit. Every time you replace the drum unit with a third-party drum unit may contain toner. See Cleaning on . Change Drum message If the LED shows the message below, it may reduce... not only the print quality but also the quality and life of toner used only in the print quality. Note • There are many factors that determine the actual drum... job and so on page 73. 68 The printer should be printed by the use only genuine Brother toner. Routine Maintenance Drum unit A new drum unit can print approximately 25,000 A4 or Letter size...


