Users Manual - English
Page 7
... tray unit (LT-5300) ...56 DIMM ...57 DIMM types ...57 Installing extra memory ...58 Print server (NC-2100p) (For HL-5240 60 6 Routine Maintenance Replacing the consumable items...61 Consumables...61 Toner cartridge ...62 Drum unit ...68 Replacing periodic maintenance parts...72...Cleaning the corona wire...77 7 Troubleshooting Identifying your problem ...79 Error messages in the Status Monitor ...80 Error message printout ...82 Paper handling ...83 Paper jams and how to clear them ...84 Improving the print quality...91 Solving print problems ...97 Network problems...98 Other problems ...98 ...
... tray unit (LT-5300) ...56 DIMM ...57 DIMM types ...57 Installing extra memory ...58 Print server (NC-2100p) (For HL-5240 60 6 Routine Maintenance Replacing the consumable items...61 Consumables...61 Toner cartridge ...62 Drum unit ...68 Replacing periodic maintenance parts...72...Cleaning the corona wire...77 7 Troubleshooting Identifying your problem ...79 Error messages in the Status Monitor ...80 Error message printout ...82 Paper handling ...83 Paper jams and how to clear them ...84 Improving the print quality...91 Solving print problems ...97 Network problems...98 Other problems ...98 ...

Users Manual - English
Page 14
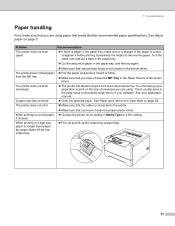
... 1, B5 (ISO), Executive, A5, B6 (ISO) DX A4, Letter, Legal 1 250 sheets 250 sheets 1 Legal size paper is not recommended, a paper jam or misfeed may cause a paper jam or damage your paper on page 105. 6 Note If you choose which paper to use with a moisture content of sheets (80 g/m2 / 21 lb) MP Tray Width: 69.9 to...
... 1, B5 (ISO), Executive, A5, B6 (ISO) DX A4, Letter, Legal 1 250 sheets 250 sheets 1 Legal size paper is not recommended, a paper jam or misfeed may cause a paper jam or damage your paper on page 105. 6 Note If you choose which paper to use with a moisture content of sheets (80 g/m2 / 21 lb) MP Tray Width: 69.9 to...

Users Manual - English
Page 15
... will be of envelopes, test one to the way they may damage your application as the paper in the tray. 7 Brother does not recommend a particular envelope because envelope manufacturers may cause paper jams or misfeeds. • Do not print envelopes using the envelopes in a pile. „... Do not use any Brother warranty or service agreement. This damage is not covered under any of the types of envelopes listed...
... will be of envelopes, test one to the way they may damage your application as the paper in the tray. 7 Brother does not recommend a particular envelope because envelope manufacturers may cause paper jams or misfeeds. • Do not print envelopes using the envelopes in a pile. „... Do not use any Brother warranty or service agreement. This damage is not covered under any of the types of envelopes listed...

Users Manual - English
Page 19
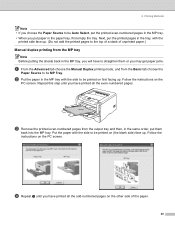
2. f Lift up the support flap to curl. 11 Stacking the printed transparencies may cause a paper jam or the transparency to prevent paper from sliding off the face-down . • When printing on must be face down output tray, or remove each transparency at once after printing. Printing Methods e Put the paper tray firmly back in the printer. Make sure that it comes out of the printer. g Send the print data to be printed on transparencies, remove each page as soon as it is completely inserted into the printer. Note • The side to the printer.
2. f Lift up the support flap to curl. 11 Stacking the printed transparencies may cause a paper jam or the transparency to prevent paper from sliding off the face-down . • When printing on must be face down output tray, or remove each transparency at once after printing. Printing Methods e Put the paper tray firmly back in the printer. Make sure that it comes out of the printer. g Send the print data to be printed on transparencies, remove each page as soon as it is completely inserted into the printer. Note • The side to the printer.

Users Manual - English
Page 22
g Send the print data to curl. 14 Stacking the printed transparencies may cause a paper jam or the transparency to the printer. Make sure that the paper stays under the maximum paper mark (b) on both sides of the paper) in the MP tray. Note • The side to fit the paper size. f While pressing the paper-guide release lever, slide the paper guide to be printed on transparencies, remove each transparency at once after printing. 2. Printing Methods e Put paper in first. • When printing on must be face up with the leading edge (top of the tray.
g Send the print data to curl. 14 Stacking the printed transparencies may cause a paper jam or the transparency to the printer. Make sure that the paper stays under the maximum paper mark (b) on both sides of the paper) in the MP tray. Note • The side to fit the paper size. f While pressing the paper-guide release lever, slide the paper guide to be printed on transparencies, remove each transparency at once after printing. 2. Printing Methods e Put paper in first. • When printing on must be face up with the leading edge (top of the tray.

Users Manual - English
Page 25
... paper to jam or curl. • If envelopes get smudged during printing set the Media Type to Thick Paper or Thicker Paper to be printed on both sides of the envelope should be properly folded without wrinkles or creases. Note • Envelope joints that the paper stays under the maximum paper ...print quality on page 15. • If the envelopes is creased after printing. Printing Methods e Put paper in the MP tray. 2. f While pressing the paper-guide release lever, slide the paper guide to the printer. Note • Remove each sheet or envelope at once after they are sealed ...
... paper to jam or curl. • If envelopes get smudged during printing set the Media Type to Thick Paper or Thicker Paper to be printed on both sides of the envelope should be properly folded without wrinkles or creases. Note • Envelope joints that the paper stays under the maximum paper ...print quality on page 15. • If the envelopes is creased after printing. Printing Methods e Put paper in the MP tray. 2. f While pressing the paper-guide release lever, slide the paper guide to the printer. Note • Remove each sheet or envelope at once after they are sealed ...

Users Manual - English
Page 26
... first, then print again. • When you put paper in the MP tray, remember the following: • Put the leading edge (top of the paper) in first and push it is not, the paper may not be fed properly, resulting in a skewed printout or a paper jam. 18 If it gently into the tray. • Make... sure that the paper is creased after printing, choose DL Long Edge in the...
... first, then print again. • When you put paper in the MP tray, remember the following: • Put the leading edge (top of the paper) in first and push it is not, the paper may not be fed properly, resulting in a skewed printout or a paper jam. 18 If it gently into the tray. • Make... sure that the paper is creased after printing, choose DL Long Edge in the...

Users Manual - English
Page 27
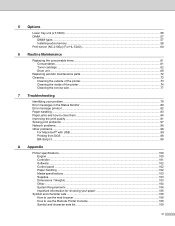
...; When you have a print quality problem, see the Help text in the printer driver. b Send the data to be paper jams or poor print quality. Manual duplex printing from the paper tray a In the printer driver choose the Advanced tab, then choose the Manual Duplex printing mode, and from the output tray...pages on one side of the paper „ If the paper is thin, it may wrinkle. „ If paper is curled, straighten it and then put them back in the paper tray or the MP tray. „ If the paper is not feeding properly, it is a paper jam, see Paper jams and how to be curled. Follow...
...; When you have a print quality problem, see the Help text in the printer driver. b Send the data to be paper jams or poor print quality. Manual duplex printing from the paper tray a In the printer driver choose the Advanced tab, then choose the Manual Duplex printing mode, and from the output tray...pages on one side of the paper „ If the paper is thin, it may wrinkle. „ If paper is curled, straighten it and then put them back in the paper tray or the MP tray. „ If the paper is not feeding properly, it is a paper jam, see Paper jams and how to be curled. Follow...
Users Manual - English
Page 28
... them or you put the printed even-numbered pages in the paper tray, first empty the tray. Printing Methods Note • If you choose the Paper Source to be Auto Select, put paper in the MP tray. • When you may get paper jams. a From the Advanced tab choose the Manual Duplex printing mode, ...and from the MP tray Note Before putting the sheets back in the MP tray with the side to be printed on the other side of unprinted paper.) Manual duplex printing from the Basic ...
... them or you put the printed even-numbered pages in the paper tray, first empty the tray. Printing Methods Note • If you choose the Paper Source to be Auto Select, put paper in the MP tray. • When you may get paper jams. a From the Advanced tab choose the Manual Duplex printing mode, ...and from the MP tray Note Before putting the sheets back in the MP tray with the side to be printed on the other side of unprinted paper.) Manual duplex printing from the Basic ...

Users Manual - English
Page 56
... you want to the printer. See Solving print problems on page 15. Font full The font memory area is A4, Letter or Legal. Paper jam Clear the paper jam. See Installing extra memory on page 58. Buffer error Check the cable connection between the PC and printer. Download full The download buffer of... Go. Set the correct paper that you selected in the tray. Duplex disabled Close the back cover of the printer is two. Fuser cover is open Close the front cover of a document. Remove additional trays. Delete fonts or add more memory to use for Duplex (For HL-5250DN) Prees Go or Job ...
... you want to the printer. See Solving print problems on page 15. Font full The font memory area is A4, Letter or Legal. Paper jam Clear the paper jam. See Installing extra memory on page 58. Buffer error Check the cable connection between the PC and printer. Download full The download buffer of... Go. Set the correct paper that you selected in the tray. Duplex disabled Close the back cover of the printer is two. Fuser cover is open Close the front cover of a document. Remove additional trays. Delete fonts or add more memory to use for Duplex (For HL-5250DN) Prees Go or Job ...

Users Manual - English
Page 87
... on page 91. „ Printout is incorrect See Solving print problems on page 98. Visit us at http://solutions.brother.com. Printer does not print: If you need additional help, the Brother Solutions Center offers the latest FAQs and troubleshooting tips. Pages are printed, but there are problems with the above checks... appears See Error messages in the Status Monitor on page 80. „ Printer printed an Error Message See Error message printout on page 82. „ Paper handling See Paper handling on page 83 and Paper jams and how to the correct printer port.
... on page 91. „ Printout is incorrect See Solving print problems on page 98. Visit us at http://solutions.brother.com. Printer does not print: If you need additional help, the Brother Solutions Center offers the latest FAQs and troubleshooting tips. Pages are printed, but there are problems with the above checks... appears See Error messages in the Status Monitor on page 80. „ Printer printed an Error Message See Error message printout on page 82. „ Paper handling See Paper handling on page 83 and Paper jams and how to the correct printer port.
Users Manual - English
Page 88
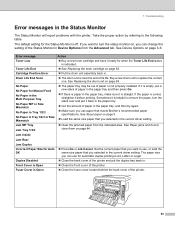
...Close the fuser cover located behind the back cover of the Status Monitor in Device Options from the indicated area. The paper size you use paper that meets Brother's recommended paper specifications. Take the proper action by referring to replace the current one. Troubleshooting Error messages in the... Life End Cartridge Position Error Drum Life End Soon No Paper No Paper for Manual Feed No Paper in the Multi Purpose Tray No Paper MP or Size Mismatch No Paper in Tray 1/2/3 No Paper in Tray 1/2/3 or Size Mismatch Jam MP Tray Jam Tray 1/2/3 Action „ Buy a new toner cartridge ...
...Close the fuser cover located behind the back cover of the Status Monitor in Device Options from the indicated area. The paper size you use paper that meets Brother's recommended paper specifications. Take the proper action by referring to replace the current one. Troubleshooting Error messages in the... Life End Cartridge Position Error Drum Life End Soon No Paper No Paper for Manual Feed No Paper in the Multi Purpose Tray No Paper MP or Size Mismatch No Paper in Tray 1/2/3 No Paper in Tray 1/2/3 or Size Mismatch Jam MP Tray Jam Tray 1/2/3 Action „ Buy a new toner cartridge ...
Users Manual - English
Page 91
... is connected to remove the paper. A paper jam has occurred. 7. See About paper on Legal size paper or longer sized paper, the paper slides off the top output tray. When printing on page 84. „ Make sure that the cable is helpful to the printer. „ Make sure that meets Brother recommended paper specifications. See Paper jams and how to clear...
... is connected to remove the paper. A paper jam has occurred. 7. See About paper on Legal size paper or longer sized paper, the paper slides off the top output tray. When printing on page 84. „ Make sure that the cable is helpful to the printer. „ Make sure that meets Brother recommended paper specifications. See Paper jams and how to clear...

Users Manual - English
Page 92
... used the printer, some internal parts of the printer will resume printing automatically. If the jammed paper is removed completely by following the steps below . 7. If the printer still does not start printing automatically, press Go. Then try printing again. Clear the jammed paper as shown below , you.... Note Always remove all the remaining jammed paper has been removed from the paper tray and straighten the stack when you open the front cover or back cover of paper from feeding through the printer at one time and prevents paper jams. 84 This helps prevent multiple sheets of...
... used the printer, some internal parts of the printer will resume printing automatically. If the jammed paper is removed completely by following the steps below . 7. If the printer still does not start printing automatically, press Go. Then try printing again. Clear the jammed paper as shown below , you.... Note Always remove all the remaining jammed paper has been removed from the paper tray and straighten the stack when you open the front cover or back cover of paper from feeding through the printer at one time and prevents paper jams. 84 This helps prevent multiple sheets of...

Users Manual - English
Page 93
CAUTION To prevent damage to the printer caused by static electricity, DO NOT touch the electrodes shown in the illustration. 85 a Press the cover release button and then open the front cover. 7. The jammed paper will be pulled out with the drum unit and toner cartridge assembly. Troubleshooting b Slowly take out the drum unit and toner cartridge assembly.
CAUTION To prevent damage to the printer caused by static electricity, DO NOT touch the electrodes shown in the illustration. 85 a Press the cover release button and then open the front cover. 7. The jammed paper will be pulled out with the drum unit and toner cartridge assembly. Troubleshooting b Slowly take out the drum unit and toner cartridge assembly.

Users Manual - English
Page 94
Troubleshooting 86 e Pull the jammed paper up and out of the printer. d Close the front cover. c Pull the paper tray completely out of the printer. f Open the front cover again. 7.
Troubleshooting 86 e Pull the jammed paper up and out of the printer. d Close the front cover. c Pull the paper tray completely out of the printer. f Open the front cover again. 7.

Users Manual - English
Page 113
... taking the place of acid paper because of the paper in the printer. Though modern paper manufacture methods started with thinner or thicker paper than these weights. Note If you use paper that you use an acid paper check pen to the carriage direction of environmental issues. Short grain paper is not recommended, a paper jam or misfeed may occur...
... taking the place of acid paper because of the paper in the printer. Though modern paper manufacture methods started with thinner or thicker paper than these weights. Note If you use paper that you use an acid paper check pen to the carriage direction of environmental issues. Short grain paper is not recommended, a paper jam or misfeed may occur...

Users Manual - English
Page 138
Index O OPC drum 93 Options 56 P Paper 5, 105 Paper handling 102 Paper jams 48, 84 Parallel interface 44 Plain paper 6 Power 4 Power supply 4 Print overrun 48 Print quality 91 Print server 60 Print test page 52 Printable area 8 Printer driver 26, 34, 40, 102 Printer ...
Index O OPC drum 93 Options 56 P Paper 5, 105 Paper handling 102 Paper jams 48, 84 Parallel interface 44 Plain paper 6 Power 4 Power supply 4 Print overrun 48 Print quality 91 Print server 60 Print test page 52 Printable area 8 Printer driver 26, 34, 40, 102 Printer ...
Quick Setup Guide - English
Page 9
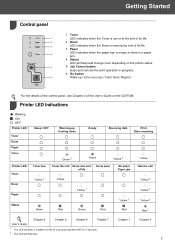
... of its life. 2 Drum LED indicates when the Drum is nearing the end of its life. 3 Paper LED indicates when the paper tray is empty or there is a paper jam. 4 Status LED will flash and change color depending on the printer status. 5 Job Cancel button stops ...-up Cooling down Ready Receiving data Print Data remaining Toner low Green 2 Green Yellow 2 Toner life end Drum near end Cover open of life No paper Paper jam Yellow Service call Yellow 1 Yellow Yellow 2 Yellow 1 Yellow 2 Yellow 2 Yellow 2 Green Red Green Red Red Red 2 User's Guide Chapter 6 Chapter 6 Chapter 6 ...
... of its life. 2 Drum LED indicates when the Drum is nearing the end of its life. 3 Paper LED indicates when the paper tray is empty or there is a paper jam. 4 Status LED will flash and change color depending on the printer status. 5 Job Cancel button stops ...-up Cooling down Ready Receiving data Print Data remaining Toner low Green 2 Green Yellow 2 Toner life end Drum near end Cover open of life No paper Paper jam Yellow Service call Yellow 1 Yellow Yellow 2 Yellow 1 Yellow 2 Yellow 2 Yellow 2 Green Red Green Red Red Red 2 User's Guide Chapter 6 Chapter 6 Chapter 6 ...

Quick Setup Guide - English
Page 13
... pull out the back of paper well to avoid paper jams and misfeeds. 2 While pressing the blue paper-guide release lever (1), slide the paper guides to the lock position. (Legal size paper is flat in the tray and below the maximum paper mark (1). 1 5 Put the paper tray firmly back in the paper tray 1 Pull the paper tray completely out of...
... pull out the back of paper well to avoid paper jams and misfeeds. 2 While pressing the blue paper-guide release lever (1), slide the paper guides to the lock position. (Legal size paper is flat in the tray and below the maximum paper mark (1). 1 5 Put the paper tray firmly back in the paper tray 1 Pull the paper tray completely out of...


