Users Manual - English
Page 3
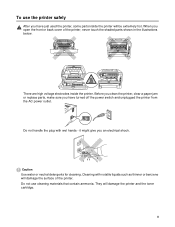
.... II Before you clean the printer, clear a paper jam or replace parts, make sure you have just used the printer, some parts inside the printer. Do not handle the plug with volatile liquids such as thinner or benzene will damage the printer and the toner cartridge. They will damage the surface... of the printer, never touch the shaded parts shown in the illustrations below. Cleaning with wet hands - it might give you open the ...
.... II Before you clean the printer, clear a paper jam or replace parts, make sure you have just used the printer, some parts inside the printer. Do not handle the plug with volatile liquids such as thinner or benzene will damage the printer and the toner cartridge. They will damage the surface... of the printer, never touch the shaded parts shown in the illustrations below. Cleaning with wet hands - it might give you open the ...
Users Manual - English
Page 6
... Using the printer driver (Not available for HL-5130 3-10 Network factory default setting (For HL-5170DN 3-11 Disabling the APIPA protocol (For HL-5170DN 3-11 4 Options ...4-1 DIMM ...4-1 Installing additional memory 4-2 Lower tray unit (LT-5000) (Not available for HL-5130 4-4 Print server (NC-2100p) ...4-5 5 Routine maintenance ...5-1 Toner cartridge ...5-2 Toner Low message ...5-2 Toner Empty message ...5-3 Replacing the toner cartridge 5-3 Drum unit...
... Using the printer driver (Not available for HL-5130 3-10 Network factory default setting (For HL-5170DN 3-11 Disabling the APIPA protocol (For HL-5170DN 3-11 4 Options ...4-1 DIMM ...4-1 Installing additional memory 4-2 Lower tray unit (LT-5000) (Not available for HL-5130 4-4 Print server (NC-2100p) ...4-5 5 Routine maintenance ...5-1 Toner cartridge ...5-2 Toner Low message ...5-2 Toner Empty message ...5-3 Replacing the toner cartridge 5-3 Drum unit...
Users Manual - English
Page 8
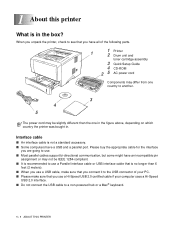
... cable to a non-powered hub or a Mac® keyboard. 1 - 1 ABOUT THIS PRINTER Interface cable ■ An interface cable is in . 1\ About this printer What is not a standard accessory. ■ Some computers have all of the following parts. 1 1 Printer 2 Drum unit and toner cartridge assembly 3 Quick Setup Guide 4 CD-ROM 2 5 AC power cord Components may differ...
... cable to a non-powered hub or a Mac® keyboard. 1 - 1 ABOUT THIS PRINTER Interface cable ■ An interface cable is in . 1\ About this printer What is not a standard accessory. ■ Some computers have all of the following parts. 1 1 Printer 2 Drum unit and toner cartridge assembly 3 Quick Setup Guide 4 CD-ROM 2 5 AC power cord Components may differ...

Users Manual - English
Page 79
... its life. We recommend that the toner cartridge is indicated. LED Toner Drum Paper Status Figure 3-6 Toner Drum Paper Status Figure 3-7 Toner Drum Paper Status Figure 3-8 Toner Drum Paper Status Figure 3-9 Printer status Data remaining in memory Print data remains in the printer memory. Toner empty Replace the toner cartridge with a new one . See Replacing the toner cartridge on for 3 seconds. See Replacing...
... its life. We recommend that the toner cartridge is indicated. LED Toner Drum Paper Status Figure 3-6 Toner Drum Paper Status Figure 3-7 Toner Drum Paper Status Figure 3-8 Toner Drum Paper Status Figure 3-9 Printer status Data remaining in memory Print data remains in the printer memory. Toner empty Replace the toner cartridge with a new one . See Replacing the toner cartridge on for 3 seconds. See Replacing...
Users Manual - English
Page 93
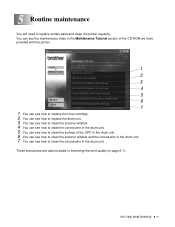
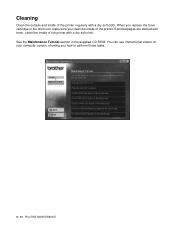
ROUTINE MAINTENANCE 5 - 1 You can see the maintenance video in the Maintenance Tutorial section of the CD-ROM we have provided with the printer. 1 2 3 4 5 6 7 1 You can see how to replace the toner cartridge. 2 You can see how to replace the drum unit. 3 You can see how to clean the scanner window. 4 You can... to clean the scanner window and the corona wire in the drum unit. 7 You can see how to replace certain parts and clean the printer regularly. These instructions are also included in the drum unit. 5 Routine maintenance You will need to clean the corona wire in Improving the print...
ROUTINE MAINTENANCE 5 - 1 You can see the maintenance video in the Maintenance Tutorial section of the CD-ROM we have provided with the printer. 1 2 3 4 5 6 7 1 You can see how to replace the toner cartridge. 2 You can see how to replace the drum unit. 3 You can see how to clean the scanner window. 4 You can... to clean the scanner window and the corona wire in the drum unit. 7 You can see how to replace certain parts and clean the printer regularly. These instructions are also included in the drum unit. 5 Routine maintenance You will need to clean the corona wire in Improving the print...

Users Manual - English
Page 94
... used will blink continuously if the toner cartridge is used . ■ If you change . ■ Wait to unpack the toner cartridge until immediately before you install it ready before you get a Toner Empty message. Toner LED will change the print density setting for 3 seconds. To put in the printer. Toner cartridge A new toner cartridge contains enough toner to print up to 3,500...
... used will blink continuously if the toner cartridge is used . ■ If you change . ■ Wait to unpack the toner cartridge until immediately before you install it ready before you get a Toner Empty message. Toner LED will change the print density setting for 3 seconds. To put in the printer. Toner cartridge A new toner cartridge contains enough toner to print up to 3,500...
Users Manual - English
Page 95
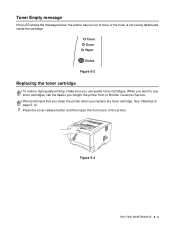
... the front cover of toner or the toner is not evenly distributed inside the cartridge. Figure 5-3 ROUTINE MAINTENANCE 5 - 3 Toner Drum Paper Status Figure 5-2 Replacing the toner cartridge To ensure high quality printing, make sure you bought the printer from or Brother Customer Service. When you want to buy toner cartridges, call the dealer you use quality toner cartridges. Toner Empty message If the...
... the front cover of toner or the toner is not evenly distributed inside the cartridge. Figure 5-3 ROUTINE MAINTENANCE 5 - 3 Toner Drum Paper Status Figure 5-2 Replacing the toner cartridge To ensure high quality printing, make sure you bought the printer from or Brother Customer Service. When you want to buy toner cartridges, call the dealer you use quality toner cartridges. Toner Empty message If the...
Users Manual - English
Page 96
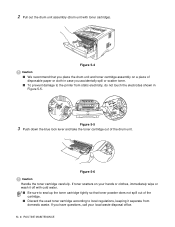
... assembly (drum unit with cold water. ■ Be sure to the printer from domestic waste. Figure 5-5 3 Push down the blue lock lever and take the toner cartridge out of the cartridge. ■ Discard the used toner cartridge according to local regulations, keeping it off with toner cartridge). Figure 5-4 Caution ■ We recommend that you have questions, call your...
... assembly (drum unit with cold water. ■ Be sure to the printer from domestic waste. Figure 5-5 3 Push down the blue lock lever and take the toner cartridge out of the cartridge. ■ Discard the used toner cartridge according to local regulations, keeping it off with toner cartridge). Figure 5-4 Caution ■ We recommend that you have questions, call your...

Users Manual - English
Page 97
... problem that you do not refill the toner cartridge provided with your printer. Our warranty coverage does not apply to spread the toner evenly inside the cartridge. To protect your investment and guarantee your printer may result in your print quality please continue to replace consumed toner cartridges with only Genuine Brother Branded Supplies. ■ Printing with both hands...
... problem that you do not refill the toner cartridge provided with your printer. Our warranty coverage does not apply to spread the toner evenly inside the cartridge. To protect your investment and guarantee your printer may result in your print quality please continue to replace consumed toner cartridges with only Genuine Brother Branded Supplies. ■ Printing with both hands...

Users Manual - English
Page 98
Figure 5-11 Caution Make sure you hear it lock into the drum unit you insert the toner cartridge properly or it may separate from the drum unit. 5 - 6 ROUTINE MAINTENANCE Figure 5-9 Figure 5-10 6 Put the new toner cartridge firmly into place. If you have removed the protective cover. Do not touch the shaded parts shown in properly, the lock lever will lift automatically. Caution Put the toner cartridge in the drum unit immediately after you put it in Figure 5-9 and Figure 5-10 to prevent any degradation to the print quality.
Figure 5-11 Caution Make sure you hear it lock into the drum unit you insert the toner cartridge properly or it may separate from the drum unit. 5 - 6 ROUTINE MAINTENANCE Figure 5-9 Figure 5-10 6 Put the new toner cartridge firmly into place. If you have removed the protective cover. Do not touch the shaded parts shown in properly, the lock lever will lift automatically. Caution Put the toner cartridge in the drum unit immediately after you put it in Figure 5-9 and Figure 5-10 to prevent any degradation to the print quality.

Users Manual - English
Page 102
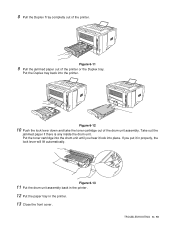
If you hear it in the printer. Caution Wait to seal up the drum unit tightly in properly, the blue lock lever will lift automatically. Exposure to local regulations, keeping it off ... direct sunlight or room light may separate from domestic waste. Figure 5-18 Caution Handle the toner cartridge carefully. 3 Push down the blue lock lever and take the toner cartridge out of the unit. 4 Unpack the new drum unit. If toner scatters on your local waste disposal office. ■ Be sure to unpack a drum unit until...
If you hear it in the printer. Caution Wait to seal up the drum unit tightly in properly, the blue lock lever will lift automatically. Exposure to local regulations, keeping it off ... direct sunlight or room light may separate from domestic waste. Figure 5-18 Caution Handle the toner cartridge carefully. 3 Push down the blue lock lever and take the toner cartridge out of the unit. 4 Unpack the new drum unit. If toner scatters on your local waste disposal office. ■ Be sure to unpack a drum unit until...
Users Manual - English
Page 103
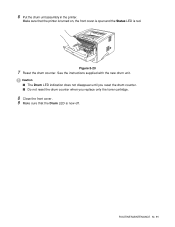
Caution ■ The Drum LED indication does not disappear until you reset the drum counter. ■ Do not reset the drum counter when you replace only the toner cartridge. 8 Close the front cover. 9 Make sure that the printer is turned on, the front cover is open and the Status LED is now off. See the instructions supplied with the new drum unit. Figure 5-20 7 Reset the drum counter. ROUTINE MAINTENANCE 5 - 11 6 Put the drum unit assembly in the printer. Make sure that the Drum LED is red.
Caution ■ The Drum LED indication does not disappear until you reset the drum counter. ■ Do not reset the drum counter when you replace only the toner cartridge. 8 Close the front cover. 9 Make sure that the printer is turned on, the front cover is open and the Status LED is now off. See the instructions supplied with the new drum unit. Figure 5-20 7 Reset the drum counter. ROUTINE MAINTENANCE 5 - 11 6 Put the drum unit assembly in the printer. Make sure that the Drum LED is red.
Users Manual - English
Page 104
If printed pages are stained with toner, clean the inside of the printer regularly with a dry soft cloth. You can see instructional videos on your computer screen, showing you clean the inside of the printer. Cleaning Clean the outside and inside of the printer with a dry soft cloth. When you replace the toner cartridge or the drum unit, make sure you how to perform these tasks. 5 - 12 ROUTINE MAINTENANCE See the Maintenance Tutorial section in the supplied CD-ROM.
If printed pages are stained with toner, clean the inside of the printer regularly with a dry soft cloth. You can see instructional videos on your computer screen, showing you clean the inside of the printer. Cleaning Clean the outside and inside of the printer with a dry soft cloth. When you replace the toner cartridge or the drum unit, make sure you how to perform these tasks. 5 - 12 ROUTINE MAINTENANCE See the Maintenance Tutorial section in the supplied CD-ROM.

Users Manual - English
Page 106
... checks, please find your problem First, check the following: ■ The power plug is connected properly and the printer is turned on. ■ All of the protective parts have been removed. ■ The toner cartridge and drum unit are problems with: Print quality See Improving the print quality on page 6-11. Other problems...
... checks, please find your problem First, check the following: ■ The power plug is connected properly and the printer is turned on. ■ All of the protective parts have been removed. ■ The toner cartridge and drum unit are problems with: Print quality See Improving the print quality on page 6-11. Other problems...
Users Manual - English
Page 108
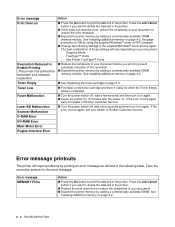
...Change the following table. If the error occurs again, call your dealer or Brother Customer Service. ■ Turn the power switch off , wait a few seconds ... Resolution Reduced to Enable Printing (The printer has printed the document at a reduced resolution) Toner Empty Toner Low Fuser Malfunction Laser BD Malfunction Scanner Malfunction D-RAM Error NV...toner cartridge on page 5-3. ■ Purchase a new toner cartridge and have it ready for when the Toner Empty status is indicated. ■ Turn the power switch off , wait a few seconds and then turn it on again. ■ Leave the printer...
...Change the following table. If the error occurs again, call your dealer or Brother Customer Service. ■ Turn the power switch off , wait a few seconds ... Resolution Reduced to Enable Printing (The printer has printed the document at a reduced resolution) Toner Empty Toner Low Fuser Malfunction Laser BD Malfunction Scanner Malfunction D-RAM Error NV...toner cartridge on page 5-3. ■ Purchase a new toner cartridge and have it ready for when the Toner Empty status is indicated. ■ Turn the power switch off , wait a few seconds and then turn it on again. ■ Leave the printer...
Users Manual - English
Page 115
...drum unit. If you hear it in the printer. 13 Close the front cover. Put the Duplex tray back into place. Figure 6-12 10 Push the lock lever down and take the toner cartridge out of the printer. TROUBLESHOOTING 6 - 10 Put the toner cartridge into the drum unit until you put it ...lock into the printer. Figure 6-11 9 Pull the jammed paper out of the printer or the Duplex tray.
...drum unit. If you hear it in the printer. 13 Close the front cover. Put the Duplex tray back into place. Figure 6-12 10 Push the lock lever down and take the toner cartridge out of the printer. TROUBLESHOOTING 6 - 10 Put the toner cartridge into the drum unit until you put it ...lock into the printer. Figure 6-11 9 Pull the jammed paper out of the printer or the Duplex tray.
Users Manual - English
Page 116
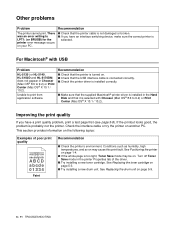
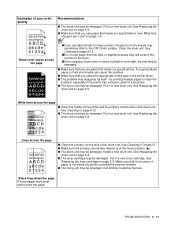
... drum unit on the following topics: Examples of the driver. ■ Try installing a new toner cartridge. For Macintosh® with Chooser (Mac OS® 8.6 to LPT1: (or BRUSB) for the printer error message occurs on . ■ Check that the USB interface cable is connected correctly. &#...device, make sure the correct printer is selected with USB Problem HL-5130 (or HL-5140, HL-5150D and HL-5170DN) does not appear in the printer Properties tab of poor print quality ABCDEFGH abcdefghijk ABCD abcde 01234 Faint Recommendation ■ Check the printer's environment. Improving the print ...
... drum unit on the following topics: Examples of the driver. ■ Try installing a new toner cartridge. For Macintosh® with Chooser (Mac OS® 8.6 to LPT1: (or BRUSB) for the printer error message occurs on . ■ Check that the USB interface cable is connected correctly. &#...device, make sure the correct printer is selected with USB Problem HL-5130 (or HL-5140, HL-5150D and HL-5170DN) does not appear in the printer Properties tab of poor print quality ABCDEFGH abcdefghijk ABCD abcde 01234 Faint Recommendation ■ Check the printer's environment. Improving the print ...
Users Manual - English
Page 117
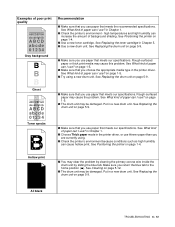
... Replacing the drum unit on page 1-4. ■ Use a new toner cartridge. Put in Chapter 5. ■ Use a new drum unit. All black TROUBLESHOOTING 6 - 12 high temperatures and high humidity can cause hollow print. See Positioning the printer on page 5-9. on page 1-5. ■ The drum unit may ... a new drum unit. Rough-surfaced paper or thick print media may cause the problem. Put in Chapter 1. ■ Check the printer's environment - Make sure you use paper that meets the recommended specifications. Examples of poor print quality ABCDEFGH abcdefghijk ABCD abcde 01234 Gray ...
... Replacing the drum unit on page 1-4. ■ Use a new toner cartridge. Put in Chapter 5. ■ Use a new drum unit. All black TROUBLESHOOTING 6 - 12 high temperatures and high humidity can cause hollow print. See Positioning the printer on page 5-9. on page 1-5. ■ The drum unit may ... a new drum unit. Rough-surfaced paper or thick print media may cause the problem. Put in Chapter 1. ■ Check the printer's environment - Make sure you use paper that meets the recommended specifications. Examples of poor print quality ABCDEFGH abcdefghijk ABCD abcde 01234 Gray ...
Users Manual - English
Page 119
.... Clean the drum unit. See Cleaning on page 1-5. ■If you use label sheets for laser printers, the glue from the sheets may sometimes stick to clear this problem, especially if the printer has not been used for a long time. ■ The drum unit may be damaged. ■... use paper that meets our specifications. See Cleaning in the printer driver. ■ The problem may be smudged. Call Brother Customer Service. Try printing multiple pages to the OPC drum surface. Make sure that you use ? See Replacing the toner cartridge on page 5-12. ■ The drum unit may disappear...
.... Clean the drum unit. See Cleaning on page 1-5. ■If you use label sheets for laser printers, the glue from the sheets may sometimes stick to clear this problem, especially if the printer has not been used for a long time. ■ The drum unit may be damaged. ■... use paper that meets our specifications. See Cleaning in the printer driver. ■ The problem may be smudged. Call Brother Customer Service. Try printing multiple pages to the OPC drum surface. Make sure that you use ? See Replacing the toner cartridge on page 5-12. ■ The drum unit may disappear...

Users Manual - English
Page 120
... toner cartridge on page 1-5. ■ Try printing using the straight-through output path. See What kind of paper can I use ? Put in the paper tray and that the guides are using the straight-through output path. on page 1-14. See Printing on plain paper from the manual feed tray (For HL-5130 and HL-5140...
... toner cartridge on page 1-5. ■ Try printing using the straight-through output path. See What kind of paper can I use ? Put in the paper tray and that the guides are using the straight-through output path. on page 1-14. See Printing on plain paper from the manual feed tray (For HL-5130 and HL-5140...


