Users Manual - English
Page 6
...HL-5130 4-4 Print server (NC-2100p) ...4-5 5 Routine maintenance ...5-1 Toner cartridge ...5-2 Toner Low message ...5-2 Toner Empty message ...5-3 Replacing the toner cartridge 5-3 Drum unit ...5-8 Change Drum message ...5-8 Replacing the drum unit ...5-9 Cleaning ...5-12 Replacing periodic maintenance parts 5-13 6 Troubleshooting... Printer specifications ...A-1 Important information for choosing your paper A-6 8 Appendix (For Europe and Other Countries B-1 Brother Numbers ...B-1 Important information: Regulations B-2 Radio interference (220 to 240 volt model only B-2 International ENERGY...
...HL-5130 4-4 Print server (NC-2100p) ...4-5 5 Routine maintenance ...5-1 Toner cartridge ...5-2 Toner Low message ...5-2 Toner Empty message ...5-3 Replacing the toner cartridge 5-3 Drum unit ...5-8 Change Drum message ...5-8 Replacing the drum unit ...5-9 Cleaning ...5-12 Replacing periodic maintenance parts 5-13 6 Troubleshooting... Printer specifications ...A-1 Important information for choosing your paper A-6 8 Appendix (For Europe and Other Countries B-1 Brother Numbers ...B-1 Important information: Regulations B-2 Radio interference (220 to 240 volt model only B-2 International ENERGY...

Users Manual - English
Page 106
...If you did not solve your problem and then go to clear them on page 6-3. 6 Troubleshooting Identifying your problem First, check the following: ■ The power plug is connected properly and the printer is turned on. ■ All of the protective parts have been removed. ■ The ...page 6-11. Printout is set up to connect to the printer and the computer. ■ The correct driver for the printer is installed and selected. ■ The PC is incorrect See Solving print problems on page 6-17. 6 - 1 TROUBLESHOOTING Printer printed an Error Message See Error message printouts on page ...
...If you did not solve your problem and then go to clear them on page 6-3. 6 Troubleshooting Identifying your problem First, check the following: ■ The power plug is connected properly and the printer is turned on. ■ All of the protective parts have been removed. ■ The ...page 6-11. Printout is set up to connect to the printer and the computer. ■ The correct driver for the printer is installed and selected. ■ The PC is incorrect See Solving print problems on page 6-17. 6 - 1 TROUBLESHOOTING Printer printed an Error Message See Error message printouts on page ...

Users Manual - English
Page 107
... for Duplex printing is straight. The default setting for the error message that meets Brother's recommended paper specifications. If it is empty, put paper in the paper tray ...Legal. ■ Install the Duplex tray into the printer. ■ Move the Duplex lever to the correct position. Specify the printable paper size. TROUBLESHOOTING 6 - 2 on page 2-6. Take the corrective...HL-5150D / HL-5170DN) Duplex Size Error (For HL-5150D / HL-5170DN) No Duplex Tray (For HL-5150D / HL-5170DN) Duplex Lever Error (For HL-5150D / HL-5170DN) Action ■ Close the front cover of the printer...
... for Duplex printing is straight. The default setting for the error message that meets Brother's recommended paper specifications. If it is empty, put paper in the paper tray ...Legal. ■ Install the Duplex tray into the printer. ■ Move the Duplex lever to the correct position. Specify the printable paper size. TROUBLESHOOTING 6 - 2 on page 2-6. Take the corrective...HL-5150D / HL-5170DN) Duplex Size Error (For HL-5150D / HL-5170DN) No Duplex Tray (For HL-5150D / HL-5170DN) Duplex Lever Error (For HL-5150D / HL-5170DN) Action ■ Close the front cover of the printer...
Users Manual - English
Page 108
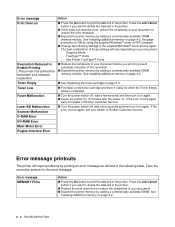
... turn it on again. Error message printouts The printer will vary depending on . See Installing additional memory on page 4-2. See Installing additional memory on page 4-2. 6 - 3 TROUBLESHOOTING The best combination of your dealer or Brother Customer Service. Take the corrective actions for 10 ...DIMM memory module. Error message Print Overrun Resolution Reduced to Enable Printing (The printer has printed the document at a reduced resolution) Toner Empty Toner Low Fuser Malfunction Laser BD Malfunction Scanner Malfunction D-RAM Error NV-RAM Error Main Motor Error Engine Interface...
... turn it on again. Error message printouts The printer will vary depending on . See Installing additional memory on page 4-2. See Installing additional memory on page 4-2. 6 - 3 TROUBLESHOOTING The best combination of your dealer or Brother Customer Service. Take the corrective actions for 10 ...DIMM memory module. Error message Print Overrun Resolution Reduced to Enable Printing (The printer has printed the document at a reduced resolution) Toner Empty Toner Low Fuser Malfunction Laser BD Malfunction Scanner Malfunction D-RAM Error NV-RAM Error Main Motor Error Engine Interface...

Users Manual - English
Page 109
...RPC program. ■ Change the following settings in the printer. See Installing additional memory on page 4-2. ■ Set page protection to ON by adding a commercially available DIMM. See Installing additional memory on page 4-2. TROUBLESHOOTING 6 - 4 Press the Job Cancel button if you ...want to delete the data left in the supplied Windows® driver and try again. Error message PRINT OVERRUN RESOLUTION REDUCED TO ENABLE PRINTING (The printer has printed the document at ...
...RPC program. ■ Change the following settings in the printer. See Installing additional memory on page 4-2. ■ Set page protection to ON by adding a commercially available DIMM. See Installing additional memory on page 4-2. TROUBLESHOOTING 6 - 4 Press the Job Cancel button if you ...want to delete the data left in the supplied Windows® driver and try again. Error message PRINT OVERRUN RESOLUTION REDUCED TO ENABLE PRINTING (The printer has printed the document at ...
Users Manual - English
Page 110
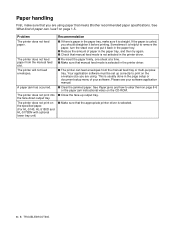
... Problem The printer does not feed paper. The printer does not print on the specified paper. (For HL-5140, HL-5150D and HL-5170DN with optional lower tray unit) Recommendation ■ If there is paper in the paper tray, make sure that you are using paper that meets Brother recommended paper ...printer does not print into the face-down output tray. See Paper jams and how to clear them on page 6-6 or the paper jam instructional video on the CD-ROM. ■ Close the face-up correctly to remove the paper, turn the stack over and put it is selected. 6 - 5 TROUBLESHOOTING...
... Problem The printer does not feed paper. The printer does not print on the specified paper. (For HL-5140, HL-5150D and HL-5170DN with optional lower tray unit) Recommendation ■ If there is paper in the paper tray, make sure that you are using paper that meets Brother recommended paper ...printer does not print into the face-down output tray. See Paper jams and how to clear them on page 6-6 or the paper jam instructional video on the CD-ROM. ■ Close the face-up correctly to remove the paper, turn the stack over and put it is selected. 6 - 5 TROUBLESHOOTING...

Users Manual - English
Page 111
... the information in Figure 6-2. This helps prevent multiple sheets of paper from feeding through the printer at one time and reduces paper jams. TROUBLESHOOTING 6 - 6 Paper jams and how to clear them When a paper jam occurs, the printer indicates it by using the optional lower tray unit, check for correct installation of the upper...
... the information in Figure 6-2. This helps prevent multiple sheets of paper from feeding through the printer at one time and reduces paper jams. TROUBLESHOOTING 6 - 6 Paper jams and how to clear them When a paper jam occurs, the printer indicates it by using the optional lower tray unit, check for correct installation of the upper...
Users Manual - English
Page 112
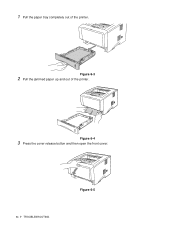
Figure 6-3 2 Pull the jammed paper up and out of the printer. 1 Pull the paper tray completely out of the printer. Figure 6-4 3 Press the cover release button and then open the front cover. 6 - 7 TROUBLESHOOTING Figure 6-5
Figure 6-3 2 Pull the jammed paper up and out of the printer. 1 Pull the paper tray completely out of the printer. Figure 6-4 3 Press the cover release button and then open the front cover. 6 - 7 TROUBLESHOOTING Figure 6-5
Users Manual - English
Page 113
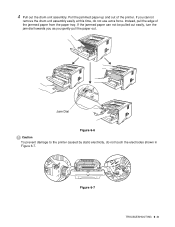
Jam Dial Figure 6-6 Caution To prevent damage to the printer caused by static electricity, do not use extra force. Pull the jammed paper up and out of the jammed paper from the paper tray. Figure 6-7 TROUBLESHOOTING 6 - 8 If you gently pull the paper out. Instead, pull the edge of the printer. If the jammed paper can not be pulled out easily, turn the jam dial towards you as you cannot remove the drum unit assembly easily at this time, do not touch the electrodes shown in Figure 6-7. 4 Pull out the drum unit assembly.
Jam Dial Figure 6-6 Caution To prevent damage to the printer caused by static electricity, do not use extra force. Pull the jammed paper up and out of the jammed paper from the paper tray. Figure 6-7 TROUBLESHOOTING 6 - 8 If you gently pull the paper out. Instead, pull the edge of the printer. If the jammed paper can not be pulled out easily, turn the jam dial towards you as you cannot remove the drum unit assembly easily at this time, do not touch the electrodes shown in Figure 6-7. 4 Pull out the drum unit assembly.
Users Manual - English
Page 114
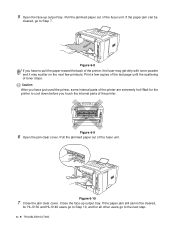
... the printer, some internal parts of the printer, the fuser may get dirty with toner powder and it may scatter on the next few copies of the test page until the scattering of the printer. Pull the jammed paper out of the fuser unit. If the paper jam can be cleared, for HL-5130 and HL-5140... users go to Step 10, and for the printer to pull the paper toward the back of the printer are extremely hot! Wait for all other users go to the next step. 6 - 9 TROUBLESHOOTING 5 Open the face-up output tray. Close the face...
... the printer, some internal parts of the printer, the fuser may get dirty with toner powder and it may scatter on the next few copies of the test page until the scattering of the printer. Pull the jammed paper out of the fuser unit. If the paper jam can be cleared, for HL-5130 and HL-5140... users go to Step 10, and for the printer to pull the paper toward the back of the printer are extremely hot! Wait for all other users go to the next step. 6 - 9 TROUBLESHOOTING 5 Open the face-up output tray. Close the face...
Users Manual - English
Page 115
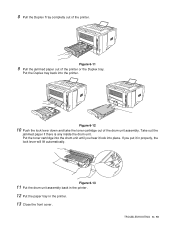
TROUBLESHOOTING 6 - 10 Figure 6-11 9 Pull the jammed paper out of the drum unit assembly. Put the toner cartridge into the drum unit until you put it lock into the printer. Figure 6-12 10 Push the lock lever down and take the toner cartridge out of the printer or the Duplex tray. Figure 6-13 11... Put the drum unit assembly back in the printer. 12 Put the paper tray in properly, the lock lever will lift automatically. Put the Duplex tray back into ...
TROUBLESHOOTING 6 - 10 Figure 6-11 9 Pull the jammed paper out of the drum unit assembly. Put the toner cartridge into the drum unit until you put it lock into the printer. Figure 6-12 10 Push the lock lever down and take the toner cartridge out of the printer or the Duplex tray. Figure 6-13 11... Put the drum unit assembly back in the printer. 12 Put the paper tray in properly, the lock lever will lift automatically. Put the Duplex tray back into ...
Users Manual - English
Page 116
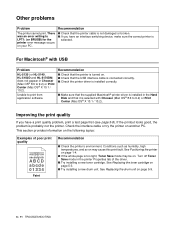
...your PC. Unable to 9.2) or Print Center (Mac OS® X 10.1 / 10.2). Check the interface cable or try the printer on page 5-9. 6 - 11 TROUBLESHOOTING If the printout looks good, the problem is too light, Toner Save mode may cause this print fault. See Replacing the drum unit...an interface-switching device, make sure the correct printer is selected with USB Problem HL-5130 (or HL-5140, HL-5150D and HL-5170DN) does not appear in the Hard Disk and that it is selected. Recommendation ■ Check that the supplied Macintosh® printer driver is installed in Chooser (Mac OS®...
...your PC. Unable to 9.2) or Print Center (Mac OS® X 10.1 / 10.2). Check the interface cable or try the printer on page 5-9. 6 - 11 TROUBLESHOOTING If the printout looks good, the problem is too light, Toner Save mode may cause this print fault. See Replacing the drum unit...an interface-switching device, make sure the correct printer is selected with USB Problem HL-5130 (or HL-5140, HL-5150D and HL-5170DN) does not appear in the Hard Disk and that it is selected. Recommendation ■ Check that the supplied Macintosh® printer driver is installed in Chooser (Mac OS®...
Users Manual - English
Page 117
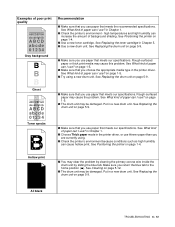
... specifications. See Replacing the drum unit on page 1-5. ■ Try using . ■ Check the printer's environment because conditions such as high humidity can cause hollow print. Hollow print ■ You may cause this problem. All black TROUBLESHOOTING 6 - 12 Rough-surfaced paper or thick print media may clear the problem by cleaning the...
... specifications. See Replacing the drum unit on page 1-5. ■ Try using . ■ Check the printer's environment because conditions such as high humidity can cause hollow print. Hollow print ■ You may cause this problem. All black TROUBLESHOOTING 6 - 12 Rough-surfaced paper or thick print media may clear the problem by cleaning the...
Users Manual - English
Page 118
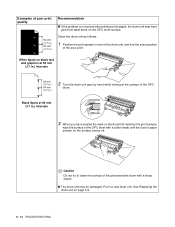
... unit. Caution Do not try to clean the surface of the photosensitive drum with a cotton swab until the dust or paper powder on page 5-9. 6 - 13 TROUBLESHOOTING See Replacing the drum unit on the surface comes off.
... unit. Caution Do not try to clean the surface of the photosensitive drum with a cotton swab until the dust or paper powder on page 5-9. 6 - 13 TROUBLESHOOTING See Replacing the drum unit on the surface comes off.
Users Manual - English
Page 119
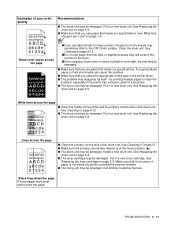
...problem. ■ Make sure that meets our specifications. Put in a new drum unit. Call Brother Customer Service. Put in a new toner cartridge. Try printing multiple pages to the OPC drum...9632;If you use label sheets for a long time. ■ The drum unit may be damaged. TROUBLESHOOTING 6 - 14 on page 5-9. ■ The toner cartridge may be damaged. See Replacing the toner ...the inside the printer covering the scanner window. ■ The fixing unit may sometimes stick to clear this problem, especially if the printer has not been used for laser printers, the glue...
...problem. ■ Make sure that meets our specifications. Put in a new drum unit. Call Brother Customer Service. Put in a new toner cartridge. Try printing multiple pages to the OPC drum...9632;If you use label sheets for a long time. ■ The drum unit may be damaged. TROUBLESHOOTING 6 - 14 on page 5-9. ■ The toner cartridge may be damaged. See Replacing the toner ...the inside the printer covering the scanner window. ■ The fixing unit may sometimes stick to clear this problem, especially if the printer has not been used for laser printers, the glue...

Users Manual - English
Page 120
...- 15 TROUBLESHOOTING Also, try rotating the paper 180° in the paper tray. Examples of paper can I use ? See Printing on plain paper from the paper tray on page 1-8. ■ Check the paper type and quality. See Printing on plain paper from the manual feed tray (For HL-5130 and HL-5140) on ... and HL-5170DN) on page 5-12. ■ The toner cartridge may be damaged. High temperatures and high humidity will cause paper to curl. See What kind of paper can I use the printer very often, the paper may clear the problem by wiping the scanner window with a soft cloth. See ...
...- 15 TROUBLESHOOTING Also, try rotating the paper 180° in the paper tray. Examples of paper can I use ? See Printing on plain paper from the paper tray on page 1-8. ■ Check the paper type and quality. See Printing on plain paper from the manual feed tray (For HL-5130 and HL-5140) on ... and HL-5170DN) on page 5-12. ■ The toner cartridge may be damaged. High temperatures and high humidity will cause paper to curl. See What kind of paper can I use the printer very often, the paper may clear the problem by wiping the scanner window with a soft cloth. See ...

Users Manual - English
Page 121
ABCDEFG EFGHIJKLMN Envelope creases TROUBLESHOOTING 6 - 16 See page 1-31. When you have finished printing your envelopes, close the face-up (back) output tray and push down the blue tabs at the left and right hand sides (as shown in the figure below). Examples of poor print quality Recommendation ■ Open the face-up output tray to reset the two blue tabs back to their original position.
ABCDEFG EFGHIJKLMN Envelope creases TROUBLESHOOTING 6 - 16 See page 1-31. When you have finished printing your envelopes, close the face-up (back) output tray and push down the blue tabs at the left and right hand sides (as shown in the figure below). Examples of poor print quality Recommendation ■ Open the face-up output tray to reset the two blue tabs back to their original position.
Users Manual - English
Page 122
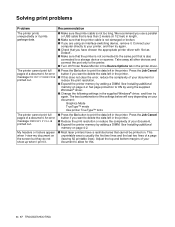
... storage device or scanner. See Installing additional memory on page 4-2. ■ Most laser printers have chosen the appropriate printer driver with 'Set as Default'. ■ Make sure that the printer is not connected to the same port that is also connected to delete the data ...cable that cannot be printed on page 4-2. Solving print problems Problem The printer prints unexpectedly or it . Set page protection to delete the data left in the printer. ■ If this . 6 - 17 TROUBLESHOOTING The printer cannot print full pages of a document. Connect your computer directly to...
... storage device or scanner. See Installing additional memory on page 4-2. ■ Most laser printers have chosen the appropriate printer driver with 'Set as Default'. ■ Make sure that the printer is not connected to the same port that is also connected to delete the data ...cable that cannot be printed on page 4-2. Solving print problems Problem The printer prints unexpectedly or it . Set page protection to delete the data left in the printer. ■ If this . 6 - 17 TROUBLESHOOTING The printer cannot print full pages of a document. Connect your computer directly to...
Users Manual - English
Page 130
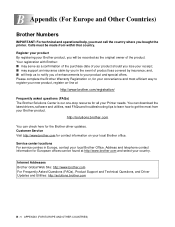
... us to notify you of enhancements to register your new product, register on your Printer needs. http://solutions.brother.com You can download the latest drivers, software and utilities, read FAQs and troubleshooting tips to learn how to get the most efficient way to your product and special... offers. Customer Service Visit http://www.brother.com for contact information on -line at http://www.brother.com and select your receipt; ■ may...
... us to notify you of enhancements to register your new product, register on your Printer needs. http://solutions.brother.com You can download the latest drivers, software and utilities, read FAQs and troubleshooting tips to learn how to get the most efficient way to your product and special... offers. Customer Service Visit http://www.brother.com for contact information on -line at http://www.brother.com and select your receipt; ■ may...
Users Manual - English
Page 136
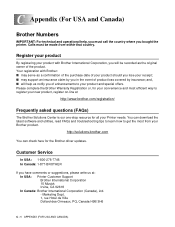
... (FOR USA AND CANADA) Calls must call the country where you in the event of enhancements to your Printer needs. Your registration with Brother International Corporation, you will help , you must be recorded as a confirmation of the purchase date of your product...: Printer Customer Support Brother International Corporation 15 Musick Irvine, CA 92618 In Canada: Brother International Corporation (Canada), Ltd. - http://solutions.brother.com You can download the latest software and utilities, read FAQs and troubleshooting tips to learn how to register your product with Brother: ...
... (FOR USA AND CANADA) Calls must call the country where you in the event of enhancements to your Printer needs. Your registration with Brother International Corporation, you will help , you must be recorded as a confirmation of the purchase date of your product...: Printer Customer Support Brother International Corporation 15 Musick Irvine, CA 92618 In Canada: Brother International Corporation (Canada), Ltd. - http://solutions.brother.com You can download the latest software and utilities, read FAQs and troubleshooting tips to learn how to register your product with Brother: ...