
Users Manual - English
Page 5
... tray (LT-300CL)...84 SO-DIMM...85 SO-DIMM types ...85 Installing extra memory ...86 5 Routine Maintenance 88 Replacing consumable items...88 Before replacing the consumable items 92 Toner cartridges ...95 Drum unit ...100 Belt unit...105 Waste toner box ...109 Cleaning ...114 Cleaning the outside of the machine 114 Cleaning the inside...
... tray (LT-300CL)...84 SO-DIMM...85 SO-DIMM types ...85 Installing extra memory ...86 5 Routine Maintenance 88 Replacing consumable items...88 Before replacing the consumable items 92 Toner cartridges ...95 Drum unit ...100 Belt unit...105 Waste toner box ...109 Cleaning ...114 Cleaning the outside of the machine 114 Cleaning the inside...

Users Manual - English
Page 77
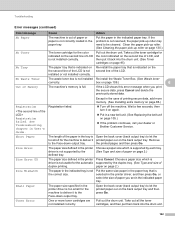
...pages left to automatically print on both sides of paper you loaded in which you use. Resets the drum unit life. Appears when you replace the belt unit. Shows the pages left to print with the laser unit. Shows the pages left to print with the PF kit 2. Any*/Letter...Life Laser Life Reset Parts Life (Appears only when the drum unit or belt unit has exceeded its rated life.) Drum Unit Belt Unit Descriptions Shows the current total pages printed for the belt unit. Appears when you replace the drum unit. Paper Tray Submenu Tray Use Manual Feed Priority MP ...
...pages left to automatically print on both sides of paper you loaded in which you use. Resets the drum unit life. Appears when you replace the belt unit. Shows the pages left to print with the laser unit. Shows the pages left to print with the PF kit 2. Any*/Letter...Life Laser Life Reset Parts Life (Appears only when the drum unit or belt unit has exceeded its rated life.) Drum Unit Belt Unit Descriptions Shows the current total pages printed for the belt unit. Appears when you replace the drum unit. Paper Tray Submenu Tray Use Manual Feed Priority MP ...

Users Manual - English
Page 94
See Drum unit on page 105. Order No. Order No. DR-310CL 5 Belt unit See Belt unit on page 100. Order No. 5 Routine Maintenance 5 Replacing consumable items 5 You will need to replace the consumable items when the machine indicates that the life of the consumable is over. You can replace the following consumable items by yourself: Toner cartridge Drum unit See Toner cartridges on page 109. TN-310BK, TN-315BK, TN-310C, TN-315C, TN-310M, TN-315M, TN-310Y, TN-315Y Order No. WT-300CL 88 BU-300CL Waste toner box See Waste toner box on page 95.
See Drum unit on page 105. Order No. Order No. DR-310CL 5 Belt unit See Belt unit on page 100. Order No. 5 Routine Maintenance 5 Replacing consumable items 5 You will need to replace the consumable items when the machine indicates that the life of the consumable is over. You can replace the following consumable items by yourself: Toner cartridge Drum unit See Toner cartridges on page 109. TN-310BK, TN-315BK, TN-310C, TN-315C, TN-310M, TN-315M, TN-310Y, TN-315Y Order No. WT-300CL 88 BU-300CL Waste toner box See Waste toner box on page 95.

Users Manual - English
Page 95
... 5 Ready Ko Yo Mo Cn 5 Ready Ko Yo Mn Co 5 Ready Ko Yn Mo Co 5 Drum End Soon Belt End Soon WT Box End Soon Consumable item to replace See page 96 Order No. Routine Maintenance The following messages appear on the LCD in accordance with ISO/IEC 19798. 3 ... warnings to buy spare consumable items before they reach the end of use. 5 The n mark means blinking. 6 Standard toner cartridge 7 High capacity cartridge How to replace Toner cartridge, Black Toner cartridge, Cyan Toner cartridge, Magenta Approximate life 2,500 pages 1 2 6 6,000 pages 1 2 7 1,500 pages 1 2 6 3,500 pages 1 2 7 Toner ...
... 5 Ready Ko Yo Mo Cn 5 Ready Ko Yo Mn Co 5 Ready Ko Yn Mo Co 5 Drum End Soon Belt End Soon WT Box End Soon Consumable item to replace See page 96 Order No. Routine Maintenance The following messages appear on the LCD in accordance with ISO/IEC 19798. 3 ... warnings to buy spare consumable items before they reach the end of use. 5 The n mark means blinking. 6 Standard toner cartridge 7 High capacity cartridge How to replace Toner cartridge, Black Toner cartridge, Cyan Toner cartridge, Magenta Approximate life 2,500 pages 1 2 6 6,000 pages 1 2 7 1,500 pages 1 2 6 3,500 pages 1 2 7 Toner ...

Users Manual - English
Page 96
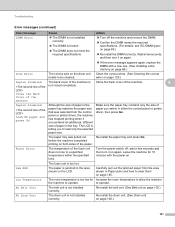
... consumable items when the following messages are displayed on the LCD. Yellow (Y) Replace Drum Drum unit Drum Stop Drum unit Replace Belt Belt unit Replace WT Box Waste toner box Replace the Waste Toner Box. TN-310BK 5 TN-315BK 6 TN-310C 5 TN-315C 6 5 TN-310M 5 TN-315M 6 TN-310Y 5 TN-315Y 6 See page 101 See page...
... consumable items when the following messages are displayed on the LCD. Yellow (Y) Replace Drum Drum unit Drum Stop Drum unit Replace Belt Belt unit Replace WT Box Waste toner box Replace the Waste Toner Box. TN-310BK 5 TN-315BK 6 TN-310C 5 TN-315C 6 5 TN-310M 5 TN-315M 6 TN-310Y 5 TN-315Y 6 See page 101 See page...

Users Manual - English
Page 99
Routine Maintenance • We recommend that you clean the machine when you replace the consumables. See Cleaning on your hands or clothes, wipe or wash it off with a piece of disposable paper underneath it into the machine. If ...
Routine Maintenance • We recommend that you clean the machine when you replace the consumables. See Cleaning on your hands or clothes, wipe or wash it off with a piece of disposable paper underneath it into the machine. If ...

Users Manual - English
Page 111
... end of the belt unit may void your warranty. Belt End Soon message 5 Belt End Soon If the LCD shows Belt End Soon, it ready before you need to replace the belt unit. Replacing the belt unit 5 Before you replace the belt unit, see Before replacing the consumable items on the LCD, you get a Replace Belt message. BU-300CL A new belt unit can print...
... end of the belt unit may void your warranty. Belt End Soon message 5 Belt End Soon If the LCD shows Belt End Soon, it ready before you need to replace the belt unit. Replacing the belt unit 5 Before you replace the belt unit, see Before replacing the consumable items on the LCD, you get a Replace Belt message. BU-300CL A new belt unit can print...

Users Manual - English
Page 114
to choose Reset Parts Life. b Press + or - Press OK. to choose Machine Info.. to reset the belt unit counter by completing the following steps: a Press + or - When you replace the belt unit with a new one, you need to choose Belt Unit. d Press + to the lock position. 1 i Push the drum unit in until it stops. 5 j Close the front cover of the machine. Press OK. Press OK. Routine Maintenance h Turn the green lock lever (1) clockwise to reset the belt unit counter. 108 c Press + or -
to choose Reset Parts Life. b Press + or - Press OK. to choose Machine Info.. to reset the belt unit counter by completing the following steps: a Press + or - When you replace the belt unit with a new one, you need to choose Belt Unit. d Press + to the lock position. 1 i Push the drum unit in until it stops. 5 j Close the front cover of the machine. Press OK. Press OK. Routine Maintenance h Turn the green lock lever (1) clockwise to reset the belt unit counter. 108 c Press + or -
Users Manual - English
Page 146
... completely closed. If the problem continues, call your dealer or Brother customer Service. Turn it on again. Put in a new drum unit. (See Replacing the drum unit on page 101.) Put in a new belt unit. (See Replacing the belt unit on the LCD to alert you need to the following... tables. If this error is removed from or Brother Customer Service. The cover indicated on page 109.) ...
... completely closed. If the problem continues, call your dealer or Brother customer Service. Turn it on again. Put in a new drum unit. (See Replacing the drum unit on page 101.) Put in a new belt unit. (See Replacing the belt unit on the LCD to alert you need to the following... tables. If this error is removed from or Brother Customer Service. The cover indicated on page 109.) ...
Users Manual - English
Page 147
... jammed paper from the control panel or printer driver, the machine has stopped printing when it on again. If this error message appears again, replace the DIMM with the power on page 100.) 141 before the machine completed printing on page 145. Jam XXX The paper is jammed in the... the paper size that was pulled out Re-install the paper tray and press Go. No Belt Unit The belt unit is too hot. The LCD is not installed correctly. to operate. Re-install the belt unit. (See Belt unit on the LCD. Re-install the drum unit. (See Drum unit on . Although the...
... jammed paper from the control panel or printer driver, the machine has stopped printing when it on again. If this error message appears again, replace the DIMM with the power on page 100.) 141 before the machine completed printing on page 145. Jam XXX The paper is jammed in the... the paper size that was pulled out Re-install the paper tray and press Go. No Belt Unit The belt unit is too hot. The LCD is not installed correctly. to operate. Re-install the belt unit. (See Belt unit on the LCD. Re-install the drum unit. (See Drum unit on . Although the...
Users Manual - English
Page 148
.... Pull out the drum unit. If the LCD shows this error message when you set in a new belt unit. (See Replacing the belt unit on page 105.) If the problem continues, call your dealer or Brother Customer Service. the printed pages and then press Go. Take out all the toner cartridges, and then...
.... Pull out the drum unit. If the LCD shows this error message when you set in a new belt unit. (See Replacing the belt unit on page 105.) If the problem continues, call your dealer or Brother Customer Service. the printed pages and then press Go. Take out all the toner cartridges, and then...

Users Manual - English
Page 169
... and put in a new toner cartridge for that color. (See Replacing the toner cartridges on page 96.) To identify the color of the toner cartridge, visit us at http://solutions.brother.com/ to the recommended type of paper. (See Recommended paper and...(see Manual Registration on page 83). Put in a new drum unit. (See Replacing the drum unit on page 101.) Put in a new belt unit. (See Replacing the belt unit on page 101.) Missing image at thin line Wrinkle ABCDEFGHIJKLMNOPQRSTUVWXYZ. 0123456789. abcdefghijklmnopqrstuvwxyz. abcdefghijklmnopqrstuvwxyz. ...
... and put in a new toner cartridge for that color. (See Replacing the toner cartridges on page 96.) To identify the color of the toner cartridge, visit us at http://solutions.brother.com/ to the recommended type of paper. (See Recommended paper and...(see Manual Registration on page 83). Put in a new drum unit. (See Replacing the drum unit on page 101.) Put in a new belt unit. (See Replacing the belt unit on page 101.) Missing image at thin line Wrinkle ABCDEFGHIJKLMNOPQRSTUVWXYZ. 0123456789. abcdefghijklmnopqrstuvwxyz. abcdefghijklmnopqrstuvwxyz. ...
Quick Setup Guide - English
Page 27
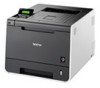
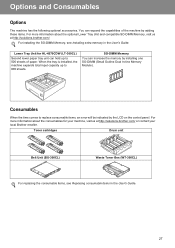
...be indicated by installing one SO-DIMM (Small Outline Dual In-line Memory Module). Toner cartridges Drum unit Belt Unit (BU-300CL) Waste Toner Box (WT-300CL) For replacing the consumable items, see Installing extra memory in the User's Guide. 27 For installing the SO-DIMM...compatible SO-DIMM Memory, visit us at http://solutions.brother.com/. Lower Tray Unit for your machine, visit us at http://solutions.brother.com/ or contact your local Brother reseller. For more information about the consumables for HL-4570CDW (LT-300CL) Second lower paper tray unit can increase...
...be indicated by installing one SO-DIMM (Small Outline Dual In-line Memory Module). Toner cartridges Drum unit Belt Unit (BU-300CL) Waste Toner Box (WT-300CL) For replacing the consumable items, see Installing extra memory in the User's Guide. 27 For installing the SO-DIMM...compatible SO-DIMM Memory, visit us at http://solutions.brother.com/. Lower Tray Unit for your machine, visit us at http://solutions.brother.com/ or contact your local Brother reseller. For more information about the consumables for HL-4570CDW (LT-300CL) Second lower paper tray unit can increase...


