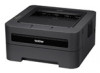
Users Manual - English
Page 3
...Automatic duplex printing (HL-2240D / HL-2242D / HL-2250DN / HL-2270DW only 21 Manual... duplex printing ...22 2 Driver and Software 23 Printer driver ...23 Features in the printer driver (for Windows 25 Features in the printer driver (for Macintosh 39 Uninstalling the printer driver ...51 Printer driver for Windows® ...51 Printer driver for Macintosh ...51 Software ...52 Software for networks (HL...-2250DN / HL-2270DW only 52 Remote Printer Console ...Print Fonts (HL-2250DN / HL-2270DW only 63 Print a WLAN report (HL-2270DW only 64...
...Automatic duplex printing (HL-2240D / HL-2242D / HL-2250DN / HL-2270DW only 21 Manual... duplex printing ...22 2 Driver and Software 23 Printer driver ...23 Features in the printer driver (for Windows 25 Features in the printer driver (for Macintosh 39 Uninstalling the printer driver ...51 Printer driver for Windows® ...51 Printer driver for Macintosh ...51 Software ...52 Software for networks (HL...-2250DN / HL-2270DW only 52 Remote Printer Console ...Print Fonts (HL-2250DN / HL-2270DW only 63 Print a WLAN report (HL-2270DW only 64...
Users Manual - English
Page 28
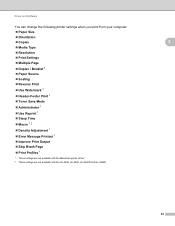
... Print Settings Multiple Page Duplex / Booklet 1 Paper Source Scaling Reverse Print Use Watermark 1 Header-Footer Print 1 Toner Save Mode Administrator 1 Use Reprint 1 Sleep Time Macro 1 2 Density Adjustment 1 Error Message Printout 1 Improve Print Output ... Page Print Profiles 1 1 These settings are not available with the Macintosh printer driver. 2 These settings are not available with the HL-2230, HL-2240, HL-2240D and HL-2242D. 24
... Print Settings Multiple Page Duplex / Booklet 1 Paper Source Scaling Reverse Print Use Watermark 1 Header-Footer Print 1 Toner Save Mode Administrator 1 Use Reprint 1 Sleep Time Macro 1 2 Density Adjustment 1 Error Message Printout 1 Improve Print Output ... Page Print Profiles 1 1 These settings are not available with the Macintosh printer driver. 2 These settings are not available with the HL-2230, HL-2240, HL-2240D and HL-2242D. 24

Users Manual - English
Page 31
... paper (75 to 105 g/m2 (20 to use. You can reduce the image size of paper. Page Order When N in your machine. If the toner is crumpled when Envelopes has been selected, choose Env. If the envelope is not fixed to have a solid border, dash border or no border around...
... paper (75 to 105 g/m2 (20 to use. You can reduce the image size of paper. Page Order When N in your machine. If the toner is crumpled when Envelopes has been selected, choose Env. If the envelope is not fixed to have a solid border, dash border or no border around...

Users Manual - English
Page 34
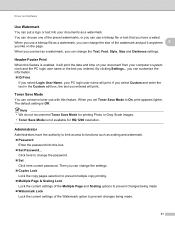
Driver and Software Advanced tab Change the tab settings by 180 degrees. 2 2 1 2 3 4 5 6 7 2 2 30 Reverse Print Check Reverse Print to rotate the print result by clicking one of the following icons: Scaling (1) Reverse Print (2) Use Watermark (3) Header-Footer Print (4) Toner Save Mode (5) Administrator (6) Other Print Options (7) Scaling You can change the print image scaling.
Driver and Software Advanced tab Change the tab settings by 180 degrees. 2 2 1 2 3 4 5 6 7 2 2 30 Reverse Print Check Reverse Print to rotate the print result by clicking one of the following icons: Scaling (1) Reverse Print (2) Use Watermark (3) Header-Footer Print (4) Toner Save Mode (5) Administrator (6) Other Print Options (7) Scaling You can change the print image scaling.
Users Manual - English
Page 35
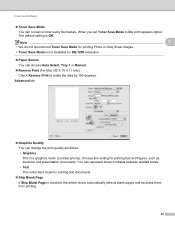
... and time on the page. Note • We do not recommend Toner Save Mode for printing Photo or Gray Scale images. • Toner Save Mode is Off. Header-Footer Print 2 When this box. Set Password... Toner Save Mode 2 You can conserve toner use text as scaling and watermark. Password Enter the password..., print appears lighter. When you use a bitmap file or text that you have the authority to limit access to functions such as a watermark, you set Toner Save Mode to change the Text, Font, Style, Size and Darkness settings.
... and time on the page. Note • We do not recommend Toner Save Mode for printing Photo or Gray Scale images. • Toner Save Mode is Off. Header-Footer Print 2 When this box. Set Password... Toner Save Mode 2 You can conserve toner use text as scaling and watermark. Password Enter the password..., print appears lighter. When you use a bitmap file or text that you have the authority to limit access to functions such as a watermark, you set Toner Save Mode to change the Text, Font, Style, Size and Darkness settings.
Users Manual - English
Page 37
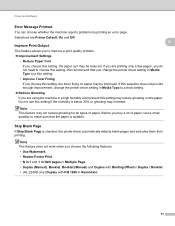
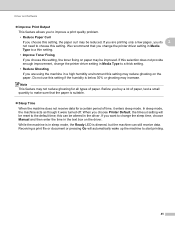
...Page is below 30% or ghosting may be reduced. Improve Print Output 2 2 This feature allows you to a thin setting. • Improve Toner Fixing If you buy a lot of paper. Driver and Software Error Message Printout 2 You can choose whether the machine reports problems by printing ...and 1 in NxN pages in Multiple Page • Duplex (Manual), Booklet, Booklet (Manual) and Duplex with Binding Offset in Duplex / Booklet • (HL-2240D only) Duplex with HQ 1200 in Media Type to improve a print quality problem. Improvement Settings • Reduce Paper Curl If you choose ...
...Page is below 30% or ghosting may be reduced. Improve Print Output 2 2 This feature allows you to a thin setting. • Improve Toner Fixing If you buy a lot of paper. Driver and Software Error Message Printout 2 You can choose whether the machine reports problems by printing ...and 1 in NxN pages in Multiple Page • Duplex (Manual), Booklet, Booklet (Manual) and Duplex with Binding Offset in Duplex / Booklet • (HL-2240D only) Duplex with HQ 1200 in Media Type to improve a print quality problem. Improvement Settings • Reduce Paper Curl If you choose ...
Users Manual - English
Page 48
... 10.4.11 only) Check Reverse Print to On, print appears lighter. Note 2 • We do not recommend Toner Save Mode for printing Photo or Gray Scale images. • Toner Save Mode is not available for HQ 1200 resolution. Paper Source You can represent sharp contrasts between shaded ...printing text and figures, such as follows: • Graphics This is a graphics mode (contrast priority). Choose this feature. When you set Toner Save Mode to rotate the data by 180 degrees. The default setting is checked, the printer driver automatically detects blank pages and excludes them ...
... 10.4.11 only) Check Reverse Print to On, print appears lighter. Note 2 • We do not recommend Toner Save Mode for printing Photo or Gray Scale images. • Toner Save Mode is not available for HQ 1200 resolution. Paper Source You can represent sharp contrasts between shaded ...printing text and figures, such as follows: • Graphics This is a graphics mode (contrast priority). Choose this feature. When you set Toner Save Mode to rotate the data by 180 degrees. The default setting is checked, the printer driver automatically detects blank pages and excludes them ...
Users Manual - English
Page 49
... increase. If you want to choose this can still receive data. We recommend that the paper is in a high humidity environment this setting, the toner fixing on the paper. Before you buy a lot of paper. Driver and Software Improve Print Output This feature allows you to start printing... Sleep Time When the machine does not receive data for all types of paper, test a small quantity to a thin setting. • Improve Toner Fixing If you choose this setting may be reduced. If this setting, the paper curl may reduce ghosting on paper may be altered in Media...
... increase. If you want to choose this can still receive data. We recommend that the paper is in a high humidity environment this setting, the toner fixing on the paper. Before you buy a lot of paper. Driver and Software Improve Print Output This feature allows you to start printing... Sleep Time When the machine does not receive data for all types of paper, test a small quantity to a thin setting. • Improve Toner Fixing If you choose this setting may be reduced. If this setting, the paper curl may reduce ghosting on paper may be altered in Media...

Users Manual - English
Page 57
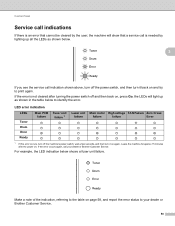
... states: 4 No paper / Paper jam / Cover open 4 Ready LED The Ready LED will need to four LEDs Toner, Drum, Error, Ready and Go button on the control panel. 1 Toner LED 3 1 The Toner LED indicates that the Toner is low. 2 Drum LED 2 The Drum LED indicates that the Drum will flash depending on . or or...
... states: 4 No paper / Paper jam / Cover open 4 Ready LED The Ready LED will need to four LEDs Toner, Drum, Error, Ready and Go button on the control panel. 1 Toner LED 3 1 The Toner LED indicates that the Toner is low. 2 Drum LED 2 The Drum LED indicates that the Drum will flash depending on . or or...

Users Manual - English
Page 59
... 71. CARTRIDGE ERROR The drum unit assembly is indicated. TONER ENDED Replace the toner cartridge with a new one . Buy a new toner cartridge and have it back in. NO TONER Open the front cover, install the toner cartridge. See REPLACE TONER on page 70. See Replacing the toner cartridge on page 71 55 Control Panel LEDs Machine Status...
... 71. CARTRIDGE ERROR The drum unit assembly is indicated. TONER ENDED Replace the toner cartridge with a new one . Buy a new toner cartridge and have it back in. NO TONER Open the front cover, install the toner cartridge. See REPLACE TONER on page 70. See Replacing the toner cartridge on page 71 55 Control Panel LEDs Machine Status...
Users Manual - English
Page 62
... indication shown above, turn it on and try to print again. LED error indication LEDs Main PCB failure Toner Drum Error Ready Fuser unit failure 1 Laser unit Main motor High voltage FAN Failure Zero Cross failure failure ... on again. Make a note of the indication, referring to your dealer or Brother Customer Service. If the error is needed by the user, the machine will show that a service call your dealer... or Brother Customer Service. 58 Leave the machine for approx.15 minutes with the power on. If...
... indication shown above, turn it on and try to print again. LED error indication LEDs Main PCB failure Toner Drum Error Ready Fuser unit failure 1 Laser unit Main motor High voltage FAN Failure Zero Cross failure failure ... on again. Make a note of the indication, referring to your dealer or Brother Customer Service. If the error is needed by the user, the machine will show that a service call your dealer... or Brother Customer Service. 58 Leave the machine for approx.15 minutes with the power on. If...
Users Manual - English
Page 65
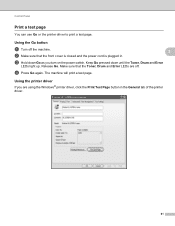
... that the front cover is closed and the power cord is plugged in the General tab of the printer driver. 61 c Hold down until the Toner, Drum and Error LEDs light up. Release Go. The machine will print a test page. Keep Go pressed down Go as you are off the machine.... 3 b Make sure that the Toner, Drum and Error LEDs are using the Windows® printer driver, click the Print Test Page button in . Using the Go button 3 a Turn off . Using...
... that the front cover is closed and the power cord is plugged in the General tab of the printer driver. 61 c Hold down until the Toner, Drum and Error LEDs light up. Release Go. The machine will print a test page. Keep Go pressed down Go as you are off the machine.... 3 b Make sure that the Toner, Drum and Error LEDs are using the Windows® printer driver, click the Print Test Page button in . Using the Go button 3 a Turn off . Using...
Users Manual - English
Page 67
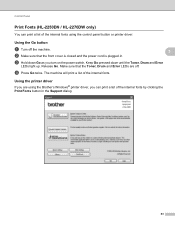
Control Panel Print Fonts (HL-2250DN / HL-2270DW only) 3 You can print a list of the internal fonts by clicking the Print Fonts button in . Using the Go button 3 a Turn off . Release Go. The machine will print a list of the internal fonts using the Brother's Windows® printer driver, you turn on the power...machine. 3 b Make sure that the Toner, Drum and Error LEDs are using the control panel button or printer driver. Make sure that the front cover is closed and the power cord is plugged in the Support dialog. 63 c Hold down until the Toner, Drum and Error LEDs light up....
Control Panel Print Fonts (HL-2250DN / HL-2270DW only) 3 You can print a list of the internal fonts by clicking the Print Fonts button in . Using the Go button 3 a Turn off . Release Go. The machine will print a list of the internal fonts using the Brother's Windows® printer driver, you turn on the power...machine. 3 b Make sure that the Toner, Drum and Error LEDs are using the control panel button or printer driver. Make sure that the front cover is closed and the power cord is plugged in the Support dialog. 63 c Hold down until the Toner, Drum and Error LEDs light up....

Users Manual - English
Page 70
Order No.DR-420 66 4 Routine Maintenance 4 You will need to clean the machine regularly and replace the consumable items. Replacing consumable items 4 The machine will indicate when it is time to replace the consumable items. (See LEDs (Light Emitting Diodes) on page 53) 4 Consumables 4 Toner cartridge See Toner cartridge on page 70 Order No.TN-420, TN-450 Drum unit See Drum unit on page 76.
Order No.DR-420 66 4 Routine Maintenance 4 You will need to clean the machine regularly and replace the consumable items. Replacing consumable items 4 The machine will indicate when it is time to replace the consumable items. (See LEDs (Light Emitting Diodes) on page 53) 4 Consumables 4 Toner cartridge See Toner cartridge on page 70 Order No.TN-420, TN-450 Drum unit See Drum unit on page 76.
Users Manual - English
Page 71
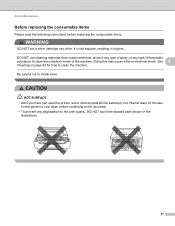
...to the print quality, DO NOT touch the shaded parts shown in injuries. CAUTION HOT SURFACE • After you have just used the printer, some internal parts will be extremely hot. Doing this may cause a fire or electrical shock. It could explode, resulting in the illustrations. 67 Wait at least... 4 Cleaning on page 82 for the printer to cool down before replacing the consumable items. WARNING DO NOT put a toner cartridge into a fire. Routine Maintenance Before replacing the consumable items 4 Please read the following instructions before continuing to the next step. • To ...
...to the print quality, DO NOT touch the shaded parts shown in injuries. CAUTION HOT SURFACE • After you have just used the printer, some internal parts will be extremely hot. Doing this may cause a fire or electrical shock. It could explode, resulting in the illustrations. 67 Wait at least... 4 Cleaning on page 82 for the printer to cool down before replacing the consumable items. WARNING DO NOT put a toner cartridge into a fire. Routine Maintenance Before replacing the consumable items 4 Please read the following instructions before continuing to the next step. • To ...

Users Manual - English
Page 72
...recommend that you clean the machine when you continue to any problem that is caused by the use of genuine Brother supplies. • We recommend that you place the drum unit and toner cartridge assembly on a clean, flat surface with a 4 piece of disposable paper underneath it off with cold ...the machine and/or may cause damage to the machine from the Brother machine, we strongly recommend the use of potentially incompatible toner and/or cartridges in the Brother machine may result in case you do not refill the toner cartridge provided with your hands or clothes, wipe or wash it ...
...recommend that you clean the machine when you continue to any problem that is caused by the use of genuine Brother supplies. • We recommend that you place the drum unit and toner cartridge assembly on a clean, flat surface with a 4 piece of disposable paper underneath it off with cold ...the machine and/or may cause damage to the machine from the Brother machine, we strongly recommend the use of potentially incompatible toner and/or cartridges in the Brother machine may result in case you do not refill the toner cartridge provided with your hands or clothes, wipe or wash it ...

Users Manual - English
Page 73
... tightly in a suitable bag so that you choose not to return your used toner cartridge, please discard the used toner cartridge to the brother collection program. If you use only genuine Brother toner cartridges. When you put it into the machine. If drum unit is exposed to sunlight or room light... waste disposal office. • To ensure high quality printing, we recommend that toner powder does not spill out 4 of the cartridge. • Go to http://www.brother.com/original/index.html for a long time the toner life may be damaged. • While removing the drum unit, handle it ...
... tightly in a suitable bag so that you choose not to return your used toner cartridge, please discard the used toner cartridge to the brother collection program. If you use only genuine Brother toner cartridges. When you put it into the machine. If drum unit is exposed to sunlight or room light... waste disposal office. • To ensure high quality printing, we recommend that toner powder does not spill out 4 of the cartridge. • Go to http://www.brother.com/original/index.html for a long time the toner life may be damaged. • While removing the drum unit, handle it ...
Users Manual - English
Page 74
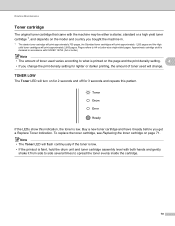
... and off for lighter or darker printing, the amount of toner used will turn on page 71. Routine Maintenance Toner cartridge 4 The original toner cartridge that came with the machine may be either a starter, standard or a high yield toner cartridge 1, and depends on the model and country you bought... the machine in accordance with both hands and gently shake it ready before you change . TONER LOW 4 The Toner LED will change the print density setting for 3 seconds and repeats this indication, the toner is printed on the page and the print density setting. 4 • If you get...
... and off for lighter or darker printing, the amount of toner used will turn on page 71. Routine Maintenance Toner cartridge 4 The original toner cartridge that came with the machine may be either a starter, standard or a high yield toner cartridge 1, and depends on the model and country you bought... the machine in accordance with both hands and gently shake it ready before you change . TONER LOW 4 The Toner LED will change the print density setting for 3 seconds and repeats this indication, the toner is printed on the page and the print density setting. 4 • If you get...
Users Manual - English
Page 75
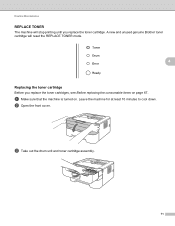
b Open the front cover. c Take out the drum unit and toner cartridge assembly. 71 a Make sure that the machine is turned on page 67. A new and unused genuine Brother toner cartridge will stop printing until you replace the toner cartridges, see Before replacing the consumable items on . Leave the machine for at least 10 minutes to cool down. Routine Maintenance REPLACE TONER 4 The machine will reset the REPLACE TONER mode. 4 Replacing the toner cartridge 4 Before you replace the toner cartridge.
b Open the front cover. c Take out the drum unit and toner cartridge assembly. 71 a Make sure that the machine is turned on page 67. A new and unused genuine Brother toner cartridge will stop printing until you replace the toner cartridges, see Before replacing the consumable items on . Leave the machine for at least 10 minutes to cool down. Routine Maintenance REPLACE TONER 4 The machine will reset the REPLACE TONER mode. 4 Replacing the toner cartridge 4 Before you replace the toner cartridge.

Users Manual - English
Page 76
Hold the cartridge level with both hands and gently shake it from side to side several times to spread the toner evenly inside the cartridge. 72 Routine Maintenance d Push down the green lock lever and take the toner cartridge out of the drum unit. 4 e Unpack the new toner cartridge.
Hold the cartridge level with both hands and gently shake it from side to side several times to spread the toner evenly inside the cartridge. 72 Routine Maintenance d Push down the green lock lever and take the toner cartridge out of the drum unit. 4 e Unpack the new toner cartridge.


