Users Manual - English
Page 8
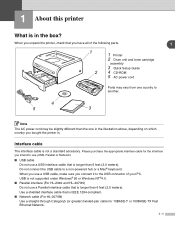
... HL-2040 and HL-2070N) Do not use a USB interface cable that you intend to use (USB, Parallel or Network). ■ USB cable Do not use a Parallel interface cable that is not a standard accessory. Do not connect the USB cable to the USB connector of the following parts. 1 1 2 1 Printer 2 Drum ...unit and toner cartridge assembly 3 Quick Setup Guide 4 CD-ROM 5 AC power cord Parts may be slightly different than 6 feet (2.0 meters).
... HL-2040 and HL-2070N) Do not use a USB interface cable that you intend to use (USB, Parallel or Network). ■ USB cable Do not use a Parallel interface cable that is not a standard accessory. Do not connect the USB cable to the USB connector of the following parts. 1 1 2 1 Printer 2 Drum ...unit and toner cartridge assembly 3 Quick Setup Guide 4 CD-ROM 5 AC power cord Parts may be slightly different than 6 feet (2.0 meters).

Users Manual - English
Page 57
... ■ After you open the front cover or back cover of the printer, never touch the shaded parts shown in the illustrations. Consumables Toner Cartridge Drum Unit See Toner cartridge on page 5-7. 5 - 1 See Drum unit on page 5-2. Note These instructions are also included in cold water to... avoid stains. ■ Be careful not to replace certain parts and clean the printer regularly. When you have just used the printer, some parts inside the printer are smeared with toner, wipe...
... ■ After you open the front cover or back cover of the printer, never touch the shaded parts shown in the illustrations. Consumables Toner Cartridge Drum Unit See Toner cartridge on page 5-7. 5 - 1 See Drum unit on page 5-2. Note These instructions are also included in cold water to... avoid stains. ■ Be careful not to replace certain parts and clean the printer regularly. When you have just used the printer, some parts inside the printer are smeared with toner, wipe...

Users Manual - English
Page 61
... be shortened. • If an unpacked drum unit is put it may reduce not only the print quality but also the quality and life of the printer itself. If toner cartridges are left unpacked for a long time the toner life will be damaged. • Brother strongly recommends that you do not refill...not touch the shaded parts shown in the illustrations to prevent any problem that you have removed the protective cover. We also strongly recommend that was caused by the use of third-party toner or third-party toner cartridges. • Put the toner cartridge in the drum unit immediately after ...
... be shortened. • If an unpacked drum unit is put it may reduce not only the print quality but also the quality and life of the printer itself. If toner cartridges are left unpacked for a long time the toner life will be damaged. • Brother strongly recommends that you do not refill...not touch the shaded parts shown in the illustrations to prevent any problem that you have removed the protective cover. We also strongly recommend that was caused by the use of third-party toner or third-party toner cartridges. • Put the toner cartridge in the drum unit immediately after ...

Users Manual - English
Page 69
2 Open the front cover of the printer. 4 Wipe the scanner window with a dry, lint-free cloth. 5 Put the drum unit and toner cartridge assembly back in the printer. 6 Close the front cover. 7 Plug the printer back in and turn on the printer power switch. 5 - 13 Wait for the printer to cool down before you have just used the printer, some internal parts of the printer are extremely hot! Routine maintenance 5 HOT SURFACE After you touch the internal parts of the printer. 3 Pull out the drum unit and toner cartridge assembly.
2 Open the front cover of the printer. 4 Wipe the scanner window with a dry, lint-free cloth. 5 Put the drum unit and toner cartridge assembly back in the printer. 6 Close the front cover. 7 Plug the printer back in and turn on the printer power switch. 5 - 13 Wait for the printer to cool down before you have just used the printer, some internal parts of the printer are extremely hot! Routine maintenance 5 HOT SURFACE After you touch the internal parts of the printer. 3 Pull out the drum unit and toner cartridge assembly.
Users Manual - English
Page 72
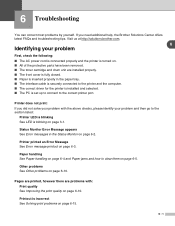
... on page 6-5. 6 Troubleshooting You can correct most problems by yourself. Visit us at http://solutions.brother.com. 6 Identifying your problem and then go to the correct printer port. Status Monitor Error Message appears See Error messages in the paper tray. ■ The interface...on. ■ All of the protective parts have been removed. ■ The toner cartridge and drum unit are problems with: Print quality See Improving the print quality on page 6-2. Printer does not print: If you need additional help, the Brother Solutions Center offers latest FAQs and troubleshooting ...
... on page 6-5. 6 Troubleshooting You can correct most problems by yourself. Visit us at http://solutions.brother.com. 6 Identifying your problem and then go to the correct printer port. Status Monitor Error Message appears See Error messages in the paper tray. ■ The interface...on. ■ All of the protective parts have been removed. ■ The toner cartridge and drum unit are problems with: Print quality See Improving the print quality on page 6-2. Printer does not print: If you need additional help, the Brother Solutions Center offers latest FAQs and troubleshooting ...
Users Manual - English
Page 79
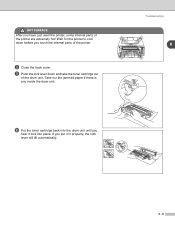
If you hear it lock into the drum unit until you put it in properly, the lock lever will lift automatically. Wait for the printer to cool down before you touch the internal parts of the printer. 8 Close the back cover. 9 Push the lock lever down and take the toner cartridge out of the printer are extremely hot! Take out the jammed paper if there is any inside the drum unit. 0 Put the toner cartridge back into place. Troubleshooting 6 6 - 8 HOT SURFACE After you have just used the printer, some internal parts of the drum unit.
If you hear it lock into the drum unit until you put it in properly, the lock lever will lift automatically. Wait for the printer to cool down before you touch the internal parts of the printer. 8 Close the back cover. 9 Push the lock lever down and take the toner cartridge out of the printer are extremely hot! Take out the jammed paper if there is any inside the drum unit. 0 Put the toner cartridge back into place. Troubleshooting 6 6 - 8 HOT SURFACE After you have just used the printer, some internal parts of the drum unit.


