Users Manual - English
Page 1
Brother Laser Printer HL-2030 HL-2040 HL-2070N User's Guide For visually-impaired users You can read the User's Guide with Screen Reader 'text-to set up the printer. You must set up the hardware and install the driver before you need to Frequently Asked Questions (FAQs), Product Support and Technical... Guide with HTML format by visiting our web site at http://solutions.brother.com where you can use it from the CD-ROM directly. You can find a printed copy in a convenient place so you can use the printer. Version 5 EN-US_Eur You can also read this User's Guide thoroughly...
Brother Laser Printer HL-2030 HL-2040 HL-2070N User's Guide For visually-impaired users You can read the User's Guide with Screen Reader 'text-to set up the printer. You must set up the hardware and install the driver before you need to Frequently Asked Questions (FAQs), Product Support and Technical... Guide with HTML format by visiting our web site at http://solutions.brother.com where you can use it from the CD-ROM directly. You can find a printed copy in a convenient place so you can use the printer. Version 5 EN-US_Eur You can also read this User's Guide thoroughly...
Users Manual - English
Page 5
... the manual feed slot 1-18 Paper orientation for manual duplex printing 1-19 2 Driver and software 2-1 Printer driver ...2-1 For Windows®...2-3 Features in the printer driver 2-3 For Macintosh® ...2-12 Uninstalling the printer driver...2-14 Printer driver for Windows 2-14 Brother Laser driver for Macintosh 2-15 Software ...2-16 Software for Networks ...2-16 BRAdmin Professional...2-16 Driver Deployment Wizard...
... the manual feed slot 1-18 Paper orientation for manual duplex printing 1-19 2 Driver and software 2-1 Printer driver ...2-1 For Windows®...2-3 Features in the printer driver 2-3 For Macintosh® ...2-12 Uninstalling the printer driver...2-14 Printer driver for Windows 2-14 Brother Laser driver for Macintosh 2-15 Software ...2-16 Software for Networks ...2-16 BRAdmin Professional...2-16 Driver Deployment Wizard...
Users Manual - English
Page 6
... panel button 3-9 Using the printer driver ...3-9 Print Fonts (For HL-2070N) ...3-10 Using the control panel button 3-10 Using the printer driver ...3-10 Network factory default setting (For HL-2070N 3-11 Network factory default setting with APIPA protocol disabled (For HL-2070N 3-11 4 Options ...4-1 Wireless print server (NC-2200w)...4-1 Print server (NC-2100p) (For HL-2040 4-2 5 Routine maintenance 5-1 Replacing the...
... panel button 3-9 Using the printer driver ...3-9 Print Fonts (For HL-2070N) ...3-10 Using the control panel button 3-10 Using the printer driver ...3-10 Network factory default setting (For HL-2070N 3-11 Network factory default setting with APIPA protocol disabled (For HL-2070N 3-11 4 Options ...4-1 Wireless print server (NC-2200w)...4-1 Print server (NC-2100p) (For HL-2040 4-2 5 Routine maintenance 5-1 Replacing the...

Users Manual - English
Page 11
Thin Env. Thick Paper size Number of paper The printer loads paper from the printer driver Plain Paper Recycled Paper Bond Paper Thick Paper or Thicker Paper Transparencies Thicker Paper Envelopes Env. Type and size of sheets Tray 1 A4, Letter, ... L A4 or Letter L Select the Media type from the installed paper tray, or the manual feed slot. 1 The names for the paper trays in the printer driver and this guide are as follows: Paper tray Manual feed slot Tray 1 Manual While looking at this...
Thin Env. Thick Paper size Number of paper The printer loads paper from the printer driver Plain Paper Recycled Paper Bond Paper Thick Paper or Thicker Paper Transparencies Thicker Paper Envelopes Env. Type and size of sheets Tray 1 A4, Letter, ... L A4 or Letter L Select the Media type from the installed paper tray, or the manual feed slot. 1 The names for the paper trays in the printer driver and this guide are as follows: Paper tray Manual feed slot Tray 1 Manual While looking at this...

Users Manual - English
Page 13
Portrait 1 About this printer 1 2 4 A4 1 4.23 mm (0.16 in.) 2 6.01 mm (0.24 in.) 3 4.23 mm (0.16 in.) 4 6.01 mm (0.24 in.) Landscape Letter 4.23 mm (0.16 in.) 6.35 mm (0.....) B6 4.23 mm (0.16 in.) 5.0 mm (0.19 in.) 4.23 mm (0.16 in.) 5.0 mm (0.19 in.) 1 - 6 Printable area The edges of the paper that cannot be printed on are shown below.
Portrait 1 About this printer 1 2 4 A4 1 4.23 mm (0.16 in.) 2 6.01 mm (0.24 in.) 3 4.23 mm (0.16 in.) 4 6.01 mm (0.24 in.) Landscape Letter 4.23 mm (0.16 in.) 6.35 mm (0.....) B6 4.23 mm (0.16 in.) 5.0 mm (0.19 in.) 4.23 mm (0.16 in.) 5.0 mm (0.19 in.) 1 - 6 Printable area The edges of the paper that cannot be printed on are shown below.

Users Manual - English
Page 14
...use , see What kind of the printer. 1 - 7 Printing on plain paper, bond paper or transparencies from the paper tray or manual feed slot. Select Plain Paper, Bond Paper or Transparencies. Select Tray1. 2 Pull the paper tray completely out of paper can print on plain paper, bond paper or ...transparencies from the paper tray Note Do not put more than 10 transparencies in the printer driver. on transparencies. 1 Select the Paper Size, Media Type, Paper Source and...
...use , see What kind of the printer. 1 - 7 Printing on plain paper, bond paper or transparencies from the paper tray or manual feed slot. Select Plain Paper, Bond Paper or Transparencies. Select Tray1. 2 Pull the paper tray completely out of paper can print on plain paper, bond paper or ...transparencies from the paper tray Note Do not put more than 10 transparencies in the printer driver. on transparencies. 1 Select the Paper Size, Media Type, Paper Source and...

Users Manual - English
Page 15
3 While pressing the blue paper-guide release lever, slide the paper guides to be printed on (blank side) face down, with the top of the paper at the front of the tray. 6 Put the paper tray firmly back in the printer. 1 - 8 Check that the paper is going to fit the paper size. About.... • Paper jams may occur if you put more than 10 transparencies in the paper tray at any one time. • When you use pre-printed paper, put the side that the guides are firmly in the slots. 4 Put paper in the tray. Check that is below the maximum paper mark...
3 While pressing the blue paper-guide release lever, slide the paper guides to be printed on (blank side) face down, with the top of the paper at the front of the tray. 6 Put the paper tray firmly back in the printer. 1 - 8 Check that the paper is going to fit the paper size. About.... • Paper jams may occur if you put more than 10 transparencies in the paper tray at any one time. • When you use pre-printed paper, put the side that the guides are firmly in the slots. 4 Put paper in the tray. Check that is below the maximum paper mark...
Users Manual - English
Page 16
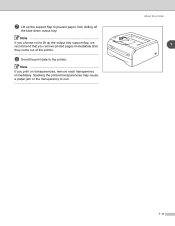
Stacking the printed transparencies may cause a paper jam or the transparency to prevent paper from sliding off the face-down output tray. Note If you choose not to the printer. Note If you remove printed pages immediately after they come out of the printer. 8 Send the print data to lift up the support flap to curl. About this printer 1 1 - 9 7 Lift up the output tray support flap, we recommend that you print on transparencies, remove each transparency immediately.
Stacking the printed transparencies may cause a paper jam or the transparency to prevent paper from sliding off the face-down output tray. Note If you choose not to the printer. Note If you remove printed pages immediately after they come out of the printer. 8 Send the print data to lift up the support flap to curl. About this printer 1 1 - 9 7 Lift up the output tray support flap, we recommend that you print on transparencies, remove each transparency immediately.

Users Manual - English
Page 17
About this printer Printing on plain paper, bond paper or transparencies from the manual feed slot Note The printer automatically turns on the Manual Feed mode when you put paper in the manual feed slot. 1 1 Select the Paper Size, Media Type, Paper Source and other settings in the manual feed slot. 1 - 10 Note A No paper fed manual feed slot status is shown by the control panel LEDs until you put a sheet of paper or a transparency in the printer driver. Select Manual. 2 Send the print data to the printer. Select Plain Paper, Bond Paper or Transparencies.
About this printer Printing on plain paper, bond paper or transparencies from the manual feed slot Note The printer automatically turns on the Manual Feed mode when you put paper in the manual feed slot. 1 1 Select the Paper Size, Media Type, Paper Source and other settings in the manual feed slot. 1 - 10 Note A No paper fed manual feed slot status is shown by the control panel LEDs until you put a sheet of paper or a transparency in the printer driver. Select Manual. 2 Send the print data to the printer. Select Plain Paper, Bond Paper or Transparencies.
Users Manual - English
Page 18
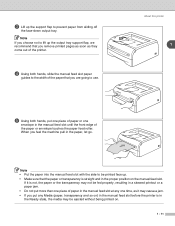
...1 - 11 Note • Put the paper into the manual feed slot with the side to be printed face up. • Make sure that you feel the machine pull in the manual feed slot until the... edge of the paper or envelope touches the paper feed roller. When you remove printed pages as soon as they come out of the printer. 4 Using both hands, put more than one envelope in the paper, let ... • If you put any Media (paper, transparency and so on) in the manual feed slot before the printer is not, the paper or the transparency may be fed properly, resulting in a skewed printout or a paper jam....
...1 - 11 Note • Put the paper into the manual feed slot with the side to be printed face up. • Make sure that you feel the machine pull in the manual feed slot until the... edge of the paper or envelope touches the paper feed roller. When you remove printed pages as soon as they come out of the printer. 4 Using both hands, put more than one envelope in the paper, let ... • If you put any Media (paper, transparency and so on) in the manual feed slot before the printer is not, the paper or the transparency may be fed properly, resulting in a skewed printout or a paper jam....

Users Manual - English
Page 19
Repeat for each page that you print on transparencies, remove each transparency immediately after printing. Note If you want to curl. 1 - 12 About this printer 6 After the printed page comes out of the printer, put in the next sheet of paper or the transparency as in Step 5 above. Stacking the printed 1 transparencies may cause a paper jam or the transparency to print.
Repeat for each page that you print on transparencies, remove each transparency immediately after printing. Note If you want to curl. 1 - 12 About this printer 6 After the printed page comes out of the printer, put in the next sheet of paper or the transparency as in Step 5 above. Stacking the printed 1 transparencies may cause a paper jam or the transparency to print.
Users Manual - English
Page 20
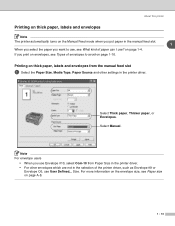
... feed slot 1 Select the Paper Size, Media Type, Paper Source and other envelopes which are not in the printer driver. Size. Printing on thick paper, labels and envelopes from Paper Size in the printer driver. • For other settings in the selection of paper can I use User Defined... About this... printer Printing on thick paper, labels and envelopes Note The printer automatically turns on the Manual Feed mode when you put paper in the manual feed slot. 1 When you select the paper you ...
... feed slot 1 Select the Paper Size, Media Type, Paper Source and other envelopes which are not in the printer driver. Size. Printing on thick paper, labels and envelopes from Paper Size in the printer driver. • For other settings in the selection of paper can I use User Defined... About this... printer Printing on thick paper, labels and envelopes Note The printer automatically turns on the Manual Feed mode when you put paper in the manual feed slot. 1 When you select the paper you ...

Users Manual - English
Page 21
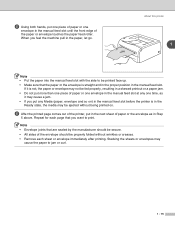
Note If you choose not to lift up the output tray support flap, we recommend that you remove printed pages as soon as they come out of the printer. 4 Using both hands, slide the manual feed slot paper guides to the width of the paper that you put a sheet of paper or an envelope in the manual feed slot. 3 Lift up the support flap to prevent paper from sliding off the face-down output tray. About this printer 1 1 - 14 Note A No paper fed manual feed slot status is shown by the control panel LEDs until you are going to the printer. 2 Send the print data to use.
Note If you choose not to lift up the output tray support flap, we recommend that you remove printed pages as soon as they come out of the printer. 4 Using both hands, slide the manual feed slot paper guides to the width of the paper that you put a sheet of paper or an envelope in the manual feed slot. 3 Lift up the support flap to prevent paper from sliding off the face-down output tray. About this printer 1 1 - 14 Note A No paper fed manual feed slot status is shown by the control panel LEDs until you are going to the printer. 2 Send the print data to use.
Users Manual - English
Page 22
... than one piece of paper or one envelope in the manual feed slot at any Media (paper, envelope and so on . 6 After the printed page comes out of the printer, put in the next sheet of paper or the envelope as it may cause a jam. • If you put one piece of... feel the machine pull in Step 5 above. Repeat for each sheet or envelope immediately after printing. Stacking the sheets or envelopes may be properly folded without being printed on ) in the manual feed slot before the printer is straight and in the proper position in the manual feed slot until the front edge...
... than one piece of paper or one envelope in the manual feed slot at any Media (paper, envelope and so on . 6 After the printed page comes out of the printer, put in the next sheet of paper or the envelope as it may cause a jam. • If you put one piece of... feel the machine pull in Step 5 above. Repeat for each sheet or envelope immediately after printing. Stacking the sheets or envelopes may be properly folded without being printed on ) in the manual feed slot before the printer is straight and in the proper position in the manual feed slot until the front edge...
Users Manual - English
Page 23
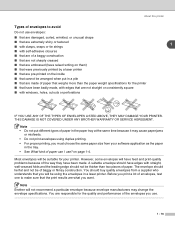
... what you want. The envelope should not be thicker than the paper weight specifications for the printer ■ that have raised writing on them) ■ that were previously printed by a laser printer ■ that are not straight or consistently square ■ with straight, well-creased folds ... the paper in a laser printer. Most envelopes will be of the way they have edges with windows, holes, cutouts or perforations IF YOU USE ANY OF THE TYPES OF ENVELOPES LISTED ABOVE, THEY MAY DAMAGE YOUR PRINTER. Note Brother will have feed and print-quality problems because of...
... what you want. The envelope should not be thicker than the paper weight specifications for the printer ■ that have raised writing on them) ■ that were previously printed by a laser printer ■ that are not straight or consistently square ■ with straight, well-creased folds ... the paper in a laser printer. Most envelopes will be of the way they have edges with windows, holes, cutouts or perforations IF YOU USE ANY OF THE TYPES OF ENVELOPES LISTED ABOVE, THEY MAY DAMAGE YOUR PRINTER. Note Brother will have feed and print-quality problems because of...

Users Manual - English
Page 24
..., and from the Basic tab choose the Paper Source to be Auto Select or Tray1. 2 The printer will automatically print all allow manual duplex printing. Remove the paper and straighten it. ■ When you use the manual duplex function, it is going to clear them on both sides of...-numbered pages from the output tray and put it may be paper jams or poor print quality. Do not use plain paper and recycled paper. About this printer Duplex Printing The supplied printer drivers for printing on page 6-5. For more information about how to choose the settings, see Paper jams and how to be...
..., and from the Basic tab choose the Paper Source to be Auto Select or Tray1. 2 The printer will automatically print all allow manual duplex printing. Remove the paper and straighten it. ■ When you use the manual duplex function, it is going to clear them on both sides of...-numbered pages from the output tray and put it may be paper jams or poor print quality. Do not use plain paper and recycled paper. About this printer Duplex Printing The supplied printer drivers for printing on page 6-5. For more information about how to choose the settings, see Paper jams and how to be...

Users Manual - English
Page 25
Repeat this printer 4 The printer will now automatically print all the odd-numbered pages on the other side of the paper. 1 - 18 Note When you put paper in the paper tray, first empty the tray then put the printed pages in the tray, with the printed side face up. (Do not add the printed pages to the... the manual feed slot Note You should not use very thin or very thick paper. 1 From the Advanced tab choose the Manual Duplex printing mode, and from the output tray and put the paper in the same order one by one. Place the paper with the side that is ...
Repeat this printer 4 The printer will now automatically print all the odd-numbered pages on the other side of the paper. 1 - 18 Note When you put paper in the paper tray, first empty the tray then put the printed pages in the tray, with the printed side face up. (Do not add the printed pages to the... the manual feed slot Note You should not use very thin or very thick paper. 1 From the Advanced tab choose the Manual Duplex printing mode, and from the output tray and put the paper in the same order one by one. Place the paper with the side that is ...
Users Manual - English
Page 26
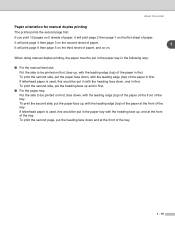
... side, put in with the heading face up , with the leading edge (top) of the tray. If letterhead paper is used , this printer Paper orientation for manual duplex printing The printer prints the second page first. If letterhead paper is used , this would be put the paper face down, with the leading edge (top...
... side, put in with the heading face up , with the leading edge (top) of the tray. If letterhead paper is used , this printer Paper orientation for manual duplex printing The printer prints the second page first. If letterhead paper is used , this would be put the paper face down, with the leading edge (top...
Users Manual - English
Page 27
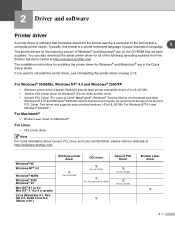
...printer needs. The printer drivers for Windows® (For HL-2030 and HL-2040) • Generic PCL Driver (For users of Citrix® MetaFrame®, Windows® Terminal Server environments and other Windows NT 4.0® and Windows® 2000/XP network shared environments, we have supplied. This driver only supports basic printing functions.) (For HL... printer driver GDI driver L (For HL-2070N) L (For HL-2040) L (For HL-2030 and HL-2040) L Generic PCL Driver L (For HL-2070N) L (For HL-2070N) Brother Laser driver L 2 - 1 You can also download the latest printer driver...
...printer needs. The printer drivers for Windows® (For HL-2030 and HL-2040) • Generic PCL Driver (For users of Citrix® MetaFrame®, Windows® Terminal Server environments and other Windows NT 4.0® and Windows® 2000/XP network shared environments, we have supplied. This driver only supports basic printing functions.) (For HL... printer driver GDI driver L (For HL-2070N) L (For HL-2040) L (For HL-2030 and HL-2040) L Generic PCL Driver L (For HL-2070N) L (For HL-2070N) Brother Laser driver L 2 - 1 You can also download the latest printer driver...
Users Manual - English
Page 28
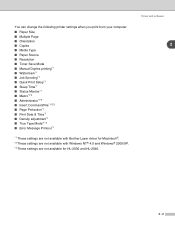
... Protection*1 ■ Print Date & Time*1 ■ Density adjustment*1 ■ True Type Mode*1*3 ■ Error Message Printout*1 *1 These settings are not available with Brother Laser driver for Macintosh®. *2 These settings are not available with Windows NT® 4.0 and Windows® 2000/XP. *3 These settings are not available for HL-2030 and HL-2040. Driver and software...
... Protection*1 ■ Print Date & Time*1 ■ Density adjustment*1 ■ True Type Mode*1*3 ■ Error Message Printout*1 *1 These settings are not available with Brother Laser driver for Macintosh®. *2 These settings are not available with Windows NT® 4.0 and Windows® 2000/XP. *3 These settings are not available for HL-2030 and HL-2040. Driver and software...


