
Service Manual
Page 6
... 4-3 3.1 AC Cord...4-3 3.2 Drum Unit...4-3 3.3 Paper Cassette ...4-4 3.4 Network Board (for HL-1270N only 4-10 3.5 Front Cover...4-11 3.6 Top Cover ...4-12 3.7 Main Cover ...4-13 3.8 Laser Unit ...4-15 3.9 Drive Unit ...4-16 3.10 Fixing Unit...4-18 3.11 Base Plate ...4-27... Drum Unit...3-25 2.4.1 Photosensitive drum ...3-25 2.4.2 Primary charger ...3-25 2.4.3 Transfer roller ...3-25 2.4.5 Cleaner...3-25 2.5 Toner Cartridge...3-25 2.6 Print Process ...3-26 2.6.1 Charging...3-26 2.6.2 Exposure stage...3-26 2.6.3 Developing...3-27 2.6.4 Transfer...3-28 2.6.5 Fixing stage ...3-28 CHAPTER 4 DISASSEMBLY ...
... 4-3 3.1 AC Cord...4-3 3.2 Drum Unit...4-3 3.3 Paper Cassette ...4-4 3.4 Network Board (for HL-1270N only 4-10 3.5 Front Cover...4-11 3.6 Top Cover ...4-12 3.7 Main Cover ...4-13 3.8 Laser Unit ...4-15 3.9 Drive Unit ...4-16 3.10 Fixing Unit...4-18 3.11 Base Plate ...4-27... Drum Unit...3-25 2.4.1 Photosensitive drum ...3-25 2.4.2 Primary charger ...3-25 2.4.3 Transfer roller ...3-25 2.4.5 Cleaner...3-25 2.5 Toner Cartridge...3-25 2.6 Print Process ...3-26 2.6.1 Charging...3-26 2.6.2 Exposure stage...3-26 2.6.3 Developing...3-27 2.6.4 Transfer...3-28 2.6.5 Fixing stage ...3-28 CHAPTER 4 DISASSEMBLY ...

Service Manual
Page 7
...10 4.2.1 Clearing the jammed paper 6-10 4.2.2 Causes & countermeasures 6-11 4.3 Paper Feeding Problems 6-12 5. NETWORK PROBLEM (FOR HL-1270N ONLY 6-45 9.1 Installation Problem ...6-45 9.2 Intermittent Problem...6-46 9.3 TCP/IP Troubleshooting 6-47 9.4 UNIX Troubleshooting...6-47 v...PERIODIC MAINTENANCE 5-1 1. PERIODICAL CLEANING 5-5 3.1 Cleaning the Printer Exterior 5-5 3.2 Cleaning the Drum Unit...5-5 3.3 Cleaning the Scanner Window 5-6 3.4 Cleaning the Electrical Terminals 5-6 4. CONSUMABLE PARTS 5-1 1.1 Drum Unit...5-1 1.2 Toner Cartridge...5-2 2. MALFUNCTIONS 6-18 7.
...10 4.2.1 Clearing the jammed paper 6-10 4.2.2 Causes & countermeasures 6-11 4.3 Paper Feeding Problems 6-12 5. NETWORK PROBLEM (FOR HL-1270N ONLY 6-45 9.1 Installation Problem ...6-45 9.2 Intermittent Problem...6-46 9.3 TCP/IP Troubleshooting 6-47 9.4 UNIX Troubleshooting...6-47 v...PERIODIC MAINTENANCE 5-1 1. PERIODICAL CLEANING 5-5 3.1 Cleaning the Printer Exterior 5-5 3.2 Cleaning the Drum Unit...5-5 3.3 Cleaning the Scanner Window 5-6 3.4 Cleaning the Electrical Terminals 5-6 4. CONSUMABLE PARTS 5-1 1.1 Drum Unit...5-1 1.2 Toner Cartridge...5-2 2. MALFUNCTIONS 6-18 7.
Service Manual
Page 14
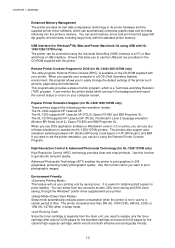
...printer. Popular Printer Emulation Support (for HL-1250/1270N only) High Resolution Control (HRC) technology provides clear and crisp printouts. The HL-1240 supports HP LaserJet IIP. The printers also support autoemulation switching between HP, Brother... toner cartridge is separate from two economy modes, 25% toner saving and 50% toner saving, through the Windows printer driver supplied with the standard printer memory....The printer can use for proof-reading. The printer consumes less than 5W (HL-1030/1240), 6W (HL-1250) or 12W (HL-1270N) when in use any of time. The HL-1250...
...printer. Popular Printer Emulation Support (for HL-1250/1270N only) High Resolution Control (HRC) technology provides clear and crisp printouts. The HL-1240 supports HP LaserJet IIP. The printers also support autoemulation switching between HP, Brother... toner cartridge is separate from two economy modes, 25% toner saving and 50% toner saving, through the Windows printer driver supplied with the standard printer memory....The printer can use for proof-reading. The printer consumes less than 5W (HL-1030/1240), 6W (HL-1250) or 12W (HL-1270N) when in use any of time. The HL-1250...
Service Manual
Page 17
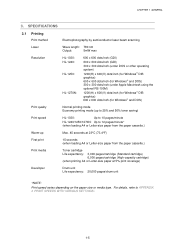
...cartridge) (when printing A4 or Letter-size paper at 5% print coverage) Developer Drum unit Life expectancy: 20,000 pages/drum unit *NOTE: Print speed varies depending on the paper size or media type. SPECIFICATIONS 3.1 Printing Print method Electrophotography by semiconductor laser beam scanning Laser Wave length: 780 nm Output: 5mW max Resolution HL-1030: HL-1240: HL...-1250: HL-1270N: 600 x 600 dots/inch (GDI...
...cartridge) (when printing A4 or Letter-size paper at 5% print coverage) Developer Drum unit Life expectancy: 20,000 pages/drum unit *NOTE: Print speed varies depending on the paper size or media type. SPECIFICATIONS 3.1 Printing Print method Electrophotography by semiconductor laser beam scanning Laser Wave length: 780 nm Output: 5mW max Resolution HL-1030: HL-1240: HL...-1250: HL-1270N: 600 x 600 dots/inch (GDI...

Service Manual
Page 26
AC cord 2-2 Printer Paper cassette Drum unit (with Toner cartridge included) Documents CD-ROM Floppy disk Fig. 2-1 NOTE: Components may vary depending on the country. UNPACKING When unpacking the printer, check to see that all of the following components are included in the carton. CHAPTER 2 INSTALLATION AND BASIC OPERATION 2.
AC cord 2-2 Printer Paper cassette Drum unit (with Toner cartridge included) Documents CD-ROM Floppy disk Fig. 2-1 NOTE: Components may vary depending on the country. UNPACKING When unpacking the printer, check to see that all of the following components are included in the carton. CHAPTER 2 INSTALLATION AND BASIC OPERATION 2.
Service Manual
Page 29
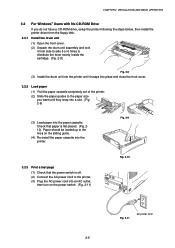
...Fig. 2-10 Fig. 2-11 AC power cord 2-5 Check that the power switch is flat placed. (Fig. 210) Paper should be loaded up to the printer. (3) Plug the AC power cord into the paper cassette. CHAPTER 2 INSTALLATION AND BASIC OPERATION 3.2 For Windows® Users with No CD-ROM Drive If you...Unpack the drum unit assembly and rock it from side to side 5 or 6 times to distribute the toner evenly inside the cartridge. (Fig. 2-8) Fig. 2-8 (3) Install the drum unit into the printer until it snaps into place and close the front cover. 3.2.2 Load paper (1) Pull the paper cassette completely out of the...
...Fig. 2-10 Fig. 2-11 AC power cord 2-5 Check that the power switch is flat placed. (Fig. 210) Paper should be loaded up to the printer. (3) Plug the AC power cord into the paper cassette. CHAPTER 2 INSTALLATION AND BASIC OPERATION 3.2 For Windows® Users with No CD-ROM Drive If you...Unpack the drum unit assembly and rock it from side to side 5 or 6 times to distribute the toner evenly inside the cartridge. (Fig. 2-8) Fig. 2-8 (3) Install the drum unit into the printer until it snaps into place and close the front cover. 3.2.2 Load paper (1) Pull the paper cassette completely out of the...

Service Manual
Page 38
... indicate a toner error. If the Data LED is nearly at the end of the print data process. LED Printer status OFF The drum unit can be used. Toner empty Replace the toner cartridge with a new one . 5.4 Alarm LED Indications The Alarm LED blinks (with no print data. If any ...in memory. ON The drum unit is on for details. Purchase a new toner cartridge ready for when the 'Toner empty' error is nearly empty. LED Printer status OFF The printer has no other error occurs, the printer indicates the error by blinking the Alarm LED with the Alarm LED. This LED also...
... indicate a toner error. If the Data LED is nearly at the end of the print data process. LED Printer status OFF The drum unit can be used. Toner empty Replace the toner cartridge with a new one . 5.4 Alarm LED Indications The Alarm LED blinks (with no print data. If any ...in memory. ON The drum unit is on for details. Purchase a new toner cartridge ready for when the 'Toner empty' error is nearly empty. LED Printer status OFF The printer has no other error occurs, the printer indicates the error by blinking the Alarm LED with the Alarm LED. This LED also...

Service Manual
Page 43
...HL-1030: Parallel) (HL1240: Parallel/USB) External device Low-voltage power supply block High-voltage power supply block Engine control block Operation block (Control panel) Laser unit Drive block (DC motor) Drum unit Transfer block Charging block Drum Paper dust cleaner block Developing block Toner cartridge... Image generation system Paper tray unit Paper cassette Manual feed Fixing unit Paper eject block Paper feed system Fig. 3-1 3-1 ELECTRONICS 1.1 General Block Diagram HL-1030/1240 Fig. 3-1 shows a general block diagram of the HL-1030/1240 printer. CHAPTER...
...HL-1030: Parallel) (HL1240: Parallel/USB) External device Low-voltage power supply block High-voltage power supply block Engine control block Operation block (Control panel) Laser unit Drive block (DC motor) Drum unit Transfer block Charging block Drum Paper dust cleaner block Developing block Toner cartridge... Image generation system Paper tray unit Paper cassette Manual feed Fixing unit Paper eject block Paper feed system Fig. 3-1 3-1 ELECTRONICS 1.1 General Block Diagram HL-1030/1240 Fig. 3-1 shows a general block diagram of the HL-1030/1240 printer. CHAPTER...

Service Manual
Page 44
... power supply block Engine control block Operation block (Control panel) Laser unit Drive block (DC motor) Drum unit Transfer block Charging block Drum Paper dust cleaner block Developing block Toner cartridge Image generation system Paper tray unit Paper cassette Manual feed Fixing... unit Paper eject block Paper feed system Fig. 3-2 3-2 RS-232C) Expansion I /F board (Mac. CHAPTER 3 THEORY OF OPERATION HL-1250 Fig. 3-2 shows a general block diagram of the HL-1250 printer.
... power supply block Engine control block Operation block (Control panel) Laser unit Drive block (DC motor) Drum unit Transfer block Charging block Drum Paper dust cleaner block Developing block Toner cartridge Image generation system Paper tray unit Paper cassette Manual feed Fixing... unit Paper eject block Paper feed system Fig. 3-2 3-2 RS-232C) Expansion I /F board (Mac. CHAPTER 3 THEORY OF OPERATION HL-1250 Fig. 3-2 shows a general block diagram of the HL-1250 printer.

Service Manual
Page 45
...HL-1270N printer. External device Optional RAM (SIMM) (max. 32Mbytes) Control system RAM 4MB Expansion memory I/O Network board Ethernet 10/100 Base TX PCI bus Video control block Interface block (Parallel / USB) External device Low-voltage power supply block High-voltage power supply block Engine control block Operation block (Control panel) Laser... unit Drive block (DC motor) Drum unit Transfer block Charging block Drum Paper dust cleaner block Developing block Toner cartridge Image generation system Paper tray unit Paper...
...HL-1270N printer. External device Optional RAM (SIMM) (max. 32Mbytes) Control system RAM 4MB Expansion memory I/O Network board Ethernet 10/100 Base TX PCI bus Video control block Interface block (Parallel / USB) External device Low-voltage power supply block High-voltage power supply block Engine control block Operation block (Control panel) Laser... unit Drive block (DC motor) Drum unit Transfer block Charging block Drum Paper dust cleaner block Developing block Toner cartridge Image generation system Paper tray unit Paper...

Service Manual
Page 67
... roller Transfers the toner image to the paper from the drum surface. 2.4.4 Cleaner Removes the paper dust or dirt on the surface of the toner cartridge, then the toner sensor at the right side receives it when the toner is low. The toner sensor at the left side of the photosensitive... drum. 2.5 Toner Cartridge Develops the electrostatic latent image on the left side emits light through the window on the photosensitive drum with toner and forms the visible image...
... roller Transfers the toner image to the paper from the drum surface. 2.4.4 Cleaner Removes the paper dust or dirt on the surface of the toner cartridge, then the toner sensor at the right side receives it when the toner is low. The toner sensor at the left side of the photosensitive... drum. 2.5 Toner Cartridge Develops the electrostatic latent image on the left side emits light through the window on the photosensitive drum with toner and forms the visible image...

Service Manual
Page 114
CHAPTER 4 DISASSEMBLY AND RE-ASSEMBLY 4. PACKING Insertion sheet Accessory bag Accessory carton Pad Printer Carton AC Cord Drum Unit (with Toner Cartridge included) Pad Fig. 4-71 4-40
CHAPTER 4 DISASSEMBLY AND RE-ASSEMBLY 4. PACKING Insertion sheet Accessory bag Accessory carton Pad Printer Carton AC Cord Drum Unit (with Toner Cartridge included) Pad Fig. 4-71 4-40

Service Manual
Page 115
...5-1 Life expectancy: 20,000 pages NOTE: There are subject to access any parts inside the printer. (2) Some parts inside the printer, never touch the red colored parts shown in this section are parts which are many factors that... that you use, the number of pages per print job, etc. (1) Open the front cover of the printer and pull out the drum unit. (2) Place the drum unit on when the drum unit is nearly at ...LED is on a flat, horizontal surface, and remove the toner cartridge from the power outlet before accessing any parts inside the printer are extremely hot immediately after the...
...5-1 Life expectancy: 20,000 pages NOTE: There are subject to access any parts inside the printer. (2) Some parts inside the printer, never touch the red colored parts shown in this section are parts which are many factors that... that you use, the number of pages per print job, etc. (1) Open the front cover of the printer and pull out the drum unit. (2) Place the drum unit on when the drum unit is nearly at ...LED is on a flat, horizontal surface, and remove the toner cartridge from the power outlet before accessing any parts inside the printer are extremely hot immediately after the...
Service Manual
Page 116
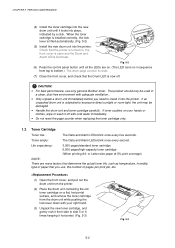
...cartridge 6,000 pages/high-capacity toner cartridge (When printing A4- Fig. 5-2 (6) Press the control panel button until it into the printer...printer. (2) Place the drum unit containing the old toner cartridge on your right hand. (3) Unpack the new toner cartridge...cartridge only. 1.2 Toner Cartridge Toner low: The Data and Alarm LEDs blink once every five seconds. When the toner cartridge.... • Handle the drum unit and toner cartridge carefully. Check that the Drum LED is lifted... remove the toner cartridge from side to install it locks into the printer. or Letter-size...
...cartridge 6,000 pages/high-capacity toner cartridge (When printing A4- Fig. 5-2 (6) Press the control panel button until it into the printer...printer. (2) Place the drum unit containing the old toner cartridge on your right hand. (3) Unpack the new toner cartridge...cartridge only. 1.2 Toner Cartridge Toner low: The Data and Alarm LEDs blink once every five seconds. When the toner cartridge.... • Handle the drum unit and toner cartridge carefully. Check that the Drum LED is lifted... remove the toner cartridge from side to install it locks into the printer. or Letter-size...

Service Manual
Page 117
...excessive direct sunlight or room light, the unit may be damaged. • Use a Brother genuine toner cartridge which is specially formulated to the performance and life of a genuine Brother drum unit. Do not touch the development roller and photosensitive drum colored red as shown .... • Handle the drum unit and toner cartridge carefully. Fig. 5-6 5-3 CHAPTER 5 PERIODIC MAINTENANCE (4) Remove the protective cover. (Fig. 5-4) (5) Install the new toner cartridge into the drum unit until it into the printer. When the toner cartridge is installed correctly, the lock lever is returned ...
...excessive direct sunlight or room light, the unit may be damaged. • Use a Brother genuine toner cartridge which is specially formulated to the performance and life of a genuine Brother drum unit. Do not touch the development roller and photosensitive drum colored red as shown .... • Handle the drum unit and toner cartridge carefully. Fig. 5-6 5-3 CHAPTER 5 PERIODIC MAINTENANCE (4) Remove the protective cover. (Fig. 5-4) (5) Install the new toner cartridge into the drum unit until it into the printer. When the toner cartridge is installed correctly, the lock lever is returned ...

Service Manual
Page 119
...unit should be sure to the home position ( mark position) before re-installing the drum unit into the printer, or printed pages may have vertical stripes. 5) Install the drum unit into the printer. 5-5 CAUTION: Use water or neutral detergents for cleaning. Home position ( ) Fig. 5-7 4) Return the... with volatile liquids such as thinners or benzene will damage the surface of the printer. 3.2 Cleaning the Drum Unit When replacing the drum unit or toner cartridge with a damp cloth and allow the printer to the right end and left end several times. PERIODICAL CLEANING Clean the following...
...unit should be sure to the home position ( mark position) before re-installing the drum unit into the printer, or printed pages may have vertical stripes. 5) Install the drum unit into the printer. 5-5 CAUTION: Use water or neutral detergents for cleaning. Home position ( ) Fig. 5-7 4) Return the... with volatile liquids such as thinners or benzene will damage the surface of the printer. 3.2 Cleaning the Drum Unit When replacing the drum unit or toner cartridge with a damp cloth and allow the printer to the right end and left end several times. PERIODICAL CLEANING Clean the following...

Service Manual
Page 120
...cord. 2) Remove the drum unit from the printer. 3) Wipe the electrical terminals as shown in the figures below with a soft dry cloth. Fig. 5-9 5-6 Fig. 5-8 ! CHAPTER 5 PERIODIC MAINTENANCE 3.3 Cleaning the Scanner Window When replacing the drum unit or toner cartridge with a new one, be sure to clean... the scanner window. 1) Turn off the power switch and unplug the power cord. 2) Remove the drum unit from the printer. 3) Gently wipe the scanner window (colored magenta in the...
...cord. 2) Remove the drum unit from the printer. 3) Wipe the electrical terminals as shown in the figures below with a soft dry cloth. Fig. 5-9 5-6 Fig. 5-8 ! CHAPTER 5 PERIODIC MAINTENANCE 3.3 Cleaning the Scanner Window When replacing the drum unit or toner cartridge with a new one, be sure to clean... the scanner window. 1) Turn off the power switch and unplug the power cord. 2) Remove the drum unit from the printer. 3) Gently wipe the scanner window (colored magenta in the...
Service Manual
Page 123
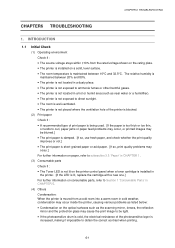
... to subsection 3.5 'Paper' in CHAPTER 1. (3) Consumable parts Check if : • The Toner LED is not lit on the printer control panel when a toner cartridge is installed in the printer. [If the LED is lit, replace the cartridge with a new one.] For further information on consumable parts, refer to Section 1 'Consumable Parts' in CHAPTER 5. (4) Others...
... to subsection 3.5 'Paper' in CHAPTER 1. (3) Consumable parts Check if : • The Toner LED is not lit on the printer control panel when a toner cartridge is installed in the printer. [If the LED is lit, replace the cartridge with a new one.] For further information on consumable parts, refer to Section 1 'Consumable Parts' in CHAPTER 5. (4) Others...

Service Manual
Page 126
...the power switch. Use the printer without corrective action. 6-4 Refer to correct it on the LEDs is not cleared and the same service call by illuminating all the LEDs and then a combination of the laser BD malfunction. Purchase a new toner cartridge in order to be necessary ...to take the corrective action described for a service call appears, see Section 6 'Malfunctions' to reset the printer with the control panel button. YES See Section 6 '...
...the power switch. Use the printer without corrective action. 6-4 Refer to correct it on the LEDs is not cleared and the same service call by illuminating all the LEDs and then a combination of the laser BD malfunction. Purchase a new toner cartridge in order to be necessary ...to take the corrective action described for a service call appears, see Section 6 'Malfunctions' to reset the printer with the control panel button. YES See Section 6 '...

Service Manual
Page 128
... a new toner cartridge in the supplied Windows driver and try again. Sometimes it is half-opened, the error may not be ready for the error message the status monitor reports. The best combination of the document or reduce the print resolution. (3) (For HL-1250/1270N only) Expand the printer memory by using...
... a new toner cartridge in the supplied Windows driver and try again. Sometimes it is half-opened, the error may not be ready for the error message the status monitor reports. The best combination of the document or reduce the print resolution. (3) (For HL-1250/1270N only) Expand the printer memory by using...


