
Service Manual
Page 6
... ...4-12 3.7 Main Cover ...4-13 3.8 Laser Unit ...4-15 3.9 Drive Unit ...4-16 3.10 Fixing Unit...4-18 3.11 Base Plate ...4-27 3.12 Main PCB ASSY ...4-29 3.13 Lower Tray Relay PCB ASSY (for HL-1250/1270N only 4-29 3.14 Low-... 2.2.3 Paper eject ...3-24 2.3 Sensors ...3-24 2.3.1 Cover sensors A and B 3-24 2.3.2 Toner sensor ...3-25 2.4 Drum Unit...3-25 2.4.1 Photosensitive drum ...3-25 2.4.2 Primary charger ...3-25 2.4.3 Transfer roller ...3-25 2.4.5 Cleaner...3-25 2.5 Toner Cartridge...3-25 2.6 Print Process ...3-26 2.6.1 Charging...3-26 2.6.2 Exposure stage...3-26 2.6.3 Developing...3-27 2.6.4 ...
... ...4-12 3.7 Main Cover ...4-13 3.8 Laser Unit ...4-15 3.9 Drive Unit ...4-16 3.10 Fixing Unit...4-18 3.11 Base Plate ...4-27 3.12 Main PCB ASSY ...4-29 3.13 Lower Tray Relay PCB ASSY (for HL-1250/1270N only 4-29 3.14 Low-... 2.2.3 Paper eject ...3-24 2.3 Sensors ...3-24 2.3.1 Cover sensors A and B 3-24 2.3.2 Toner sensor ...3-25 2.4 Drum Unit...3-25 2.4.1 Photosensitive drum ...3-25 2.4.2 Primary charger ...3-25 2.4.3 Transfer roller ...3-25 2.4.5 Cleaner...3-25 2.5 Toner Cartridge...3-25 2.6 Print Process ...3-26 2.6.1 Charging...3-26 2.6.2 Exposure stage...3-26 2.6.3 Developing...3-27 2.6.4 ...

Service Manual
Page 7
CONSUMABLE PARTS 5-1 1.1 Drum Unit...5-1 1.2 Toner Cartridge...5-2 2. PERIODICAL CLEANING 5-5 3.1 Cleaning the Printer Exterior 5-5 3.2 Cleaning the Drum Unit...5-5 3.3 Cleaning the Scanner Window 5-6 3.4 Cleaning the Electrical Terminals 5-6 4. MALFUNCTIONS 6-18 7. NETWORK PROBLEM (FOR HL-1270N ONLY 6-45 9.1 Installation Problem ...6-45 9.2 Intermittent Problem...6-46 9.3 TCP/IP Troubleshooting 6-47 9.4 UNIX Troubleshooting...6-47 v INTRODUCTION ...6-1 1.1 Initial Check ...6-1 1.2 Warnings for Maintenance Work 6-2 1.3 Identify the...
CONSUMABLE PARTS 5-1 1.1 Drum Unit...5-1 1.2 Toner Cartridge...5-2 2. PERIODICAL CLEANING 5-5 3.1 Cleaning the Printer Exterior 5-5 3.2 Cleaning the Drum Unit...5-5 3.3 Cleaning the Scanner Window 5-6 3.4 Cleaning the Electrical Terminals 5-6 4. MALFUNCTIONS 6-18 7. NETWORK PROBLEM (FOR HL-1270N ONLY 6-45 9.1 Installation Problem ...6-45 9.2 Intermittent Problem...6-46 9.3 TCP/IP Troubleshooting 6-47 9.4 UNIX Troubleshooting...6-47 v INTRODUCTION ...6-1 1.1 Initial Check ...6-1 1.2 Warnings for Maintenance Work 6-2 1.3 Identify the...
Service Manual
Page 14
... Universal Serial Bus (USB) interface to a PC or Mac which has a USB interface. The HL-1240 supports HP LaserJet IIP. The printers also support autoemulation switching between HP, Brother BR-Script 2 and Epson or HP, BR-Script 2 and IBM. USB Interface (for a certain...printer status while running in the background and report the current status or errors on the CD-ROM supplied with the standard printer memory. The printer consumes less than 5W (HL-1030/1240), 6W (HL-1250) or 12W (HL-1270N) when in 256 grayscales, producing nearly photographic quality. Since the toner cartridge...
... Universal Serial Bus (USB) interface to a PC or Mac which has a USB interface. The HL-1240 supports HP LaserJet IIP. The printers also support autoemulation switching between HP, Brother BR-Script 2 and Epson or HP, BR-Script 2 and IBM. USB Interface (for a certain...printer status while running in the background and report the current status or errors on the CD-ROM supplied with the standard printer memory. The printer consumes less than 5W (HL-1030/1240), 6W (HL-1250) or 12W (HL-1270N) when in 256 grayscales, producing nearly photographic quality. Since the toner cartridge...
Service Manual
Page 17
... 15 seconds (when loading A4 or Letter-size paper from the paper cassette.) Print media Toner cartridge Life expectancy: 3,000 pages/cartridge (Standard cartridge) 6,000 pages/cartridge (High-capacity cartridge) (when printing A4 or Letter-size paper at 5% print coverage) Developer Drum unit Life... size or media type. CHAPTER 1 GENERAL 3. SPECIFICATIONS 3.1 Printing Print method Electrophotography by semiconductor laser beam scanning Laser Wave length: 780 nm Output: 5mW max Resolution HL-1030: HL-1240: HL-1250: HL-1270N: 600 x 600 dots/inch (GDI) 600 x 600 dots/inch (GDI) 300 ...
... 15 seconds (when loading A4 or Letter-size paper from the paper cassette.) Print media Toner cartridge Life expectancy: 3,000 pages/cartridge (Standard cartridge) 6,000 pages/cartridge (High-capacity cartridge) (when printing A4 or Letter-size paper at 5% print coverage) Developer Drum unit Life... size or media type. CHAPTER 1 GENERAL 3. SPECIFICATIONS 3.1 Printing Print method Electrophotography by semiconductor laser beam scanning Laser Wave length: 780 nm Output: 5mW max Resolution HL-1030: HL-1240: HL-1250: HL-1270N: 600 x 600 dots/inch (GDI) 600 x 600 dots/inch (GDI) 300 ...

Service Manual
Page 26
AC cord 2-2 UNPACKING When unpacking the printer, check to see that all of the following components are included in the carton. Printer Paper cassette Drum unit (with Toner cartridge included) Documents CD-ROM Floppy disk Fig. 2-1 NOTE: Components may vary depending on the country. CHAPTER 2 INSTALLATION AND BASIC OPERATION 2.
AC cord 2-2 UNPACKING When unpacking the printer, check to see that all of the following components are included in the carton. Printer Paper cassette Drum unit (with Toner cartridge included) Documents CD-ROM Floppy disk Fig. 2-1 NOTE: Components may vary depending on the country. CHAPTER 2 INSTALLATION AND BASIC OPERATION 2.

Service Manual
Page 38
.... This LED also works as "cover open" or "memory full". Error Action Toner low Indicates that the toner cartridge is processing data in CHAPTER 6. 2-14 Blinking The printer is receiving data from the computer or the printer is nearly empty. Toner empty Replace the toner cartridge with a new one . 5.4 Alarm LED Indications The Alarm LED blinks (with another...
.... This LED also works as "cover open" or "memory full". Error Action Toner low Indicates that the toner cartridge is processing data in CHAPTER 6. 2-14 Blinking The printer is receiving data from the computer or the printer is nearly empty. Toner empty Replace the toner cartridge with a new one . 5.4 Alarm LED Indications The Alarm LED blinks (with another...

Service Manual
Page 43
... printer. Control system RAM 2MB Video control block Interface block (HL-1030: Parallel) (HL1240: Parallel/USB) External device Low-voltage power supply block High-voltage power supply block Engine control block Operation block (Control panel) Laser unit Drive block (DC motor) Drum unit Transfer block Charging block Drum Paper dust cleaner block Developing block Toner cartridge...
... printer. Control system RAM 2MB Video control block Interface block (HL-1030: Parallel) (HL1240: Parallel/USB) External device Low-voltage power supply block High-voltage power supply block Engine control block Operation block (Control panel) Laser unit Drive block (DC motor) Drum unit Transfer block Charging block Drum Paper dust cleaner block Developing block Toner cartridge...

Service Manual
Page 44
...) Laser unit Drive block (DC motor) Drum unit Transfer block Charging block Drum Paper dust cleaner block Developing block Toner cartridge Image generation system Paper tray unit Paper cassette Manual feed Fixing unit Paper eject block Paper feed system Fig. 3-2 3-2 CHAPTER 3 THEORY OF OPERATION HL-1250 Fig. 3-2 shows a general block diagram of the HL-1250 printer.
...) Laser unit Drive block (DC motor) Drum unit Transfer block Charging block Drum Paper dust cleaner block Developing block Toner cartridge Image generation system Paper tray unit Paper cassette Manual feed Fixing unit Paper eject block Paper feed system Fig. 3-2 3-2 CHAPTER 3 THEORY OF OPERATION HL-1250 Fig. 3-2 shows a general block diagram of the HL-1250 printer.

Service Manual
Page 45
...) Laser unit Drive block (DC motor) Drum unit Transfer block Charging block Drum Paper dust cleaner block Developing block Toner cartridge Image generation system Paper tray unit Paper cassette Manual feed Fixing unit Paper eject block Paper feed system Fig. 3-3 3-3 CHAPTER 3 THEORY OF OPERATION HL-1270N Fig. 3-3 shows a general block diagram of the HL-1270N printer.
...) Laser unit Drive block (DC motor) Drum unit Transfer block Charging block Drum Paper dust cleaner block Developing block Toner cartridge Image generation system Paper tray unit Paper cassette Manual feed Fixing unit Paper eject block Paper feed system Fig. 3-3 3-3 CHAPTER 3 THEORY OF OPERATION HL-1270N Fig. 3-3 shows a general block diagram of the HL-1270N printer.

Service Manual
Page 67
...ion charge evenly over the drum surface. 2.4.3 Transfer roller Transfers the toner image to the paper from the drum surface. 2.4.4 Cleaner Removes the paper dust or dirt on the surface of the toner cartridge, then the toner sensor at the left side emits light through the window on the ...left side of the photosensitive drum. 2.5 Toner Cartridge Develops the electrostatic latent image on the photosensitive drum with toner and forms the visible image. 3-25 The toner sensor at the right side receives it when the toner is installed in the toner cartridge. They also detect whether or not the ...
...ion charge evenly over the drum surface. 2.4.3 Transfer roller Transfers the toner image to the paper from the drum surface. 2.4.4 Cleaner Removes the paper dust or dirt on the surface of the toner cartridge, then the toner sensor at the left side emits light through the window on the ...left side of the photosensitive drum. 2.5 Toner Cartridge Develops the electrostatic latent image on the photosensitive drum with toner and forms the visible image. 3-25 The toner sensor at the right side receives it when the toner is installed in the toner cartridge. They also detect whether or not the ...

Service Manual
Page 114
PACKING Insertion sheet Accessory bag Accessory carton Pad Printer Carton AC Cord Drum Unit (with Toner Cartridge included) Pad Fig. 4-71 4-40 CHAPTER 4 DISASSEMBLY AND RE-ASSEMBLY 4.
PACKING Insertion sheet Accessory bag Accessory carton Pad Printer Carton AC Cord Drum Unit (with Toner Cartridge included) Pad Fig. 4-71 4-40 CHAPTER 4 DISASSEMBLY AND RE-ASSEMBLY 4.

Service Manual
Page 115
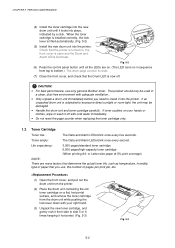
... any print quality problem appears. 1.1 Drum Unit The Drum LED is on a flat, horizontal surface, and remove the toner cartridge from the power outlet before accessing any parts inside the printer are many factors that determine the actual drum life, such as temperature, humidity, type of paper and... toner that you use, the number of pages per print job, etc. (1) Open the front cover of its life. Fig. 5-1 5-1 ...
... any print quality problem appears. 1.1 Drum Unit The Drum LED is on a flat, horizontal surface, and remove the toner cartridge from the power outlet before accessing any parts inside the printer are many factors that determine the actual drum life, such as temperature, humidity, type of paper and... toner that you use, the number of pages per print job, etc. (1) Open the front cover of its life. Fig. 5-1 5-1 ...
Service Manual
Page 116
...five seconds. The product should only be damaged. • Handle the drum unit and toner cartridge carefully. Check that the printer is turned on, the front cover is lifted automatically. (Fig. 5-2) (5) Install ...Brother toner. Life expectancy: 3,000 pages/standard toner cartridge 6,000 pages/high-capacity toner cartridge (When printing A4- CHAPTER 5 PERIODIC MAINTENANCE (4) Install the toner cartridge into the new drum unit until all the LEDs are many factors that determine the actual toner life, such as temperature, humidity, type of paper that you need to install it into the printer...
...five seconds. The product should only be damaged. • Handle the drum unit and toner cartridge carefully. Check that the printer is turned on, the front cover is lifted automatically. (Fig. 5-2) (5) Install ...Brother toner. Life expectancy: 3,000 pages/standard toner cartridge 6,000 pages/high-capacity toner cartridge (When printing A4- CHAPTER 5 PERIODIC MAINTENANCE (4) Install the toner cartridge into the new drum unit until all the LEDs are many factors that determine the actual toner life, such as temperature, humidity, type of paper that you need to install it into the printer...

Service Manual
Page 117
..., the unit may be damaged. • Use a Brother genuine toner cartridge which is returned to the home position ( mark position) before re-installing the drum unit into the printer, or printed pages may have vertical stripes. (Refer to Fig. 5-5.) • Install the toner cartridge immediately after removing the toner cartridge to the home position before you remove the...
..., the unit may be damaged. • Use a Brother genuine toner cartridge which is returned to the home position ( mark position) before re-installing the drum unit into the printer, or printed pages may have vertical stripes. (Refer to Fig. 5-5.) • Install the toner cartridge immediately after removing the toner cartridge to the home position before you remove the...

Service Manual
Page 119
... dust away from the printer. 3) Clean the primary corona wire inside the drum unit by a service technician. Cleaning with volatile liquids such as thinners or benzene will damage the surface of the printer. 3.2 Cleaning the Drum Unit When replacing the drum unit or toner cartridge with a damp cloth and... allow the printer to dry completely before turning the power on the drum unit is returned to the...
... dust away from the printer. 3) Clean the primary corona wire inside the drum unit by a service technician. Cleaning with volatile liquids such as thinners or benzene will damage the surface of the printer. 3.2 Cleaning the Drum Unit When replacing the drum unit or toner cartridge with a damp cloth and... allow the printer to dry completely before turning the power on the drum unit is returned to the...

Service Manual
Page 120
...5 PERIODIC MAINTENANCE 3.3 Cleaning the Scanner Window When replacing the drum unit or toner cartridge with a new one, be sure to clean the scanner window. 1) Turn off the power switch and unplug the power cord. 2) Remove the drum unit from the printer. 3) Gently wipe the scanner window (colored magenta in the figure below ) ... with cleaning alcohol (isopropyl). 3.4 Clean the Electrical Terminals To obtain the best print performance, be sure to clean the electrical terminals inside the printer body. 1) Turn off the power switch and unplug the power cord. 2) Remove the drum unit from the...
...5 PERIODIC MAINTENANCE 3.3 Cleaning the Scanner Window When replacing the drum unit or toner cartridge with a new one, be sure to clean the scanner window. 1) Turn off the power switch and unplug the power cord. 2) Remove the drum unit from the printer. 3) Gently wipe the scanner window (colored magenta in the figure below ) ... with cleaning alcohol (isopropyl). 3.4 Clean the Electrical Terminals To obtain the best print performance, be sure to clean the electrical terminals inside the printer body. 1) Turn off the power switch and unplug the power cord. 2) Remove the drum unit from the...
Service Manual
Page 123
... information on paper, refer to subsection 3.5 'Paper' in CHAPTER 1. (3) Consumable parts Check if : • The Toner LED is not lit on the printer control panel when a toner cartridge is installed in the printer. [If the LED is lit, replace the cartridge with a new one.] For further information on consumable parts, refer to Section 1 'Consumable Parts' in...
... information on paper, refer to subsection 3.5 'Paper' in CHAPTER 1. (3) Consumable parts Check if : • The Toner LED is not lit on the printer control panel when a toner cartridge is installed in the printer. [If the LED is lit, replace the cartridge with a new one.] For further information on consumable parts, refer to Section 1 'Consumable Parts' in...

Service Manual
Page 126
... panel button. YES See Section 6 'Malfunction'. Press the panel button if the printer does not automatically resume printing. Indicates that the toner cartridge is not cleared even after closing it again. Confirm the LED indication. LED Indication...of the laser BD malfunction. Error occurs. Use the printer without corrective action. 6-4 Identify the error from most errors, but it may have occurred. Purchase a new toner cartridge in Section 6. Replace the toner cartridge with the control panel button. Temporary error. The printer automatically ...
... panel button. YES See Section 6 'Malfunction'. Press the panel button if the printer does not automatically resume printing. Indicates that the toner cartridge is not cleared even after closing it again. Confirm the LED indication. LED Indication...of the laser BD malfunction. Error occurs. Use the printer without corrective action. 6-4 Identify the error from most errors, but it may have occurred. Purchase a new toner cartridge in Section 6. Replace the toner cartridge with the control panel button. Temporary error. The printer automatically ...

Service Manual
Page 128
... nearly empty. Purchase a new toner cartridge in depth. (5) Check that the toner cartridge is a specified type of settings below 27mm in order to be cleared even after closing it before printing to print the data remaining in the printer. (2) Reduce the complexity of the document. (3) (For HL-1250/1270N only) Expand the printer memory by adding a commercially...
... nearly empty. Purchase a new toner cartridge in depth. (5) Check that the toner cartridge is a specified type of settings below 27mm in order to be cleared even after closing it before printing to print the data remaining in the printer. (2) Reduce the complexity of the document. (3) (For HL-1250/1270N only) Expand the printer memory by adding a commercially...

Service Manual
Page 146
... the whole page is replaced with a full one? I-1 Light User Check (1) Check the printer's environment. Possible cause Toner sensing failure (printer side) Toner sensing failure (toner cartridge side) Drum connection failure High-voltage power supply PCB failure Engine PCB / Main PCB failure ... Can printing be cleared by end users. Replace the laser unit. Are all the contacts between the drum unit and printer body connected correctly? Is the problem solved after the toner cartridge is light, toner save mode within Printer Properties tab of the grounding contacts. ! Clean contact...
... the whole page is replaced with a full one? I-1 Light User Check (1) Check the printer's environment. Possible cause Toner sensing failure (printer side) Toner sensing failure (toner cartridge side) Drum connection failure High-voltage power supply PCB failure Engine PCB / Main PCB failure ... Can printing be cleared by end users. Replace the laser unit. Are all the contacts between the drum unit and printer body connected correctly? Is the problem solved after the toner cartridge is light, toner save mode within Printer Properties tab of the grounding contacts. ! Clean contact...


