
Service Manual
Page 4
CONDITIONS REQUIRED FOR INSTALLATION 2-1 1.1 Power Supply...2-1 1.2 Environment...2-1 1.3 System Requirements for Brother Printer Solution for HL-1270N only 1-8 3.5 Paper ...1-8 3.5.1 Feedable paper...1-8 3.5.2 Paper cassette capacity...1-10 3.5.3 Print delivery ...1-10 ... a test page...2-5 3.2.4 Connect the printer and the computer 2-6 3.2.5 Install the printer driver from floppy disk 2-6 3.3 Using the USB Interface (for Windows® 98 only 2-7 3.3.1 Connect the USB interface cable 2-7 3.3.2 Install the USB driver ...2-7 3.3.3 Set the PC printer port ...2-9 3.4 For Macintosh (iMac ...
CONDITIONS REQUIRED FOR INSTALLATION 2-1 1.1 Power Supply...2-1 1.2 Environment...2-1 1.3 System Requirements for Brother Printer Solution for HL-1270N only 1-8 3.5 Paper ...1-8 3.5.1 Feedable paper...1-8 3.5.2 Paper cassette capacity...1-10 3.5.3 Print delivery ...1-10 ... a test page...2-5 3.2.4 Connect the printer and the computer 2-6 3.2.5 Install the printer driver from floppy disk 2-6 3.3 Using the USB Interface (for Windows® 98 only 2-7 3.3.1 Connect the USB interface cable 2-7 3.3.2 Install the USB driver ...2-7 3.3.3 Set the PC printer port ...2-9 3.4 For Macintosh (iMac ...
Service Manual
Page 13
...CHAPTER1 GENERAL 1. You can easily install them into your Windows system using bi-directional parallel communications. It is launched automatically when this printer driver is recommended. True 600 x 600 dots per inch (dpi) and 1200 x 600 dots per inch (dpi) (PCL mode) with Bi-...directional Parallel Interface The printer driver can use a variety of types and sizes of your printer. IEEE-1284 bi-directional parallel printer cable is selected. Quick Print Setup The Quick Print Setup is a convenient utility to allow ...
...CHAPTER1 GENERAL 1. You can easily install them into your Windows system using bi-directional parallel communications. It is launched automatically when this printer driver is recommended. True 600 x 600 dots per inch (dpi) and 1200 x 600 dots per inch (dpi) (PCL mode) with Bi-...directional Parallel Interface The printer driver can use a variety of types and sizes of your printer. IEEE-1284 bi-directional parallel printer cable is selected. Quick Print Setup The Quick Print Setup is a convenient utility to allow ...
Service Manual
Page 14
...through the Windows printer driver supplied with the standard printer memory. When you operate your computer in the background and report the current status or errors on your printer. The HL-1240 supports HP LaserJet IIP. The printers also support autoemulation switching between HP, Brother BR-Script 2 and... language emulation (Brother BR-Script Level 2), Epson FX-850 and IBM Proprinter XL. Since the toner cartridge is available on the CD-ROM supplied with your printing cost by saving toner. The printer consumes less than 5W (HL-1030/1240), 6W (HL-1250) or 12W (HL-1270N) when in...
...through the Windows printer driver supplied with the standard printer memory. When you operate your computer in the background and report the current status or errors on your printer. The HL-1240 supports HP LaserJet IIP. The printers also support autoemulation switching between HP, Brother BR-Script 2 and... language emulation (Brother BR-Script Level 2), Epson FX-850 and IBM Proprinter XL. Since the toner cartridge is available on the CD-ROM supplied with your printing cost by saving toner. The printer consumes less than 5W (HL-1030/1240), 6W (HL-1250) or 12W (HL-1270N) when in...

Service Manual
Page 18
... 3.2 Functions CPU Emulation Printer driver Interface Memory Control panel Diagnostics HL-1030/1240: MB86833 66MHz HL-1250/1270N: MB86832 66MHz HL-1030: HL-1240: HL-1250: HL-1270N: Brother Printing Solution for Windows® Brother Printing Solution for Windows® HP LaserJet IIP (PCL level 4) Brother Printing Solution for Windows...; Automatic emulation selection among HP LaserJet 6P (PCL level 6), EPSON FX-850 or IBM Proprinter XL Brother Printing Solution for HL-1270N only) HL-1030/1240: HL-1250/1270N: 2.0 Mbytes No memory expansion is effective.) Height: 35.0 mm (1.38 inches) or...
... 3.2 Functions CPU Emulation Printer driver Interface Memory Control panel Diagnostics HL-1030/1240: MB86833 66MHz HL-1250/1270N: MB86832 66MHz HL-1030: HL-1240: HL-1250: HL-1270N: Brother Printing Solution for Windows® Brother Printing Solution for Windows® HP LaserJet IIP (PCL level 4) Brother Printing Solution for Windows...; Automatic emulation selection among HP LaserJet 6P (PCL level 6), EPSON FX-850 or IBM Proprinter XL Brother Printing Solution for HL-1270N only) HL-1030/1240: HL-1250/1270N: 2.0 Mbytes No memory expansion is effective.) Height: 35.0 mm (1.38 inches) or...

Service Manual
Page 20
... • BRAdmin32 management utility (for Windows 95/98/NT 4.0) • Port driver for Windows 95/98/NT 4.0 LPR port driver (for Windows 95/98 only) NetBIOS port driver SMTP port driver 3.5 Paper 3.5.1 Feedable paper (1) Type & size Feeding source Paper type Paper size Paper cassette... Transparencies A4, Letter Other sizes 70-216 x 116-356 mm (2.75-8.5 x 4.57-14 inches) Optional lower Normal paper paper cassette Transparencies (HL-1250/1270N only) A4, Letter, B5 (ISO), A5, Executive, Legal* *NOTE: Legal-size paper can be printed with the standard paper ...
... • BRAdmin32 management utility (for Windows 95/98/NT 4.0) • Port driver for Windows 95/98/NT 4.0 LPR port driver (for Windows 95/98 only) NetBIOS port driver SMTP port driver 3.5 Paper 3.5.1 Feedable paper (1) Type & size Feeding source Paper type Paper size Paper cassette... Transparencies A4, Letter Other sizes 70-216 x 116-356 mm (2.75-8.5 x 4.57-14 inches) Optional lower Normal paper paper cassette Transparencies (HL-1250/1270N only) A4, Letter, B5 (ISO), A5, Executive, Legal* *NOTE: Legal-size paper can be printed with the standard paper ...

Service Manual
Page 25
... a well ventilation room. • Place the printer on a flat, horizontal surface. • Keep the printer clean. Do not place the printer in the side cover. 1.3 System Requirements for Brother Printer Solution for Windows Check the following system requirements to setup and operate the printer using Brother Printing Solution for the printer driver and all fonts. • Microsoft Windows...
... a well ventilation room. • Place the printer on a flat, horizontal surface. • Keep the printer clean. Do not place the printer in the side cover. 1.3 System Requirements for Brother Printer Solution for Windows Check the following system requirements to setup and operate the printer using Brother Printing Solution for the printer driver and all fonts. • Microsoft Windows...

Service Manual
Page 27
...HL-1240 model. Then, type D:\START in Windows 95/98/NT4.0. NOTE: • If the opening screen will appear automatically in the command line box and click OK. (If your CD-ROM drive is not D, type the correct drive letter instead of your printer. (5) Select the language you can install the printer driver... instead of "D".) • The setup screens shown below are contained on your computer. INSTALL THE PRINTER You need to implement hardware setup and driver installation to use the printer. If you do not have a CD-ROM drive, you want, then follow the instructions on ...
...HL-1240 model. Then, type D:\START in Windows 95/98/NT4.0. NOTE: • If the opening screen will appear automatically in the command line box and click OK. (If your CD-ROM drive is not D, type the correct drive letter instead of your printer. (5) Select the language you can install the printer driver... instead of "D".) • The setup screens shown below are contained on your computer. INSTALL THE PRINTER You need to implement hardware setup and driver installation to use the printer. If you do not have a CD-ROM drive, you want, then follow the instructions on ...
Service Manual
Page 28
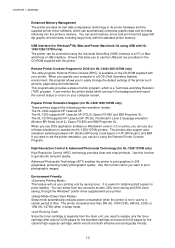
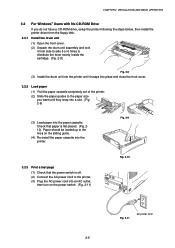
...98 only)'. 2-4 Fig. 2-4 (8) Click the interface cable you can view the Initial Setup operations in the video movie. Fig. 2-6 Fig. 2-7 If your printer using a parallel interface cable, the setup is now completed. Follow the onscreen messages to use, Parallel or USB. Fig. 2-5 (9) If you click the ...are going to complete the installation. CHAPTER 2 INSTALLATION AND BASIC OPERATION (6) Click the Initial Setup button. (7) You can install the printer driver immediately. (10) After the printer driver has been installed, the HL-1030, HL-1240, HL-1250 or HL1270N window will appear.
...98 only)'. 2-4 Fig. 2-4 (8) Click the interface cable you can view the Initial Setup operations in the video movie. Fig. 2-6 Fig. 2-7 If your printer using a parallel interface cable, the setup is now completed. Follow the onscreen messages to use, Parallel or USB. Fig. 2-5 (9) If you click the ...are going to complete the installation. CHAPTER 2 INSTALLATION AND BASIC OPERATION (6) Click the Initial Setup button. (7) You can install the printer driver immediately. (10) After the printer driver has been installed, the HL-1030, HL-1240, HL-1250 or HL1270N window will appear.
Service Manual
Page 29
... OPERATION 3.2 For Windows® Users with No CD-ROM Drive If you do not have a CD-ROM drive, setup the printer following the steps below, then install the printer driver from the floppy disk. 3.2.1 Install the drum unit (1) Open the front cover. (2) Unpack the drum unit assembly and rock ...it from side to side 5 or 6 times to distribute the toner evenly inside the cartridge. (Fig. 2-8) Fig. 2-8 (3) Install the drum unit into the printer until it ...
... OPERATION 3.2 For Windows® Users with No CD-ROM Drive If you do not have a CD-ROM drive, setup the printer following the steps below, then install the printer driver from the floppy disk. 3.2.1 Install the drum unit (1) Open the front cover. (2) Unpack the drum unit assembly and rock ...it from side to side 5 or 6 times to distribute the toner evenly inside the cartridge. (Fig. 2-8) Fig. 2-8 (3) Install the drum unit into the printer until it ...

Service Manual
Page 30
... to lit. (Fig. 2-12) (5) Press the control panel button. Parallel interface cable Fig. 2-12 Fig. 2-13 3.2.5 Install the printer driver from blinking to secure the parallel interface cable. (4) Turn on the screen. In Windows 3.1 i) Click File menu in the Program Manager ...If the "Add New Hardware Wizard" window appears, click the Cancel button. (2) Insert the supplied floppy disk into the floppy disk drive. (3) Install the printer driver using the Setup.exe file. ii) Type A:\SETUP click OK. (If your floppy disk drive is not A, insert the correct drive letter instead of 'A'.) ...
... to lit. (Fig. 2-12) (5) Press the control panel button. Parallel interface cable Fig. 2-12 Fig. 2-13 3.2.5 Install the printer driver from blinking to secure the parallel interface cable. (4) Turn on the screen. In Windows 3.1 i) Click File menu in the Program Manager ...If the "Add New Hardware Wizard" window appears, click the Cancel button. (2) Insert the supplied floppy disk into the floppy disk drive. (3) Install the printer driver using the Setup.exe file. ii) Type A:\SETUP click OK. (If your floppy disk drive is not A, insert the correct drive letter instead of 'A'.) ...

Service Manual
Page 31
...Select "Search for the best driver for Windows 98 only) For the HL-1240/1250/1270N printers, the USB interface cable can be connected between the printer and PC. Fig. 2-15 Fig. 2-16 2-7 Click the Next button. Click the Next button. Prepare the printer to use the USB interface ... below; 3.3.1 Connect the USB interface cable (1) Check that the printer power switch is on. (2) Connect the USB interface cable to the computer, then connect it to the printer. (Fig. 2-14) USB interface cable 3.3.2 Install the USB driver (1) The "Add New Hardware Wizard" window will appear. CHAPTER...
...Select "Search for the best driver for Windows 98 only) For the HL-1240/1250/1270N printers, the USB interface cable can be connected between the printer and PC. Fig. 2-15 Fig. 2-16 2-7 Click the Next button. Click the Next button. Prepare the printer to use the USB interface ... below; 3.3.1 Connect the USB interface cable (1) Check that the printer power switch is on. (2) Connect the USB interface cable to the computer, then connect it to the printer. (Fig. 2-14) USB interface cable 3.3.2 Install the USB driver (1) The "Add New Hardware Wizard" window will appear. CHAPTER...

Service Manual
Page 32
CHAPTER 2 INSTALLATION AND BASIC OPERATION (3) Insert the supplied CD-ROM into the CDROM drive and select "CD-ROM drive". Fig. 2-17 (5) Click the Finish button. Fig. 2-18 (6) Click the Yes button, then your PC will be installed. Fig. 2-19 Fig. 2-20 2-8 Click the Next button. (4) Click the Next button, then the USB driver will restart.
CHAPTER 2 INSTALLATION AND BASIC OPERATION (3) Insert the supplied CD-ROM into the CDROM drive and select "CD-ROM drive". Fig. 2-17 (5) Click the Finish button. Fig. 2-18 (6) Click the Yes button, then your PC will be installed. Fig. 2-19 Fig. 2-20 2-8 Click the Next button. (4) Click the Next button, then the USB driver will restart.

Service Manual
Page 33
...22 (2) Click the "Instructional Video" icon in the window above to view the Initial Setup operations in the video movie. (3) Click the "Printer Driver Installer" icon in the "Print to the following the Initial Setup instructions on the supplied CD-ROM. (1) Turn on the computer power, then... install the printer driver. 2-9 CHAPTER 2 INSTALLATION AND BASIC OPERATION 3.3.3 Set the PC printer port Your PC printer port has to be connected to the printer at the same time. 3.4 For Macintosh (iMac and Power Macintosh) with USB Users Only When you use the HL-1240/1250/1270N printer with Macintosh ...
...22 (2) Click the "Instructional Video" icon in the window above to view the Initial Setup operations in the video movie. (3) Click the "Printer Driver Installer" icon in the "Print to the following the Initial Setup instructions on the supplied CD-ROM. (1) Turn on the computer power, then... install the printer driver. 2-9 CHAPTER 2 INSTALLATION AND BASIC OPERATION 3.3.3 Set the PC printer port Your PC printer port has to be connected to the printer at the same time. 3.4 For Macintosh (iMac and Power Macintosh) with USB Users Only When you use the HL-1240/1250/1270N printer with Macintosh ...
Service Manual
Page 34
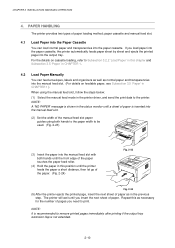
... load normal paper and transparencies into the manual feed slot with both hands to the paper width to print. NOTE: It is recommended to the printer. For the details on feedable paper, see Subsection 3.5 'Paper' in CHAPTER 1.) When using both hands until the front edge of the manual ... cassette and manual feed slot. 4.1 Load Paper into the Paper Cassette You can feed envelopes, labels and organizers as well as in the printer driver, and send the print data to remove printed pages immediately after printing if the output tray extension flap is inserted into the manual feed slot...
... load normal paper and transparencies into the manual feed slot with both hands to the paper width to print. NOTE: It is recommended to the printer. For the details on feedable paper, see Subsection 3.5 'Paper' in CHAPTER 1.) When using both hands until the front edge of the manual ... cassette and manual feed slot. 4.1 Load Paper into the Paper Cassette You can feed envelopes, labels and organizers as well as in the printer driver, and send the print data to remove printed pages immediately after printing if the output tray extension flap is inserted into the manual feed slot...

Service Manual
Page 35
... paper and straighten it. 4.3.1 To print on both sides of the paper from the paper cassette (1) Select the required manual duplex printing mode from the driver. (2) The printer will now automatically print all the even numbered pages on thicker paper or card. (1) Select the manual feed mode in the... printer driver. (2) Lift up . Fig. 2-26 2-11 Stacking the sheets may cause wrinkling. • If paper is curled, straighten it and then set it may cause curl ...
... paper and straighten it. 4.3.1 To print on both sides of the paper from the paper cassette (1) Select the required manual duplex printing mode from the driver. (2) The printer will now automatically print all the even numbered pages on thicker paper or card. (1) Select the manual feed mode in the... printer driver. (2) Lift up . Fig. 2-26 2-11 Stacking the sheets may cause wrinkling. • If paper is curled, straighten it and then set it may cause curl ...

Service Manual
Page 36
...paper into the manual feed slot, loading the paper with the side to be printed (blank side) face up, and the top edge towards the printer. CAUTION: • Before re-inserting the sheets, straighten them in order into the manual feed slot with the side to be printed first facing... that paper jams may occur or print quality may not be satisfactory. (1) Select the required manual duplex printing mode and manual feed mode from the driver. (2) Using both sides of the paper. Follow the instructions on the computer screen. (Fig. 2-27) (6) Repeat action (5) until you have printed all the...
...paper into the manual feed slot, loading the paper with the side to be printed (blank side) face up, and the top edge towards the printer. CAUTION: • Before re-inserting the sheets, straighten them in order into the manual feed slot with the side to be printed first facing... that paper jams may occur or print quality may not be satisfactory. (1) Select the required manual duplex printing mode and manual feed mode from the driver. (2) Using both sides of the paper. Follow the instructions on the computer screen. (Fig. 2-27) (6) Repeat action (5) until you have printed all the...

Service Manual
Page 39
... warming up. • You can change the timeout for the sleep mode with the Data LED off, the printer reprints the last job you press the button with the supplied printer driver (all the LEDs are defined as if it was turned off and it is insufficient memory, the last page... mode timeout because the fan running for at least 5 minutes after the printer goes into the ready status. NOTE: • When the printer goes into the ready status. While the printer is in the printer driver or RPC program for the printer to go into sleep mode.) • Sleep mode allows the print engine...
... warming up. • You can change the timeout for the sleep mode with the Data LED off, the printer reprints the last job you press the button with the supplied printer driver (all the LEDs are defined as if it was turned off and it is insufficient memory, the last page... mode timeout because the fan running for at least 5 minutes after the printer goes into the ready status. NOTE: • When the printer goes into the ready status. While the printer is in the printer driver or RPC program for the printer to go into sleep mode.) • Sleep mode allows the print engine...

Service Manual
Page 75
... the front of grease referring to the parts reference list. 4-5 Refer to the figure below; When disassembling/re-assembling the screw, you need a special screw driver. Always replace it has been removed. CHAPTER 4 DISASSEMBLY AND RE-ASSEMBLY NOTE: When replacing/re-assembling the separation pad holder, remove the old grease and...
... the front of grease referring to the parts reference list. 4-5 Refer to the figure below; When disassembling/re-assembling the screw, you need a special screw driver. Always replace it has been removed. CHAPTER 4 DISASSEMBLY AND RE-ASSEMBLY NOTE: When replacing/re-assembling the separation pad holder, remove the old grease and...

Service Manual
Page 128
... a new toner cartridge in the supplied Windows driver and try again. Replace the toner cartridge with the printer as defined in the printer. (2) Reduce the complexity of paper. If it is a specified type of the document. (3) (For HL-1250/1270N only) Expand the printer memory by adding a commercially available SIMM. Keep paper loads below...
... a new toner cartridge in the supplied Windows driver and try again. Replace the toner cartridge with the printer as defined in the printer. (2) Reduce the complexity of paper. If it is a specified type of the document. (3) (For HL-1250/1270N only) Expand the printer memory by adding a commercially available SIMM. Keep paper loads below...

Service Manual
Page 130
.... The best combination of the document or reduce the print resolution. (3) (For HL-1250/1270N only) Expand the printer memory by using the supplied Windows driver or RPC program. (4) (For HL-1250/1270N only) Change the following table. For details on how to print the... data remaining in the printer. (2) Reduce the complexity of settings below will report problems by adding a commercially available SIMM. PRINT...
.... The best combination of the document or reduce the print resolution. (3) (For HL-1250/1270N only) Expand the printer memory by using the supplied Windows driver or RPC program. (4) (For HL-1250/1270N only) Change the following table. For details on how to print the... data remaining in the printer. (2) Reduce the complexity of settings below will report problems by adding a commercially available SIMM. PRINT...


