

Instruction Manual - English
Page 5
... before inserting or removing the plug, otherwise damage to use only genuine Brother parts. If only one hand is the danger that they cannot move. Turn off the power switch. When replacing parts and installing optional accessories, be secured in injury. • When carrying out inspection, adjustment and maintenance • When replacing consumable parts such as they operate correctly before carrying out cleaning, otherwise the machine may operate...
... before inserting or removing the plug, otherwise damage to use only genuine Brother parts. If only one hand is the danger that they cannot move. Turn off the power switch. When replacing parts and installing optional accessories, be secured in injury. • When carrying out inspection, adjustment and maintenance • When replacing consumable parts such as they operate correctly before carrying out cleaning, otherwise the machine may operate...
Instruction Manual - English
Page 8
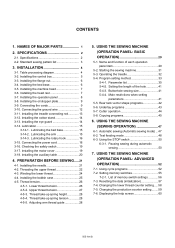
... USING THE SEWING MACHINE (SEWING OPERATION 47 6-1. Changing the lower thread counter setting .....58 7-5. Table processing diagram 4 3-2. Installing the needle 21 4-2. Threading the upper thread 22 4-3. Lower thread tension 26 4-5-2. Thread take -up spring height 28 4-5-4. Thread take -up spring tension 28 4-5-5. Buttonhole sewing size 41 5-4-4. Copying programs 45 6. SPECIFICATIONS 2 2-1. INSTALLATION 4 3-1. Installing the machine head 7 3-6. Lubricating the arm 15 3-14-3. Installing the motor cover 19 3-18. Underlay programs 43 5-7. Automatic...
... USING THE SEWING MACHINE (SEWING OPERATION 47 6-1. Changing the lower thread counter setting .....58 7-5. Table processing diagram 4 3-2. Installing the needle 21 4-2. Threading the upper thread 22 4-3. Lower thread tension 26 4-5-2. Thread take -up spring height 28 4-5-4. Thread take -up spring tension 28 4-5-5. Buttonhole sewing size 41 5-4-4. Copying programs 45 6. SPECIFICATIONS 2 2-1. INSTALLATION 4 3-1. Installing the machine head 7 3-6. Lubricating the arm 15 3-14-3. Installing the motor cover 19 3-18. Underlay programs 43 5-7. Automatic...
Instruction Manual - English
Page 9
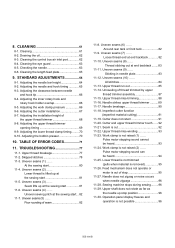
... seams (8) ...... Uneven seams (10) ...... Cutter does not return 91 11-20. Work clamp is not possible 96 HE-800B Sewing machine stops during sewing.........96 11-29. 8. CLEANING 61 8-1. Draining the oil 62 8-3. Cleaning the control box air inlet port 62 8-4. Checking the needle 63 8-6. Adjusting the needle bar height 64 9-2. Adjusting the installation height of seam 82 11-8. Adjusting the upper thread trimmer opening timing 69 9-9. Adjusting the lower thread clamp timing......... 70 9-10. Adjusting the bobbin presser 70 10. TABLE OF ERROR CODES 71...
... seams (8) ...... Uneven seams (10) ...... Cutter does not return 91 11-20. Work clamp is not possible 96 HE-800B Sewing machine stops during sewing.........96 11-29. 8. CLEANING 61 8-1. Draining the oil 62 8-3. Cleaning the control box air inlet port 62 8-4. Checking the needle 63 8-6. Adjusting the needle bar height 64 9-2. Adjusting the installation height of seam 82 11-8. Adjusting the upper thread trimmer opening timing 69 9-9. Adjusting the lower thread clamp timing......... 70 9-10. Adjusting the bobbin presser 70 10. TABLE OF ERROR CODES 71...
Instruction Manual - English
Page 11
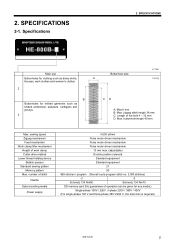
... is required.) HE-800B 2 sewing speed Zigzag mechanism Feed mechanism Work clamp lifter mechanism Height of work clothes and women's clothes 2 4734M 2193Q B Buttonholes for clothing such as knitted underwear, sweaters, cardigans and jerseys 3 C D A: Max.6 mm B: Max. SPECIFICATIONS Main use Buttonhole size Buttonholes for knitted garments such as dress shirts, A blouses, work clamp Cutter drive method Lower thread holding device Bobbin presser Standard sewing pattern Memory pattern Max. 2. Specifications 2. number of stitch Needle Data recording media Power supply 4,000...
... is required.) HE-800B 2 sewing speed Zigzag mechanism Feed mechanism Work clamp lifter mechanism Height of work clothes and women's clothes 2 4734M 2193Q B Buttonholes for clothing such as knitted underwear, sweaters, cardigans and jerseys 3 C D A: Max.6 mm B: Max. SPECIFICATIONS Main use Buttonhole size Buttonholes for knitted garments such as dress shirts, A blouses, work clamp Cutter drive method Lower thread holding device Bobbin presser Standard sewing pattern Memory pattern Max. 2. Specifications 2. number of stitch Needle Data recording media Power supply 4,000...

Instruction Manual - English
Page 31
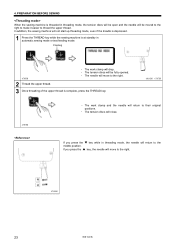
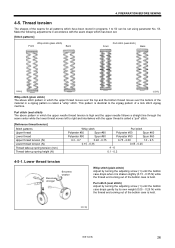
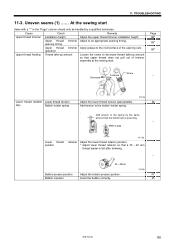
4. It is used to prevent the upper thread from the zigzag thread tension (1), move the tension release lever (2) in the direction of the arrow to open and the needle will be moved to the right to make it easier to pass the thread through the needle. * When the sewing machine is threaded in order to the next page.) NOTE: ▪ If you start sewing without passing the thread through the thread guide (5), error "E600...
4. It is used to prevent the upper thread from the zigzag thread tension (1), move the tension release lever (2) in the direction of the arrow to open and the needle will be moved to the right to make it easier to pass the thread through the needle. * When the sewing machine is threaded in order to the next page.) NOTE: ▪ If you start sewing without passing the thread through the thread guide (5), error "E600...
Instruction Manual - English
Page 32
... to thread the upper thread. In addition, the sewing machine will not start up threading mode, even if the treadle is depressed. 1 Press the THREAD key while the sewing machine is complete, press the THREAD key. 4916M 4767M 4768M ・ The work clamp will drop. ・ The tension discs will be fully opened. ・ The needle will be open and the needle will move to their original positions. ・ The tension...
... to thread the upper thread. In addition, the sewing machine will not start up threading mode, even if the treadle is depressed. 1 Press the THREAD key while the sewing machine is complete, press the THREAD key. 4916M 4767M 4768M ・ The work clamp will drop. ・ The tension discs will be fully opened. ・ The needle will be open and the needle will move to their original positions. ・ The tension...
Instruction Manual - English
Page 35
... a lock stitch zigzag machine. Thread tension The shapes of the seams for all patterns which has been set using parameter No. 53. Lower thread tension Becomes stronger Becomes weaker Whip stitch (plain stitch) Adjust by its own weight (0.05 - 0.25 N) while the thread end coming out of the bobbin case is held . 2813Q HE-800B 26 Make the following adjustments in accordance with the upper thread is identical to 50 can be set . [Stitch patterns] Whip stitch (plain stitch) Front...
... a lock stitch zigzag machine. Thread tension The shapes of the seams for all patterns which has been set using parameter No. 53. Lower thread tension Becomes stronger Becomes weaker Whip stitch (plain stitch) Adjust by its own weight (0.05 - 0.25 N) while the thread end coming out of the bobbin case is held . 2813Q HE-800B 26 Make the following adjustments in accordance with the upper thread is identical to 50 can be set . [Stitch patterns] Whip stitch (plain stitch) Front...
Instruction Manual - English
Page 52
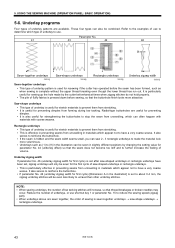
... positions by the cutter beforehand at times when zigzag stitches do not hold properly. ▪ The pile of underlay is useful for first cycle) [Dimension A in the illustration can also be sewn in materials which type of underlay to further increase the feeling of underlay patterns are useful for strengthening the buttonholes to (9) in the illustration] is complete without the upper thread breaking...
... positions by the cutter beforehand at times when zigzag stitches do not hold properly. ▪ The pile of underlay is useful for first cycle) [Dimension A in the illustration can also be sewn in materials which type of underlay to further increase the feeling of underlay patterns are useful for strengthening the buttonholes to (9) in the illustration] is complete without the upper thread breaking...
Instruction Manual - English
Page 73
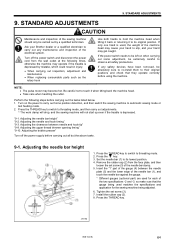
... cutter. Adjusting the bobbin presser" Turn off the power switch and disconnect the power cord from the face plate, and then loosen the set screw (3). 7. Turn on when carrying out some adjustment, be extremely careful to automatic sewing mode or test feeding mode. 2. Adjusting the upper thread trimmer opening timing" "9-10. STANDARD ADJUSTMENTS CAUTION Maintenance and inspection of the needle bar (1), and touch the needle bar against the gauge. * Different gauges (optional part) are used for the sewing machine...
... cutter. Adjusting the bobbin presser" Turn off the power switch and disconnect the power cord from the face plate, and then loosen the set screw (3). 7. Turn on when carrying out some adjustment, be extremely careful to automatic sewing mode or test feeding mode. 2. Adjusting the upper thread trimmer opening timing" "9-10. STANDARD ADJUSTMENTS CAUTION Maintenance and inspection of the needle bar (1), and touch the needle bar against the gauge. * Different gauges (optional part) are used for the sewing machine...
Instruction Manual - English
Page 79
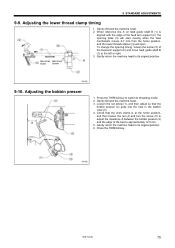
Adjusting the lower thread clamp timing Becomes Becomes faster slower 1. To change the opening plate (3) will start moving when the feed mechanism moves 6-7 mm from the home position, and the lower thread retainer (4) will open. Press the THREAD key to switch to its original position. 3988Q 9-10. Loosen the set screw (1), and then adjust so that the work clamp is aligned with the edge of the feed arm support (2), the opening timing, loosen the screw (5) of the bed...
Adjusting the lower thread clamp timing Becomes Becomes faster slower 1. To change the opening plate (3) will start moving when the feed mechanism moves 6-7 mm from the home position, and the lower thread retainer (4) will open. Press the THREAD key to switch to its original position. 3988Q 9-10. Loosen the set screw (1), and then adjust so that the work clamp is aligned with the edge of the feed arm support (2), the opening timing, loosen the screw (5) of the bed...
Instruction Manual - English
Page 80
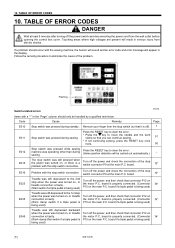
... sewing machine, the buzzer will sound and an error code and error message will appear in serious injury from the wall outlet before opening the control box cover. Stop switch was pressed during sewing. * Press the key to the 2nd step when the power was turned on, or treadle connection is faulty. (Start switch if a triple pedal is being used ) 74* Treadle was operating...
... sewing machine, the buzzer will sound and an error code and error message will appear in serious injury from the wall outlet before opening the control box cover. Stop switch was pressed during sewing. * Press the key to the 2nd step when the power was turned on, or treadle connection is faulty. (Start switch if a triple pedal is being used ) 74* Treadle was operating...
Instruction Manual - English
Page 88
... thread tension appropriately. Lower thread retainer cam should be sitting firmly on the gauge. 2. Screw * Lower thread clamp 3999Q Relation between material ・When using knits or woven materials, replace the parts with the -3 specification parts: Length feed plate (for specification -3), work clamp pressure. * The standard height of the rotary hook does not strike the needle. Reduce the needle bar play Lower thread clamp Check Work clamp pressure Relation between work clamp ・Replace with a smaller needle hole. Angle of work clamp assembly and sewing...
... thread tension appropriately. Lower thread retainer cam should be sitting firmly on the gauge. 2. Screw * Lower thread clamp 3999Q Relation between material ・When using knits or woven materials, replace the parts with the -3 specification parts: Length feed plate (for specification -3), work clamp pressure. * The standard height of the rotary hook does not strike the needle. Reduce the needle bar play Lower thread clamp Check Work clamp pressure Relation between work clamp ・Replace with a smaller needle hole. Angle of work clamp assembly and sewing...
Instruction Manual - English
Page 89
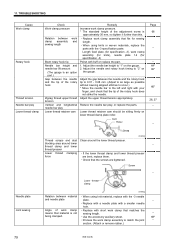
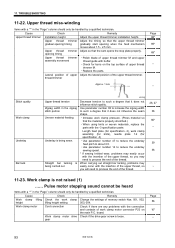
... bobbin presser position. operation Upper thread feeding Thread take -up amount so that a 35 - 40 mm thread leader is projecting. * Make a gap Lower thread position 4001Q retainer Adjust the lower thread retainer position. * Adjust lower thread retainer so that upper thread does not pull out of the opening timing. Uneven seams (1) ...... Add tension to decrease thread take -up amount Loosen the screw to the spring by a qualified technician. Insert the bobbin correctly. 4002Q 70* 25 HE-800B 80 Cause Check Remedy Upper thread trimmer Installation...
... bobbin presser position. operation Upper thread feeding Thread take -up amount so that a 35 - 40 mm thread leader is projecting. * Make a gap Lower thread position 4001Q retainer Adjust the lower thread retainer position. * Adjust lower thread retainer so that upper thread does not pull out of the opening timing. Uneven seams (1) ...... Add tension to decrease thread take -up amount Loosen the screw to the spring by a qualified technician. Insert the bobbin correctly. 4002Q 70* 25 HE-800B 80 Cause Check Remedy Upper thread trimmer Installation...
Instruction Manual - English
Page 91
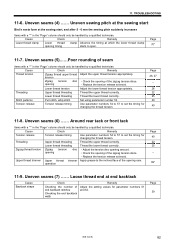
... opening timing starts to the inclined face of the opening of the zigzag tension discs. ・Replace the tension release solenoid. Uneven seams (6) ...... operation Page 40 22 25 * 69* 11-9. Cause Check Remedy Lower thread clamp Lower thread clamp Advance the timing at which the lower thread clamp opening of the zigzag tension discs. ・Replace the tension release solenoid. Stitch patterns Purl stitch, whip stitch Set using parameter number 53. Threading Upper thread threading Thread the upper thread correctly. Loose thread end at the sewing start...
... opening timing starts to the inclined face of the opening of the zigzag tension discs. ・Replace the tension release solenoid. Uneven seams (6) ...... operation Page 40 22 25 * 69* 11-9. Cause Check Remedy Lower thread clamp Lower thread clamp Advance the timing at which the lower thread clamp opening of the zigzag tension discs. ・Replace the tension release solenoid. Stitch patterns Purl stitch, whip stitch Set using parameter number 53. Threading Upper thread threading Thread the upper thread correctly. Loose thread end at the sewing start...
Instruction Manual - English
Page 93
... bobbin case and bent * Use the HE-800B bobbin case. * bobbin holder spring, etc. TROUBLESHOOTING 11-12. Page 22 25 * Needle Thread chips or dust Upper thread Rotary hook holder Needle plate hole 3996Q Needle installation Needle size Rotary hook rim Rotary hook edge Around needle plate hole Upper thread tension Thread and needle Flaw on the Polish with buff or replace the part. Cause Check Remedy Threading Upper thread threading Thread the upper thread correctly. Bobbin winder tension Bobbin thread tension bracket Use the tension nut to adjust the lower thread...
... bobbin case and bent * Use the HE-800B bobbin case. * bobbin holder spring, etc. TROUBLESHOOTING 11-12. Page 22 25 * Needle Thread chips or dust Upper thread Rotary hook holder Needle plate hole 3996Q Needle installation Needle size Rotary hook rim Rotary hook edge Around needle plate hole Upper thread tension Thread and needle Flaw on the Polish with buff or replace the part. Cause Check Remedy Threading Upper thread threading Thread the upper thread correctly. Bobbin winder tension Bobbin thread tension bracket Use the tension nut to adjust the lower thread...

Instruction Manual - English
Page 95
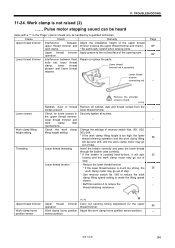
... 2. Adjust the needle and rotary hook timing to set the number of zigzag tension discs and bar tack tension discs Remedy Use parameter number 54 to 0.5 - 1.0 mm by removing the top cover and moving the tension release cam. amount * 4003Q Lower thread snapping Adjust the positions of the lower thread retainer, lower thread clamp and lower thread presser plate so that upper thread does not pull out of trimmer assembly at the beginning of sewing Opening amount of stitches and the speed for changing the thread tension (increase...
... 2. Adjust the needle and rotary hook timing to set the number of zigzag tension discs and bar tack tension discs Remedy Use parameter number 54 to 0.5 - 1.0 mm by removing the top cover and moving the tension release cam. amount * 4003Q Lower thread snapping Adjust the positions of the lower thread retainer, lower thread clamp and lower thread presser plate so that upper thread does not pull out of trimmer assembly at the beginning of sewing Opening amount of stitches and the speed for changing the thread tension (increase...
Instruction Manual - English
Page 96
... timing Opening amount of zigzag tension discs and bar tack tension discs (particularly zigzag tension discs) 4009Q ・ Adjust the zigzag tension discs by moving the tension stud bracket in and out. ・ Adjust the bar tack tension discs opening amount to 0.5 - 1.0 mm by removing the top cover and moving the setting plate assembly. ・ Upper thread trimmer longitudinal position adjustment ・ Upper thread trimmer cutting depth adjustment Page * 4005Q Burr on tips of upper thread trimmer assembly by a qualified technician. TROUBLESHOOTING...
... timing Opening amount of zigzag tension discs and bar tack tension discs (particularly zigzag tension discs) 4009Q ・ Adjust the zigzag tension discs by moving the tension stud bracket in and out. ・ Adjust the bar tack tension discs opening amount to 0.5 - 1.0 mm by removing the top cover and moving the setting plate assembly. ・ Upper thread trimmer longitudinal position adjustment ・ Upper thread trimmer cutting depth adjustment Page * 4005Q Burr on tips of upper thread trimmer assembly by a qualified technician. TROUBLESHOOTING...
Instruction Manual - English
Page 102
... -3 specification parts: Length feed plate (for specification -3), work clamp assembly (for knits), needle plate 1.2 (for specification -3) ・Use parameter number 47 to reduce the underlay feed pitch to such a degree that it does not influence the seam shape. ・Increase work clamp Change the settings of the upper thread trimmer. When carrying out straight bar tacking, problems may need to process the end of the thread. Work clamp motor drive Check if the drive gear screw is properly stretched.) ・When using knits...
... -3 specification parts: Length feed plate (for specification -3), work clamp assembly (for knits), needle plate 1.2 (for specification -3) ・Use parameter number 47 to reduce the underlay feed pitch to such a degree that it does not influence the seam shape. ・Increase work clamp Change the settings of the upper thread trimmer. When carrying out straight bar tacking, problems may need to process the end of the thread. Work clamp motor drive Check if the drive gear screw is properly stretched.) ・When using knits...
Instruction Manual - English
Page 103
...Repair or replace the parts. operation Lower thread trimmer Interference between Adjust the installation height of the upper thread upper thread trimmer and trimmer (remove the upper thread trimmer and check). Lower thread tension ・ Reduce the lower thread tension. * If the lower thread tension is inserted back-to-front, it will become stiff, and the work clamp * Be particularly careful when sewing joints. Lower thread trimmer link A assembly Lower thread trimmer connecting rod Page 68* 69* * Loose screws Work clamp lifting height setting Threading Remove...
...Repair or replace the parts. operation Lower thread trimmer Interference between Adjust the installation height of the upper thread upper thread trimmer and trimmer (remove the upper thread trimmer and check). Lower thread tension ・ Reduce the lower thread tension. * If the lower thread tension is inserted back-to-front, it will become stiff, and the work clamp * Be particularly careful when sewing joints. Lower thread trimmer link A assembly Lower thread trimmer connecting rod Page 68* 69* * Loose screws Work clamp lifting height setting Threading Remove...
Instruction Manual - English
Page 104
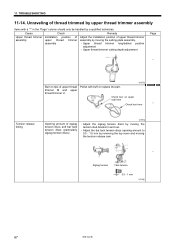
... plate, the cutter will bump against the upper thread trimmer. 69* 4018Q Feed home position sensor Feed home position sensor Adjust the feed home position sensor position. Adjust the cam position. * If the feed mechanism operates when the cam has not opened the stop plate. position * Feed timing belt Feed timing belt tension Adjust the feed timing belt. * 95 HE-800B knife do not mesh. Upper thread trimmer Upper thread trimmer Remove and re-install the upper thread trimmer. Repair or replace the knife. 4024Q * 11-26. board. TROUBLESHOOTING...
... plate, the cutter will bump against the upper thread trimmer. 69* 4018Q Feed home position sensor Feed home position sensor Adjust the feed home position sensor position. Adjust the cam position. * If the feed mechanism operates when the cam has not opened the stop plate. position * Feed timing belt Feed timing belt tension Adjust the feed timing belt. * 95 HE-800B knife do not mesh. Upper thread trimmer Upper thread trimmer Remove and re-install the upper thread trimmer. Repair or replace the knife. 4024Q * 11-26. board. TROUBLESHOOTING...


