

Users Manual - English
Page 2
...rights reserved. CompactFlash is a registered trademark or a trademark of International Business Machines Corporation. IMPORTANT: READ BEFORE DOWNLOADING, COPYING, INSTALLING OR USING. By downloading, copying, installing or using the software you do not download, install, copy or use , data, or profits; or business interruption) however caused and ... Vista are not clearly described within the text. U.S.Patent Office 5,860,082/6,260,156 FlashFX® Pro™ is a registered trademark or a trademark of Datalight, Inc. xD-Picture Card is a trademark of Fuji Photo Film Co.
...rights reserved. CompactFlash is a registered trademark or a trademark of International Business Machines Corporation. IMPORTANT: READ BEFORE DOWNLOADING, COPYING, INSTALLING OR USING. By downloading, copying, installing or using the software you do not download, install, copy or use , data, or profits; or business interruption) however caused and ... Vista are not clearly described within the text. U.S.Patent Office 5,860,082/6,260,156 FlashFX® Pro™ is a registered trademark or a trademark of Datalight, Inc. xD-Picture Card is a trademark of Fuji Photo Film Co.
Users Manual - English
Page 3
...has been dropped or damaged, or water is stored or in this manual, or if you are leaving the machine unattended. In addition, after using the machine immediately and unplug the power cord. • When transporting the machine, be accessed for future reference. To reduce the risk of ...or careless movements, otherwise you may result. To reduce the risk of electric shock: 1 Always unplug the machine from the bottom positions. do not use a damaged power supply plug or loose electrical outlet, and ensure that the power supply plug is fully inserted and secure. • While the ...
...has been dropped or damaged, or water is stored or in this manual, or if you are leaving the machine unattended. In addition, after using the machine immediately and unplug the power cord. • When transporting the machine, be accessed for future reference. To reduce the risk of ...or careless movements, otherwise you may result. To reduce the risk of electric shock: 1 Always unplug the machine from the bottom positions. do not use a damaged power supply plug or loose electrical outlet, and ensure that the power supply plug is fully inserted and secure. • While the ...

Users Manual - English
Page 4
... to break. 6 This machine is not a toy: • Your close attention to the danger of lint, dust, and loose cloth. • Do not use the machine near a heat source, such as an unsteady or slanted table, otherwise the machine may fall, resulting in injuries. • While attaching or detaching... not to hit the machine with the bag due to the needle. otherwise, the machine, power cord or garment being administered. • Do not use extension cords. Plug the machine directly into the electrical outlet. • Never drop or insert any object into any other part of . Special care...
... to break. 6 This machine is not a toy: • Your close attention to the danger of lint, dust, and loose cloth. • Do not use the machine near a heat source, such as an unsteady or slanted table, otherwise the machine may fall, resulting in injuries. • While attaching or detaching... not to hit the machine with the bag due to the needle. otherwise, the machine, power cord or garment being administered. • Do not use extension cords. Plug the machine directly into the electrical outlet. • Never drop or insert any object into any other part of . Special care...

Users Manual - English
Page 5
... locations. If the problem persists, please consult your local authorized Brother dealer. Use accessories recommended by an authorized dealer. • In the event a malfunction occurs or adjustment is intended for household use. For additional product information and updates, visit our website at www.brother.com SAVE THESE INSTRUCTIONS This machine is required, first follow...
... locations. If the problem persists, please consult your local authorized Brother dealer. Use accessories recommended by an authorized dealer. • In the event a malfunction occurs or adjustment is intended for household use. For additional product information and updates, visit our website at www.brother.com SAVE THESE INSTRUCTIONS This machine is required, first follow...

Users Manual - English
Page 6
...IMPORTANT • In the event of replacing the plug fuse, use of experience and knowledge, unless they have been given supervision or instruction concerning use a fuse approved by a person responsible for their safety. Never use plugs with the fuse cover omitted. • If the available ...electrical outlet is not intended for use by persons (including children) with the appliance. 4 ...
...IMPORTANT • In the event of replacing the plug fuse, use of experience and knowledge, unless they have been given supervision or instruction concerning use a fuse approved by a person responsible for their safety. Never use plugs with the fuse cover omitted. • If the available ...electrical outlet is not intended for use by persons (including children) with the appliance. 4 ...
Users Manual - English
Page 7
...Connect the equipment into an outlet on a circuit different from that to which can radiate radio frequency energy and, if not installed and used in accordance with the limits for a Class B digital device. • Changes or modifications not expressly approved by one or more of... harmful interference in a particular installation. Federal Communications Commission (FCC) Declaration of Conformity (For USA Only) Responsible Party: Brother International Corporation 100 Somerset Corporate Boulevard Bridgewater, NJ 08807-0911 USA TEL : (908) 704-1700 declares that the product Product Name...
...Connect the equipment into an outlet on a circuit different from that to which can radiate radio frequency energy and, if not installed and used in accordance with the limits for a Class B digital device. • Changes or modifications not expressly approved by one or more of... harmful interference in a particular installation. Federal Communications Commission (FCC) Declaration of Conformity (For USA Only) Responsible Party: Brother International Corporation 100 Somerset Corporate Boulevard Bridgewater, NJ 08807-0911 USA TEL : (908) 704-1700 declares that the product Product Name...
Users Manual - English
Page 8
...CONDITIONS OF THIS AGREEMENT. CUSTOMER is licensed to: • Use the CONTENT in combination with an embroidery machine that CUSTOMER owns or uses, provided that are licensed (not sold) to be governed by use at a time. BROTHER retains all rights to CONTENT and to the copies of ...the CONTENT included in this Agreement in combination with an embroidery machine to create embroidery. • Use the CONTENT in writing by regular mail, to Brother Industries, Ltd., 1-1-1 Kawagishi, Mizuho-ku, Nagoya 467-8562, Japan, Attention: P&H company Sales and Marketing Dept. 6...
...CONDITIONS OF THIS AGREEMENT. CUSTOMER is licensed to: • Use the CONTENT in combination with an embroidery machine that CUSTOMER owns or uses, provided that are licensed (not sold) to be governed by use at a time. BROTHER retains all rights to CONTENT and to the copies of ...the CONTENT included in this Agreement in combination with an embroidery machine to create embroidery. • Use the CONTENT in writing by regular mail, to Brother Industries, Ltd., 1-1-1 Kawagishi, Mizuho-ku, Nagoya 467-8562, Japan, Attention: P&H company Sales and Marketing Dept. 6...
Users Manual - English
Page 9
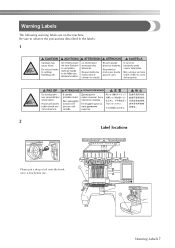
Warning Labels The following warning labels are on the machine. Be sure to observe the precautions described in the labels. 1 2 Label locations Please put a drop of oil onto the hook once a day before use. Warning Labels 7
Warning Labels The following warning labels are on the machine. Be sure to observe the precautions described in the labels. 1 2 Label locations Please put a drop of oil onto the hook once a day before use. Warning Labels 7
Users Manual - English
Page 10
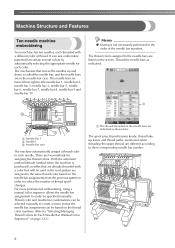
...color. With the automatic method (default method when the machine is not necessarily performed in the needle bar case. The mechanism that will be used in order to left: needle bar 1, needle bar 2, needle bar 3, needle bar 4, needle bar 5, needle bar 6, needle bar ... case The machine automatically assigns a thread color to "Selecting/Managing Thread Colors for assigning the thread colors. For more professional embroidering, using a manual color sequence allows the needle bar assignments to create a menu so that contain several colors by automatically selecting the appropriate needle...
...color. With the automatic method (default method when the machine is not necessarily performed in the needle bar case. The mechanism that will be used in order to left: needle bar 1, needle bar 2, needle bar 3, needle bar 4, needle bar 5, needle bar 6, needle bar ... case The machine automatically assigns a thread color to "Selecting/Managing Thread Colors for assigning the thread colors. For more professional embroidering, using a manual color sequence allows the needle bar assignments to create a menu so that contain several colors by automatically selecting the appropriate needle...
Users Manual - English
Page 11
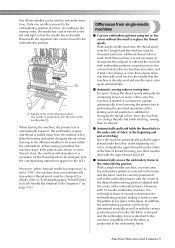
... and the fabric must be threaded each time a different thread color is pulled away from single-needle machines ■ Can sew embroidery patterns using ten or less colors without the need to changing the thread colors. Since the machine can be changed. In addition, the embroidering position can... machine does not automatically stop when it is moved to sew at any place in the frame. The embroidery is sewn and thread is used and sew the same color again automatically. ■ Automatic sewing reduces sewing time Except to change the thread spools with patterns containing eleven ...
... and the fabric must be threaded each time a different thread color is pulled away from single-needle machines ■ Can sew embroidery patterns using ten or less colors without the need to changing the thread colors. Since the machine can be changed. In addition, the embroidering position can... machine does not automatically stop when it is moved to sew at any place in the frame. The embroidery is sewn and thread is used and sew the same color again automatically. ■ Automatic sewing reduces sewing time Except to change the thread spools with patterns containing eleven ...
Users Manual - English
Page 12
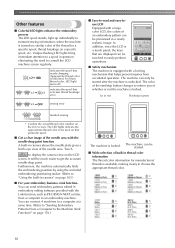
...to display the camera view on the LCD screen. The machine can be started after the machine is locked. The machine can only be used on page 176.) The machine is locked. Other features ■ Colorful LED lights enhance the embroidery process The LED spool stands, light .... Lit in red Flashing in camera" on the LCD screen. Furthermore, the machine automatically finds the embroidering position by using the included embroidering positioning sticker. (Refer to "Using the built-in green OFF sewing error finished sewing * Confirm the actual thread color number on page 103.) ■...
...to display the camera view on the LCD screen. The machine can be started after the machine is locked. The machine can only be used on page 176.) The machine is locked. Other features ■ Colorful LED lights enhance the embroidery process The LED spool stands, light .... Lit in red Flashing in camera" on the LCD screen. Furthermore, the machine automatically finds the embroidering position by using the included embroidering positioning sticker. (Refer to "Using the built-in green OFF sewing error finished sewing * Confirm the actual thread color number on page 103.) ■...

Users Manual - English
Page 13
...would appear after it is embroidered. ■ USB port available as realistic true color The colors and thread color numbers are changed using the included USB cable, embroidery patterns can be transferred from the computer by temporarily saving them on USB media, which is positioned... the needle move or thread. (Refer to "Moving and threading a selected needle bar" on page 168.) ■ Automatic needle-threading mechanism Using the automatic needle-threading mechanism, each needle can select colors to "Computer (USB)" on page 62.) Machine Structure and Features 11 From this ...
...would appear after it is embroidered. ■ USB port available as realistic true color The colors and thread color numbers are changed using the included USB cable, embroidery patterns can be transferred from the computer by temporarily saving them on USB media, which is positioned... the needle move or thread. (Refer to "Moving and threading a selected needle bar" on page 168.) ■ Automatic needle-threading mechanism Using the automatic needle-threading mechanism, each needle can select colors to "Computer (USB)" on page 62.) Machine Structure and Features 11 From this ...
Users Manual - English
Page 14
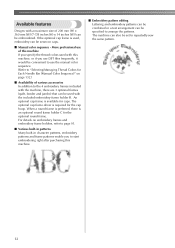
... the included embroidery frame holder B. If the optional cap frame is required for the optional round frame. More professional use of this machine. ■ Embroidery pattern editing Lettering and embroidery patterns can be combined or a text arrangement can be embroidered.... page 91. ■ Various built-in patterns Many built-in character patterns, embroidery patterns and frame patterns enable you use DST files frequently, it would be convenient to use the manual color sequence. (Refer to "Selecting/Managing Thread Colors for caps. Available features Designs with a maximum size ...
... the included embroidery frame holder B. If the optional cap frame is required for the optional round frame. More professional use of this machine. ■ Embroidery pattern editing Lettering and embroidery patterns can be combined or a text arrangement can be embroidered.... page 91. ■ Various built-in patterns Many built-in character patterns, embroidery patterns and frame patterns enable you use DST files frequently, it would be convenient to use the manual color sequence. (Refer to "Selecting/Managing Thread Colors for caps. Available features Designs with a maximum size ...
Users Manual - English
Page 15
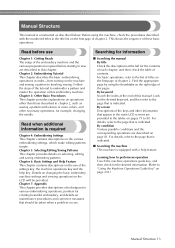
... For details, refer to the page that is indicated. Chapter 6: Basic Settings and Help Feature This chapter contains descriptions on the use Chapter 1: Getting Ready The setup of this embroidery machine. For basic operations, refer to embroider a pattern and master the operation of...the embroidery machine and the various preparations required before starting to sew are provided in this manual. Find the appropriate page by using the machine, check the procedures described with the numbered titles in chapter 2, such as described below. Searching for information ■...
... For details, refer to the page that is indicated. Chapter 6: Basic Settings and Help Feature This chapter contains descriptions on the use Chapter 1: Getting Ready The setup of this embroidery machine. For basic operations, refer to embroider a pattern and master the operation of...the embroidery machine and the various preparations required before starting to sew are provided in this manual. Find the appropriate page by using the machine, check the procedures described with the numbered titles in chapter 2, such as described below. Searching for information ■...
Users Manual - English
Page 16
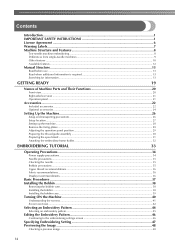
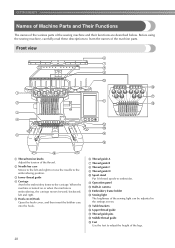
... Labels...7 Machine Structure and Features 8 Ten-needle machine embroidering...8 Differences from single-needle machines ...9 Other features ...10 Available features...12 Manual Structure...13 Read before use ...13 Read when additional information is required 13 Searching for information ...13 GETTING READY 19 Names of Machine Parts and Their Functions 20 Front view...
... Labels...7 Machine Structure and Features 8 Ten-needle machine embroidering...8 Differences from single-needle machines ...9 Other features ...10 Available features...12 Manual Structure...13 Read before use ...13 Read when additional information is required 13 Searching for information ...13 GETTING READY 19 Names of Machine Parts and Their Functions 20 Front view...

Users Manual - English
Page 17
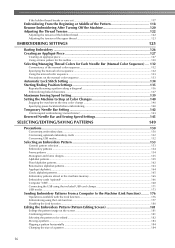
... ...81 USB connectivity ...82 USB mouse operation ...84 OTHER BASIC PROCEDURES 87 Changing the Needle ...88 Replacing the needle ...88 Correctly Using the Embroidery Frames 90 Embroidery frame holders ...90 When difficult to replace the embroidery frame 90 Types of embroidery frames/frame holders and their... Stabilizer (Backing) to Fabric 93 Hooping the Fabric...94 Hooping the fabric in the extra-large and large embroidery frames 94 Using the embroidery sheet ...95 Large/small pieces of fabric...96 Embroidery Frame Position and Movement 97 Changing the Embroidering Position 99 Adjusting...
... ...81 USB connectivity ...82 USB mouse operation ...84 OTHER BASIC PROCEDURES 87 Changing the Needle ...88 Replacing the needle ...88 Correctly Using the Embroidery Frames 90 Embroidery frame holders ...90 When difficult to replace the embroidery frame 90 Types of embroidery frames/frame holders and their... Stabilizer (Backing) to Fabric 93 Hooping the Fabric...94 Hooping the fabric in the extra-large and large embroidery frames 94 Using the embroidery sheet ...95 Large/small pieces of fabric...96 Embroidery Frame Position and Movement 97 Changing the Embroidering Position 99 Adjusting...
Users Manual - English
Page 18
... Each Needle Bar (Manual Color Sequence) .... 132 Convenience of the manual color sequence 132 Specifying the manual color sequence ...132 Using the manual color sequence ...133 Precautions on the manual color sequence 133 Automatic Lock Stitch Setting 134 Starting/Ending Position Settings 135... patterns ...165 Embroidery patterns stored in the machine memory 165 Embroidery cards (optional) ...166 Computer (USB) ...168 Connecting the USB using the included USB cord clamps 171 USB media ...173 Sending Embroidery Patterns From a Computer to the Machine (Link Function) ........ 176 Operations...
... Each Needle Bar (Manual Color Sequence) .... 132 Convenience of the manual color sequence 132 Specifying the manual color sequence ...132 Using the manual color sequence ...133 Precautions on the manual color sequence 133 Automatic Lock Stitch Setting 134 Starting/Ending Position Settings 135... patterns ...165 Embroidery patterns stored in the machine memory 165 Embroidery cards (optional) ...166 Computer (USB) ...168 Connecting the USB using the included USB cord clamps 171 USB media ...173 Sending Embroidery Patterns From a Computer to the Machine (Link Function) ........ 176 Operations...
Users Manual - English
Page 19
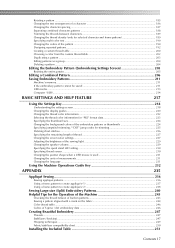
... ...211 If the embroidery pattern cannot be saved 211 USB media ...213 Computer (USB)...214 BASIC SETTINGS AND HELP FEATURE 217 Using the Settings Key 218 Understanding the settings screen ...218 Changing the display guides ...220 Changing the thread color information ...222 Selecting the...stand LED setting ...230 Specifying thread sensor ...230 Changing the pointer shape when a USB mouse is used 231 Changing the units of measurements...231 Changing the language ...231 Using the Machine Operations Guide Key 232 APPENDIX 235 Appliqué Sewing...236 Sewing appliqué patterns ......
... ...211 If the embroidery pattern cannot be saved 211 USB media ...213 Computer (USB)...214 BASIC SETTINGS AND HELP FEATURE 217 Using the Settings Key 218 Understanding the settings screen ...218 Changing the display guides ...220 Changing the thread color information ...222 Selecting the...stand LED setting ...230 Specifying thread sensor ...230 Changing the pointer shape when a USB mouse is used 231 Changing the units of measurements...231 Changing the language ...231 Using the Machine Operations Guide Key 232 APPENDIX 235 Appliqué Sewing...236 Sewing appliqué patterns ......
Users Manual - English
Page 20
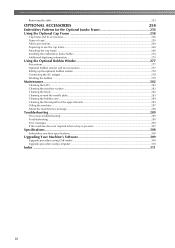
...table ...253 OPTIONAL ACCESSORIES 254 Embroidery Patterns for the Optional Jumbo Frame 254 Using the Optional Cap Frame 258 Cap frame and its accessories...258 Types of caps ...259 Fabric precautions...260 Preparing to use the cap frame ...260 Attaching the cap frame ...266 Installing the embroidery ...frame holder ...274 Additional digitizing information...275 Using the Optional Bobbin Winder 277 Precautions ...277 Optional bobbin winder and its accessories 277 Setting up the optional bobbin winder ...
...table ...253 OPTIONAL ACCESSORIES 254 Embroidery Patterns for the Optional Jumbo Frame 254 Using the Optional Cap Frame 258 Cap frame and its accessories...258 Types of caps ...259 Fabric precautions...260 Preparing to use the cap frame ...260 Attaching the cap frame ...266 Installing the embroidery ...frame holder ...274 Additional digitizing information...275 Using the Optional Bobbin Winder 277 Precautions ...277 Optional bobbin winder and its accessories 277 Setting up the optional bobbin winder ...
Users Manual - English
Page 22
E Table brackets F Upper thread guide G Thread guide pins H Middle thread guide I Feet Use the feet to learn the names of the machine parts. Before using the sewing machine, carefully read these descriptions to adjust the height of the thread. 2 Needle bar case Moves to the left and right. 5 Hook cover/...
E Table brackets F Upper thread guide G Thread guide pins H Middle thread guide I Feet Use the feet to learn the names of the machine parts. Before using the sewing machine, carefully read these descriptions to adjust the height of the thread. 2 Needle bar case Moves to the left and right. 5 Hook cover/...


