

Users Manual - English
Page 2
... companies. Trademarks FlashFX® is a registered trademark or a trademark of Sony Corporation. U.S.Patent Office 5,860,082/6,260,156 FlashFX® Pro™ is a registered trademark or a trademark of conditions and the following disclaimer in this license. Copyright 1989-2007 Datalight, Inc., All ... the distribution. • The name of Intel Corporation may not be liable for any way out of International Business Machines Corporation. Intel License Agreement For Open Source Computer Vision Library Copyright © 2000, Intel Corporation, all rights reserved.
... companies. Trademarks FlashFX® is a registered trademark or a trademark of Sony Corporation. U.S.Patent Office 5,860,082/6,260,156 FlashFX® Pro™ is a registered trademark or a trademark of conditions and the following disclaimer in this license. Copyright 1989-2007 Datalight, Inc., All ... the distribution. • The name of Intel Corporation may not be liable for any way out of International Business Machines Corporation. Intel License Agreement For Open Source Computer Vision Library Copyright © 2000, Intel Corporation, all rights reserved.
Users Manual - English
Page 3
In addition, after using this machine, carefully read these safety instructions before attempting to use a damaged power supply plug or loose electrical outlet, and ensure that the power supply plug is fully inserted and secure. • While the machine is stored or in this manual, or if you notice anything unusual, such as an odor, heat, discoloration or deformation, stop using the machine immediately and unplug the power cord. • When transporting the machine, be sure to lift it from the electrical outlet immediately after you have finished reading this manual, store it where ...
In addition, after using this machine, carefully read these safety instructions before attempting to use a damaged power supply plug or loose electrical outlet, and ensure that the power supply plug is fully inserted and secure. • While the machine is stored or in this manual, or if you notice anything unusual, such as an odor, heat, discoloration or deformation, stop using the machine immediately and unplug the power cord. • When transporting the machine, be sure to lift it from the electrical outlet immediately after you have finished reading this manual, store it where ...

Users Manual - English
Page 4
the movement of the machine free from all machine openings, such as near a heat source, such as an unsteady or slanted table, otherwise the machine may result. • Do not operate where aerosol (spray) products are intended. 4 Always keep your hands away from the needle bar case and all moving parts. otherwise, the machine, power cord or garment being administered. • Do not use outdoors. 2 In addition, when opening . • Keep fingers out of . Keep ventilation openings of the embroidery frame could cause the needle to break. 6 This machine is not a toy: • ...
the movement of the machine free from all machine openings, such as near a heat source, such as an unsteady or slanted table, otherwise the machine may result. • Do not operate where aerosol (spray) products are intended. 4 Always keep your hands away from the needle bar case and all moving parts. otherwise, the machine, power cord or garment being administered. • Do not use outdoors. 2 In addition, when opening . • Keep fingers out of . Keep ventilation openings of the embroidery frame could cause the needle to break. 6 This machine is not a toy: • ...

Users Manual - English
Page 5
... the interface cable (USB cable) included with this machine, avoid direct sunlight and high humidity locations. If the problem persists, please consult your local authorized Brother dealer. Use this machine only for this manual. For additional product information and updates, visit our website at www...
... the interface cable (USB cable) included with this machine, avoid direct sunlight and high humidity locations. If the problem persists, please consult your local authorized Brother dealer. Use this machine only for this manual. For additional product information and updates, visit our website at www...

Users Manual - English
Page 6
Never use plugs with the fuse cover omitted. • If the available electrical outlet is not intended for the plug supplied with this equipment, you should be supervised to ensure that they do not play with reduced physical, sensory or mental capabilities, or lack of experience and knowledge, unless they have been given supervision or instruction concerning use of replacing the plug fuse, use by persons (including children) with the appliance. 4 carrying the mark, rating as marked on plug. • Always replace the fuse cover. FOR USERS IN THE UK, EIRE, MALTA AND CYPRUS ONLY...
Never use plugs with the fuse cover omitted. • If the available electrical outlet is not intended for the plug supplied with this equipment, you should be supervised to ensure that they do not play with reduced physical, sensory or mental capabilities, or lack of experience and knowledge, unless they have been given supervision or instruction concerning use of replacing the plug fuse, use by persons (including children) with the appliance. 4 carrying the mark, rating as marked on plug. • Always replace the fuse cover. FOR USERS IN THE UK, EIRE, MALTA AND CYPRUS ONLY...
Users Manual - English
Page 7
... Commission (FCC) Declaration of Conformity (For USA Only) Responsible Party: Brother International Corporation 100 Somerset Corporate Boulevard Bridgewater, NJ 08807-0911 USA TEL : (908) 704-1700 declares that the product Product Name: Brother Embroidery Machine Model Number: PR-1000 complies with the limits for a Class B digital device. • ...• Connect the equipment into an outlet on , the user is encouraged to try to correct the interference by Brother Corporation could void the user's authority to operate the equipment. These limits are designed to radio communications.
... Commission (FCC) Declaration of Conformity (For USA Only) Responsible Party: Brother International Corporation 100 Somerset Corporate Boulevard Bridgewater, NJ 08807-0911 USA TEL : (908) 704-1700 declares that the product Product Name: Brother Embroidery Machine Model Number: PR-1000 complies with the limits for a Class B digital device. • ...• Connect the equipment into an outlet on , the user is encouraged to try to correct the interference by Brother Corporation could void the user's authority to operate the equipment. These limits are designed to radio communications.
Users Manual - English
Page 8
...that CUSTOMER owns or uses, provided that are licensed (not sold) to you ("CUSTOMER") under any one embroidery machine at a time. BROTHER retains ownership of all rights to CONTENT and to the copies of this Agreement. Nothing in writing by the laws of the CONTENT, ...WHICH ORIGINALLY BEARS CERTAIN COPYRIGHT NOTICE UNDER THE NAME OF ANY THIRD PARTIES OTHER THAN BROTHER (e.g. Please direct all rights not expressly granted to CUSTOMER herein. License Agreement The enclosed machine includes data, software and/or documentation (collectively ...
...that CUSTOMER owns or uses, provided that are licensed (not sold) to you ("CUSTOMER") under any one embroidery machine at a time. BROTHER retains ownership of all rights to CONTENT and to the copies of this Agreement. Nothing in writing by the laws of the CONTENT, ...WHICH ORIGINALLY BEARS CERTAIN COPYRIGHT NOTICE UNDER THE NAME OF ANY THIRD PARTIES OTHER THAN BROTHER (e.g. Please direct all rights not expressly granted to CUSTOMER herein. License Agreement The enclosed machine includes data, software and/or documentation (collectively ...
Users Manual - English
Page 9
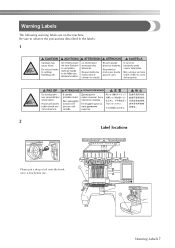
Warning Labels The following warning labels are on the machine. Be sure to observe the precautions described in the labels. 1 2 Label locations Please put a drop of oil onto the hook once a day before use. Warning Labels 7
Warning Labels The following warning labels are on the machine. Be sure to observe the precautions described in the labels. 1 2 Label locations Please put a drop of oil onto the hook once a day before use. Warning Labels 7
Users Manual - English
Page 10
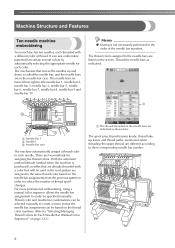
For more professional embroidering, using a manual color sequence allows the needle bar assignments to the needle bars are different according to left: needle bar 1, needle bar 2, needle bar 3, needle bar 4, needle bar 5, needle bar 6, needle bar 7, needle bar 8, needle bar 9 and needle bar 10. The thread colors assigned to easily be selected manually to create a menu so that the needle bar assignments can sew embroidery patterns that contain several colors by automatically selecting the appropriate needle for each color. There are in the order of thread spool changes. The ...
For more professional embroidering, using a manual color sequence allows the needle bar assignments to the needle bars are different according to left: needle bar 1, needle bar 2, needle bar 3, needle bar 4, needle bar 5, needle bar 6, needle bar 7, needle bar 8, needle bar 9 and needle bar 10. The thread colors assigned to easily be selected manually to create a menu so that the needle bar assignments can sew embroidery patterns that contain several colors by automatically selecting the appropriate needle for each color. There are in the order of thread spool changes. The ...
Users Manual - English
Page 11
If the pattern uses eleven or more colors, once the machine is started, it easier to the embroidering position at the time of thread trimming, you don't need to replace the thread spools With single-needle machines, the thread spool must be changed and the machine must be threaded each time a different thread color is used and sew the same color again automatically. ■ Automatic sewing reduces sewing time Except to change the thread spools with patterns containing eleven or more thread colors, the machine will come back to the needle that the needle bar and needle thread with ...
If the pattern uses eleven or more colors, once the machine is started, it easier to the embroidering position at the time of thread trimming, you don't need to replace the thread spools With single-needle machines, the thread spool must be changed and the machine must be threaded each time a different thread color is used and sew the same color again automatically. ■ Automatic sewing reduces sewing time Except to change the thread spools with patterns containing eleven or more thread colors, the machine will come back to the needle that the needle bar and needle thread with ...
Users Manual - English
Page 12
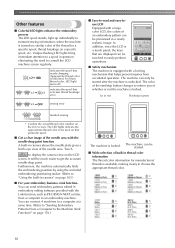
Unique flashing LED lights bring immediate attention to -read and easy-touse LCD Equipped with the Link function, such as PE-DESIGN NEXT or later, from accidental operation. indicates the spool that activates thread breakage error ■ Easy-to a spool in green OFF sewing error finished sewing * Confirm the actual thread color number on the LCD screen. Lit in red Flashing in question eliminating the need to easily perform operations. ■ Safety mechanism The machine is locked. For black thread color, LED light turns off.) indicates the spool that needs changing (...
Unique flashing LED lights bring immediate attention to -read and easy-touse LCD Equipped with the Link function, such as PE-DESIGN NEXT or later, from accidental operation. indicates the spool that activates thread breakage error ■ Easy-to a spool in green OFF sewing error finished sewing * Confirm the actual thread color number on the LCD screen. Lit in red Flashing in question eliminating the need to easily perform operations. ■ Safety mechanism The machine is locked. For black thread color, LED light turns off.) indicates the spool that needs changing (...

Users Manual - English
Page 13
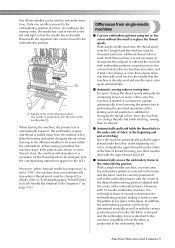
In addition, the embroidery pattern can be displayed as it would appear after it is embroidered. ■ USB port available as standard equipment By connecting a computer to the machine using this thread color library, you can be selected at any one of the needle bars can select colors to "Moving and threading a selected needle bar" on page 168.) ■ Automatic needle-threading mechanism Using the automatic needle-threading mechanism, each needle can easily be displayed as realistic true color The colors and thread color numbers are stored in the machine's memory. If the ...
In addition, the embroidery pattern can be displayed as it would appear after it is embroidered. ■ USB port available as standard equipment By connecting a computer to the machine using this thread color library, you can be selected at any one of the needle bars can select colors to "Moving and threading a selected needle bar" on page 168.) ■ Automatic needle-threading mechanism Using the automatic needle-threading mechanism, each needle can easily be displayed as realistic true color The colors and thread color numbers are stored in the machine's memory. If the ...
Users Manual - English
Page 14
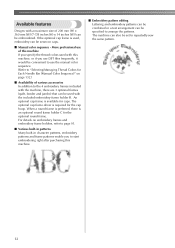
Available features Designs with a maximum size of various accessories In addition to the 4 embroidery frames included with the machine, there are 3 optional frames (quilt, border and jumbo) that can be used with this machine, or if you specify the thread colors used , embroidery can also be specified to "Selecting/Managing Thread Colors for caps. When a round frame is preferred, there is required for the optional round frame. For details on embroidery frames and embroidery frame holders, refer to page 91. ■ Various built-in patterns Many built-in character patterns, embroidery...
Available features Designs with a maximum size of various accessories In addition to the 4 embroidery frames included with the machine, there are 3 optional frames (quilt, border and jumbo) that can be used with this machine, or if you specify the thread colors used , embroidery can also be specified to "Selecting/Managing Thread Colors for caps. When a round frame is preferred, there is required for the optional round frame. For details on embroidery frames and embroidery frame holders, refer to page 91. ■ Various built-in patterns Many built-in character patterns, embroidery...
Users Manual - English
Page 15
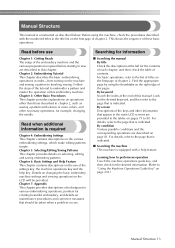
This shows the sequence of this embroidery machine. Searching for the desired keyword, and then refer to the page that is indicated. Look for information ■ Searching the manual By title Check the descriptions at the end of this chapter. For details, refer to "Using the Machine Operations Guide Key" on the various embroidering settings, which make editing patterns simple. Learning how to perform an operation Touch the machine operations guide key, and then check for creating beautiful embroidery, and details on the LCD will be taken when a problem occurs. Read when ...
This shows the sequence of this embroidery machine. Searching for the desired keyword, and then refer to the page that is indicated. Look for information ■ Searching the manual By title Check the descriptions at the end of this chapter. For details, refer to "Using the Machine Operations Guide Key" on the various embroidering settings, which make editing patterns simple. Learning how to perform an operation Touch the machine operations guide key, and then check for creating beautiful embroidery, and details on the LCD will be taken when a problem occurs. Read when ...
Users Manual - English
Page 16
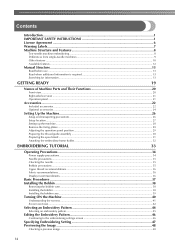
Contents Introduction ...1 IMPORTANT SAFETY INSTRUCTIONS 1 License Agreement ...6 Warning Labels...7 Machine Structure and Features 8 Ten-needle machine embroidering...8 Differences from single-needle machines ...9 Other features ...10 Available features...12 Manual Structure...13 Read before use ...13 Read when additional information is required 13 Searching for information ...13 GETTING READY 19 Names of Machine Parts and Their Functions 20 Front view ...20 Right-side/rear view ...21 Operation panel ...21 Accessories ...22 Included accessories ...22 Optional accessories ...24 Setting...
Contents Introduction ...1 IMPORTANT SAFETY INSTRUCTIONS 1 License Agreement ...6 Warning Labels...7 Machine Structure and Features 8 Ten-needle machine embroidering...8 Differences from single-needle machines ...9 Other features ...10 Available features...12 Manual Structure...13 Read before use ...13 Read when additional information is required 13 Searching for information ...13 GETTING READY 19 Names of Machine Parts and Their Functions 20 Front view ...20 Right-side/rear view ...21 Operation panel ...21 Accessories ...22 Included accessories ...22 Optional accessories ...24 Setting...

Users Manual - English
Page 17
Hooping the Fabric in the Embroidery Frame 49 Hooping the fabric in the embroidery frame 49 Attaching the Embroidery Frame to the Machine 51 Attaching the embroidery frame...51 Checking the Embroidery Area 53 Temporarily stopping to check the area ...53 Continuing to the embroidering screen ...53 Upper Threading ...54 Checking the needle bars and thread colors 54 Upper threading ...56 Threading the needle ...60 Sewing the Embroidery 64 Starting embroidering ...64 Stopping embroidering ...66 Checking the Thread Tension 68 Removing the Embroidery Frame and Fabric 69 Removing the ...
Hooping the Fabric in the Embroidery Frame 49 Hooping the fabric in the embroidery frame 49 Attaching the Embroidery Frame to the Machine 51 Attaching the embroidery frame...51 Checking the Embroidery Area 53 Temporarily stopping to check the area ...53 Continuing to the embroidering screen ...53 Upper Threading ...54 Checking the needle bars and thread colors 54 Upper threading ...56 Threading the needle ...60 Sewing the Embroidery 64 Starting embroidering ...64 Stopping embroidering ...66 Checking the Thread Tension 68 Removing the Embroidery Frame and Fabric 69 Removing the ...
Users Manual - English
Page 18
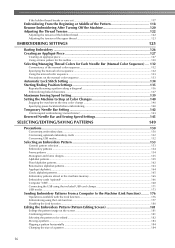
If the bobbin thread breaks or runs out ...117 Embroidering From the Beginning or Middle of the Pattern 118 Resume Embroidering After Turning Off the Machine 120 Adjusting the Thread Tension 122 Adjusting the tension of the bobbin thread 122 Adjusting the tension of the upper thread 123 EMBROIDERING SETTINGS 125 Basting Embroidery ...126 Creating an Appliqué Piece 127 Creating an appliqué piece ...127 Using a frame pattern for the outline ...130 Selecting/Managing Thread Colors for Each Needle Bar (Manual Color Sequence) .... 132 Convenience of the manual color sequence 132...
If the bobbin thread breaks or runs out ...117 Embroidering From the Beginning or Middle of the Pattern 118 Resume Embroidering After Turning Off the Machine 120 Adjusting the Thread Tension 122 Adjusting the tension of the bobbin thread 122 Adjusting the tension of the upper thread 123 EMBROIDERING SETTINGS 125 Basting Embroidery ...126 Creating an Appliqué Piece 127 Creating an appliqué piece ...127 Using a frame pattern for the outline ...130 Selecting/Managing Thread Colors for Each Needle Bar (Manual Color Sequence) .... 132 Convenience of the manual color sequence 132...
Users Manual - English
Page 19
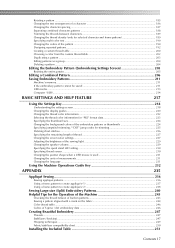
Rotating a pattern ...185 Changing the text arrangement of a character 186 Changing the character spacing ...187 Separating combined character patterns 188 Trimming the threads between characters 189 Changing the thread density (only for selected character and frame patterns 189 Specifying multi-color text ...190 Changing the colors of the pattern ...190 Designing repeated patterns...192 Creating a custom thread table ...200 Choosing a color from the custom thread table 202 Duplicating a pattern ...203 Editing patterns as a group ...204 Deleting a pattern ...204 Editing the Embroidery ...
Rotating a pattern ...185 Changing the text arrangement of a character 186 Changing the character spacing ...187 Separating combined character patterns 188 Trimming the threads between characters 189 Changing the thread density (only for selected character and frame patterns 189 Specifying multi-color text ...190 Changing the colors of the pattern ...190 Designing repeated patterns...192 Creating a custom thread table ...200 Choosing a color from the custom thread table 202 Duplicating a pattern ...203 Editing patterns as a group ...204 Deleting a pattern ...204 Editing the Embroidery ...
Users Manual - English
Page 20
Removing the table ...253 OPTIONAL ACCESSORIES 254 Embroidery Patterns for the Optional Jumbo Frame 254 Using the Optional Cap Frame 258 Cap frame and its accessories...258 Types of caps ...259 Fabric precautions...260 Preparing to use the cap frame ...260 Attaching the cap frame ...266 Installing the embroidery frame holder ...274 Additional digitizing information...275 Using the Optional Bobbin Winder 277 Precautions ...277 Optional bobbin winder and its accessories 277 Setting up the optional bobbin winder ...278 Connecting the AC adapter ...278 Winding the bobbin ......
Removing the table ...253 OPTIONAL ACCESSORIES 254 Embroidery Patterns for the Optional Jumbo Frame 254 Using the Optional Cap Frame 258 Cap frame and its accessories...258 Types of caps ...259 Fabric precautions...260 Preparing to use the cap frame ...260 Attaching the cap frame ...266 Installing the embroidery frame holder ...274 Additional digitizing information...275 Using the Optional Bobbin Winder 277 Precautions ...277 Optional bobbin winder and its accessories 277 Setting up the optional bobbin winder ...278 Connecting the AC adapter ...278 Winding the bobbin ......
Users Manual - English
Page 21
The setup of Machine Parts and Their Functions 20 Front view ...20 Right-side/rear view 21 Operation panel 21 Accessories...22 Included accessories 22 Optional accessories 24 Setting Up the Machine 26 Setup and transporting precautions 26 Setup location...27 Setting up . 1 GETTING READY After unpacking the machine, first refer to sew are included. After checking that all accessories are included, the embroidery machine can be set up the machine 28 Remove the fixing plates 29 Adjusting the operation panel position 29 Preparing the thread guide assembly 30 Preparing the ...
The setup of Machine Parts and Their Functions 20 Front view ...20 Right-side/rear view 21 Operation panel 21 Accessories...22 Included accessories 22 Optional accessories 24 Setting Up the Machine 26 Setup and transporting precautions 26 Setup location...27 Setting up . 1 GETTING READY After unpacking the machine, first refer to sew are included. After checking that all accessories are included, the embroidery machine can be set up the machine 28 Remove the fixing plates 29 Adjusting the operation panel position 29 Preparing the thread guide assembly 30 Preparing the ...
