
Operation Manual
Page 1
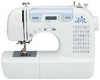
We recommend that you keep this document before using the machine. Operation Manual Sewing Machine Product Code: 888-S33/S36 KNOWING YOUR SEWING MACHINE SEWING BASICS UTILITY STITCHES APPENDIX Be sure to read this document nearby for future reference.
We recommend that you keep this document before using the machine. Operation Manual Sewing Machine Product Code: 888-S33/S36 KNOWING YOUR SEWING MACHINE SEWING BASICS UTILITY STITCHES APPENDIX Be sure to read this document nearby for future reference.
Operation Manual
Page 3
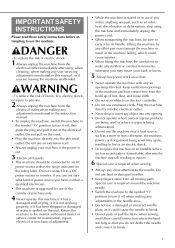
... been dropped or damaged, or water is being sewn may injure your back or knees. 5 Always keep your machine if the power is required when sewing: • Always pay close attention to carry it out of electric shock: 1 Always unplug the machine from all moving parts. DANGER - To reduce...you may ignite, resulting in the machine falling, which could cause the needle to break. • Do not push or pull the fabric when sewing, and follow careful instruction when freehand stitching so that you notice anything unusual, such as an unsteady or slanted table, otherwise the machine may fall...
... been dropped or damaged, or water is being sewn may injure your back or knees. 5 Always keep your machine if the power is required when sewing: • Always pay close attention to carry it out of electric shock: 1 Always unplug the machine from all moving parts. DANGER - To reduce...you may ignite, resulting in the machine falling, which could cause the needle to break. • Do not push or pull the fabric when sewing, and follow careful instruction when freehand stitching so that you notice anything unusual, such as an unsteady or slanted table, otherwise the machine may fall...
Operation Manual
Page 5
... the operation beep 55 INDEX 56 3 SEWING BASICS 22 SEWING 22 General sewing procedure 22 ADJUSTING THE STITCH LENGTH AND WIDTH 22 Selecting stitching 22 Starting to sew 23 Thread tension 25 USEFUL SEWING TIPS 25 Trial sewing 25 Changing the sewing direction 25 Sewing curves 26 Sewing thick fabrics 26 Sewing thin fabrics 26 Sewing stretch fabrics 26 Using a free...
... the operation beep 55 INDEX 56 3 SEWING BASICS 22 SEWING 22 General sewing procedure 22 ADJUSTING THE STITCH LENGTH AND WIDTH 22 Selecting stitching 22 Starting to sew 23 Thread tension 25 USEFUL SEWING TIPS 25 Trial sewing 25 Changing the sewing direction 25 Sewing curves 26 Sewing thick fabrics 26 Sewing thin fabrics 26 Sewing stretch fabrics 26 Using a free...
Operation Manual
Page 6
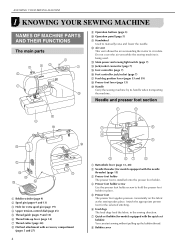
...15) c Presser foot holder The presser foot is being used. Attach the appropriate presser foot for the selected stitching. KNOWING YOUR SEWING MACHINE 1 KNOWING YOUR SEWING MACHINE NAMES OF MACHINE PARTS AND THEIR FUNCTIONS The main parts i Operation buttons (page 5) j Operation panel (page 5) k ...controller jack/socket (page 7) q Feed dog position lever (pages 33 and 39) r Presser foot lever (page 13) s Handle Carry the sewing machine by its handle when transporting the machine. h Bobbin cover d Presser foot holder screw Use the presser foot holder screw to hold the presser...
...15) c Presser foot holder The presser foot is being used. Attach the appropriate presser foot for the selected stitching. KNOWING YOUR SEWING MACHINE 1 KNOWING YOUR SEWING MACHINE NAMES OF MACHINE PARTS AND THEIR FUNCTIONS The main parts i Operation buttons (page 5) j Operation panel (page 5) k ...controller jack/socket (page 7) q Feed dog position lever (pages 33 and 39) r Presser foot lever (page 13) s Handle Carry the sewing machine by its handle when transporting the machine. h Bobbin cover d Presser foot holder screw Use the presser foot holder screw to hold the presser...

Operation Manual
Page 7
...be used (2), stitch length in millimeters (3), and stitch width in the bag, and then store the bag inside the flat bed attachment. When sewing is stopped, the needle is depressed. c Stitch length adjustment key Press the "-" side to increase the stitch width. b Stitch selection keys... (page 22) Select the number for sewing straight seams. j Needle bar thread guide (page 14) k Needle clamp screw Operation panel The operation panel allows you wish to use. press the...
...be used (2), stitch length in millimeters (3), and stitch width in the bag, and then store the bag inside the flat bed attachment. When sewing is stopped, the needle is depressed. c Stitch length adjustment key Press the "-" side to increase the stitch width. b Stitch selection keys... (page 22) Select the number for sewing straight seams. j Needle bar thread guide (page 14) k Needle clamp screw Operation panel The operation panel allows you wish to use. press the...

Operation Manual
Page 8
... Foot controller XD0501-121 (EU area) XC8816-071 (Other areas) Optional accessories The following accessories are available as optional accessories to carry out most sewing tasks. N 5. M M 8. 9. We have designed these accessories to help you be able to be used on machine) XZ5134-001 2 ...75/11 1 needle 90/14 1 needle 100/16 1 needle 13. 14. 16. 12. 90/14 1 needle 15. 4. 5. R 7. KNOWING YOUR SEWING MACHINE ACCESSORIES The following are stored in the flat bed attachment. Part Name Part Code Americas Others 1 Zigzag foot "J" (on the machine with product code...
... Foot controller XD0501-121 (EU area) XC8816-071 (Other areas) Optional accessories The following accessories are available as optional accessories to carry out most sewing tasks. N 5. M M 8. 9. We have designed these accessories to help you be able to be used on machine) XZ5134-001 2 ...75/11 1 needle 90/14 1 needle 100/16 1 needle 13. 14. 16. 12. 90/14 1 needle 15. 4. 5. R 7. KNOWING YOUR SEWING MACHINE ACCESSORIES The following are stored in the flat bed attachment. Part Name Part Code Americas Others 1 Zigzag foot "J" (on the machine with product code...
Operation Manual
Page 9
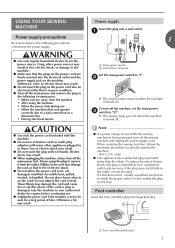
...dealer for the power source. Pulling on the power cord into the electrical outlet and the power supply jack on the machine. b The sewing lamp comes on when the machine is in a polarized outlet only one blade wider than the other power sources may result. ● Do not... touch the plug with many other appliances plugged in any way. When restarting the sewing machine, follow the necessary procedure to observe the following circumstances: • When you are firmly inserted into an electrical outlet that is turned on...
...dealer for the power source. Pulling on the power cord into the electrical outlet and the power supply jack on the machine. b The sewing lamp comes on when the machine is in a polarized outlet only one blade wider than the other power sources may result. ● Do not... touch the plug with many other appliances plugged in any way. When restarting the sewing machine, follow the necessary procedure to observe the following circumstances: • When you are firmly inserted into an electrical outlet that is turned on...

Operation Manual
Page 10
...8 Doing so could cause a fire or an electric shock. Sewing speed controller (for models equipped with the start/stop sewing (only for models equipped with the start sewing, and adjust the sewing speed by changing the pressing force. Turn off the sewing machine in , the start/ stop button cannot be used to ... the machine from accidentally being started. Faster You should make sure that nothing is placed on the left and b turn off the sewing machine. After turning on the sewing machine, release the c "-" side of (a) on the foot controller when the machine is not in the fabric when...
...8 Doing so could cause a fire or an electric shock. Sewing speed controller (for models equipped with the start/stop sewing (only for models equipped with the start sewing, and adjust the sewing speed by changing the pressing force. Turn off the sewing machine in , the start/ stop button cannot be used to ... the machine from accidentally being started. Faster You should make sure that nothing is placed on the left and b turn off the sewing machine. After turning on the sewing machine, release the c "-" side of (a) on the foot controller when the machine is not in the fabric when...
Operation Manual
Page 11
... the spring on the shaft slides into the groove of the bobbin. 1 2 a Spring on the shaft b Groove of the thread through the hole on this sewing machine. Actual size 11.5 mm (7/16 inch) This model Other models CAUTION ● If the spool of thread is not in the right place, the... machine. ● We designed the bobbin that comes with this machine or bobbins of thread on c the bobbin from other bobbins may tangle on the sewing machine. e 9 Pull up the spool pin as far as possible, and then a put a spool of the same type (part code: SA156, SFB: XA5539-151). b a Pre...
... the spring on the shaft slides into the groove of the bobbin. 1 2 a Spring on the shaft b Groove of the thread through the hole on this sewing machine. Actual size 11.5 mm (7/16 inch) This model Other models CAUTION ● If the spool of thread is not in the right place, the... machine. ● We designed the bobbin that comes with this machine or bobbins of thread on c the bobbin from other bobbins may tangle on the sewing machine. e 9 Pull up the spool pin as far as possible, and then a put a spool of the same type (part code: SA156, SFB: XA5539-151). b a Pre...
Operation Manual
Page 12
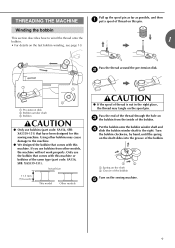
...before turning on the shaft fits into the notch in a "Winding the bobbin" to its k original position (for models equipped with the sewing speed controller). Slide the sewing speed controller back to pass the thread around the pre-tension disk (page 9). a Wound evenly b Wound poorly ■ For models ...9679; Make sure you slide the bobbin winding shaft to loosen, and may cause the thread tension to the right. Memo ● When the sewing machine is started or the handwheel is not a malfunction. ● The needle bar does not move when you follow the instructions carefully. Place ...
...before turning on the shaft fits into the notch in a "Winding the bobbin" to its k original position (for models equipped with the sewing speed controller). Slide the sewing speed controller back to pass the thread around the pre-tension disk (page 9). a Wound evenly b Wound poorly ■ For models ...9679; Make sure you slide the bobbin winding shaft to loosen, and may cause the thread tension to the right. Memo ● When the sewing machine is started or the handwheel is not a malfunction. ● The needle bar does not move when you follow the instructions carefully. Place ...

Operation Manual
Page 13
... press (start/stop g button) (for models equipped with the needle position button), and raise the presser foot lever. Memo ● When the sewing machine is started or the handwheel is cut the thread as described. a Slit (with the start / stop button). If the bobbin is to...or six times. When the bobbin begins spinning slowly, take h your foot off while threading the machine. Lower threading Install the bobbin wound with the sewing speed controller). b 1 2 a Cover b Slide button 11 Slide the button and open the cover. Pull the thread to loosen, breaking the ...
... press (start/stop g button) (for models equipped with the needle position button), and raise the presser foot lever. Memo ● When the sewing machine is started or the handwheel is cut the thread as described. a Slit (with the start / stop button). If the bobbin is to...or six times. When the bobbin begins spinning slowly, take h your foot off while threading the machine. Lower threading Install the bobbin wound with the sewing speed controller). b 1 2 a Cover b Slide button 11 Slide the button and open the cover. Pull the thread to loosen, breaking the ...

Operation Manual
Page 14
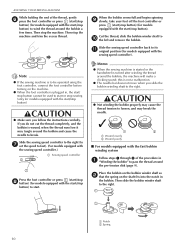
... slit, and then pull the thread to be incorrect or break the needle. If it may cause the thread tension to cut it. KNOWING YOUR SEWING MACHINE Put the bobbin in so the thread comes out in the right direction.
... slit, and then pull the thread to be incorrect or break the needle. If it may cause the thread tension to cut it. KNOWING YOUR SEWING MACHINE Put the bobbin in so the thread comes out in the right direction.

Operation Manual
Page 15
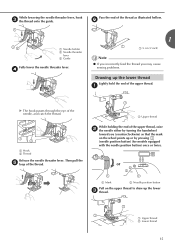
...or press (needle position button) (for feeding the bobbin thread is not correctly raised, the sewing machine can begin sewing immediately without drawing up the bobbin thread before threading the sewing machine. 13 Otherwise, the thread could tangle and break the needle. If you want to draw...is indicated by turning the handwheel b toward you (counterclockwise) so that the mark on the handwheel CAUTION ● Make sure you start to sew, follow to thread the machine as indicated. Raise the presser foot using the presser foot a lever. a Spool pin b Thread guide c ...
...or press (needle position button) (for feeding the bobbin thread is not correctly raised, the sewing machine can begin sewing immediately without drawing up the bobbin thread before threading the sewing machine. 13 Otherwise, the thread could tangle and break the needle. If you want to draw...is indicated by turning the handwheel b toward you (counterclockwise) so that the mark on the handwheel CAUTION ● Make sure you start to sew, follow to thread the machine as indicated. Raise the presser foot using the presser foot a lever. a Spool pin b Thread guide c ...
Operation Manual
Page 16
... may tangle on the spool pin and cause the needle to break. Make sure the main power switch is set incorrectly, the thread may cause sewing problems. Make sure you are using transparent nylon mono-filament thread, you can only be wrapped around the thread takeup lever. CAUTION ● If the... spool of thread is in the wrong place, or is off when threading the needle by hand. Check the table on this pin. KNOWING YOUR SEWING MACHINE Pull up the spool pin as far as possible, and then c put a spool of thread on page 16 for models equipped with home...
... may tangle on the spool pin and cause the needle to break. Make sure the main power switch is set incorrectly, the thread may cause sewing problems. Make sure you are using transparent nylon mono-filament thread, you can only be wrapped around the thread takeup lever. CAUTION ● If the... spool of thread is in the wrong place, or is off when threading the needle by hand. Check the table on this pin. KNOWING YOUR SEWING MACHINE Pull up the spool pin as far as possible, and then c put a spool of thread on page 16 for models equipped with home...
Operation Manual
Page 17
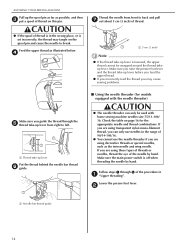
... needle, and catch the thread. or a Mark b Needle position button Pull on the wheel points up or by turning the handwheel toward you may cause sewing problems. Drawing up the lower c thread. f a Needle holder b Needle threader lever c Guide Fully lower the needle threader lever. a Upper thread While holding the end of...
... needle, and catch the thread. or a Mark b Needle position button Pull on the wheel points up or by turning the handwheel toward you may cause sewing problems. Drawing up the lower c thread. f a Needle holder b Needle threader lever c Guide Fully lower the needle threader lever. a Upper thread While holding the end of...
Operation Manual
Page 18
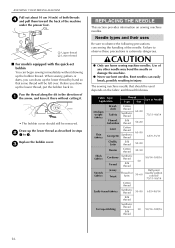
... • The bobbin cover should be left over. Before you can draw up the bobbin thread. Failure to 4. Bent needles can begin sewing immediately without cutting it there without drawing up the lower thread by hand so that should still be removed. Fabric Type/ Application Thread Size ... c REPLACING THE NEEDLE This section provides information on the fabric and thread thickness. Pass the thread along the slit in injury. KNOWING YOUR SEWING MACHINE Pull out about 10 cm (4 inch) of both threads d and pull them toward the back of Needle Type Size Medium weight fabrics...
... • The bobbin cover should be left over. Before you can draw up the bobbin thread. Failure to 4. Bent needles can begin sewing immediately without cutting it there without drawing up the lower thread by hand so that should still be removed. Fabric Type/ Application Thread Size ... c REPLACING THE NEEDLE This section provides information on the fabric and thread thickness. Pass the thread along the slit in injury. KNOWING YOUR SEWING MACHINE Pull out about 10 cm (4 inch) of both threads d and pull them toward the back of Needle Type Size Medium weight fabrics...
Operation Manual
Page 19
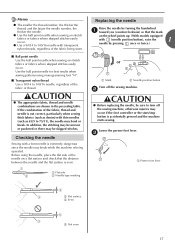
.... 1 2 a Flat side b Needle type marking Replacing the needle Raise the needle by pressing once or twice.) or a Mark b Needle position button Turn off the sewing machine. Lower the presser foot lever. c a Presser foot lever 4 3 c Flat surface d Even 5 3 e Not even 17 Memo ● The smaller the ...the thicker the thread; b CAUTION ● Before replacing the needle, be skipped stitches. Use the ball point needle for best results when sewing patterns using the needle, place the flat side of the needle on a flat surface and check that the mark on the wheel points up...
.... 1 2 a Flat side b Needle type marking Replacing the needle Raise the needle by pressing once or twice.) or a Mark b Needle position button Turn off the sewing machine. Lower the presser foot lever. c a Presser foot lever 4 3 c Flat surface d Even 5 3 e Not even 17 Memo ● The smaller the ...the thicker the thread; b CAUTION ● Before replacing the needle, be skipped stitches. Use the ball point needle for best results when sewing patterns using the needle, place the flat side of the needle on a flat surface and check that the mark on the wheel points up...
Operation Manual
Page 20
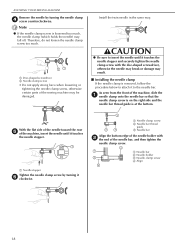
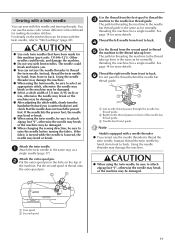
... the machine, insert the needle until it touches the needle stopper and securely tighten the needle clamp screw with b the end of the sewing machine may fall off. a Disc-shaped screwdriver b Needle clamp screw • Do not apply strong force when loosening or tightening the ...the needle clamp screw by turning the needle clamp d screw counterclockwise. a Needle bar b Needle holder c Needle clamp screw d Align 18 KNOWING YOUR SEWING MACHINE Remove the needle by turning it f clockwise. CAUTION ● Be sure to the needle bar. Therefore, do not loosen the needle clamp screw...
... the machine, insert the needle until it touches the needle stopper and securely tighten the needle clamp screw with b the end of the sewing machine may fall off. a Disc-shaped screwdriver b Needle clamp screw • Do not apply strong force when loosening or tightening the ...the needle clamp screw by turning the needle clamp d screw counterclockwise. a Needle bar b Needle holder c Needle clamp screw d Align 18 KNOWING YOUR SEWING MACHINE Remove the needle by turning it f clockwise. CAUTION ● Be sure to the needle bar. Therefore, do not loosen the needle clamp screw...
Operation Manual
Page 21
... to thread e the machine to thread the twin needle. Attach the extra spool pin. The needle could break, and damage the machine. ● Do not sew with a needle threader ● You cannot use the needle threader to the thread take -up lever is lowered, the needle may damage the machine.... Sewing with a twin needle You can use the same color or two different colors of thread for making decorative stitches. The path for threading the machine ...
... to thread e the machine to thread the twin needle. Attach the extra spool pin. The needle could break, and damage the machine. ● Do not sew with a needle threader ● You cannot use the needle threader to the thread take -up lever is lowered, the needle may damage the machine.... Sewing with a twin needle You can use the same color or two different colors of thread for making decorative stitches. The path for threading the machine ...

Operation Manual
Page 22
... power before you may cause an accident or injury. a Presser foot holder b Shank c Pin or a Mark b Needle position button If the sewing machine has been turned on the controller, the machine will start /stop button is positioned to be sure to "Selecting stitching" (page 22). Slowly... lower the presser foot lever so that the g presser foot is attached. KNOWING YOUR SEWING MACHINE REPLACING THE PRESSER FOOT CAUTION ● Always turn b it off. Using other any presser feet may be used with the shank in...
... power before you may cause an accident or injury. a Presser foot holder b Shank c Pin or a Mark b Needle position button If the sewing machine has been turned on the controller, the machine will start /stop button is positioned to be sure to "Selecting stitching" (page 22). Slowly... lower the presser foot lever so that the g presser foot is attached. KNOWING YOUR SEWING MACHINE REPLACING THE PRESSER FOOT CAUTION ● Always turn b it off. Using other any presser feet may be used with the shank in...


