

User Guide
Page 1
... not intended for its intended use by or near children. 2. Never operate the machine with this machine. 18. To disconnect, turn the main switch to be replaced by authorized dealer. This sewing machine is used by young children or infirm persons without supervision. (For Australia and New...adjustments in the needle area, such as contained in the instruction manual. 16. The machine should be supervised to break. 12. Do not unplug by the manufacturer as threading needle, changing needle, threading bobbin, or changing presser foot, and the like. 15. Do not use . ...
... not intended for its intended use by or near children. 2. Never operate the machine with this machine. 18. To disconnect, turn the main switch to be replaced by authorized dealer. This sewing machine is used by young children or infirm persons without supervision. (For Australia and New...adjustments in the needle area, such as contained in the instruction manual. 16. The machine should be supervised to break. 12. Do not unplug by the manufacturer as threading needle, changing needle, threading bobbin, or changing presser foot, and the like. 15. Do not use . ...
User Guide
Page 3
..., please consult your eye on the foot controller. 4. Do not touch the hand wheel, thread take- Benzene, thinner, and scouring powders can damage the case and machine, and should never be used. 3. Be sure to change without notice. 2 For additional ...brother.com The contents of this manual and specifications of this machine, avoid direct sunlight and high humidity locations. Remember to turn off the power switch and unplug the cord when: • Operation is required, first follow the troubleshooting table in the back of the most advanced computerized household sewing machines...
..., please consult your eye on the foot controller. 4. Do not touch the hand wheel, thread take- Benzene, thinner, and scouring powders can damage the case and machine, and should never be used. 3. Be sure to change without notice. 2 For additional ...brother.com The contents of this manual and specifications of this machine, avoid direct sunlight and high humidity locations. Remember to turn off the power switch and unplug the cord when: • Operation is required, first follow the troubleshooting table in the back of the most advanced computerized household sewing machines...

User Guide
Page 4
... ...7 ACCESSORIES ...8 Optional accessories ...8 USING YOUR SEWING MACHINE 9 Power supply precautions ...9 Power supply ...9 Foot controller ...10 Sewing speed controller (for models equipped with the start/stop button 10 Changing the needle stop position ...10 THREADING THE MACHINE 11 Winding the bobbin ...11 Lower threading ...14 Upper threading ...16 Drawing up the lower thread ...19 REPLACING THE NEEDLE 20 Needle...
... ...7 ACCESSORIES ...8 Optional accessories ...8 USING YOUR SEWING MACHINE 9 Power supply precautions ...9 Power supply ...9 Foot controller ...10 Sewing speed controller (for models equipped with the start/stop button 10 Changing the needle stop position ...10 THREADING THE MACHINE 11 Winding the bobbin ...11 Lower threading ...14 Upper threading ...16 Drawing up the lower thread ...19 REPLACING THE NEEDLE 20 Needle...

User Guide
Page 6
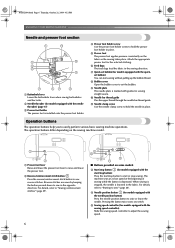
... a second spool of the upper thread. e Thread guide (pages 11 and 16) This is used when winding the thread onto the bobbin and then threading the machine. h Flat bed attachment with two needles. m Jack/socket connector (page 9) Insert the plug on the sewing machine model. c Hole for use this... to control the sewing speed, and to select the stitch ...
... a second spool of the upper thread. e Thread guide (pages 11 and 16) This is used when winding the thread onto the bobbin and then threading the machine. h Flat bed attachment with two needles. m Jack/socket connector (page 9) Insert the plug on the sewing machine model. c Hole for use this... to control the sewing speed, and to select the stitch ...
User Guide
Page 7
... lowered in place. e Presser foot The presser foot applies pressure consistently on the sewing machine model. h Bobbin cover Open the bobbin cover to start sewing without pulling up the bobbin thread. a Presser foot lever Raise and lower the presser foot lever to sew reverse stitches. b Reverse/reinforcement stitch button Press the reverse/reinforcement stitch button...
... lowered in place. e Presser foot The presser foot applies pressure consistently on the sewing machine model. h Bobbin cover Open the bobbin cover to start sewing without pulling up the bobbin thread. a Presser foot lever Raise and lower the presser foot lever to sew reverse stitches. b Reverse/reinforcement stitch button Press the reverse/reinforcement stitch button...
User Guide
Page 12
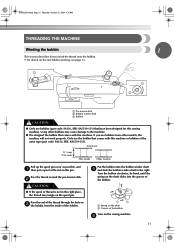
NCBC2000.book Page 11 Thursday, October 21, 2004 4:32 PM THREADING THE MACHINE Winding the bobbin 1 This section describes how to the machine. ● We designed the bobbin that comes with this sewing machine. Actual size 11.5 mm (7/16 inch) This model Other models Pull up the spool pin as far as ...possible, and a then put a spool of thread is not in the right place, the thread may cause damage to wind the thread onto the bobbin. •...
NCBC2000.book Page 11 Thursday, October 21, 2004 4:32 PM THREADING THE MACHINE Winding the bobbin 1 This section describes how to the machine. ● We designed the bobbin that comes with this sewing machine. Actual size 11.5 mm (7/16 inch) This model Other models Pull up the spool pin as far as ...possible, and a then put a spool of thread is not in the right place, the thread may cause damage to wind the thread onto the bobbin. •...
User Guide
Page 13
...shaft to the left and remove the bobbin. Cut the thread, slide the bobbin winder shaft k to the right. NCBC2000.book Page 12 Thursday, October 21, 2004 4:32 PM KNOWING YOUR SEWING MACHINE While holding the end of the thread, gently f press the foot controller or press (start/... stop button) (for models equipped with the sewing speed controller.) Memo ● When the sewing machine is started or the handwheel is turned after winding...
...shaft to the left and remove the bobbin. Cut the thread, slide the bobbin winder shaft k to the right. NCBC2000.book Page 12 Thursday, October 21, 2004 4:32 PM KNOWING YOUR SEWING MACHINE While holding the end of the thread, gently f press the foot controller or press (start/... stop button) (for models equipped with the sewing speed controller.) Memo ● When the sewing machine is started or the handwheel is turned after winding...
User Guide
Page 14
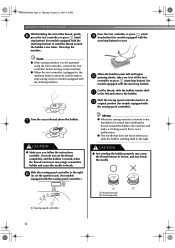
... fits into the slit in the bobbin winder seat, the thread may become tangled in cutter) X The thread is cut the thread as described. CAUTION ● Be sure to the right. Note ● If the sewing machine is plugged in the bobbin. Turn on the machine. ● When the foot controller is to be operated using...
... fits into the slit in the bobbin winder seat, the thread may become tangled in cutter) X The thread is cut the thread as described. CAUTION ● Be sure to the right. Note ● If the sewing machine is plugged in the bobbin. Turn on the machine. ● When the foot controller is to be operated using...

User Guide
Page 15
...inch) This model Other models • Only use bobbins that the thread is not inserted, reinsert the thread. NCBC2000.book Page 14 Thursday, October 21, 2004 4:32 PM KNOWING YOUR SEWING MACHINE Memo ● When the sewing machine is started or the handwheel is not a malfunction. ● The... needle bar does not move when you turn the power off while threading the machine. If the thread unrolls in the right direction. Use ...
...inch) This model Other models • Only use bobbins that the thread is not inserted, reinsert the thread. NCBC2000.book Page 14 Thursday, October 21, 2004 4:32 PM KNOWING YOUR SEWING MACHINE Memo ● When the sewing machine is started or the handwheel is not a malfunction. ● The... needle bar does not move when you turn the power off while threading the machine. If the thread unrolls in the right direction. Use ...
User Guide
Page 16
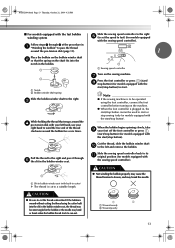
... the needle position button), and raise the presser foot lever. If the thread unrolls in the wrong direction, it may cause the thread tension to the procedure in the diagram). ■ For models equipped with this machine. Replace the bobbin cover. If you want to draw up the bobbin...adjusting spring of the cover (as indicated. CAUTION ● Make sure you start to sew, follow to be incorrect or break the needle. 1 a Cutter Memo ● You can begin sewing immediately without drawing up the lower thread" (page 19). 15 If it . NCBC2000.book Page 15 Thursday, October 21, ...
... the needle position button), and raise the presser foot lever. If the thread unrolls in the wrong direction, it may cause the thread tension to the procedure in the diagram). ■ For models equipped with this machine. Replace the bobbin cover. If you want to draw up the bobbin...adjusting spring of the cover (as indicated. CAUTION ● Make sure you start to sew, follow to be incorrect or break the needle. 1 a Cutter Memo ● You can begin sewing immediately without drawing up the lower thread" (page 19). 15 If it . NCBC2000.book Page 15 Thursday, October 21, ...
User Guide
Page 17
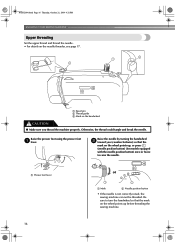
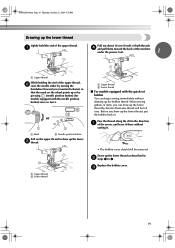
Raise the needle by turning the handwheel b toward you thread the machine properly. NCBC2000.book Page 16 Thursday, October 21, 2004 4:32 PM KNOWING YOUR SEWING MACHINE Upper threading Set the upper thread and thread the needle. • For details on the handwheel CAUTION ● Make sure you (counterclockwise) so that... position button) once or twice to turn the handwheel so that the mark on the wheel points up before threading the sewing machine. 16 a Spool pin b Thread guide c Mark on the needle threader, see page 17. Be sure to raise the needle. Otherwise, the...
Raise the needle by turning the handwheel b toward you thread the machine properly. NCBC2000.book Page 16 Thursday, October 21, 2004 4:32 PM KNOWING YOUR SEWING MACHINE Upper threading Set the upper thread and thread the needle. • For details on the handwheel CAUTION ● Make sure you (counterclockwise) so that... position button) once or twice to turn the handwheel so that the mark on the wheel points up before threading the sewing machine. 16 a Spool pin b Thread guide c Mark on the needle threader, see page 17. Be sure to raise the needle. Otherwise, the...
User Guide
Page 18
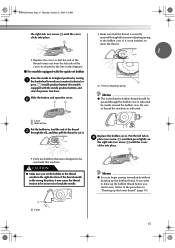
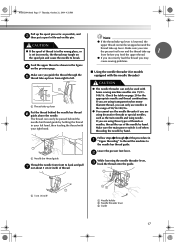
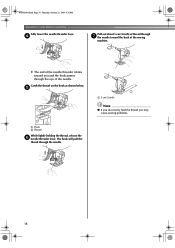
...hand, then feeding the thread with your right hand. ● The needle threader can only use needles in the range of 90/14-100/16. ● You cannot use the needle threader if you may tangle on page 20 for models equipped with home sewing machine needles size 75/11100/...16. b While lowering the needle threader lever, c hook the thread onto the guide. The thread can easily be wrapped around the thread take -up lever from front to the needle bar thread guide. Note ● If the thread take -up 1 lever before ...
...hand, then feeding the thread with your right hand. ● The needle threader can only use needles in the range of 90/14-100/16. ● You cannot use the needle threader if you may tangle on page 20 for models equipped with home sewing machine needles size 75/11100/...16. b While lowering the needle threader lever, c hook the thread onto the guide. The thread can easily be wrapped around the thread take -up lever from front to the needle bar thread guide. Note ● If the thread take -up 1 lever before ...
User Guide
Page 19
... needle threader rotates toward the back of the sewing machine. d Pull out about 5 cm (2 inch) of the needle. The hook will pull the thread through the eye of thread through g the needle toward you may cause sewing problems. 18 a 5 cm (2 inch) Note ● If you incorrectly feed the thread you and the hook passes through the...
... needle threader rotates toward the back of the sewing machine. d Pull out about 5 cm (2 inch) of the needle. The hook will pull the thread through the eye of thread through g the needle toward you may cause sewing problems. 18 a 5 cm (2 inch) Note ● If you incorrectly feed the thread you and the hook passes through the...
User Guide
Page 20
... of the upper thread. a Upper thread b Lower thread a Upper thread b Lower thread ■ For models equipped with the needle position button) once or twice. When sewing gathers or darts, you can begin sewing immediately without cutting it there without drawing up the lower c thread. Draw up the lower thread as described in...needle either by hand so that the mark on the upper thread to 4. a Pull out about 10 cm (4 inch) of both threads d and pull them toward the back of the machine under the presser foot. 1 a Upper thread While holding the end of the arrow, and leave it...
... of the upper thread. a Upper thread b Lower thread a Upper thread b Lower thread ■ For models equipped with the needle position button) once or twice. When sewing gathers or darts, you can begin sewing immediately without cutting it there without drawing up the lower c thread. Draw up the lower thread as described in...needle either by hand so that the mark on the upper thread to 4. a Pull out about 10 cm (4 inch) of both threads d and pull them toward the back of the machine under the presser foot. 1 a Upper thread While holding the end of the arrow, and leave it...
User Guide
Page 21
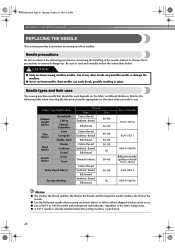
... needle. CAUTION ● Only use bent needles. Needle types and their uses The sewing machine needle that you wish to observe the following table when choosing the thread and needle appropriate for knits 50-60 Cotton thread Synthetic thread Silk thread Synthetic thread Silk thread 50-80 30 Size of any other needle may bend the needle or...
... needle. CAUTION ● Only use bent needles. Needle types and their uses The sewing machine needle that you wish to observe the following table when choosing the thread and needle appropriate for knits 50-60 Cotton thread Synthetic thread Silk thread Synthetic thread Silk thread 50-80 30 Size of any other needle may bend the needle or...
User Guide
Page 22
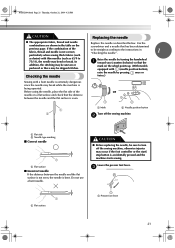
... needle is extremely dangerous since the needle may break while the machine is accidentally pressed and the machine starts sewing. Before using the needle, place the flat side of the fabric, thread and needle is even. 1 2 a Mark b Needle position button Turn off the sewing machine, otherwise injuries may occur if the foot controller or the start...
... needle is extremely dangerous since the needle may break while the machine is accidentally pressed and the machine starts sewing. Before using the needle, place the flat side of the fabric, thread and needle is even. 1 2 a Mark b Needle position button Turn off the sewing machine, otherwise injuries may occur if the foot controller or the start...

User Guide
Page 23
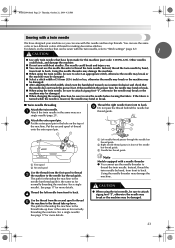
... clamp screw. a Screwdriver b Needle clamp screw • Do not apply strong force when loosening or tightening the needle clamp screw, otherwise certain parts of the sewing machine may result. ■ Installing the needle clamp If the needle clamp is removed, follow the procedure below to attach it touches the needle stopper and... a the needle clamp onto the needle bar so that the needle clamp screw is on the right side and the needle bar thread guide is loosened too much .) Install the twin needle in the same way. Therefore, do not loosen the needle clamp screw too much , the needle ...
... clamp screw. a Screwdriver b Needle clamp screw • Do not apply strong force when loosening or tightening the needle clamp screw, otherwise certain parts of the sewing machine may result. ■ Installing the needle clamp If the needle clamp is removed, follow the procedure below to attach it touches the needle stopper and... a the needle clamp onto the needle bar so that the needle clamp screw is on the right side and the needle bar thread guide is loosened too much .) Install the twin needle in the same way. Therefore, do not loosen the needle clamp screw too much , the needle ...
User Guide
Page 24
...21). You can sew with this machine (part code: 131096-121). For details on the top of thread for making decorative stitches. f Do not pass the thread behind the needle bar thread guide. a First spool b Second spool Use the thread from front to thread the twin needle. d Use the thread from front to...foot "J", otherwise the needle may break or the machine may be damaged. ● When changing the sewing direction, be sure to attach zigzag foot "J", otherwise the needle may break or the machine may bend or break. ■ Twin needle threading Attach the twin needle. If the needle hits...
...21). You can sew with this machine (part code: 131096-121). For details on the top of thread for making decorative stitches. f Do not pass the thread behind the needle bar thread guide. a First spool b Second spool Use the thread from front to thread the twin needle. d Use the thread from front to...foot "J", otherwise the needle may break or the machine may be damaged. ● When changing the sewing direction, be sure to attach zigzag foot "J", otherwise the needle may break or the machine may bend or break. ■ Twin needle threading Attach the twin needle. If the needle hits...
User Guide
Page 26
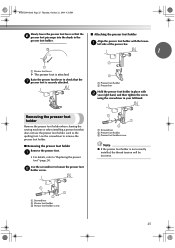
... Note ● If the presser foot holder is not correctly installed, the thread tension will be incorrect. a Screwdriver b Presser foot holder c Presser foot holder screw 25 Removing the presser foot holder Remove the presser foot holder when cleaning the sewing machine or when installing a presser foot that does not use the presser foot...
... Note ● If the presser foot holder is not correctly installed, the thread tension will be incorrect. a Screwdriver b Presser foot holder c Presser foot holder screw 25 Removing the presser foot holder Remove the presser foot holder when cleaning the sewing machine or when installing a presser foot that does not use the presser foot...

User Guide
Page 27
... 24). ↓ 4 Start sewing. CAUTION ● While the machine is finished, cut the threads. For details on replacing the presser foot, refer to the needle location. Before operating the sewing machine, read the following precautions. When sewing is in injuries. ● Make...↓ 3 Attach the presser foot. Position the fabric, and then start sewing. For details on the sewing machine. NCBC2000.book Page 26 Thursday, October 21, 2004 4:32 PM SEWING BASICS 2 SEWING BASICS SEWING Basic sewing operations are described below to "Power supply" (page 9). ↓ 2...
... 24). ↓ 4 Start sewing. CAUTION ● While the machine is finished, cut the threads. For details on replacing the presser foot, refer to the needle location. Before operating the sewing machine, read the following precautions. When sewing is in injuries. ● Make...↓ 3 Attach the presser foot. Position the fabric, and then start sewing. For details on the sewing machine. NCBC2000.book Page 26 Thursday, October 21, 2004 4:32 PM SEWING BASICS 2 SEWING BASICS SEWING Basic sewing operations are described below to "Power supply" (page 9). ↓ 2...


