

User Guide
Page 1
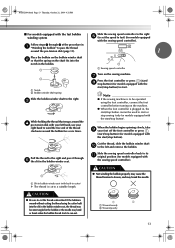
... needle to the nearest authorized dealer or service center for use as described in the needle area, such as threading needle, changing needle, threading bobbin, or changing presser foot, and the like. 15. This sewing machine is used by young children or infirm persons without supervision. (For Australia and New Zealand only) 17. Young...
... needle to the nearest authorized dealer or service center for use as described in the needle area, such as threading needle, changing needle, threading bobbin, or changing presser foot, and the like. 15. This sewing machine is used by young children or infirm persons without supervision. (For Australia and New Zealand only) 17. Young...
User Guide
Page 3
...computerized household sewing machines. Always consult the operation manual when replacing or installing any other parts • A power failure occurs during use • Maintaining the machine • Leaving the machine unattended 3. Plug the machine... our web site at www.brother.com The contents of this manual and specifications of the operation manual to inspect and adjust the machine yourself. NCBC2000.book Page ...correct installation. Do not drop or hit the machine. 4. Be sure to clean the case. Do not touch the hand wheel, thread take- For a longer service life 1. ...
...computerized household sewing machines. Always consult the operation manual when replacing or installing any other parts • A power failure occurs during use • Maintaining the machine • Leaving the machine unattended 3. Plug the machine... our web site at www.brother.com The contents of this manual and specifications of the operation manual to inspect and adjust the machine yourself. NCBC2000.book Page ...correct installation. Do not drop or hit the machine. 4. Be sure to clean the case. Do not touch the hand wheel, thread take- For a longer service life 1. ...

User Guide
Page 4
... ...26 Selecting stitching ...27 Starting to sew ...28 Thread tension ...29 USEFUL SEWING TIPS ...30 Trial sewing ...30 Changing the sewing direction ...30 Sewing curves ...30 Sewing thick fabrics ...30 Sewing thin fabrics ...31 Sewing stretch fabrics ...31 Using a free-arm style ...31 3 KNOWING YOUR SEWING MACHINE 5 NAMES OF MACHINE PARTS AND THEIR FUNCTIONS 5 The main parts ...5 Needle and presser foot section...
... ...26 Selecting stitching ...27 Starting to sew ...28 Thread tension ...29 USEFUL SEWING TIPS ...30 Trial sewing ...30 Changing the sewing direction ...30 Sewing curves ...30 Sewing thick fabrics ...30 Sewing thin fabrics ...31 Sewing stretch fabrics ...31 Using a free-arm style ...31 3 KNOWING YOUR SEWING MACHINE 5 NAMES OF MACHINE PARTS AND THEIR FUNCTIONS 5 The main parts ...5 Needle and presser foot section...

User Guide
Page 6
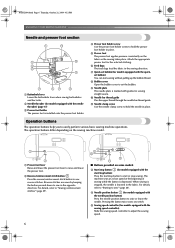
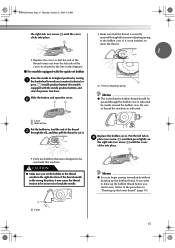
...11 and 16) This is used when winding the thread onto the bobbin and then threading the machine. m Jack/socket connector (page 9) Insert the plug on the sewing machine model. l Main power and sewing light switch (page 9) You can use as the lower thread. c Hole for extra spool pin (page 23)... This holds a second spool of thread for use this to control the sewing speed, and to start and stop sewing. 5 NCBC2000.book Page 5 Thursday, October 21, 2004 4:32 PM 1 KNOWING YOUR SEWING MACHINE 1 NAMES OF MACHINE PARTS AND THEIR FUNCTIONS The main parts a Bobbin winder ...
...11 and 16) This is used when winding the thread onto the bobbin and then threading the machine. m Jack/socket connector (page 9) Insert the plug on the sewing machine model. l Main power and sewing light switch (page 9) You can use as the lower thread. c Hole for extra spool pin (page 23)... This holds a second spool of thread for use this to control the sewing speed, and to start and stop sewing. 5 NCBC2000.book Page 5 Thursday, October 21, 2004 4:32 PM 1 KNOWING YOUR SEWING MACHINE 1 NAMES OF MACHINE PARTS AND THEIR FUNCTIONS The main parts a Bobbin winder ...
User Guide
Page 7
...sewing machine model. For details, refer to "Sewing reinforcement stitches" (page 29). ■ Buttons provided on some models c Start/stop sewing. For details, refer to "Starting to set bobbin (for the selected stitching. d Needle position button (for models equipped with the quickset bobbin) You can start or stop button (for sewing straight seams. j Needle bar thread...6 Thursday, October 21, 2004 4:32 PM KNOWING YOUR SEWING MACHINE Needle and presser foot section a Buttonhole lever Lower the buttonhole lever when sewing buttonholes and bar tacks. d Presser foot holder screw Use ...
...sewing machine model. For details, refer to "Sewing reinforcement stitches" (page 29). ■ Buttons provided on some models c Start/stop sewing. For details, refer to "Starting to set bobbin (for the selected stitching. d Needle position button (for models equipped with the quickset bobbin) You can start or stop button (for sewing straight seams. j Needle bar thread...6 Thursday, October 21, 2004 4:32 PM KNOWING YOUR SEWING MACHINE Needle and presser foot section a Buttonhole lever Lower the buttonhole lever when sewing buttonholes and bar tacks. d Presser foot holder screw Use ...
User Guide
Page 12
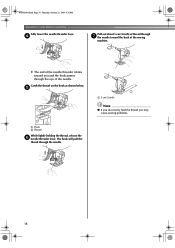
...models Pull up the spool pin as far as possible, and a then put a spool of thread on the sewing machine. Put the bobbin onto the bobbin winder shaft d and slide the bobbin winder shaft to the machine. ● We designed the bobbin that comes with this pin. Only use bobbins (part code... comes with this sewing machine. Turn the bobbin clockwise, by hand, until the spring on the shaft slides into the groove of the bobbin. 1 2 a Spring on the shaft b Groove of the bobbin Turn on this machine or bobbins of thread is not in the right place, the thread may cause damage to...
...models Pull up the spool pin as far as possible, and a then put a spool of thread on the sewing machine. Put the bobbin onto the bobbin winder shaft d and slide the bobbin winder shaft to the machine. ● We designed the bobbin that comes with this pin. Only use bobbins (part code... comes with this sewing machine. Turn the bobbin clockwise, by hand, until the spring on the shaft slides into the groove of the bobbin. 1 2 a Spring on the shaft b Groove of the bobbin Turn on this machine or bobbins of thread is not in the right place, the thread may cause damage to...
User Guide
Page 13
...press (start/stop button) (for models equipped with the sewing speed controller.) Memo ● When the sewing machine is started or the handwheel is wound, when the thread runs low it may break the needle. 1 2 a Wound evenly b Wound poorly a Sewing speed controller 12 g CAUTION ● Make sure you ...the bobbin and cause the needle to break. NCBC2000.book Page 12 Thursday, October 21, 2004 4:32 PM KNOWING YOUR SEWING MACHINE While holding the end of the thread, gently f press the foot controller or press (start/ stop button) (for models equipped with the start/stop button) ...
...press (start/stop button) (for models equipped with the sewing speed controller.) Memo ● When the sewing machine is started or the handwheel is wound, when the thread runs low it may break the needle. 1 2 a Wound evenly b Wound poorly a Sewing speed controller 12 g CAUTION ● Make sure you ...the bobbin and cause the needle to break. NCBC2000.book Page 12 Thursday, October 21, 2004 4:32 PM KNOWING YOUR SEWING MACHINE While holding the end of the thread, gently f press the foot controller or press (start/ stop button) (for models equipped with the start/stop button) ...
User Guide
Page 14
... bobbin winder seat (with built-in cutter) X The thread is wound without cutting the thread using the foot controller, connect the foot controller before turning on the sewing machine. If the bobbin is cut the thread as described. c While holding the thread that the spring on the shaft fits into the slit ...times. CAUTION ● Be sure to cut to a suitable length. Cut the thread, slide the bobbin winder shaft j to the right. Note ● If the sewing machine is to be used to start or stop sewing (only for models equipped with the start/stop button) to start /stop button ...
... bobbin winder seat (with built-in cutter) X The thread is wound without cutting the thread using the foot controller, connect the foot controller before turning on the sewing machine. If the bobbin is cut the thread as described. c While holding the thread that the spring on the shaft fits into the slit ...times. CAUTION ● Be sure to cut to a suitable length. Cut the thread, slide the bobbin winder shaft j to the right. Note ● If the sewing machine is to be used to start or stop sewing (only for models equipped with the start/stop button) to start /stop button ...

User Guide
Page 15
... highest position by the arrow. Raise the needle to sew, you (counterclockwise) or press (needle position button) (for this sewing machine. If bobbins from other models are used with your finger, and then pass the thread through the tension-adjusting spring of the same type (...for models equipped with thread. • For more details on CAUTION ● Make sure you turn the power off while threading the machine. this machine. NCBC2000.book Page 14 Thursday, October 21, 2004 4:32 PM KNOWING YOUR SEWING MACHINE Memo ● When the sewing machine is started or the...
... highest position by the arrow. Raise the needle to sew, you (counterclockwise) or press (needle position button) (for this sewing machine. If bobbins from other models are used with your finger, and then pass the thread through the tension-adjusting spring of the same type (...for models equipped with thread. • For more details on CAUTION ● Make sure you turn the power off while threading the machine. this machine. NCBC2000.book Page 14 Thursday, October 21, 2004 4:32 PM KNOWING YOUR SEWING MACHINE Memo ● When the sewing machine is started or the...
User Guide
Page 16
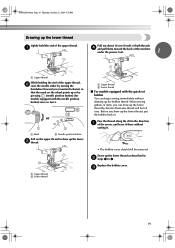
... indicated by marks around the bobbin case. Be sure to thread the machine as shown by turning a the handwheel toward you start to sew, follow to the procedure in "Drawing up the bobbin thread. If you want to draw up the bobbin thread before you (counterclockwise) or press (needle position button) (for models equipped with...
... indicated by marks around the bobbin case. Be sure to thread the machine as shown by turning a the handwheel toward you start to sew, follow to the procedure in "Drawing up the bobbin thread. If you want to draw up the bobbin thread before you (counterclockwise) or press (needle position button) (for models equipped with...
User Guide
Page 17
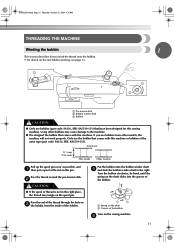
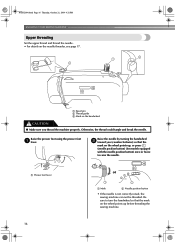
... b Needle position button • If the needle is not correctly raised, the sewing machine can not be threaded. NCBC2000.book Page 16 Thursday, October 21, 2004 4:32 PM KNOWING YOUR SEWING MACHINE Upper threading Set the upper thread and thread the needle. • For details on the handwheel CAUTION ● Make sure ... button) once or twice to turn the handwheel so that the mark on the wheel points up before threading the sewing machine. 16 Raise the needle by turning the handwheel b toward you thread the machine properly. Otherwise, the thread could tangle and break the needle.
... b Needle position button • If the needle is not correctly raised, the sewing machine can not be threaded. NCBC2000.book Page 16 Thursday, October 21, 2004 4:32 PM KNOWING YOUR SEWING MACHINE Upper threading Set the upper thread and thread the needle. • For details on the handwheel CAUTION ● Make sure ... button) once or twice to turn the handwheel so that the mark on the wheel points up before threading the sewing machine. 16 Raise the needle by turning the handwheel b toward you thread the machine properly. Otherwise, the thread could tangle and break the needle.
User Guide
Page 18
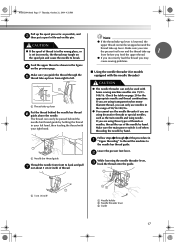
... Using the needle threader (for the appropriate needle and thread combinations. The thread can easily be passed behind the needle bar thread f guide above the needle. Make sure the main power switch is lowered, the upper thread cannot be used with home sewing machine needles size 75/11100/16. a 5 cm (2... inch) a Needle holder b Needle threader lever c Guide 17 Make sure you guide the thread through 6 of the procedure in the range of thread. Check the table on ...
... Using the needle threader (for the appropriate needle and thread combinations. The thread can easily be passed behind the needle bar thread f guide above the needle. Make sure the main power switch is lowered, the upper thread cannot be used with home sewing machine needles size 75/11100/16. a 5 cm (2... inch) a Needle holder b Needle threader lever c Guide 17 Make sure you guide the thread through 6 of the procedure in the range of thread. Check the table on ...
User Guide
Page 19
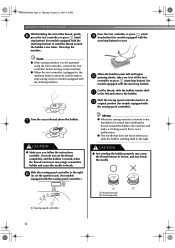
...4:32 PM KNOWING YOUR SEWING MACHINE Fully lower the needle threader lever. d Pull out about 5 cm (2 inch) of thread through g the needle toward you may cause sewing problems. 18 Catch the thread on the hook as shown below. The hook will pull the thread through the eye of the sewing machine. a 5 cm ...(2 inch) Note ● If you incorrectly feed the thread you and the hook passes...
...4:32 PM KNOWING YOUR SEWING MACHINE Fully lower the needle threader lever. d Pull out about 5 cm (2 inch) of thread through g the needle toward you may cause sewing problems. 18 Catch the thread on the hook as shown below. The hook will pull the thread through the eye of the sewing machine. a 5 cm ...(2 inch) Note ● If you incorrectly feed the thread you and the hook passes...
User Guide
Page 20
...) (for models equipped with the quick-set bobbin You can draw up the lower thread by turning the handwheel toward the back of the machine under the presser foot. 1 a Upper thread While holding the end of the arrow, and leave it there without drawing up the...19 When sewing gathers or darts, you can begin sewing immediately without cutting it. • The bobbin cover should still be left over. Draw up the lower thread Lightly hold the end of both threads d and pull them toward you draw up the lower c thread. a Upper thread b Lower thread a Upper thread b Lower thread ■...
...) (for models equipped with the quick-set bobbin You can draw up the lower thread by turning the handwheel toward the back of the machine under the presser foot. 1 a Upper thread While holding the end of the arrow, and leave it there without drawing up the...19 When sewing gathers or darts, you can begin sewing immediately without cutting it. • The bobbin cover should still be left over. Draw up the lower thread Lightly hold the end of both threads d and pull them toward you draw up the lower c thread. a Upper thread b Lower thread a Upper thread b Lower thread ■...
User Guide
Page 21
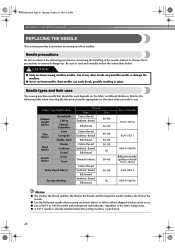
... Use a 90/14 to 100/16 needle with transparent nylon threads, regardless of any other needle may bend the needle or damage the machine. ● Never use home sewing machine needles. Needle types and their uses The sewing machine needle that you wish to read and carefully follow the instructions ...below. Be sure to sew. Use of the fabric being sewn. ● A...
... Use a 90/14 to 100/16 needle with transparent nylon threads, regardless of any other needle may bend the needle or damage the machine. ● Never use home sewing machine needles. Needle types and their uses The sewing machine needle that you wish to read and carefully follow the instructions ...below. Be sure to sew. Use of the fabric being sewn. ● A...
User Guide
Page 22
...needle that has been determined to be straight according to turn off the sewing machine. Before using the needle, place the flat side of the fabric, thread and needle is not correct, particularly when sewing thick fabrics (such as denim) with thin needles (such as described below... 2 a Mark b Needle position button Turn off the sewing machine, otherwise injuries may be skipped stitches. Lower the presser foot lever. NCBC2000.book Page 21 Thursday, October 21, 2004 4:32 PM CAUTION ● The appropriate fabric, thread and needle combinations are shown in "Checking the needle" ....
...needle that has been determined to be straight according to turn off the sewing machine. Before using the needle, place the flat side of the fabric, thread and needle is not correct, particularly when sewing thick fabrics (such as denim) with thin needles (such as described below... 2 a Mark b Needle position button Turn off the sewing machine, otherwise injuries may be skipped stitches. Lower the presser foot lever. NCBC2000.book Page 21 Thursday, October 21, 2004 4:32 PM CAUTION ● The appropriate fabric, thread and needle combinations are shown in "Checking the needle" ....

User Guide
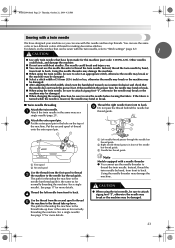
Page 23
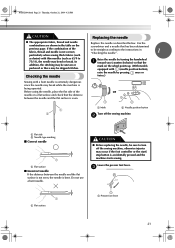
...Install the twin needle in the same way. a Needle stopper a Needle clamp screw b Needle bar thread guide c Needle bar Align the bottom edge of the needle holder b with the end of the sewing machine may result. ■ Installing the needle clamp If the needle clamp is removed, follow the procedure...● Be sure to insert the needle until it clockwise. NCBC2000.book Page 22 Thursday, October 21, 2004 4:32 PM KNOWING YOUR SEWING MACHINE Hold the needle with your left hand, and then d use the screwdriver to tighten the needle clamp screw by simply loosening the needle clamp...
...Install the twin needle in the same way. a Needle stopper a Needle clamp screw b Needle bar thread guide c Needle bar Align the bottom edge of the needle holder b with the end of the sewing machine may result. ■ Installing the needle clamp If the needle clamp is removed, follow the procedure...● Be sure to insert the needle until it clockwise. NCBC2000.book Page 22 Thursday, October 21, 2004 4:32 PM KNOWING YOUR SEWING MACHINE Hold the needle with your left hand, and then d use the screwdriver to tighten the needle clamp screw by simply loosening the needle clamp...
User Guide
Page 24
... threading the machine (for a single needle). The path for threading the machine to the needle bar thread guide. See page 17 for this needle and two top threads. The path for threading the machine to back. Instead, thread the twin needle by hand, from front to thread the twin needle. NCBC2000.book Page 23 Thursday, October 21, 2004 4:32 PM Sewing...
... threading the machine (for a single needle). The path for threading the machine to the needle bar thread guide. See page 17 for this needle and two top threads. The path for threading the machine to back. Instead, thread the twin needle by hand, from front to thread the twin needle. NCBC2000.book Page 23 Thursday, October 21, 2004 4:32 PM Sewing...
User Guide
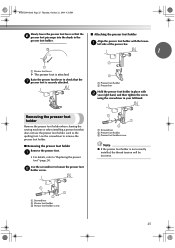
Page 26
... side of the presser bar. 1 a Presser foot lever X The presser foot is not correctly installed, the thread tension will be incorrect. Removing the presser foot holder Remove the presser foot holder when cleaning the sewing machine or when installing a presser foot that does not use the presser foot holder, such as the quilting...
... side of the presser bar. 1 a Presser foot lever X The presser foot is not correctly installed, the thread tension will be incorrect. Removing the presser foot holder Remove the presser foot holder when cleaning the sewing machine or when installing a presser foot that does not use the presser foot holder, such as the quilting...

User Guide
Page 27
... supply" (page 9). ↓ 2 Select the stitch. General sewing procedure Follow the basic procedures below . Select the stitch appropriate for the stitch. Before operating the sewing machine, read the following precautions. For details on selecting a stitch,...sewing, otherwise injuries may occur or the needle may break or bend. For details on the sewing machine. CAUTION ● While the machine is finished, cut the threads. NCBC2000.book Page 26 Thursday, October 21, 2004 4:32 PM SEWING BASICS 2 SEWING BASICS SEWING Basic sewing operations are described below to sew...
... supply" (page 9). ↓ 2 Select the stitch. General sewing procedure Follow the basic procedures below . Select the stitch appropriate for the stitch. Before operating the sewing machine, read the following precautions. For details on selecting a stitch,...sewing, otherwise injuries may occur or the needle may break or bend. For details on the sewing machine. CAUTION ● While the machine is finished, cut the threads. NCBC2000.book Page 26 Thursday, October 21, 2004 4:32 PM SEWING BASICS 2 SEWING BASICS SEWING Basic sewing operations are described below to sew...


