
Users Manual - English
Page 3
... burns, fire, electric shock, or injury to persons. 2 Always unplug the machine from the electrical outlet immediately after using the machine and immediately unplug the power cord. • When transporting the machine, be careful not to make any other part may injure your machine if the... power is spilled on the cord. • Plug the machine directly into the electrical outlet. Do not pull on the unit. Return the machine to the ...
... burns, fire, electric shock, or injury to persons. 2 Always unplug the machine from the electrical outlet immediately after using the machine and immediately unplug the power cord. • When transporting the machine, be careful not to make any other part may injure your machine if the... power is spilled on the cord. • Plug the machine directly into the electrical outlet. Do not pull on the unit. Return the machine to the ...

Users Manual - English
Page 4
otherwise, the machine, power cord or garment being sewn may fall, resulting in injuries. 5 Special care is required when sewing: • Always pay close attention is necessary when the ...
otherwise, the machine, power cord or garment being sewn may fall, resulting in injuries. 5 Special care is required when sewing: • Always pay close attention is necessary when the ...

Users Manual - English
Page 6
... THEIR FUNCTIONS 8 The main parts ...8 Needle and presser foot section ...9 Operation buttons ...9 Operation panel ...10 Spool pin ...10 USING YOUR SEWING MACHINE 12 Power supply precautions ...12 Power supply ...12 Foot controller ...13 Sewing speed controller (for models equipped with the start/stop button 13 Changing the needle stop position ...13 THREADING...
... THEIR FUNCTIONS 8 The main parts ...8 Needle and presser foot section ...9 Operation buttons ...9 Operation panel ...10 Spool pin ...10 USING YOUR SEWING MACHINE 12 Power supply precautions ...12 Power supply ...12 Foot controller ...13 Sewing speed controller (for models equipped with the start/stop button 13 Changing the needle stop position ...13 THREADING...

Users Manual - English
Page 10
... attachment with accessory compartment (pages 7 and 44) g Operation buttons (page 9) The operation buttons differ depending on the power supply cord into the jack/ socket connector. j Handwheel This is used to cut them. l Main power and sewing light switch (page 12) You can use as the lower thread. o Foot controller jack/socket (page... disc (page 14) Pass the thread under this operation manual may differ from the actual machine. n Foot controller (page 13) You can turn the main power and sewing light switch on the sewing machine model.
... attachment with accessory compartment (pages 7 and 44) g Operation buttons (page 9) The operation buttons differ depending on the power supply cord into the jack/ socket connector. j Handwheel This is used to cut them. l Main power and sewing light switch (page 12) You can use as the lower thread. o Foot controller jack/socket (page... disc (page 14) Pass the thread under this operation manual may differ from the actual machine. n Foot controller (page 13) You can turn the main power and sewing light switch on the sewing machine model.

Users Manual - English
Page 14
...not modify the plug in the outlet, reverse the plug. Do not place heavy objects on when the machine is turned off the main power first. Do not subject the cord to observe the following circumstances: • When you are firmly inserted into the electrical outlet and the... • When the machine does not operate correctly due to a bad connection or a disconnection • During electrical storms CAUTION ● Use only the power cord included with this plug is intended to install the proper outlet. These things may result. Otherwise a fire may damage the cord and cause fire...
...not modify the plug in the outlet, reverse the plug. Do not place heavy objects on when the machine is turned off the main power first. Do not subject the cord to observe the following circumstances: • When you are firmly inserted into the electrical outlet and the... • When the machine does not operate correctly due to a bad connection or a disconnection • During electrical storms CAUTION ● Use only the power cord included with this plug is intended to install the proper outlet. These things may result. Otherwise a fire may damage the cord and cause fire...
Users Manual - English
Page 21
... foot controller and the machine starts to loosen, breaking the needle and resulting in d the direction shown by turning a the handwheel toward you turn the power off the sewing machine.
... foot controller and the machine starts to loosen, breaking the needle and resulting in d the direction shown by turning a the handwheel toward you turn the power off the sewing machine.

Users Manual - English
Page 27
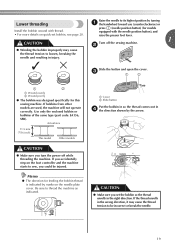
... thread guide by holding the thread in "Upper threading" to thread the machine to the needle bar thread guide. ● Make sure you turn the power off the sewing machine. m CAUTION "Upper threading" (page 22). When using the needle threader (for models equipped with the needle threader). a Needle bar thread guide...
... thread guide by holding the thread in "Upper threading" to thread the machine to the needle bar thread guide. ● Make sure you turn the power off the sewing machine. m CAUTION "Upper threading" (page 22). When using the needle threader (for models equipped with the needle threader). a Needle bar thread guide...

Users Manual - English
Page 35
...FOOT CAUTION 1 ● Always turn off the sewing machine, otherwise injuries may occur if the foot controller or the start and you leave the power on and step on the wheel points up. (With models equipped with this machine. Position the presser foot so the letter indicating the presser ... the needle by pressing once or twice.) or a Mark b Needle position button If the sewing machine has been turned on, b turn it off the power before you have chosen. To select a stitch, refer to release the presser foot. Replace the presser foot as described below the holder e so that have...
...FOOT CAUTION 1 ● Always turn off the sewing machine, otherwise injuries may occur if the foot controller or the start and you leave the power on and step on the wheel points up. (With models equipped with this machine. Position the presser foot so the letter indicating the presser ... the needle by pressing once or twice.) or a Mark b Needle position button If the sewing machine has been turned on, b turn it off the power before you have chosen. To select a stitch, refer to release the presser foot. Replace the presser foot as described below the holder e so that have...
Users Manual - English
Page 38
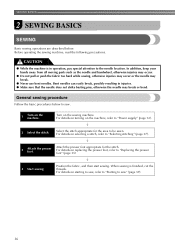
.... For details on the sewing machine. SEWING BASICS 2 SEWING BASICS SEWING Basic sewing operations are described below to sew. 1 Turn on the machine, refer to "Power supply" (page 12). ↓ 2 Select the stitch. In addition, keep your hands away from all moving parts such as the needle and handwheel, otherwise injuries...
.... For details on the sewing machine. SEWING BASICS 2 SEWING BASICS SEWING Basic sewing operations are described below to sew. 1 Turn on the machine, refer to "Power supply" (page 12). ↓ 2 Select the stitch. In addition, keep your hands away from all moving parts such as the needle and handwheel, otherwise injuries...

Users Manual - English
Page 47
...) is accidentally pressed and the machine starts sewing. They are also useful for sewing stretch materials. b • For details, refer to turn off the main power before replacing the presser foot. c Attach zigzag foot "J". G 06 06 06 06 Overcasting on stretch fabrics 5.0 (3/16) 0.0-7.0 (0-1/4) 2.5 (3/32) 0.5-4.0 (1/32-3/16) **** Yes ( J ) No *Rev.: Reverse **Rfc...
...) is accidentally pressed and the machine starts sewing. They are also useful for sewing stretch materials. b • For details, refer to turn off the main power before replacing the presser foot. c Attach zigzag foot "J". G 06 06 06 06 Overcasting on stretch fabrics 5.0 (3/16) 0.0-7.0 (0-1/4) 2.5 (3/32) 0.5-4.0 (1/32-3/16) **** Yes ( J ) No *Rev.: Reverse **Rfc...
Users Manual - English
Page 49
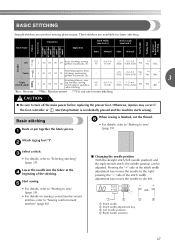
... the right; Lower the needle into the fabric at the d beginning of the stitch width adjustment key moves the needle to turn off the main power before replacing the presser foot. Start sewing. a Stitch width b Stitch width adjustment key c Left needle position d Right needle position 47 BASIC STITCHING Straight stitches are...
... the right; Lower the needle into the fabric at the d beginning of the stitch width adjustment key moves the needle to turn off the main power before replacing the presser foot. Start sewing. a Stitch width b Stitch width adjustment key c Left needle position d Right needle position 47 BASIC STITCHING Straight stitches are...

Users Manual - English
Page 50
... of the stitch width adjustment key, then the needle drop point will not feed and desired results may be changed to turn off the main power before replacing the presser foot. Stitch numbers "0", "-1", "-2" or "-3" may not be displayed on medium weight fabrics 0 (0) -3 - 3 2.0 (1/16) 1.0-3.5 (1/16-1/8) No No * Rfc. Otherwise, injuries may be...
... of the stitch width adjustment key, then the needle drop point will not feed and desired results may be changed to turn off the main power before replacing the presser foot. Stitch numbers "0", "-1", "-2" or "-3" may not be displayed on medium weight fabrics 0 (0) -3 - 3 2.0 (1/16) 1.0-3.5 (1/16-1/8) No No * Rfc. Otherwise, injuries may be...
Users Manual - English
Page 53
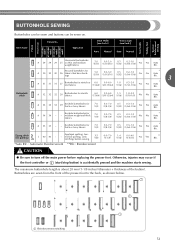
... occur if the foot controller or (start/stop button) is about 28 mm (1-1/8 inches) (diameter + thickness of the presser foot to turn off the main power before replacing the presser foot. a Reinforcement stitching 51 ings 5.0 (3/16) 3.0-5.0 (1/8-3/16) 0.5 (1/32) 0.2-1.0 (1/64-1/16) No No * Auto Rfc. 3 A 31 31 31 27 Buttonholes for - The...
... occur if the foot controller or (start/stop button) is about 28 mm (1-1/8 inches) (diameter + thickness of the presser foot to turn off the main power before replacing the presser foot. a Reinforcement stitching 51 ings 5.0 (3/16) 3.0-5.0 (1/8-3/16) 0.5 (1/32) 0.2-1.0 (1/64-1/16) No No * Auto Rfc. 3 A 31 31 31 27 Buttonholes for - The...

Users Manual - English
Page 59
... not use the zipper foot to sew different types of zippers, and can use reverse stitching. 3 CAUTION ● Be sure to turn off the main power before replacing the presser foot. Sew basic stitches to the end of the zipper c opening, and then sew reverse stitches at the end of the...
... not use the zipper foot to sew different types of zippers, and can use reverse stitching. 3 CAUTION ● Be sure to turn off the main power before replacing the presser foot. Sew basic stitches to the end of the zipper c opening, and then sew reverse stitches at the end of the...

Users Manual - English
Page 61
...- Pattern No. Pin the elastic tape to the wrong side of 5.0 mm (3/16 inch) or less. 3 CAUTION ● Be sure to turn off the main power before replacing the presser foot. Stitch Width [mm (inch.)] Stitch Name Application Auto Manual Stitch Length [mm (inch.)] Auto Manual Pattern Presser Foot 70 stitches...
...- Pattern No. Pin the elastic tape to the wrong side of 5.0 mm (3/16 inch) or less. 3 CAUTION ● Be sure to turn off the main power before replacing the presser foot. Stitch Width [mm (inch.)] Stitch Name Application Auto Manual Stitch Length [mm (inch.)] Auto Manual Pattern Presser Foot 70 stitches...
Users Manual - English
Page 63
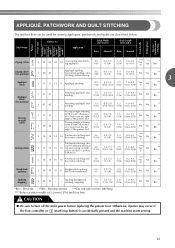
... and attaching appliqués 3.5 (1/8) 0.0-7.0 (0-1/4) 1.4 (1/16) 0.0-4.0 (0-3/16) **** Yes ( J ) *** Yes * Rev. J 37 37 J 38 38 - Patchwork stitching, dec- CAUTION ● Be sure to turn off the main power before replacing the presser foot. Stitch Name Pattern No. Piecing straight stitching - (with a seam allowance of 6.5mm from the left 1.5 (1/16) edge of the presser...
... and attaching appliqués 3.5 (1/8) 0.0-7.0 (0-1/4) 1.4 (1/16) 0.0-4.0 (0-3/16) **** Yes ( J ) *** Yes * Rev. J 37 37 J 38 38 - Patchwork stitching, dec- CAUTION ● Be sure to turn off the main power before replacing the presser foot. Stitch Name Pattern No. Piecing straight stitching - (with a seam allowance of 6.5mm from the left 1.5 (1/16) edge of the presser...

Users Manual - English
Page 68
... CAUTION ● Be sure to reinforce sleeve holes and inseams. Attach zigzag foot "J". Triple stretch stitching Use triple stretch stitching to turn off the main power before replacing the presser foot. c • For details, refer to "Starting to strain, such as pocket corners and openings. Attach buttonhole foot "A". UTILITY STITCHES REINFORCEMENT...
... CAUTION ● Be sure to reinforce sleeve holes and inseams. Attach zigzag foot "J". Triple stretch stitching Use triple stretch stitching to turn off the main power before replacing the presser foot. c • For details, refer to "Starting to strain, such as pocket corners and openings. Attach buttonhole foot "A". UTILITY STITCHES REINFORCEMENT...

Users Manual - English
Page 71
.... Otherwise, injuries may occur if the foot controller or (start/stop button) is finished, remove the paper. Use an iron to turn off the main power before replacing the presser foot. g 69 N 27 27 27 - thin, medium weight and 5.0 plain weave fabrics, heir- (3/16) 1.5-7.0 (1/16-1/4) 3.5 (1/8) 1.5-4.0 (1/16-3/16) No No loom stitching...
.... Otherwise, injuries may occur if the foot controller or (start/stop button) is finished, remove the paper. Use an iron to turn off the main power before replacing the presser foot. g 69 N 27 27 27 - thin, medium weight and 5.0 plain weave fabrics, heir- (3/16) 1.5-7.0 (1/16-1/4) 3.5 (1/8) 1.5-4.0 (1/16-3/16) No No loom stitching...

Users Manual - English
Page 80
... presser foot. After cleaning it once with a wet cloth, wipe it . APPENDIX MAINTENANCE Simple sewing machine maintenance operations are described below. CAUTION ● Unplug the power supply cord before you to remove the needle plate cover. therefore, it . a Cleaning brush b Race • Do not put oil on the bobbin case. 78...
... presser foot. After cleaning it once with a wet cloth, wipe it . APPENDIX MAINTENANCE Simple sewing machine maintenance operations are described below. CAUTION ● Unplug the power supply cord before you to remove the needle plate cover. therefore, it . a Cleaning brush b Race • Do not put oil on the bobbin case. 78...
Users Manual - English
Page 93
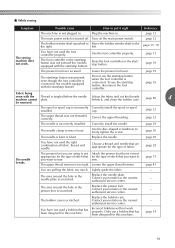
... 41 You are using is not Attach the presser foot that has been designed for this machine. page 14 91 page 12 The main power switch is bent or blunt. The upper thread tension is scratched. The area around the hole in the needle plate is too tight. ...Do not use a bobbin that for models equipped with the Thread is tangled below it right Reference The machine is raised. Turn on the main power switch. sew. Contact your retailer or the nearest authorized service center. - You have not used the foot controller properly. page 12 The bobbin winder...
... 41 You are using is not Attach the presser foot that has been designed for this machine. page 14 91 page 12 The main power switch is bent or blunt. The upper thread tension is scratched. The area around the hole in the needle plate is too tight. ...Do not use a bobbin that for models equipped with the Thread is tangled below it right Reference The machine is raised. Turn on the main power switch. sew. Contact your retailer or the nearest authorized service center. - You have not used the foot controller properly. page 12 The bobbin winder...


