
Users Manual - English
Page 4
..., and loose cloth. • Do not store objects on an unstable surface, such as a stove or iron; Benzene, thinner, and scouring powders can damage the case and machine, and should be used or where oxygen is not a toy: • Your close attention to clean the...
..., and loose cloth. • Do not store objects on an unstable surface, such as a stove or iron; Benzene, thinner, and scouring powders can damage the case and machine, and should be used or where oxygen is not a toy: • Your close attention to clean the...
Users Manual - English
Page 7
... stitching ...71 Joining ...71 Heirloom stitching ...72 4. APPENDIX ...73 STITCH SETTINGS ...73 Utility stitches ...73 MAINTENANCE ...78 Cleaning the machine surface ...78 Cleaning the bobbin case ...78 TROUBLESHOOTING ...81 Frequent troubleshooting topics ...81 Upper thread tightened up ...81 Tangled thread on wrong side of fabric ...82 Incorrect thread tension ...85 Fabric...
... stitching ...71 Joining ...71 Heirloom stitching ...72 4. APPENDIX ...73 STITCH SETTINGS ...73 Utility stitches ...73 MAINTENANCE ...78 Cleaning the machine surface ...78 Cleaning the bobbin case ...78 TROUBLESHOOTING ...81 Frequent troubleshooting topics ...81 Upper thread tightened up ...81 Tangled thread on wrong side of fabric ...82 Incorrect thread tension ...85 Fabric...

Users Manual - English
Page 22
... thread firmly around the tab with your right hand so that the end of the thread comes out from the left side of the bobbin case, it may cause the thread tension to be incorrect or break the needle. 20 KNOWING YOUR SEWING MACHINE Hold the end of the thread, push...
... thread firmly around the tab with your right hand so that the end of the thread comes out from the left side of the bobbin case, it may cause the thread tension to be incorrect or break the needle. 20 KNOWING YOUR SEWING MACHINE Hold the end of the thread, push...
Users Manual - English
Page 23
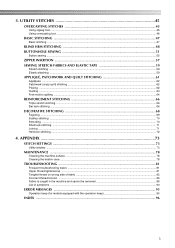
.... 1 a Slit b Cutter (Cut the thread with the cutter.) Note ● If the thread is not correctly inserted through the tension-adjusting spring of the bobbin case, it with e your right hand as shown, guide the thread through the slit (a and b). Replace the bobbin cover. While lightly holding down the bobbin with...
.... 1 a Slit b Cutter (Cut the thread with the cutter.) Note ● If the thread is not correctly inserted through the tension-adjusting spring of the bobbin case, it with e your right hand as shown, guide the thread through the slit (a and b). Replace the bobbin cover. While lightly holding down the bobbin with...
Users Manual - English
Page 43
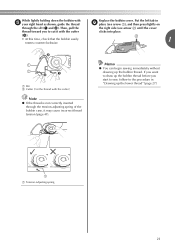
...Upper tension is shown as below . Note ● If the bobbin thread was incorrectly threaded, the upper thread may be too tight. In this case, refer to a higher number. 54 3 41 Thread tension The thread tension will affect the quality of the fabric. Memo ● We recommend... bobbin thread. 1 2 3 5 4 a Wrong side b Surface c Upper thread d Lower thread e Loops appear on the wrong side of the bobbin case correctly. In this case, refer to sew. ■ Correct tension Correct tension is important as too much or too little tension will weaken your seams or cause puckers...
...Upper tension is shown as below . Note ● If the bobbin thread was incorrectly threaded, the upper thread may be too tight. In this case, refer to a higher number. 54 3 41 Thread tension The thread tension will affect the quality of the fabric. Memo ● We recommend... bobbin thread. 1 2 3 5 4 a Wrong side b Surface c Upper thread d Lower thread e Loops appear on the wrong side of the bobbin case correctly. In this case, refer to sew. ■ Correct tension Correct tension is important as too much or too little tension will weaken your seams or cause puckers...
Users Manual - English
Page 45
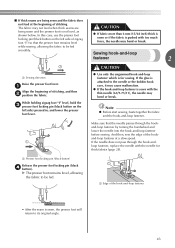
... needle or the bobbin hook race, it may bend or break. And then, sew the edge of stitching, and then b position the fabric. In this case, use the presser foot locking pin (black button on the left side of zigzag foot "J") so that the needle passes through the hook-andloop fastener...
... needle or the bobbin hook race, it may bend or break. And then, sew the edge of stitching, and then b position the fabric. In this case, use the presser foot locking pin (black button on the left side of zigzag foot "J") so that the needle passes through the hook-andloop fastener...

Users Manual - English
Page 80
.... Otherwise, you to remove the needle plate cover. therefore, it . a Cleaning brush b Race • Do not put oil on the bobbin case. 78 Cleaning the machine surface Slide the needle plate cover release toward d you may occur. a Needle plate cover b Needle plate cover release Remove ...the bobbin case. a CAUTION ● Make sure you unplug the machine before cleaning the machine, otherwise injuries or an electric shock may get an electric ...
.... Otherwise, you to remove the needle plate cover. therefore, it . a Cleaning brush b Race • Do not put oil on the bobbin case. 78 Cleaning the machine surface Slide the needle plate cover release toward d you may occur. a Needle plate cover b Needle plate cover release Remove ...the bobbin case. a CAUTION ● Make sure you unplug the machine before cleaning the machine, otherwise injuries or an electric shock may get an electric ...

Users Manual - English
Page 81
... needle plate h cover into the hole in the needle plate, and then correctly position of the machine. 79 Insert the bobbin case so that the U mark on g the bobbin case aligns with the top surface of the needle plate cover. • Align the U and { marks. CAUTION ● Never ...use a bobbin case that the indicated points are aligned before installing the bobbin case. For a new bobbin case (part code: XE7560-001), contact your nearest authorized service center. ● Make sure that you fit the bobbin...
... needle plate h cover into the hole in the needle plate, and then correctly position of the machine. 79 Insert the bobbin case so that the U mark on g the bobbin case aligns with the top surface of the needle plate cover. • Align the U and { marks. CAUTION ● Never ...use a bobbin case that the indicated points are aligned before installing the bobbin case. For a new bobbin case (part code: XE7560-001), contact your nearest authorized service center. ● Make sure that you fit the bobbin...
Users Manual - English
Page 83
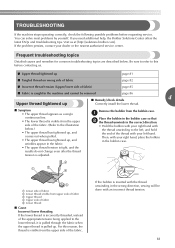
...(Refer to this reason, the thread is visible from the bobbin case. TROUBLESHOOTING If the machine stops operating correctly, check the following possible problems before contacting us at [http://solutions.brother.com]. If you need additional help, the Brother Solutions Center offers the latest FAQs and troubleshooting tips. Remove the ...The upper thread has tightened up, and comes out when pulled. • The upper thread has tightened up, and wrinkles appear in the bobbin case. You can solve most problems by yourself. Be sure to refer to the illustration below .
...(Refer to this reason, the thread is visible from the bobbin case. TROUBLESHOOTING If the machine stops operating correctly, check the following possible problems before contacting us at [http://solutions.brother.com]. If you need additional help, the Brother Solutions Center offers the latest FAQs and troubleshooting tips. Remove the ...The upper thread has tightened up, and comes out when pulled. • The upper thread has tightened up, and wrinkles appear in the bobbin case. You can solve most problems by yourself. Be sure to refer to the illustration below .

Users Manual - English
Page 84
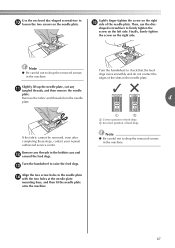
..."Lower threading" (page 19) and "Remedy/check details" in the section "Upper thread tightened up and the upper thread becomes tangled in the bobbin case, causing a rattling noise. ■ Remedy/check details Remove the tangled thread, and then correct the upper threading. On models equipped with the quick-set... pass the thread through the slit in the needle plate, then cut the thread with scissors. • For details, refer to "Cleaning the bobbin case" on the lower side of the thread around the tab with your right hand. Tangled thread on wrong side of fabric ■ Symptom • ...
..."Lower threading" (page 19) and "Remedy/check details" in the section "Upper thread tightened up and the upper thread becomes tangled in the bobbin case, causing a rattling noise. ■ Remedy/check details Remove the tangled thread, and then correct the upper threading. On models equipped with the quick-set... pass the thread through the slit in the needle plate, then cut the thread with scissors. • For details, refer to "Cleaning the bobbin case" on the lower side of the thread around the tab with your right hand. Tangled thread on wrong side of fabric ■ Symptom • ...

Users Manual - English
Page 88
... removed Continue with step j. f Cut out the tangled threads, and then remove g the bobbin. c If the needle is caught in the bobbin case, remove them. a Bobbin case Use the cleaning brush or a vacuum cleaner to "Replacing the presser foot" (page 33) and "Removing the presser foot holder" (page 34)....could not be completed according to the procedure, instead of the fabric, and then remove the needle. • Refer to clean the bobbin case. Remove the presser foot and presser foot d holder. • Refer to i remove any dust from the race and its surrounding area. Remove the...
... removed Continue with step j. f Cut out the tangled threads, and then remove g the bobbin. c If the needle is caught in the bobbin case, remove them. a Bobbin case Use the cleaning brush or a vacuum cleaner to "Replacing the presser foot" (page 33) and "Removing the presser foot holder" (page 34)....could not be completed according to the procedure, instead of the fabric, and then remove the needle. • Refer to clean the bobbin case. Remove the presser foot and presser foot d holder. • Refer to i remove any dust from the race and its surrounding area. Remove the...
Users Manual - English
Page 89
... needle plate mounting base, and then fit the needle plate onto the machine. Slightly lift up the needle plate, cut any threads in the bobbin case and l around the feed dogs. Turn the handwheel to firmly tighten the screw on the right side. Use the enclosed disc-shaped screwdriver to j loosen...
... needle plate mounting base, and then fit the needle plate onto the machine. Slightly lift up the needle plate, cut any threads in the bobbin case and l around the feed dogs. Turn the handwheel to firmly tighten the screw on the right side. Use the enclosed disc-shaped screwdriver to j loosen...

Users Manual - English
Page 90
...scratched, otherwise the upper thread may become tangled, the needle may break or sewing performance may suffer. CAUTION ● Never use a bobbin case that is operating correctly. Memo ● Since the needle may break. Attach the needle plate cover according to "Checking the needle" (page... 29) and "Replacing the needle" (page 29). APPENDIX Insert the bobbin case so that the U mark on the race. CAUTION ● Never use bent needles. For a new bobbin case (part code: XE7560-001), contact your nearest authorized service center. ● Make sure that...
...scratched, otherwise the upper thread may become tangled, the needle may break or sewing performance may suffer. CAUTION ● Never use a bobbin case that is operating correctly. Memo ● Since the needle may break. Attach the needle plate cover according to "Checking the needle" (page... 29) and "Replacing the needle" (page 29). APPENDIX Insert the bobbin case so that the U mark on the race. CAUTION ● Never use bent needles. For a new bobbin case (part code: XE7560-001), contact your nearest authorized service center. ● Make sure that...
Users Manual - English
Page 93
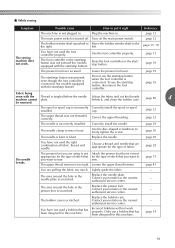
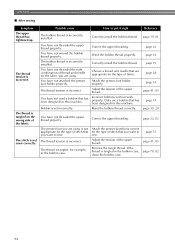
... to the right. The upper thread tension is bent or blunt. Loosen the upper thread tension. Lightly guide the fabric. - Replace the bobbin case. Use the foot controller properly. below the needle Lift up the fabric and cut the threads machine cannot plate. page 86 4 be removed. ... pulling the fabric too much. The area around the hole in . page 17, 18 The sewing machine does not work properly. The bobbin case is raised. Move the bobbin winder shaft to the left. page 22 The needle is turned off. ■ While sewing Symptom Possible cause ...
... to the right. The upper thread tension is bent or blunt. Loosen the upper thread tension. Lightly guide the fabric. - Replace the bobbin case. Use the foot controller properly. below the needle Lift up the fabric and cut the threads machine cannot plate. page 86 4 be removed. ... pulling the fabric too much. The area around the hole in . page 17, 18 The sewing machine does not work properly. The bobbin case is raised. Move the bobbin winder shaft to the left. page 22 The needle is turned off. ■ While sewing Symptom Possible cause ...

Users Manual - English
Page 94
...the thread. Incorrect bobbins will not work properly. You have not used . Reference page 22 - The needle is bent or blunt. The bobbin case is scratched, or has a burr on it right The upper thread was not threaded correctly (for example, the spool is not installed correctly,... the spool cap is wrinkled. Remove the tangled thread and clean the bobbin case. The needle is incorrectly installed. The fabric is too big for the type of fabric, thread and needle. APPENDIX Symptom The upper thread ...
...the thread. Incorrect bobbins will not work properly. You have not used . Reference page 22 - The needle is bent or blunt. The bobbin case is scratched, or has a burr on it right The upper thread was not threaded correctly (for example, the spool is not installed correctly,... the spool cap is wrinkled. Remove the tangled thread and clean the bobbin case. The needle is incorrectly installed. The fabric is too big for the type of fabric, thread and needle. APPENDIX Symptom The upper thread ...

Users Manual - English
Page 95
... that you want to sew. page 43 The fabric feeds in the opposite The feed mechanism is tangled, for example, in the bobbin case, clean the bobbin case. Incorrect bobbins will not work properly. The presser foot you are using is correct for the type of fabric. direction. The thread is... of the upper thread. page 28 page 29 Dust has accumulated under the Remove the needle plate cover and needle plate or in the bobbin case. The presser foot you are using is wrinkled. Correctly install the needle. page 78 Dust has built up in the feed dogs or Remove...
... that you want to sew. page 43 The fabric feeds in the opposite The feed mechanism is tangled, for example, in the bobbin case, clean the bobbin case. Incorrect bobbins will not work properly. The presser foot you are using is correct for the type of fabric. direction. The thread is... of the upper thread. page 28 page 29 Dust has accumulated under the Remove the needle plate cover and needle plate or in the bobbin case. The presser foot you are using is wrinkled. Correctly install the needle. page 78 Dust has built up in the feed dogs or Remove...
Users Manual - English
Page 96
The thread tension is set incorrectly. The thread is correct for example, in the bobbin case, clean the bobbin case. Bobbin is incorrect. The presser foot you are using . Attach the presser-foot holder properly. Only use a bobbin that is tangled, for the ... thread is not appropriate for this machine. The stitch is tangled on the wrong side of stitch that are using is tangled in the bobbin case. The thread is not sewn correctly. Possible cause The bobbin thread is incorrect. The thread tension is incorrectly installed. The bobbin thread is incorrect...
The thread tension is set incorrectly. The thread is correct for example, in the bobbin case, clean the bobbin case. Bobbin is incorrect. The presser foot you are using . Attach the presser-foot holder properly. Only use a bobbin that is tangled, for the ... thread is not appropriate for this machine. The stitch is tangled on the wrong side of stitch that are using is tangled in the bobbin case. The thread is not sewn correctly. Possible cause The bobbin thread is incorrect. The thread tension is incorrectly installed. The bobbin thread is incorrect...

Users Manual - English
Page 97
...controller is not connected) while the Lower the buttonhole lever before continuing the operation. 4 buttonhole lever is raised. Clean the bobbin case to check for four seconds and the machine automatically stops. If a non-functioning key is pressed or an incorrect operation is ...shaft to the left before continuing the operation. Otherwise, operate the machine by using the foot controller. After cleaning the bobbin case, insert the bobbin case properly. Note ● If error message "F1" through "F9" appears in the table. Raise the buttonhole lever before continuing...
...controller is not connected) while the Lower the buttonhole lever before continuing the operation. 4 buttonhole lever is raised. Clean the bobbin case to check for four seconds and the machine automatically stops. If a non-functioning key is pressed or an incorrect operation is ...shaft to the left before continuing the operation. Otherwise, operate the machine by using the foot controller. After cleaning the bobbin case, insert the bobbin case properly. Note ● If error message "F1" through "F9" appears in the table. Raise the buttonhole lever before continuing...
Users Manual - English
Page 98
APPENDIX i INDEX Numerics , 3-point zigzag stitch 45 59 A accessories 6 appliqués 61 B bar tack 66 basic stitching 47 blind hem stitching 48 bobbin 19 , bobbin case 20 78 bobbin , cover 9 19, 20 bobbin winder 8, 14, 17, 90, 91, 95 button sewing 55 , buttonhole foot 52 66 buttonhole , lever 9 53, 67 buttonhole ...
APPENDIX i INDEX Numerics , 3-point zigzag stitch 45 59 A accessories 6 appliqués 61 B bar tack 66 basic stitching 47 blind hem stitching 48 bobbin 19 , bobbin case 20 78 bobbin , cover 9 19, 20 bobbin winder 8, 14, 17, 90, 91, 95 button sewing 55 , buttonhole foot 52 66 buttonhole , lever 9 53, 67 buttonhole ...


