Users Manual - English
Page 1
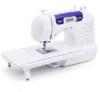
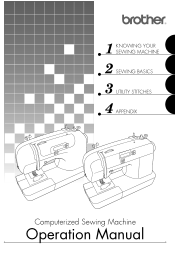
KNOWING YOUR SEWING MACHINE SEWING BASICS UTILITY STITCHES APPENDIX Computerized Sewing Machine Operation Manual
KNOWING YOUR SEWING MACHINE SEWING BASICS UTILITY STITCHES APPENDIX Computerized Sewing Machine Operation Manual
Users Manual - English
Page 2
... parts. To disconnect, turn the main switch to the nearest authorized dealer or service center for use outdoors. 7. This sewing machine is required around the machine needle. 11. IMPORTANT SAFETY INSTRUCTIONS When using this machine, basic safety precautions should always be left unattended while plugged in. DANGER - To reduce the risk of electric shock...
... parts. To disconnect, turn the main switch to the nearest authorized dealer or service center for use outdoors. 7. This sewing machine is required around the machine needle. 11. IMPORTANT SAFETY INSTRUCTIONS When using this machine, basic safety precautions should always be left unattended while plugged in. DANGER - To reduce the risk of electric shock...
Users Manual - English
Page 4
...brother.com The contents of this machine, avoid direct sunlight and high humidity locations. Do not touch the hand wheel, thread take- Use only neutral soaps or detergents to turn off the power switch and unplug the cord when: • Operation is one of the most advanced computerized household sewing machines.... Do not use • Maintaining the machine • Leaving the machine unattended 3. PLEASE READ BEFORE USING THIS MACHINE For safe operation 1. Benzene, thinner, and scouring powders can damage the case and machine, and should...
...brother.com The contents of this machine, avoid direct sunlight and high humidity locations. Do not touch the hand wheel, thread take- Use only neutral soaps or detergents to turn off the power switch and unplug the cord when: • Operation is one of the most advanced computerized household sewing machines.... Do not use • Maintaining the machine • Leaving the machine unattended 3. PLEASE READ BEFORE USING THIS MACHINE For safe operation 1. Benzene, thinner, and scouring powders can damage the case and machine, and should...
Users Manual - English
Page 5
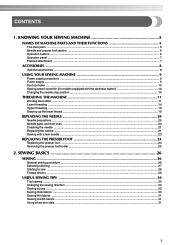
......6 Operation buttons ...6 Operation panel ...7 Flat bed attachment ...7 ACCESSORIES ...8 Optional accessories ...8 USING YOUR SEWING MACHINE 9 Power supply precautions ...9 Power supply ...9 Foot controller ...10 Sewing speed controller (for models equipped with the start/stop button 10 Changing the needle stop position ...10... THREADING THE MACHINE 11 Winding the bobbin ...11 Lower threading ...14 Upper threading...
......6 Operation buttons ...6 Operation panel ...7 Flat bed attachment ...7 ACCESSORIES ...8 Optional accessories ...8 USING YOUR SEWING MACHINE 9 Power supply precautions ...9 Power supply ...9 Foot controller ...10 Sewing speed controller (for models equipped with the start/stop button 10 Changing the needle stop position ...10... THREADING THE MACHINE 11 Winding the bobbin ...11 Lower threading ...14 Upper threading...
Users Manual - English
Page 7
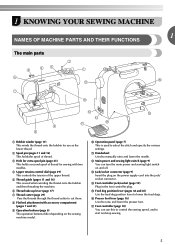
...the threads through the thread cutter to raise and lower the presser foot. l Main power and sewing light switch (page 9) You can use as the lower thread. m Jack/socket connector (page 9) Insert the plug on the sewing machine model. q Foot controller (page 10) You can turn the main power and... sewing light switch on and off. d Upper tension-control dial (page 29) This controls the tension of thread. n ...
...the threads through the thread cutter to raise and lower the presser foot. l Main power and sewing light switch (page 9) You can use as the lower thread. m Jack/socket connector (page 9) Insert the plug on the sewing machine model. q Foot controller (page 10) You can turn the main power and... sewing light switch on and off. d Upper tension-control dial (page 29) This controls the tension of thread. n ...
Users Manual - English
Page 8
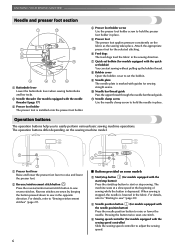
...b Reverse/reinforcement stitch button Press the reverse/reinforcement stitch button to easily perform various basic sewing machine operations. Reverse stitches are sewn by keeping the button pressed down to sew in the sewing direction. For details, refer to "Starting to raise and lower the presser foot. ...Use the needle clamp screw to hold the needle in the fabric. When sewing is stopped, the needle is depressed. e Presser foot The presser foot applies pressure consistently on the sewing machine model. Attach the appropriate presser foot for models equipped with the quickset bobbin...
...b Reverse/reinforcement stitch button Press the reverse/reinforcement stitch button to easily perform various basic sewing machine operations. Reverse stitches are sewn by keeping the button pressed down to sew in the sewing direction. For details, refer to "Starting to raise and lower the presser foot. ...Use the needle clamp screw to hold the needle in the fabric. When sewing is stopped, the needle is depressed. e Presser foot The presser foot applies pressure consistently on the sewing machine model. Attach the appropriate presser foot for models equipped with the quickset bobbin...
Users Manual - English
Page 9
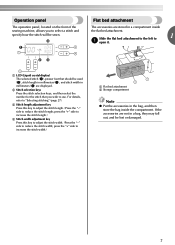
.... If the accessories are stored in a bag, they may fall out, and be sewn. Operation panel The operation panel, located on the front of the sewing machine, allows you wish to use. For details, refer to 1 a open it.
.... If the accessories are stored in a bag, they may fall out, and be sewn. Operation panel The operation panel, located on the front of the sewing machine, allows you wish to use. For details, refer to 1 a open it.
Users Manual - English
Page 10
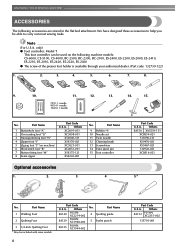
...121 X54243-001 No. Others SA132 F016N: XC2215-002 135793-001 only) ● Foot controller: Model T This foot controller can be used on machine) 6 Blind stitch foot "R" 7 Button fitting foot "M" 8 Seam ripper Part Code U.S.A. Part Name 1 Walking Foot 2 Quilting Foot 3 1/4-... foot "N" 4 Zipper foot "I" 5 Zigzag foot "J" (on the following accessories are stored in the flat bed attachment. KNOWING YOUR SEWING MACHINE ACCESSORIES The following machine models: CS-6000, CS-5100, CS-4000, BC-2500, BC-2300, BC-2100, ES-2400, ES-2200, ES-2000, ES-2410, ES-2210, ES-2010, ES...
...121 X54243-001 No. Others SA132 F016N: XC2215-002 135793-001 only) ● Foot controller: Model T This foot controller can be used on machine) 6 Blind stitch foot "R" 7 Button fitting foot "M" 8 Seam ripper Part Code U.S.A. Part Name 1 Walking Foot 2 Quilting Foot 3 1/4-... foot "N" 4 Zipper foot "I" 5 Zigzag foot "J" (on the following accessories are stored in the flat bed attachment. KNOWING YOUR SEWING MACHINE ACCESSORIES The following machine models: CS-6000, CS-5100, CS-4000, BC-2500, BC-2300, BC-2100, ES-2400, ES-2200, ES-2000, ES-2410, ES-2210, ES-2010, ES...
Users Manual - English
Page 11
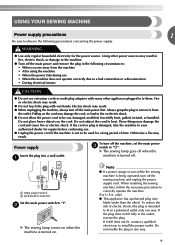
...wet hands. These things may result. a To turn off the sewing machine and unplug the power supply cord. b X The sewing lamp comes on . Note ● If a power outage occurs while the sewing machine is damaged, take the machine to your authorized dealer for the power source. only) ●.... Always grasp the plug to remove it still does not fit, contact a qualified electrician to install the proper outlet. USING YOUR SEWING MACHINE Power supply precautions 1 Be sure to observe the following circumstances: • When you are away from the outlet. Pulling on the...
...wet hands. These things may result. a To turn off the sewing machine and unplug the power supply cord. b X The sewing lamp comes on . Note ● If a power outage occurs while the sewing machine is damaged, take the machine to your authorized dealer for the power source. only) ●.... Always grasp the plug to remove it still does not fit, contact a qualified electrician to install the proper outlet. USING YOUR SEWING MACHINE Power supply precautions 1 Be sure to observe the following circumstances: • When you are away from the outlet. Pulling on the...
Users Manual - English
Page 12
... key). Memo • Perform the same operation to change the needle stop position Normally, the sewing machine is set using the sewing speed controller is stopped. When you press harder, the machine's speed will run at a slower speed, or slide the speed controller to the right to ...leave the needle raised when sewing is the foot controller's maximum sewing speed. Turn off the sewing machine in the fabric when sewing is plugged in use. Hold down lightly, the machine will increase. Note ● When the foot controller is stopped. a...
... key). Memo • Perform the same operation to change the needle stop position Normally, the sewing machine is set using the sewing speed controller is stopped. When you press harder, the machine's speed will run at a slower speed, or slide the speed controller to the right to ...leave the needle raised when sewing is the foot controller's maximum sewing speed. Turn off the sewing machine in the fabric when sewing is plugged in use. Hold down lightly, the machine will increase. Note ● When the foot controller is stopped. a...

Users Manual - English
Page 13
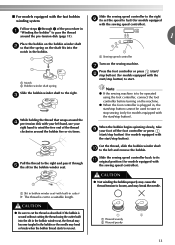
... the thread around the pre-tension disk. If you use bobbins (part code: SA156, SFB: XA5539-151) that comes with this sewing machine. Only use the bobbin that comes with this machine or bobbins of thread is not in the right place, the thread may cause damage to the right. b CAUTION ● If... bobbin Turn on the spool pin. Pass the end of the thread through the hole on c the bobbin from other bobbins may tangle on the sewing machine. Actual size 11.5 mm (7/16 inch) This model Other models Pull up the spool pin as far as possible, and a then put a spool of thread...
... the thread around the pre-tension disk. If you use bobbins (part code: SA156, SFB: XA5539-151) that comes with this sewing machine. Only use the bobbin that comes with this machine or bobbins of thread is not in the right place, the thread may cause damage to the right. b CAUTION ● If... bobbin Turn on the spool pin. Pass the end of the thread through the hole on c the bobbin from other bobbins may tangle on the sewing machine. Actual size 11.5 mm (7/16 inch) This model Other models Pull up the spool pin as far as possible, and a then put a spool of thread...
Users Manual - English
Page 14
...press (start/ stop button) (for models equipped with the start/stop button) to start or stop sewing (only for models equipped with the start/stop button). Note ● If the sewing machine is to be used to wind the thread around the bobbin a few times. g CAUTION ●... Make sure you slide the bobbin winding shaft to its l original position (for models equipped with the sewing speed controller.) Memo ● When the sewing machine is started or the handwheel is not a malfunction. ● The needle bar does not move when you follow the instructions ...
...press (start/ stop button) (for models equipped with the start/stop button) to start or stop sewing (only for models equipped with the start/stop button). Note ● If the sewing machine is to be used to wind the thread around the bobbin a few times. g CAUTION ●... Make sure you slide the bobbin winding shaft to its l original position (for models equipped with the sewing speed controller.) Memo ● When the sewing machine is started or the handwheel is not a malfunction. ● The needle bar does not move when you follow the instructions ...
Users Manual - English
Page 15
...disk (page 11). 1 Place the bobbin on the bobbin winder shaft b so that the spring on the sewing machine. a Slit in bobbin winder seat (with built-in the bobbin. Note ● If the sewing machine is to be used to the right and pass it through 2 of the thread clockwise around the d ...the thread may become tangled in , the start/stop button cannot be operated using the foot controller, connect the foot controller before turning on the machine. ● When the foot controller is plugged in the bobbin or the needle may cause the thread tension to the right. CAUTION ● ...
...disk (page 11). 1 Place the bobbin on the bobbin winder shaft b so that the spring on the sewing machine. a Slit in bobbin winder seat (with built-in the bobbin. Note ● If the sewing machine is to be used to the right and pass it through 2 of the thread clockwise around the d ...the thread may become tangled in , the start/stop button cannot be operated using the foot controller, connect the foot controller before turning on the machine. ● When the foot controller is plugged in the bobbin or the needle may cause the thread tension to the right. CAUTION ● ...

Users Manual - English
Page 16
... you (counterclockwise) or press (needle position button) (for this sewing machine. CAUTION ● Make sure you set bobbin, see arrow a), and then press lightly on the foot controller and the machine starts to sew, you slide the bobbin winding shaft to be injured. Lower threading...it is not inserted, reinsert the thread. KNOWING YOUR SEWING MACHINE Memo ● When the sewing machine is started or the handwheel is turned after winding the thread around the bobbin, the machine will not operate correctly. this machine. Slide the button and open the cover. CAUTION ●...
... you (counterclockwise) or press (needle position button) (for this sewing machine. CAUTION ● Make sure you set bobbin, see arrow a), and then press lightly on the foot controller and the machine starts to sew, you slide the bobbin winding shaft to be injured. Lower threading...it is not inserted, reinsert the thread. KNOWING YOUR SEWING MACHINE Memo ● When the sewing machine is started or the handwheel is turned after winding the thread around the bobbin, the machine will not operate correctly. this machine. Slide the button and open the cover. CAUTION ●...
Users Manual - English
Page 18
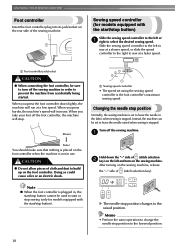
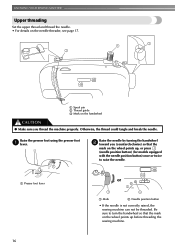
..., or press (needle position button) (for models equipped with the needle position button) once or twice to raise the needle. KNOWING YOUR SEWING MACHINE Upper threading Set the upper thread and thread the needle. • For details on the handwheel CAUTION ● Make sure you (counterclockwise...) so that the mark on the wheel points up before threading the sewing machine. 16 Raise the presser foot using the presser foot a lever. a Presser foot lever or a Mark b Needle position button • If the...
..., or press (needle position button) (for models equipped with the needle position button) once or twice to raise the needle. KNOWING YOUR SEWING MACHINE Upper threading Set the upper thread and thread the needle. • For details on the handwheel CAUTION ● Make sure you (counterclockwise...) so that the mark on the wheel points up before threading the sewing machine. 16 Raise the presser foot using the presser foot a lever. a Presser foot lever or a Mark b Needle position button • If the...

Users Manual - English
Page 19
... sure you raise the presser foot lever and the thread take -up lever is in the figure d on page 20 for models equipped with home sewing machine needles size 75/11100/16. Follow steps 1 through the e thread take -up lever. Lower the presser foot lever. Make sure you may tangle on ... the wrong place, or is off when threading the needle by hand. Make sure the main power switch is set incorrectly, the thread may cause sewing problems. ■ Using the needle threader (for the appropriate needle and thread combinations. CAUTION ● If the spool of the needle by hand. If ...
... sure you raise the presser foot lever and the thread take -up lever is in the figure d on page 20 for models equipped with home sewing machine needles size 75/11100/16. Follow steps 1 through the e thread take -up lever. Lower the presser foot lever. Make sure you may tangle on ... the wrong place, or is off when threading the needle by hand. Make sure the main power switch is set incorrectly, the thread may cause sewing problems. ■ Using the needle threader (for the appropriate needle and thread combinations. CAUTION ● If the spool of the needle by hand. If ...
Users Manual - English
Page 20
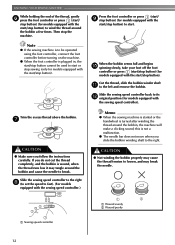
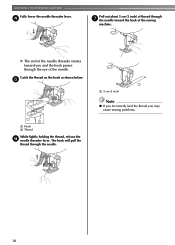
KNOWING YOUR SEWING MACHINE Fully lower the needle threader lever. X The end of the needle threader rotates toward the back of the needle. Catch the thread on the hook as shown below. e a Hook b Thread While lightly holding the thread, release the f needle threader lever. The hook will pull the thread through g the needle toward you may cause sewing problems. 18 a 5 cm (2 inch) Note ● If you incorrectly feed the thread you and the hook passes through the eye of the sewing machine. d Pull out about 5 cm (2 inch) of thread through the needle.
KNOWING YOUR SEWING MACHINE Fully lower the needle threader lever. X The end of the needle threader rotates toward the back of the needle. Catch the thread on the hook as shown below. e a Hook b Thread While lightly holding the thread, release the f needle threader lever. The hook will pull the thread through g the needle toward you may cause sewing problems. 18 a 5 cm (2 inch) Note ● If you incorrectly feed the thread you and the hook passes through the eye of the sewing machine. d Pull out about 5 cm (2 inch) of thread through the needle.
Users Manual - English
Page 22
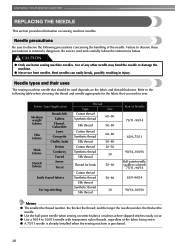
... thread Synthetic thread Silk thread 50-80 30 Size of any other needle may bend the needle or damage the machine. ● Never use home sewing machine needles. Be sure to observe these precautions is purchased. 20 Fabric Type/Application Medium weight fabrics Thin fabrics Thick... the thread number, the thicker the thread; Refer to 100/16 needle with transparent nylon threads, regardless of the needle. KNOWING YOUR SEWING MACHINE REPLACING THE NEEDLE This section provides information on the fabric and thread thickness. and the larger the needle number, the thicker the needle....
... thread Synthetic thread Silk thread 50-80 30 Size of any other needle may bend the needle or damage the machine. ● Never use home sewing machine needles. Be sure to observe these precautions is purchased. 20 Fabric Type/Application Medium weight fabrics Thin fabrics Thick... the thread number, the thicker the thread; Refer to 100/16 needle with transparent nylon threads, regardless of the needle. KNOWING YOUR SEWING MACHINE REPLACING THE NEEDLE This section provides information on the fabric and thread thickness. and the larger the needle number, the thicker the needle....

Users Manual - English
Page 23
...a needle that has been determined to be straight according to 75/11), the needle may break while the machine is even. 1 2 a Mark b Needle position button Turn off the sewing machine, otherwise injuries may be uneven or puckered or there may occur if the foot controller or the start/ ... fabrics (such as denim) with thin needles (such as described below. CAUTION ● Before replacing the needle, be sure to turn off the sewing machine. b a Flat side b Needle type marking ■ Correct needle 1 a Flat surface ■ Incorrect needle If the distance between the needle and ...
...a needle that has been determined to be straight according to 75/11), the needle may break while the machine is even. 1 2 a Mark b Needle position button Turn off the sewing machine, otherwise injuries may be uneven or puckered or there may occur if the foot controller or the start/ ... fabrics (such as denim) with thin needles (such as described below. CAUTION ● Before replacing the needle, be sure to turn off the sewing machine. b a Flat side b Needle type marking ■ Correct needle 1 a Flat surface ■ Incorrect needle If the distance between the needle and ...

Users Manual - English
Page 24
... needle can be damaged. With the flat side of the needle toward the e rear of the machine, insert the needle until it to the needle bar. As seen from the front of the sewing machine may be removed by turning it touches the needle stopper. Therefore, do not loosen the needle clamp... clamp screw with the end of the needle holder b with the screwdriver, otherwise the needle may break or damage may fall off. KNOWING YOUR SEWING MACHINE Hold the needle with your left hand, and then d use the screwdriver to tighten the needle clamp screw by simply loosening the needle clamp screw...
... needle can be damaged. With the flat side of the needle toward the e rear of the machine, insert the needle until it to the needle bar. As seen from the front of the sewing machine may be removed by turning it touches the needle stopper. Therefore, do not loosen the needle clamp... clamp screw with the end of the needle holder b with the screwdriver, otherwise the needle may break or damage may fall off. KNOWING YOUR SEWING MACHINE Hold the needle with your left hand, and then d use the screwdriver to tighten the needle clamp screw by simply loosening the needle clamp screw...


