Users Manual - English
Page 2
... safety precautions should always be taken, including the following: Read all moving parts. To unplug, grasp the plug, not the cord. 10. Switch the machine to be replaced by or near children. 2. This sewing machine is required around the machine needle. 11. DANGER - Do not use the proper needle plate. To disconnect, turn the main...
... safety precautions should always be taken, including the following: Read all moving parts. To unplug, grasp the plug, not the cord. 10. Switch the machine to be replaced by or near children. 2. This sewing machine is required around the machine needle. 11. DANGER - Do not use the proper needle plate. To disconnect, turn the main...
Users Manual - English
Page 4
... parts to change without notice. 2 CONGRATULATIONS ON CHOOSING OUR MACHINE Your machine is one of this machine, avoid direct sunlight and high humidity locations. Do not store anything on the needle while sewing. For additional product information and updates, visit our web site at www.brother....com The contents of this manual and specifications of the most advanced computerized household sewing machines. When storing this product are subject to ...
... parts to change without notice. 2 CONGRATULATIONS ON CHOOSING OUR MACHINE Your machine is one of this machine, avoid direct sunlight and high humidity locations. Do not store anything on the needle while sewing. For additional product information and updates, visit our web site at www.brother....com The contents of this manual and specifications of the most advanced computerized household sewing machines. When storing this product are subject to ...
Users Manual - English
Page 5
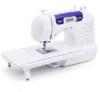
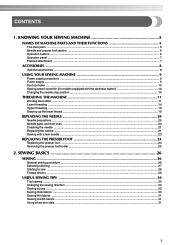
CONTENTS 1. SEWING BASICS 26 SEWING ...26 General sewing procedure ...26 Selecting stitching ...27 Starting to sew ...28 Thread tension ...29 USEFUL SEWING TIPS ...30 Trial sewing ...30 Changing the sewing direction ...30 Sewing curves ...30 Sewing thick fabrics ...30 Sewing thin fabrics ...31 Sewing stretch fabrics ...31 Using a free-arm style ...31 3 KNOWING YOUR SEWING MACHINE 5 NAMES OF MACHINE PARTS AND THEIR FUNCTIONS 5 The main parts ...5 Needle...
CONTENTS 1. SEWING BASICS 26 SEWING ...26 General sewing procedure ...26 Selecting stitching ...27 Starting to sew ...28 Thread tension ...29 USEFUL SEWING TIPS ...30 Trial sewing ...30 Changing the sewing direction ...30 Sewing curves ...30 Sewing thick fabrics ...30 Sewing thin fabrics ...31 Sewing stretch fabrics ...31 Using a free-arm style ...31 3 KNOWING YOUR SEWING MACHINE 5 NAMES OF MACHINE PARTS AND THEIR FUNCTIONS 5 The main parts ...5 Needle...
Users Manual - English
Page 7
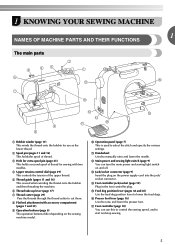
... (pages 11 and 16) This is used when winding the thread onto the bobbin and then threading the machine. m Jack/socket connector (page 9) Insert the plug on the sewing machine model. f Thread take-up lever (page 17) g Thread cutter (page 29) Pass the threads through...lever (page 16) Used to manually raise and lower the needle. 1 KNOWING YOUR SEWING MACHINE 1 NAMES OF MACHINE PARTS AND THEIR FUNCTIONS The main parts a Bobbin winder (page 11) This winds the thread onto the bobbin for sewing with accessory compartment (pages 7 and 31) i Operation buttons (page 6) The operation...
... (pages 11 and 16) This is used when winding the thread onto the bobbin and then threading the machine. m Jack/socket connector (page 9) Insert the plug on the sewing machine model. f Thread take-up lever (page 17) g Thread cutter (page 29) Pass the threads through...lever (page 16) Used to manually raise and lower the needle. 1 KNOWING YOUR SEWING MACHINE 1 NAMES OF MACHINE PARTS AND THEIR FUNCTIONS The main parts a Bobbin winder (page 11) This winds the thread onto the bobbin for sewing with accessory compartment (pages 7 and 31) i Operation buttons (page 6) The operation...
Users Manual - English
Page 10
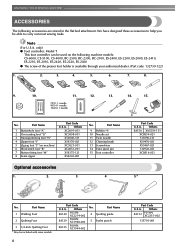
...: Model T This foot controller can be used on machine) 6 Blind stitch foot "R" 7 Button fitting foot "M" 8 Seam ripper Part Code U.S.A. Others XC2691-031 XC3098-031 X53840-331 X59370-021 XC3021-031 XC4051-031 X59375-121 X54243-001 No. KNOWING YOUR SEWING MACHINE ACCESSORIES The following machine models: CS-6000, CS-5100, CS-4000, BC-2500, BC-2300, BC-2100, ES...
...: Model T This foot controller can be used on machine) 6 Blind stitch foot "R" 7 Button fitting foot "M" 8 Seam ripper Part Code U.S.A. Others XC2691-031 XC3098-031 X53840-331 X59370-021 XC3021-031 XC4051-031 X59375-121 X54243-001 No. KNOWING YOUR SEWING MACHINE ACCESSORIES The following machine models: CS-6000, CS-5100, CS-4000, BC-2500, BC-2300, BC-2100, ES...

Users Manual - English
Page 13
... winder shaft d and slide the bobbin winder shaft to the right. Using other models, the machine will not work properly. Pass the end of the thread through the hole on the sewing machine. Turn the bobbin clockwise, by hand, until the spring on the shaft slides into the groove... of the bobbin. 1 2 a Spring on the shaft b Groove of thread on this sewing machine. a Pre-tension disk b Bobbin winder shaft c Bobbin CAUTION ● Only use bobbins (part code: SA156, SFB: XA5539-151) that have been designed for this pin. Actual size 11.5 mm (7/16 inch)...
... winder shaft d and slide the bobbin winder shaft to the right. Using other models, the machine will not work properly. Pass the end of the thread through the hole on the sewing machine. Turn the bobbin clockwise, by hand, until the spring on the shaft slides into the groove... of the bobbin. 1 2 a Spring on the shaft b Groove of thread on this sewing machine. a Pre-tension disk b Bobbin winder shaft c Bobbin CAUTION ● Only use bobbins (part code: SA156, SFB: XA5539-151) that have been designed for this pin. Actual size 11.5 mm (7/16 inch)...

Users Manual - English
Page 16
... the direction shown by turning a the handwheel toward you (counterclockwise) or press (needle position button) (for this sewing machine. Hold the end of the same type (part code: SA156, SFB: XA5539-151). Raise the needle to its highest position by the arrow. If bobbins from ...bar does not move when you turn the power off while threading the machine. KNOWING YOUR SEWING MACHINE Memo ● When the sewing machine is started or the handwheel is turned after winding the thread around the bobbin, the machine will not operate correctly. Put the left tab in injury. 1 2 ...
... the direction shown by turning a the handwheel toward you (counterclockwise) or press (needle position button) (for this sewing machine. Hold the end of the same type (part code: SA156, SFB: XA5539-151). Raise the needle to its highest position by the arrow. If bobbins from ...bar does not move when you turn the power off while threading the machine. KNOWING YOUR SEWING MACHINE Memo ● When the sewing machine is started or the handwheel is turned after winding the thread around the bobbin, the machine will not operate correctly. Put the left tab in injury. 1 2 ...

Users Manual - English
Page 24
... stopper a Needle clamp screw b Needle bar thread guide c Needle bar Align the bottom edge of the needle holder b with the end of the sewing machine may result. ■ Installing the needle clamp If the needle clamp is at the bottom. While holding the needle with your left hand, f use... apply strong force when loosening or tightening the needle clamp screw, otherwise certain parts of the needle bar, and then tighten the needle clamp screw. Note ● The needle can be damaged. KNOWING YOUR SEWING MACHINE Hold the needle with your left hand, and then d use the screwdriver ...
... stopper a Needle clamp screw b Needle bar thread guide c Needle bar Align the bottom edge of the needle holder b with the end of the sewing machine may result. ■ Installing the needle clamp If the needle clamp is at the bottom. While holding the needle with your left hand, f use... apply strong force when loosening or tightening the needle clamp screw, otherwise certain parts of the needle bar, and then tighten the needle clamp screw. Note ● The needle can be damaged. KNOWING YOUR SEWING MACHINE Hold the needle with your left hand, and then d use the screwdriver ...
Users Manual - English
Page 25
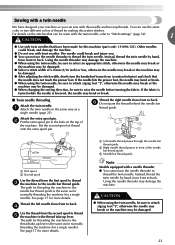
...break and injure you (counterclockwise) and check that the needle does not touch the presser foot. The needle could break, and damage the machine. ● Do not sew with bent needles. c Needle bar thread guide Note Models equipped with a needle threader ● You cannot use the needle threader to ...the extra spool pin. d Use the thread from front to back. b Right needle thread passes in the hole on the stitches that can sew with this machine (part code: 131096-121). If the needle hits the presser foot, the needle may bend or break. ● When using the twin needle, be...
...break and injure you (counterclockwise) and check that the needle does not touch the presser foot. The needle could break, and damage the machine. ● Do not sew with bent needles. c Needle bar thread guide Note Models equipped with a needle threader ● You cannot use the needle threader to ...the extra spool pin. d Use the thread from front to back. b Right needle thread passes in the hole on the stitches that can sew with this machine (part code: 131096-121). If the needle hits the presser foot, the needle may bend or break. ● When using the twin needle, be...
Users Manual - English
Page 28
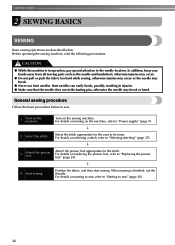
...; 3 Attach the presser foot. Position the fabric, and then start sewing. CAUTION ● While the machine is finished, cut the threads. In addition, keep your hands away from all moving parts such as the needle and handwheel, otherwise injuries may occur. ●... Do not pull or push the fabric too hard while sewing, otherwise injuries may occur or the needle may break or bend. For details on the sewing machine...
...; 3 Attach the presser foot. Position the fabric, and then start sewing. CAUTION ● While the machine is finished, cut the threads. In addition, keep your hands away from all moving parts such as the needle and handwheel, otherwise injuries may occur. ●... Do not pull or push the fabric too hard while sewing, otherwise injuries may occur or the needle may break or bend. For details on the sewing machine...
Users Manual - English
Page 40
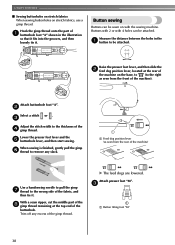
... thread. Hook the gimp thread onto the part of the d gimp thread. Lower the presser foot lever and the e buttonhole lever, and then start sewing. X The feed dogs are lowered. Button sewing Buttons can be sewn on with 4 holes can be attached. Buttons with 2 or with the sewing machine. Raise the presser foot lever, and...
... thread. Hook the gimp thread onto the part of the d gimp thread. Lower the presser foot lever and the e buttonhole lever, and then start sewing. X The feed dogs are lowered. Button sewing Buttons can be sewn on with 4 holes can be attached. Buttons with 2 or with the sewing machine. Raise the presser foot lever, and...
Users Manual - English
Page 65
... stitch 32 main parts 5 main power switch 9 A monogramming 49, 51 accessories 8 appliqués 42 N needle 20 B bar tack 46 basic stitching 33 blind hem stitching 34 bobbin 14 bobbin case 14, 57 bobbin cover 6, 14 bobbin winder 11, 59, 62 button sewing 38 needle bar ...button 6 H handwheel 5 heirloom stitching 51 J joining 51 joining stitch 42, 48 L LCD 7 S scallop stitching 49 seam ripper 37 sewing machine needles 20 sewing speed controller 6 sleeve holes 46 smocking 50 spool pin 11, 16 start/stop button 6, 28 stitch length 27 stitch selection key 7 ...
... stitch 32 main parts 5 main power switch 9 A monogramming 49, 51 accessories 8 appliqués 42 N needle 20 B bar tack 46 basic stitching 33 blind hem stitching 34 bobbin 14 bobbin case 14, 57 bobbin cover 6, 14 bobbin winder 11, 59, 62 button sewing 38 needle bar ...button 6 H handwheel 5 heirloom stitching 51 J joining 51 joining stitch 42, 48 L LCD 7 S scallop stitching 49 seam ripper 37 sewing machine needles 20 sewing speed controller 6 sleeve holes 46 smocking 50 spool pin 11, 16 start/stop button 6, 28 stitch length 27 stitch selection key 7 ...


