Users Manual - English
Page 2
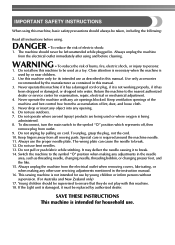
...the needle causing it is being administered. 8. To reduce the risk of the machine and foot control free from the electrical outlet when removing covers, lubricating, or when making any opening. 6. Young children should never be left unattended while plugged in the needle area, such as ...described in this machine to be supervised to the symbol "{" position which represents off, then remove plug from the electrical outlet immediately after using . Keep ventilation openings of burns, fire, electric shock, or injury to break. 12. ...
...the needle causing it is being administered. 8. To reduce the risk of the machine and foot control free from the electrical outlet when removing covers, lubricating, or when making any opening. 6. Young children should never be left unattended while plugged in the needle area, such as ...described in this machine to be supervised to the symbol "{" position which represents off, then remove plug from the electrical outlet immediately after using . Keep ventilation openings of burns, fire, electric shock, or injury to break. 12. ...
Users Manual - English
Page 21
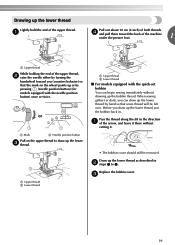
... you can begin sewing immediately without cutting it there without drawing up the lower c thread. Before you (counterclockwise) so that some thread will be removed. Draw up the lower thread as described in b steps 1 to draw up the bobbin thread. Drawing up the lower thread, put the bobbin ...back in. Replace the bobbin cover. or a Mark b Needle position button Pull on the wheel points up or by pressing (needle position button) (for models equipped with the quick-...
... you can begin sewing immediately without cutting it there without drawing up the lower c thread. Before you (counterclockwise) so that some thread will be removed. Draw up the lower thread as described in b steps 1 to draw up the bobbin thread. Drawing up the lower thread, put the bobbin ...back in. Replace the bobbin cover. or a Mark b Needle position button Pull on the wheel points up or by pressing (needle position button) (for models equipped with the quick-...
Users Manual - English
Page 59
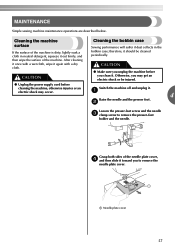
... slide it toward you clean it. therefore, it . Otherwise, you may occur. b Loosen the presser-foot screw and the needle c clamp screw to remove the needle plate cover. CAUTION ● Make sure you unplug the machine before cleaning the machine, otherwise injuries or an Switch the machine off and unplug it should...
... slide it toward you clean it. therefore, it . Otherwise, you may occur. b Loosen the presser-foot screw and the needle c clamp screw to remove the needle plate cover. CAUTION ● Make sure you unplug the machine before cleaning the machine, otherwise injuries or an Switch the machine off and unplug it should...
Users Manual - English
Page 60
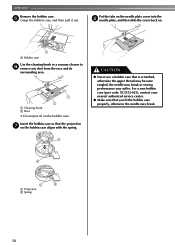
Put the tabs on the needle plate cover into the h needle plate, and then slide the cover back on the bobbin case. Insert the bobbin case so that the projection g on the bobbin case aligns with the spring. 1 CAUTION ● Never use a ...; Make sure that is scratched, otherwise the upper thread may become tangled, the needle may break or sewing performance may break. 2 1 2 a Projection b Spring 58 APPENDIX Remove the bobbin case. a Cleaning brush b Race • Do not put oil on . 1 a Bobbin case Use the cleaning brush or a vacuum cleaner to...
Put the tabs on the needle plate cover into the h needle plate, and then slide the cover back on the bobbin case. Insert the bobbin case so that the projection g on the bobbin case aligns with the spring. 1 CAUTION ● Never use a ...; Make sure that is scratched, otherwise the upper thread may become tangled, the needle may break or sewing performance may break. 2 1 2 a Projection b Spring 58 APPENDIX Remove the bobbin case. a Cleaning brush b Race • Do not put oil on . 1 a Bobbin case Use the cleaning brush or a vacuum cleaner to...
Users Manual - English
Page 63
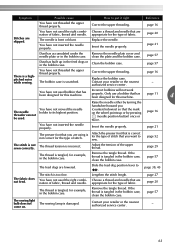
... incorrect. Lengthen the stitch length. You have not inserted the needle properly. page 20 page 21 Dust has accumulated under the Remove the needle plate cover and needle plate or in the bobbin case, clean the bobbin case. You have not threaded the upper thread properly. Replace ...the bobbin case. The thread tension is too fine. Remove the tangle thread. Choose a thread and needle that is tangled in the bobbin case...
... incorrect. Lengthen the stitch length. You have not inserted the needle properly. page 20 page 21 Dust has accumulated under the Remove the needle plate cover and needle plate or in the bobbin case, clean the bobbin case. You have not threaded the upper thread properly. Replace ...the bobbin case. The thread tension is too fine. Remove the tangle thread. Choose a thread and needle that is tangled in the bobbin case...


