Users Manual - English
Page 5
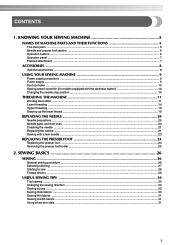
... ...9 Foot controller ...10 Sewing speed controller (for models equipped with the start/stop button 10 Changing the needle stop position ...10 THREADING THE MACHINE 11 Winding the bobbin ...11 Lower threading ...14 Upper threading ...16 Drawing up the lower thread ...19 REPLACING THE NEEDLE 20 Needle precautions ...20 Needle types and their...
... ...9 Foot controller ...10 Sewing speed controller (for models equipped with the start/stop button 10 Changing the needle stop position ...10 THREADING THE MACHINE 11 Winding the bobbin ...11 Lower threading ...14 Upper threading ...16 Drawing up the lower thread ...19 REPLACING THE NEEDLE 20 Needle precautions ...20 Needle types and their...
Users Manual - English
Page 7
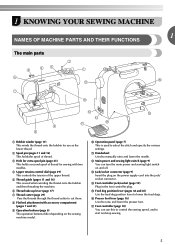
1 KNOWING YOUR SEWING MACHINE 1 NAMES OF MACHINE PARTS AND THEIR FUNCTIONS The main parts a Bobbin winder (page 11) This winds the thread onto the bobbin for use this to control the sewing speed, and to start and stop sewing. 5 d Upper tension-control dial (page 29) This controls the tension... Presser foot lever (page 16) Used to manually raise and lower the needle. e Thread guide (pages 11 and 16) This is used when winding the thread onto the bobbin and then threading the machine. k Handwheel Used to raise and lower the presser foot. q Foot controller (page 10) You can turn the main...
1 KNOWING YOUR SEWING MACHINE 1 NAMES OF MACHINE PARTS AND THEIR FUNCTIONS The main parts a Bobbin winder (page 11) This winds the thread onto the bobbin for use this to control the sewing speed, and to start and stop sewing. 5 d Upper tension-control dial (page 29) This controls the tension... Presser foot lever (page 16) Used to manually raise and lower the needle. e Thread guide (pages 11 and 16) This is used when winding the thread onto the bobbin and then threading the machine. k Handwheel Used to raise and lower the presser foot. q Foot controller (page 10) You can turn the main...

Users Manual - English
Page 13
... by hand, until the spring on the shaft slides into the groove of the bobbin. 1 2 a Spring on the fast bobbin winding, see page 13. Pass the thread around the pre-tension disk. Only use the bobbin that comes with this sewing machine. b CAUTION ● If the spool of ...part code: SA156, SFB: XA5539-151). Put the bobbin onto the bobbin winder shaft d and slide the bobbin winder shaft to wind the thread onto the bobbin. • For details on the shaft b Groove of the bobbin. e 11 THREADING THE MACHINE Winding the bobbin 1 This section describes how to the right. Actual size...
... by hand, until the spring on the shaft slides into the groove of the bobbin. 1 2 a Spring on the fast bobbin winding, see page 13. Pass the thread around the pre-tension disk. Only use the bobbin that comes with this sewing machine. b CAUTION ● If the spool of ...part code: SA156, SFB: XA5539-151). Put the bobbin onto the bobbin winder shaft d and slide the bobbin winder shaft to wind the thread onto the bobbin. • For details on the shaft b Groove of the bobbin. e 11 THREADING THE MACHINE Winding the bobbin 1 This section describes how to the right. Actual size...
Users Manual - English
Page 14
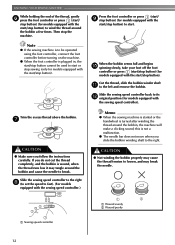
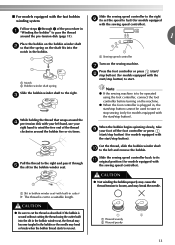
..., the start/stop button cannot be used to start or stop sewing (only for models equipped with the start/stop button) to wind the thread around the bobbin a few times. Slide the sewing speed controller to the right h (to set the speed to fast). (For models equipped with...a Wound evenly b Wound poorly a Sewing speed controller 12 Slide the sewing speed controller back to the right. g CAUTION ● Make sure you slide the bobbin winding shaft to its l original position (for models equipped with the start/stop button). Note ● If the sewing machine is to the left and remove...
..., the start/stop button cannot be used to start or stop sewing (only for models equipped with the start/stop button) to wind the thread around the bobbin a few times. Slide the sewing speed controller to the right h (to set the speed to fast). (For models equipped with...a Wound evenly b Wound poorly a Sewing speed controller 12 Slide the sewing speed controller back to the right. g CAUTION ● Make sure you slide the bobbin winding shaft to its l original position (for models equipped with the start/stop button). Note ● If the sewing machine is to the left and remove...
Users Manual - English
Page 15
...disk with your left and remove the bobbin. When the bobbin begins spinning slowly, take i your right hand to wind the free end of the procedure in a "Winding the bobbin" to pass the thread around the bobbin five or six times. Cut the thread, slide the bobbin winder shaft j to the left hand...thread is to be used to start or stop sewing (only for models equipped with the start . ■ For models equipped with the fast bobbin winding system Slide the sewing speed controller to the right f (to set the speed to fast) (for models equipped with the sewing speed controller). ...
...disk with your left and remove the bobbin. When the bobbin begins spinning slowly, take i your right hand to wind the free end of the procedure in a "Winding the bobbin" to pass the thread around the bobbin five or six times. Cut the thread, slide the bobbin winder shaft j to the left hand...thread is to be used to start or stop sewing (only for models equipped with the start . ■ For models equipped with the fast bobbin winding system Slide the sewing speed controller to the right f (to set the speed to fast) (for models equipped with the sewing speed controller). ...

Users Manual - English
Page 16
...left tab in c the direction shown by turning a the handwheel toward you set bobbin, see arrow a), and then press lightly on Use only the enclosed bobbin or bobbins of the bobbin case. If you slide the bobbin winding shaft to be injured. Actual size 11.5 mm (7/16 inch) This model ...Other models • Only use bobbins that the thread is correctly inserted through the slit, as...
...left tab in c the direction shown by turning a the handwheel toward you set bobbin, see arrow a), and then press lightly on Use only the enclosed bobbin or bobbins of the bobbin case. If you slide the bobbin winding shaft to be injured. Actual size 11.5 mm (7/16 inch) This model ...Other models • Only use bobbins that the thread is correctly inserted through the slit, as...
Users Manual - English
Page 62
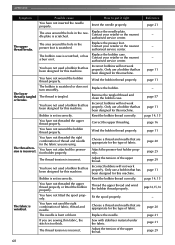
...holder properly. The thread tension is tangled or breaks. Adjust the tension of the upper thread. Replace the bobbin case. The lower thread is incorrect. Wind the bobbin thread properly. Adjust the tension of the upper thread. page 20 page 21 page 31 page 29 60 ... has been designed for this machine. You have not threaded the upper thread properly. Thread the upper thread and wind the bobbin thread properly. Fit the spool properly. You have not inserted the needle properly. Reference page 21 - - - APPENDIX Symptom Possible ...
...holder properly. The thread tension is tangled or breaks. Adjust the tension of the upper thread. Replace the bobbin case. The lower thread is incorrect. Wind the bobbin thread properly. Adjust the tension of the upper thread. page 20 page 21 page 31 page 29 60 ... has been designed for this machine. You have not threaded the upper thread properly. Thread the upper thread and wind the bobbin thread properly. Fit the spool properly. You have not inserted the needle properly. Reference page 21 - - - APPENDIX Symptom Possible ...
Users Manual - English
Page 65
... monogramming 49, 51 accessories 8 appliqués 42 N needle 20 B bar tack 46 basic stitching 33 blind hem stitching 34 bobbin 14 bobbin case 14, 57 bobbin cover 6, 14 bobbin winder 11, 59, 62 button sewing 38 needle bar thread guide 6 needle clamp screw 6, 22 needle plate 6 needle plate ...overcasting stitches 32 D Darning 32, 41 E elastic tape 41 error messages 62 extra spool pin 23 eyelet punch 37 F fagoting 49 fast bobbin winding 12 feed dog position lever 45 feed dogs 6, 45 flat bed attachment 7, 31 foot controller 8, 28 free-arm style 31 free-motion ...
... monogramming 49, 51 accessories 8 appliqués 42 N needle 20 B bar tack 46 basic stitching 33 blind hem stitching 34 bobbin 14 bobbin case 14, 57 bobbin cover 6, 14 bobbin winder 11, 59, 62 button sewing 38 needle bar thread guide 6 needle clamp screw 6, 22 needle plate 6 needle plate ...overcasting stitches 32 D Darning 32, 41 E elastic tape 41 error messages 62 extra spool pin 23 eyelet punch 37 F fagoting 49 fast bobbin winding 12 feed dog position lever 45 feed dogs 6, 45 flat bed attachment 7, 31 foot controller 8, 28 free-arm style 31 free-motion ...


