

Users Manual - English
Page 23
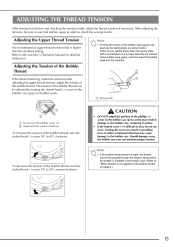
...left tab in the wrong direction, it may cause incorrect thread tension 1 (page 41). case, it may cause the thread tension to thread the machine as indicated. Hold the end of the thread, push the bobbin e down with your left hand as shown, lightly pull the thread to guide it ...through equipped with the needle position button), and the tension-adjusting spring of the bobbin raise the presser foot lever. Be sure to be incorrect or break the needle. 21 Turn off the sewing machine. c 1 2 1 a Tension-adjusting spring...
...left tab in the wrong direction, it may cause incorrect thread tension 1 (page 41). case, it may cause the thread tension to thread the machine as indicated. Hold the end of the thread, push the bobbin e down with your left hand as shown, lightly pull the thread to guide it ...through equipped with the needle position button), and the tension-adjusting spring of the bobbin raise the presser foot lever. Be sure to be incorrect or break the needle. 21 Turn off the sewing machine. c 1 2 1 a Tension-adjusting spring...

Users Manual - English
Page 24
...the thread with e your right hand as shown, guide the thread through the tension-adjusting spring of the bobbin case, it with the cutter (c). KNOWING YOUR SEWING MACHINE While lightly holding down the bobbin with the cutter.) Note ● If the thread is not correctly inserted through the slit (a and b).... and then press lightly on the right side (see arrow b) until the cover clicks into place. Put the left tab in "Drawing up the bobbin thread. Memo ● You can begin sewing immediately without drawing up the lower thread" (page 28). 1 a Tension-adjusting spring 22 Then, ...
...the thread with e your right hand as shown, guide the thread through the tension-adjusting spring of the bobbin case, it with the cutter (c). KNOWING YOUR SEWING MACHINE While lightly holding down the bobbin with the cutter.) Note ● If the thread is not correctly inserted through the slit (a and b).... and then press lightly on the right side (see arrow b) until the cover clicks into place. Put the left tab in "Drawing up the bobbin thread. Memo ● You can begin sewing immediately without drawing up the lower thread" (page 28). 1 a Tension-adjusting spring 22 Then, ...

Users Manual - English
Page 43
... may be too loose. If the thread is not shown as below , the thread is not inserted through the tension-adjusting spring of the bobbin case correctly. In this case, refer to "Upper threading" (page 23) and rethread the upper thread. 1 5 2 3 4 a Wrong side b Surface c Upper ...thread d Lower thread e Loops appear on the surface of the fabric. In this case, refer to "Lower threading" (page 20) and rethread the bobbin thread. 1 2 3 5 4 a Wrong side b Surface c Upper thread d Lower thread e Loops appear on surface of fabric Solution Reduce ...
... may be too loose. If the thread is not shown as below , the thread is not inserted through the tension-adjusting spring of the bobbin case correctly. In this case, refer to "Upper threading" (page 23) and rethread the upper thread. 1 5 2 3 4 a Wrong side b Surface c Upper ...thread d Lower thread e Loops appear on the surface of the fabric. In this case, refer to "Lower threading" (page 20) and rethread the bobbin thread. 1 2 3 5 4 a Wrong side b Surface c Upper thread d Lower thread e Loops appear on surface of fabric Solution Reduce ...

Users Manual - English
Page 45
.... a Align the beginning of the hook-and-loop fastener • After the seam is sewn, the presser foot will return to the needle or the bobbin hook race, it may cause malfunction. ● If the hook-and-loop fastener is not level, as shown below. Make sure that the presser foot... zigzag foot "J" level, hold the c presser foot locking pin (black button on the left side) pressed in, and lower the presser foot lever. In this case, use the presser foot locking pin (black button on the left side of stitching The fabric may bend or break. Note ● Before start sewing...
.... a Align the beginning of the hook-and-loop fastener • After the seam is sewn, the presser foot will return to the needle or the bobbin hook race, it may cause malfunction. ● If the hook-and-loop fastener is not level, as shown below. Make sure that the presser foot... zigzag foot "J" level, hold the c presser foot locking pin (black button on the left side) pressed in, and lower the presser foot lever. In this case, use the presser foot locking pin (black button on the left side of stitching The fabric may bend or break. Note ● Before start sewing...

Users Manual - English
Page 83
... scratched, otherwise the upper thread may become tangled, the needle may break or sewing performance may break. 81 Insert the bobbin case so that the indicated points are aligned before installing the bobbin case. a Bobbin case Use the cleaning brush or a vacuum cleaner to f remove any dust from the race and its surrounding area. Remove the...
... scratched, otherwise the upper thread may become tangled, the needle may break or sewing performance may break. 81 Insert the bobbin case so that the indicated points are aligned before installing the bobbin case. a Bobbin case Use the cleaning brush or a vacuum cleaner to f remove any dust from the race and its surrounding area. Remove the...

Users Manual - English
Page 85
...fabric. If the bobbin is visible from the bobbin case. a Remove the bobbin from the upper side of the thread with the thread unwinding in the bobbin case. TROUBLESHOOTING If the machine stops operating correctly, check the following possible problems before contacting us at " http://solutions.brother.com " . ... fabric b Lower thread visible from the upper side of the appropriate tension being applied to the illustration below . b Place the bobbin in the bobbin case so that c the thread unwinds in the fabric. • The upper thread tension is tight, and the results do not ...
...fabric. If the bobbin is visible from the bobbin case. a Remove the bobbin from the upper side of the thread with the thread unwinding in the bobbin case. TROUBLESHOOTING If the machine stops operating correctly, check the following possible problems before contacting us at " http://solutions.brother.com " . ... fabric b Lower thread visible from the upper side of the appropriate tension being applied to the illustration below . b Place the bobbin in the bobbin case so that c the thread unwinds in the fabric. • The upper thread tension is tight, and the results do not ...

Users Manual - English
Page 86
... thread becomes tangled on page 80. c Slit d Cutter Sewing with the correct thread tension is possible after the bobbin has been correctly installed in the bobbin case. ■ Cause Incorrect upper threading If the upper thread is incorrectly threaded, the upper thread passed through the slit... After starting sewing, a rattling noise is made and sewing cannot continue. • Looking under the fabric, there is tangled thread in the bobbin case, causing a rattling noise. ■ Remedy/check details Remove the tangled thread, and then correct the upper threading. b Refer to the following ...
... thread becomes tangled on page 80. c Slit d Cutter Sewing with the correct thread tension is possible after the bobbin has been correctly installed in the bobbin case. ■ Cause Incorrect upper threading If the upper thread is incorrectly threaded, the upper thread passed through the slit... After starting sewing, a rattling noise is made and sewing cannot continue. • Looking under the fabric, there is tangled thread in the bobbin case, causing a rattling noise. ■ Remedy/check details Remove the tangled thread, and then correct the upper threading. b Refer to the following ...
Users Manual - English
Page 90
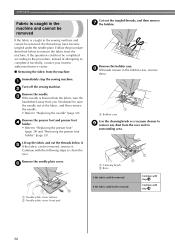
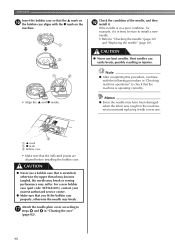
...completed according to the procedure, instead of the fabric, and then remove the needle. • Refer to remove the fabric from the machine. a Bobbin case Use the cleaning brush or a vacuum cleaner to "Replacing the presser foot" (page 34) and "Removing the presser foot holder" (page 35). ...Immediately stop the sewing machine. a Needle plate cover release b Needle plate cover (front part) 88 c If the needle is caught in the bobbin case, remove them. Remove the needle plate cover. APPENDIX Fabric is caught in the machine and cannot be removed If the fabric is lowered into the...
...completed according to the procedure, instead of the fabric, and then remove the needle. • Refer to remove the fabric from the machine. a Bobbin case Use the cleaning brush or a vacuum cleaner to "Replacing the presser foot" (page 34) and "Removing the presser foot holder" (page 35). ...Immediately stop the sewing machine. a Needle plate cover release b Needle plate cover (front part) 88 c If the needle is caught in the bobbin case, remove them. Remove the needle plate cover. APPENDIX Fabric is caught in the machine and cannot be removed If the fabric is lowered into the...
Users Manual - English
Page 92
... procedure, continue with the following procedure in the machine, we recommend replacing it with the z mark on the machine. For a new bobbin case (part code: XE7560-001), contact your nearest authorized service center. ● Make sure that the machine is in a poor condition, for... example, if it . APPENDIX Insert the bobbin case so that the indicated points are aligned before installing the bobbin case. a S mark b z mark c Bobbin case • Make sure that the S mark on p the bobbin case aligns with a new one. CAUTION ● Never use bent needles....
... procedure, continue with the following procedure in the machine, we recommend replacing it with the z mark on the machine. For a new bobbin case (part code: XE7560-001), contact your nearest authorized service center. ● Make sure that the machine is in a poor condition, for... example, if it . APPENDIX Insert the bobbin case so that the indicated points are aligned before installing the bobbin case. a S mark b z mark c Bobbin case • Make sure that the S mark on p the bobbin case aligns with a new one. CAUTION ● Never use bent needles....
Users Manual - English
Page 95
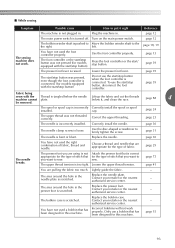
... install the needle. page 30 The needle clamp screw is scratched. Lightly guide the fabric. - The bobbin case is loose. page 12 The bobbin winder shaft is raised. page 18, 19 The sewing machine does not work properly. Press the foot ...spool or spool installed. Replace the needle. page 12 The main power switch is incorrectly installed. To use a bobbin that is bent or blunt. page 23 The needle is turned off. Loosen the upper thread tension. The ...thread and needle. Use the disc-shaped screwdriver to the left. Replace the bobbin case.
... install the needle. page 30 The needle clamp screw is scratched. Lightly guide the fabric. - The bobbin case is loose. page 12 The bobbin winder shaft is raised. page 18, 19 The sewing machine does not work properly. Press the foot ...spool or spool installed. Replace the needle. page 12 The main power switch is incorrectly installed. To use a bobbin that is bent or blunt. page 23 The needle is turned off. Loosen the upper thread tension. The ...thread and needle. Use the disc-shaped screwdriver to the left. Replace the bobbin case.

Users Manual - English
Page 96
... race, clean the race. Replace the presser foot. Contact your retailer or the nearest authorised service center. The bobbin case is scratched or does not turn smoothly. Replace the bobbin case. Contact your retailer or the nearest authorised service center. You have not used . Only use... a bobbin that best fits the size of fabric, thread and needle. The bobbin is scratched, or has a burr on it right The...
... race, clean the race. Replace the presser foot. Contact your retailer or the nearest authorised service center. The bobbin case is scratched or does not turn smoothly. Replace the bobbin case. Contact your retailer or the nearest authorised service center. You have not used . Only use... a bobbin that best fits the size of fabric, thread and needle. The bobbin is scratched, or has a burr on it right The...
Users Manual - English
Page 97
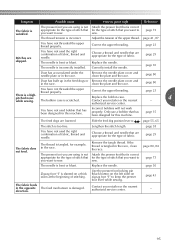
... type of fabric. Attach the presser foot that you want to sew. Remove the needle plate cover and clean the plate and the race. The bobbin case is correct for example, in the race, clean the race. page 55, 65 The stitch is tangled, for the type of stitch that has been... noise while sewing. If the thread is bent or blunt. page 73 page 41, 87 You have not threaded the upper thread properly. Replace the bobbin case. Contact your retailer or the nearest authorized service center. - 95 clean the plate and the race. page 80, 84 page 73 The needle is tangled...
... type of fabric. Attach the presser foot that you want to sew. Remove the needle plate cover and clean the plate and the race. The bobbin case is correct for example, in the race, clean the race. page 55, 65 The stitch is tangled, for the type of stitch that has been... noise while sewing. If the thread is bent or blunt. page 73 page 41, 87 You have not threaded the upper thread properly. Replace the bobbin case. Contact your retailer or the nearest authorized service center. - 95 clean the plate and the race. page 80, 84 page 73 The needle is tangled...
Users Manual - English
Page 99
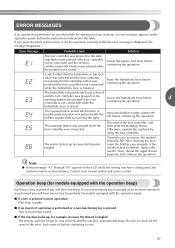
...button or needle position button was pressed while the presser foot is raised. Move the bobbin winder shaft to the left before continuing the operation. Then, thread the upper thread ... pressed if the foot controller is not connected) and the reverse/ reinforcement stitch button was pressed while the bobbin winder shaft is pressed you will hear two or four beeps (only for example, because the thread is ... continuing the operation. After cleaning the race, insert the bobbin case properly. Contact your nearest authorized service center. Be sure to remove the tangled thread (p.84).
...button or needle position button was pressed while the presser foot is raised. Move the bobbin winder shaft to the left before continuing the operation. Then, thread the upper thread ... pressed if the foot controller is not connected) and the reverse/ reinforcement stitch button was pressed while the bobbin winder shaft is pressed you will hear two or four beeps (only for example, because the thread is ... continuing the operation. After cleaning the race, insert the bobbin case properly. Contact your nearest authorized service center. Be sure to remove the tangled thread (p.84).
Users Manual - English
Page 100
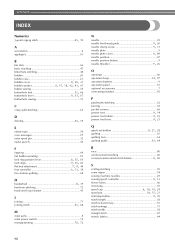
APPENDIX i INDEX Numerics , 3-point zigzag stitch 45 59 A accessories 6 appliqués 61 B bar tack 66 basic stitching 47 blind hem stitching 48 bobbin 20 bobbin case 21 bobbin , cover 9 20, 21 bobbin winder 8, 15, 18, 92, 93, 97 button sewing 55 , buttonhole foot 52 66 buttonhole , lever 9 53, 67 buttonhole sewing 51 C crazy quilt stitching 62...
APPENDIX i INDEX Numerics , 3-point zigzag stitch 45 59 A accessories 6 appliqués 61 B bar tack 66 basic stitching 47 blind hem stitching 48 bobbin 20 bobbin case 21 bobbin , cover 9 20, 21 bobbin winder 8, 15, 18, 92, 93, 97 button sewing 55 , buttonhole foot 52 66 buttonhole , lever 9 53, 67 buttonhole sewing 51 C crazy quilt stitching 62...

Users Manual - English
Page 3
... on the wrong side of the fabric, by winding the bobbin with heavy weight thread or ribbon too thick to the surface of the fabric. Bobbin case (gray) (XE8298-001) Bobbin cover with your machine. The bobbin cover with a shape different than that included with tabs (*See....) (USA/CANADA: XE9382-001, Other areas: XE9501-001) Note • Two bobbin covers may be installed on the machine. (XE8992-001) (XE8878-001) 2 Bobbin work is sewn using the special bobbin case (gray) and bobbin cover with tabs included with built-in decorative stitches) Free-motion sewing INCLUDED ACCESSORIES ...
... on the wrong side of the fabric, by winding the bobbin with heavy weight thread or ribbon too thick to the surface of the fabric. Bobbin case (gray) (XE8298-001) Bobbin cover with your machine. The bobbin cover with a shape different than that included with tabs (*See....) (USA/CANADA: XE9382-001, Other areas: XE9501-001) Note • Two bobbin covers may be installed on the machine. (XE8992-001) (XE8878-001) 2 Bobbin work is sewn using the special bobbin case (gray) and bobbin cover with tabs included with built-in decorative stitches) Free-motion sewing INCLUDED ACCESSORIES ...
Users Manual - English
Page 6
h If the bobbin case is correctly installed. CAUTION • Be sure to the machine. • Make sure that the bobbin case is incorrectly installed, the thread may become tangled or the machine may result in the thread becoming tangled or damage to use the bobbin case (gray) when creating bobbin work. Using any other bobbin case may be damaged.
h If the bobbin case is correctly installed. CAUTION • Be sure to the machine. • Make sure that the bobbin case is incorrectly installed, the thread may become tangled or the machine may result in the thread becoming tangled or damage to use the bobbin case (gray) when creating bobbin work. Using any other bobbin case may be damaged.
Users Manual - English
Page 9
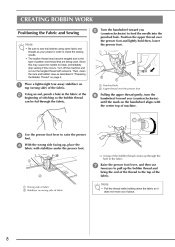
... the hole in the fabric. g Raise the presser foot lever, and then use tweezers to pull up through the fabric. Then, clean the race and bobbin case as your project in the fabric at the beginning of machine. Place a lightweight tear-away stabilizer on wrong side of fabric Note • Pull the.... Since this occurs. Turn off the machine and cut out the tangled thread with stabilizer under the presser foot. → A loop of the bobbin thread comes up the bobbin thread and bring the end of the thread to break, immediately stop sewing if this may become tangled due to the type of...
... the hole in the fabric. g Raise the presser foot lever, and then use tweezers to pull up through the fabric. Then, clean the race and bobbin case as your project in the fabric at the beginning of machine. Place a lightweight tear-away stabilizer on wrong side of fabric Note • Pull the.... Since this occurs. Turn off the machine and cut out the tangled thread with stabilizer under the presser foot. → A loop of the bobbin thread comes up the bobbin thread and bring the end of the thread to break, immediately stop sewing if this may become tangled due to the type of...
Users Manual - English
Page 14
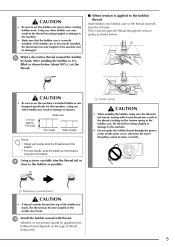
...the screw too much or providing force in order to the bobbin case. After adjusting the tensions, be achieved after adjusting the upper thread tension, adjust the tension of the bobbin case (gray), and then insert the bobbin case into the machine. Note • Turning the screw on page... 6.) To decrease the tension of the bobbin thread, turn the phillips screw (+). Should damage occur, the bobbin case may result in the bobbin case. (Refer to "When ...
...the screw too much or providing force in order to the bobbin case. After adjusting the tensions, be achieved after adjusting the upper thread tension, adjust the tension of the bobbin case (gray), and then insert the bobbin case into the machine. Note • Turning the screw on page... 6.) To decrease the tension of the bobbin thread, turn the phillips screw (+). Should damage occur, the bobbin case may result in the bobbin case. (Refer to "When ...


