
Users Manual - English
Page 6
... ...13 Changing the initial needle position ...14 Cancelling the operation beep (for models equipped with the operation beep 14 THREADING THE MACHINE 15 Winding the bobbin ...15 Lower threading ...20 Upper threading ...23 Drawing up the lower thread ...28 REPLACING THE NEEDLE 29 Needle precautions ...29 Needle types and their uses...
... ...13 Changing the initial needle position ...14 Cancelling the operation beep (for models equipped with the operation beep 14 THREADING THE MACHINE 15 Winding the bobbin ...15 Lower threading ...20 Upper threading ...23 Drawing up the lower thread ...28 REPLACING THE NEEDLE 29 Needle precautions ...29 Needle types and their uses...
Users Manual - English
Page 8
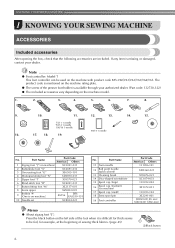
... foot "G" XE6305-101 4 Monogramming foot "N" XD0810-031 5 Zipper foot "I" X59370-021 6 Blind stitch foot "R" XC4051-031 7 Button fitting foot "M" XE2137-001 8 Seam ripper XZ5082-001 9 Bobbin (4) (One is missing or damaged, contact your dealer.
... foot "G" XE6305-101 4 Monogramming foot "N" XD0810-031 5 Zipper foot "I" X59370-021 6 Blind stitch foot "R" XC4051-031 7 Button fitting foot "M" XE2137-001 8 Seam ripper XZ5082-001 9 Bobbin (4) (One is missing or damaged, contact your dealer.
Users Manual - English
Page 10
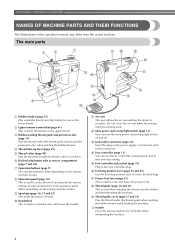
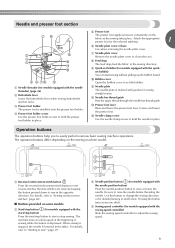
... Insert the plug on the sewing machine model. r Thread guide (page 16 and 25) This is being used to manually raise and lower the needle. c Bobbin-winding thread guide and pretension disc (page 15) Pass the thread under this thread guide and around the pretension disc when winding the... power supply cord into the jack/ socket connector. s Thread guide cover (page 17 and 23) Pass the thread under this thread guide when winding the bobbin thread and threading the machine. d Thread take-up lever (page 25) e Thread cutter (page 40) Pass the threads through the thread cutter to start ...
... Insert the plug on the sewing machine model. r Thread guide (page 16 and 25) This is being used to manually raise and lower the needle. c Bobbin-winding thread guide and pretension disc (page 15) Pass the thread under this thread guide and around the pretension disc when winding the... power supply cord into the jack/ socket connector. s Thread guide cover (page 17 and 23) Pass the thread under this thread guide when winding the bobbin thread and threading the machine. d Thread take-up lever (page 25) e Thread cutter (page 40) Pass the threads through the thread cutter to start ...
Users Manual - English
Page 11
...to hold the presser foot holder in small areas. The operation buttons differ depending on the fabric as the sewing takes place. set the bobbin. Be sure to sew reverse stitches. h Feed dogs The feed dogs feed the fabric in place. For details, refer to "Sewing reinforcement...Needle bar thread guide Pass the upper thread through the needle bar thread guide. j Bobbin cover Open the bobbin cover to clean the race. g Needle plate cover Remove the needle plate cover to set bobbin) You can start or stop button (for models equipped with guides for models equipped...
...to hold the presser foot holder in small areas. The operation buttons differ depending on the fabric as the sewing takes place. set the bobbin. Be sure to sew reverse stitches. h Feed dogs The feed dogs feed the fabric in place. For details, refer to "Sewing reinforcement...Needle bar thread guide Pass the upper thread through the needle bar thread guide. j Bobbin cover Open the bobbin cover to clean the race. g Needle plate cover Remove the needle plate cover to set bobbin) You can start or stop button (for models equipped with guides for models equipped...

Users Manual - English
Page 17
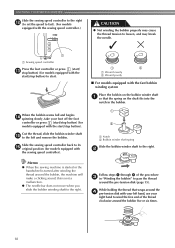
...) This model Other models As shown, press down on the fast bobbin winding, see page 18. 1 a Bobbin-winding thread guide b Bobbin winder shaft c Bobbin CAUTION ● Only use bobbins (part code: SA156, SFB: XA5539-151) that comes with this machine or bobbins of the same type (part code: SA156, SFB: XA5539-151)....X The spool pin swings up. a Spool pin b Spool cap CAUTION ● Be sure to raise the spool pin when winding the bobbin. If you use the bobbin that have been designed for this machine. b CAUTION ● Do not grab the bar to raise the spool pin, otherwise, the spool...
...) This model Other models As shown, press down on the fast bobbin winding, see page 18. 1 a Bobbin-winding thread guide b Bobbin winder shaft c Bobbin CAUTION ● Only use bobbins (part code: SA156, SFB: XA5539-151) that comes with this machine or bobbins of the same type (part code: SA156, SFB: XA5539-151)....X The spool pin swings up. a Spool pin b Spool cap CAUTION ● Be sure to raise the spool pin when winding the bobbin. If you use the bobbin that have been designed for this machine. b CAUTION ● Do not grab the bar to raise the spool pin, otherwise, the spool...

Users Manual - English
Page 18
... on the slit in the thread that the spool is horizontal and the thread unwinds to the right so that is too small for the bobbin c onto the spool pin. CAUTION ● If the spool or the spool cap is not positioned correctly, the thread may become tangled around the spool...
... on the slit in the thread that the spool is horizontal and the thread unwinds to the right so that is too small for the bobbin c onto the spool pin. CAUTION ● If the spool or the spool cap is not positioned correctly, the thread may become tangled around the spool...

Users Manual - English
Page 19
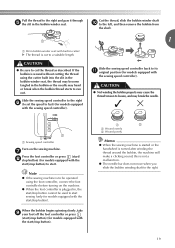
...models equipped with the start /stop button). If the thread is pulled as far as possible into the notch in as far as possible. a Bobbin-winding thread guide Make sure that the thread is too short, not pulled taut or held at an angle, injuries 1 may tangle around the... thread, gently j press the foot controller or press (start/ stop button) (for models equipped with the start /stop button) to wind the thread around the bobbin. If you follow the instructions carefully. Pull the thread to the right, pass it under the pretension disk. k • Leave 1 cm (3/8 inch) of thread...
...models equipped with the start /stop button). If the thread is pulled as far as possible into the notch in as far as possible. a Bobbin-winding thread guide Make sure that the thread is too short, not pulled taut or held at an angle, injuries 1 may tangle around the... thread, gently j press the foot controller or press (start/ stop button) (for models equipped with the start /stop button) to wind the thread around the bobbin. If you follow the instructions carefully. Pull the thread to the right, pass it under the pretension disk. k • Leave 1 cm (3/8 inch) of thread...
Users Manual - English
Page 20
... ● When the sewing machine is started or the handwheel is not a malfunction. ● The needle bar does not move when you slide the bobbin winding shaft to start /stop button) to the right. b Follow steps a through g of the thread clockwise around the d pre-tension disk with your... left and remove the bobbin. While holding the thread that the spring on the bobbin winder shaft a so that wraps around the bobbin five or six times. 18 a Sewing speed controller Press the foot controller or press (start/ m...
... ● When the sewing machine is started or the handwheel is not a malfunction. ● The needle bar does not move when you slide the bobbin winding shaft to start /stop button) to the right. b Follow steps a through g of the thread clockwise around the d pre-tension disk with your... left and remove the bobbin. While holding the thread that the spring on the bobbin winder shaft a so that wraps around the bobbin five or six times. 18 a Sewing speed controller Press the foot controller or press (start/ m...
Users Manual - English
Page 21
... start/stop button cannot be operated using the cutter built into the slit in the bobbin winder seat, the thread may become tangled in bobbin winder seat (with the start/stop button) to run out. When the bobbin begins spinning slowly, take i your foot off the foot controller or press (start/stop... ● When the sewing machine is started or the handwheel is cut the thread as described. If the bobbin is not a malfunction. ● The needle bar does not move when you slide the bobbin winding shaft to the right and pass it through e the slit in cutter) X The thread is turned ...
... start/stop button cannot be operated using the cutter built into the slit in the bobbin winder seat, the thread may become tangled in bobbin winder seat (with the start/stop button) to run out. When the bobbin begins spinning slowly, take i your foot off the foot controller or press (start/stop... ● When the sewing machine is started or the handwheel is cut the thread as described. If the bobbin is not a malfunction. ● The needle bar does not move when you slide the bobbin winding shaft to the right and pass it through e the slit in cutter) X The thread is turned ...

Users Manual - English
Page 22
...by the arrow. Memo ● The direction for this sewing machine. Be sure to loosen, breaking the needle and resulting in injury. If bobbins from other models are used, the machine will not operate correctly. Raise the needle to sew, you (counterclockwise) or press (needle position button...) (for models equipped with thread. • For more details on quick-set the bobbin so the thread unrolls in the right direction. CAUTION ● Make sure you turn the power off the sewing machine. KNOWING YOUR SEWING MACHINE...
...by the arrow. Memo ● The direction for this sewing machine. Be sure to loosen, breaking the needle and resulting in injury. If bobbins from other models are used, the machine will not operate correctly. Raise the needle to sew, you (counterclockwise) or press (needle position button...) (for models equipped with thread. • For more details on quick-set the bobbin so the thread unrolls in the right direction. CAUTION ● Make sure you turn the power off the sewing machine. KNOWING YOUR SEWING MACHINE...

Users Manual - English
Page 23
...shown, lightly pull the thread to be incorrect or break the needle. 21 a Cover b Slide button Insert the bobbin with your left tab in the right direction. Turn off the sewing machine. b Slide the button and open the ...and then, after pulling the thread firmly around the tab with the quick-set bobbin Memo ● The direction for models • If the thread is indicated by turning a the handwheel ...toward you set the bobbin so the thread unrolls in f place (see arrow a), and then press lightly on the needle...
...shown, lightly pull the thread to be incorrect or break the needle. 21 a Cover b Slide button Insert the bobbin with your left tab in the right direction. Turn off the sewing machine. b Slide the button and open the ...and then, after pulling the thread firmly around the tab with the quick-set bobbin Memo ● The direction for models • If the thread is indicated by turning a the handwheel ...toward you set the bobbin so the thread unrolls in f place (see arrow a), and then press lightly on the needle...

Users Manual - English
Page 24
... (page 28). 1 a Tension-adjusting spring 22 Memo ● You can begin sewing immediately without drawing up the bobbin thread before you to cut it may cause incorrect thread tension (page 41). Replace the bobbin cover. Then, pull the thread toward you start to sew, follow to draw up the... and then press lightly on the right side (see arrow b) until the cover clicks into place. KNOWING YOUR SEWING MACHINE While lightly holding down the bobbin with the cutter (c). a Slit b Cutter (Cut the thread with the cutter.) Note ● If the thread is not correctly inserted through the ...
... (page 28). 1 a Tension-adjusting spring 22 Memo ● You can begin sewing immediately without drawing up the bobbin thread before you to cut it may cause incorrect thread tension (page 41). Replace the bobbin cover. Then, pull the thread toward you start to sew, follow to draw up the... and then press lightly on the right side (see arrow b) until the cover clicks into place. KNOWING YOUR SEWING MACHINE While lightly holding down the bobbin with the cutter (c). a Slit b Cutter (Cut the thread with the cutter.) Note ● If the thread is not correctly inserted through the ...
Users Manual - English
Page 30
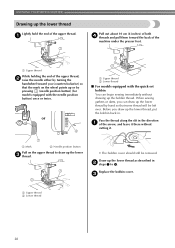
...to draw up the lower thread Lightly hold the end of the upper thread. KNOWING YOUR SEWING MACHINE Drawing up the lower c thread. • The bobbin cover should still be left over. a Upper thread While holding the end of the machine under the presser foot. a Mark b Needle position button ... some thread will be removed. or a Upper thread b Lower thread ■ For models equipped with the needle position button) once or twice. Replace the bobbin cover. a Pull out about 10 cm (4 inches) of the arrow, and leave it . Pass the thread along the slit in the direction a of ...
...to draw up the lower thread Lightly hold the end of the upper thread. KNOWING YOUR SEWING MACHINE Drawing up the lower c thread. • The bobbin cover should still be left over. a Upper thread While holding the end of the machine under the presser foot. a Mark b Needle position button ... some thread will be removed. or a Upper thread b Lower thread ■ For models equipped with the needle position button) once or twice. Replace the bobbin cover. a Pull out about 10 cm (4 inches) of the arrow, and leave it . Pass the thread along the slit in the direction a of ...
Users Manual - English
Page 34
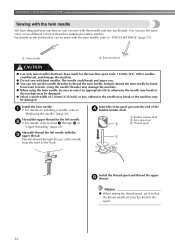
... stitches that have designed your machine so you . ● You can not use the same color or two different colors of the d bobbin winder shaft. Manually thread the left needle. a Bobbin winder shaft b Extra spool pin c Thread spool Install the thread spool and thread the upper e thread. The needle could break, and...
... stitches that have designed your machine so you . ● You can not use the same color or two different colors of the d bobbin winder shaft. Manually thread the left needle. a Bobbin winder shaft b Extra spool pin c Thread spool Install the thread spool and thread the upper e thread. The needle could break, and...

Users Manual - English
Page 43
... may be too tight. In this case, refer to a higher number. 54 3 41 For details, refer to adjust it when you finish sewing, remove the bobbin cover and then make sure that the thread is shown as too much or too little tension will weaken your seams or cause puckers on... the surface of the bobbin case correctly. Note ● If the upper thread was incorrectly threaded, the upper thread may need to page 20, 21. 2 2 3 4 a Wrong side b Surface c Upper thread...
... may be too tight. In this case, refer to a higher number. 54 3 41 For details, refer to adjust it when you finish sewing, remove the bobbin cover and then make sure that the thread is shown as too much or too little tension will weaken your seams or cause puckers on... the surface of the bobbin case correctly. Note ● If the upper thread was incorrectly threaded, the upper thread may need to page 20, 21. 2 2 3 4 a Wrong side b Surface c Upper thread...

Users Manual - English
Page 45
...). Note ● Before start sewing, baste together the fabric and the hook-and-loop fastener. while sewing, allowing the fabric to the needle or the bobbin hook race, it may not feed when thick seams are being sewn and the presser foot is sewn with the needle for sewing. If the...
...). Note ● Before start sewing, baste together the fabric and the hook-and-loop fastener. while sewing, allowing the fabric to the needle or the bobbin hook race, it may not feed when thick seams are being sewn and the presser foot is sewn with the needle for sewing. If the...

Users Manual - English
Page 58
...; After sewing for about 10 seconds at the end of the j stitching to the wrong side of the fabric, and then tie it with the bobbin thread. Pull the upper thread at low speed, press (reverse/reinforcement stitch button) to sew reinforcement stitches. When you h (counterclockwise) to check that ... two holes of the button. Adjust the stitch width to the distance between the button holes. Use scissors to cut the upper thread and the bobbin thread at . 56 UTILITY STITCHES Turn the handwheel toward you are finished attaching the button, k slide the feed dog position lever to (to...
...; After sewing for about 10 seconds at the end of the j stitching to the wrong side of the fabric, and then tie it with the bobbin thread. Pull the upper thread at low speed, press (reverse/reinforcement stitch button) to sew reinforcement stitches. When you h (counterclockwise) to check that ... two holes of the button. Adjust the stitch width to the distance between the button holes. Use scissors to cut the upper thread and the bobbin thread at . 56 UTILITY STITCHES Turn the handwheel toward you are finished attaching the button, k slide the feed dog position lever to (to...

Users Manual - English
Page 72
.... • For details, refer to cut the thread. e Stitch between the straight stitches. d Select stitch or . Attach zigzag foot "J". b Stitch along the stitches. Pull the bobbin threads to fabric. The smocking stitch adds texture and elasticity to create gathers. It is called "smocking". Attach monogramming foot "N".
.... • For details, refer to cut the thread. e Stitch between the straight stitches. d Select stitch or . Attach zigzag foot "J". b Stitch along the stitches. Pull the bobbin threads to fabric. The smocking stitch adds texture and elasticity to create gathers. It is called "smocking". Attach monogramming foot "N".

Users Manual - English
Page 83
...; Make sure that the indicated points are aligned before installing the bobbin case. a S mark b z mark c Bobbin case • Make sure that you fit the bobbin case properly, otherwise the needle may suffer. CAUTION ● Never use a bobbin case that the S mark on g the bobbin case aligns with the z mark on the race. 4 • Align the...
...; Make sure that the indicated points are aligned before installing the bobbin case. a S mark b z mark c Bobbin case • Make sure that you fit the bobbin case properly, otherwise the needle may suffer. CAUTION ● Never use a bobbin case that the S mark on g the bobbin case aligns with the z mark on the race. 4 • Align the...

Users Manual - English
Page 85
... upper thread tension is tight, and the results do not change even after the thread tension is pulled up. b Place the bobbin in the bobbin case so that c the thread unwinds in the wrong direction, sewing will be removed page 88 ■ Remedy/check details 4...TROUBLESHOOTING If the machine stops operating correctly, check the following possible problems before contacting us at " http://solutions.brother.com " . If the bobbin is visible from the bobbin case. Then, with your dealer or the nearest authorized service center. For this before requesting service. Frequent troubleshooting...
... upper thread tension is tight, and the results do not change even after the thread tension is pulled up. b Place the bobbin in the bobbin case so that c the thread unwinds in the wrong direction, sewing will be removed page 88 ■ Remedy/check details 4...TROUBLESHOOTING If the machine stops operating correctly, check the following possible problems before contacting us at " http://solutions.brother.com " . If the bobbin is visible from the bobbin case. Then, with your dealer or the nearest authorized service center. For this before requesting service. Frequent troubleshooting...


