
Operation Manual
Page 1
We recommend that you keep this document before using the machine. Operation Manual Sewing Machine Product Code: 888-V60/V61/V62/V63/V64/V65 KNOWING YOUR SEWING MACHINE SEWING BASICS UTILITY STITCHES APPENDIX Be sure to read this document nearby for future reference.
We recommend that you keep this document before using the machine. Operation Manual Sewing Machine Product Code: 888-V60/V61/V62/V63/V64/V65 KNOWING YOUR SEWING MACHINE SEWING BASICS UTILITY STITCHES APPENDIX Be sure to read this document nearby for future reference.

Operation Manual
Page 3
... connect it by any sudden or careless movements, otherwise you may damage the machine or result in the country of purchase only. 4 Never operate this manual, or if you notice anything unusual, such as an odor, heat, discoloration or deformation, stop using , when cleaning, when making any user servicing ...adjustments mentioned in this machine if it has a damaged cord or plug, if it is stored or in the instruction manual: • To unplug the machine, switch the machine to the symbol "O" position to a DC power source or inverter. WARNING -
... connect it by any sudden or careless movements, otherwise you may damage the machine or result in the country of purchase only. 4 Never operate this manual, or if you notice anything unusual, such as an odor, heat, discoloration or deformation, stop using , when cleaning, when making any user servicing ...adjustments mentioned in this machine if it has a damaged cord or plug, if it is stored or in the instruction manual: • To unplug the machine, switch the machine to the symbol "O" position to a DC power source or inverter. WARNING -

Operation Manual
Page 4
Benzene, thinner, and scouring powders can damage the case and machine, and should be used. • Always consult the operation manual when replacing or installing any adjustments in the needle area. • Do not use a damaged or incorrect needle plate, as it could cause the needle ...
Benzene, thinner, and scouring powders can damage the case and machine, and should be used. • Always consult the operation manual when replacing or installing any adjustments in the needle area. • Do not use a damaged or incorrect needle plate, as it could cause the needle ...

Operation Manual
Page 5
... • In the event a malfunction occurs or adjustment is required, first follow the troubleshooting table in the back of the operation manual to change without supervision. Never use as described in this product are subject to inspect and adjust the machine yourself. Children should contact... your local authorized Brother dealer. FOR USERS IN EUROPEAN COUNTRIES This appliance can be supervised to obtain the correct lead. 3 Use this machine only for ...
... • In the event a malfunction occurs or adjustment is required, first follow the troubleshooting table in the back of the operation manual to change without supervision. Never use as described in this product are subject to inspect and adjust the machine yourself. Children should contact... your local authorized Brother dealer. FOR USERS IN EUROPEAN COUNTRIES This appliance can be supervised to obtain the correct lead. 3 Use this machine only for ...
Operation Manual
Page 10
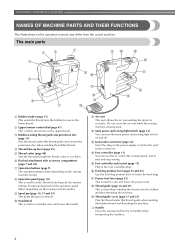
...the operation panel differs depending on and off. o Foot controller jack/socket (page 13) Plug in this to control the sewing speed, and to manually raise and lower the needle. s Thread guide cover (page 17 and 23) Pass the thread under this thread guide when winding the bobbin thread... disc when winding the bobbin thread. The main parts a Bobbin winder (page 15) This winds the thread onto the bobbin for use this operation manual may differ from the actual machine. t Handle Carry the sewing machine by its handle when transporting the machine. 8 KNOWING YOUR SEWING MACHINE NAMES OF...
...the operation panel differs depending on and off. o Foot controller jack/socket (page 13) Plug in this to control the sewing speed, and to manually raise and lower the needle. s Thread guide cover (page 17 and 23) Pass the thread under this thread guide when winding the bobbin thread... disc when winding the bobbin thread. The main parts a Bobbin winder (page 15) This winds the thread onto the bobbin for use this operation manual may differ from the actual machine. t Handle Carry the sewing machine by its handle when transporting the machine. 8 KNOWING YOUR SEWING MACHINE NAMES OF...

Operation Manual
Page 12
The operation panel differs depending on the model. This manual shows, as shown in the illustration. For details, refer to raise the spool pin. CAUTION ● Do not grab the bar to raise the spool ...
The operation panel differs depending on the model. This manual shows, as shown in the illustration. For details, refer to raise the spool pin. CAUTION ● Do not grab the bar to raise the spool ...

Operation Manual
Page 34
... two top threads. The needle could break, and damage the machine. ● Do not sew with the c upper thread. b • For details, refer to back. Manually thread the left needle. a Bobbin winder shaft b Extra spool pin c Thread spool Install the thread spool and thread the upper e thread.
... two top threads. The needle could break, and damage the machine. ● Do not sew with the c upper thread. b • For details, refer to back. Manually thread the left needle. a Bobbin winder shaft b Extra spool pin c Thread spool Install the thread spool and thread the upper e thread.

Operation Manual
Page 35
... on the sewing machine. Otherwise the needle may break or the machine may be damaged. 33 Pass the thread through the g needle bar thread guide, manually thread the right needle. Thread the upper thread for the Select a stitch.
... on the sewing machine. Otherwise the needle may break or the machine may be damaged. 33 Pass the thread through the g needle bar thread guide, manually thread the right needle. Thread the upper thread for the Select a stitch.

Operation Manual
Page 39
... the letter (J, A, etc.) that appears above the number of the presser foot type differs depending on the model. When the sewing machine is selected. This manual shows, as an example, the LCD (illustration above) of models where the presser foot type appears above or beside the stitch number. Press the "+" or...
... the letter (J, A, etc.) that appears above the number of the presser foot type differs depending on the model. When the sewing machine is selected. This manual shows, as an example, the LCD (illustration above) of models where the presser foot type appears above or beside the stitch number. Press the "+" or...

Operation Manual
Page 47
... model Twin Needle Walking Foot Reverse (Rev.)/ Reinforcement (Rfc.) Stitching Pattern No. Stitch Width Stitch Length [mm (inch.)] [mm (inch.)] Stitch Name Application Auto Auto Manual Manual 3 Zigzag stitch J 04 04 04 04 04 04 04 Overcasting and attaching appliqués 3.5 (1/8) 0.0-7.0 (0-1/4) 1.4 (1/16) 0.0-4.0 (0-3/16) ** Yes ( J ) * Yes Rev. 3-point zigzag stitch J 05 05 05...
... model Twin Needle Walking Foot Reverse (Rev.)/ Reinforcement (Rfc.) Stitching Pattern No. Stitch Width Stitch Length [mm (inch.)] [mm (inch.)] Stitch Name Application Auto Auto Manual Manual 3 Zigzag stitch J 04 04 04 04 04 04 04 Overcasting and attaching appliqués 3.5 (1/8) 0.0-7.0 (0-1/4) 1.4 (1/16) 0.0-4.0 (0-3/16) ** Yes ( J ) * Yes Rev. 3-point zigzag stitch J 05 05 05...

Operation Manual
Page 49
... Foot Reverse (Rev.)/ Reinforcement (Rfc.) Stitching Stitch Name Pattern No. Attach zigzag foot "J". Start sewing. Application Stitch Width Stitch Length [mm (inch.)] [mm (inch.)] Auto Manual Auto Manual Left J 00 00 00 00 00 00 00 Basic stitching, sewing gathers or pintucks, etc. 0.0 (0) 0.0-7.0 (0-1/4) 2.5 (3/32) 0.2-5.0 (1/64-3/16) ** Yes ( J ) * Yes Rev...
... Foot Reverse (Rev.)/ Reinforcement (Rfc.) Stitching Stitch Name Pattern No. Attach zigzag foot "J". Start sewing. Application Stitch Width Stitch Length [mm (inch.)] [mm (inch.)] Auto Manual Auto Manual Left J 00 00 00 00 00 00 00 Basic stitching, sewing gathers or pintucks, etc. 0.0 (0) 0.0-7.0 (0-1/4) 2.5 (3/32) 0.2-5.0 (1/64-3/16) ** Yes ( J ) * Yes Rev...

Operation Manual
Page 50
... the right. ● When the size of trousers, without the stitch showing. Stitch Width Stitch Length [mm (inch.)] [mm (inch.)] Stitch Name Application Auto Manual Auto Manual Blind hem stitch R 10 10 10 09 09 09 09 Blind hem stitching on medium weight fabrics R 11 11 11 10 10 10 10 Blind...
... the right. ● When the size of trousers, without the stitch showing. Stitch Width Stitch Length [mm (inch.)] [mm (inch.)] Stitch Name Application Auto Manual Auto Manual Blind hem stitch R 10 10 10 09 09 09 09 Blind hem stitching on medium weight fabrics R 11 11 11 10 10 10 10 Blind...

Operation Manual
Page 53
Stitch Name Application Stitch Width Stitch Length [mm (inch.)] [mm (inch.)] Auto Manual Auto Manual Horizontal buttonholes A 34 34 34 29 29 29 25 on . A 40 40 40 34 34 - Buttonholes are sewn from the front of the button). Secured ...
Stitch Name Application Stitch Width Stitch Length [mm (inch.)] [mm (inch.)] Auto Manual Auto Manual Horizontal buttonholes A 34 34 34 29 29 29 25 on . A 40 40 40 34 34 - Buttonholes are sewn from the front of the button). Secured ...

Operation Manual
Page 59
... to sew the zipper opening • Refer to "Basic stitching" on page 47. Stitch Width Stitch Length [mm (inch.)] [mm (inch.)] Stitch Name Application Auto Manual Auto Manual Straight stitch (center) I Attaching zippers, basic 01 01 01 01 01 01 01 stitching, and sewing gathers or pintucks, etc. 3.5 (1/8) 0.0-7.0 (0-1/4) 2.5 (3/32) 0.2-5.0 (1/64-3/16) ** Yes...
... to sew the zipper opening • Refer to "Basic stitching" on page 47. Stitch Width Stitch Length [mm (inch.)] [mm (inch.)] Stitch Name Application Auto Manual Auto Manual Straight stitch (center) I Attaching zippers, basic 01 01 01 01 01 01 01 stitching, and sewing gathers or pintucks, etc. 3.5 (1/8) 0.0-7.0 (0-1/4) 2.5 (3/32) 0.2-5.0 (1/64-3/16) ** Yes...

Operation Manual
Page 61
Stitch Name Application Stitch Width Stitch Length [mm (inch.)] [mm (inch.)] Auto Manual Auto Manual Stretch stitch J 03 03 03 03 03 03 03 Sewing stretch fabrics and decorative stitching 1.0 (1/16) 1.0-3.0 (1/16-1/8) 2.5 (3/32) 1.0-4.0 (1/16-3/16) Yes ( J ) No Rfc. 3-point zigzag ...
Stitch Name Application Stitch Width Stitch Length [mm (inch.)] [mm (inch.)] Auto Manual Auto Manual Stretch stitch J 03 03 03 03 03 03 03 Sewing stretch fabrics and decorative stitching 1.0 (1/16) 1.0-3.0 (1/16-1/8) 2.5 (3/32) 1.0-4.0 (1/16-3/16) Yes ( J ) No Rfc. 3-point zigzag ...

Operation Manual
Page 63
... 16 16 15 15 15 15 ing overcasting on both 2.5-7.0 1.0-4.0 Yes No Rfc. Stitch Width Stitch Length [mm (inch.)] [mm (inch.)] Stitch Name Application Auto Manual Auto Manual Zigzag stitch J 04 04 04 04 04 04 04 Overcasting and attaching appliqués 3.5 (1/8) 0.0-7.0 (0-1/4) 1.4 (1/16) 0.0-4.0 (0-3/16) ** Yes ( J ) * Yes Rev. Pattern No. pieces of the...
... 16 16 15 15 15 15 ing overcasting on both 2.5-7.0 1.0-4.0 Yes No Rfc. Stitch Width Stitch Length [mm (inch.)] [mm (inch.)] Stitch Name Application Auto Manual Auto Manual Zigzag stitch J 04 04 04 04 04 04 04 Overcasting and attaching appliqués 3.5 (1/8) 0.0-7.0 (0-1/4) 1.4 (1/16) 0.0-4.0 (0-3/16) ** Yes ( J ) * Yes Rev. Pattern No. pieces of the...

Operation Manual
Page 68
.... c • For details, refer to "Starting to strain, such as pocket corners and openings. Application Stitch Width Stitch Length [mm (inch.)] [mm (inch.)] Auto Manual Auto Manual Triple stretch stitch J Attaching sleeves, sew- 02 02 02 02 02 02 02 ing inseams, sewing stretch fabrics and deco- Attach buttonhole foot "A". UTILITY STITCHES...
.... c • For details, refer to "Starting to strain, such as pocket corners and openings. Application Stitch Width Stitch Length [mm (inch.)] [mm (inch.)] Auto Manual Auto Manual Triple stretch stitch J Attaching sleeves, sew- 02 02 02 02 02 02 02 ing inseams, sewing stretch fabrics and deco- Attach buttonhole foot "A". UTILITY STITCHES...

Operation Manual
Page 70
... be sewn with tricot 5.0 (3/16) 2.5-7.0 (3/32-1/4) 2.5 (3/32) 1.0-4.0 (1/16-3/16) * Yes No ( J ) Rfc. Stitch Name Application Stitch Width Stitch Length [mm (inch.)] [mm (inch.)] Auto Manual Auto Manual Fagoting stitch J 19 19 19 17 17 17 17 Fagoting, smocking and decorative stitching 5.0 (3/16) 2.5 (3/32) * 0.0-7.0 1.0-4.0 Yes No (0-1/4) (1/16-3/16) ( J ) Rfc. N 30 30 30 27...
... be sewn with tricot 5.0 (3/16) 2.5-7.0 (3/32-1/4) 2.5 (3/32) 1.0-4.0 (1/16-3/16) * Yes No ( J ) Rfc. Stitch Name Application Stitch Width Stitch Length [mm (inch.)] [mm (inch.)] Auto Manual Auto Manual Fagoting stitch J 19 19 19 17 17 17 17 Fagoting, smocking and decorative stitching 5.0 (3/16) 2.5 (3/32) * 0.0-7.0 1.0-4.0 Yes No (0-1/4) (1/16-3/16) ( J ) Rfc. N 30 30 30 27...

Operation Manual
Page 71
... and plain weave fabrics, heirloom stitching, etc. 5.0 (3/16) 1.5-7.0 (1/16-1/4) 2.0 (1/16) 1.5-4.0 (1/16-3/16) No No Rfc. Application Stitch Width Stitch Length [mm (inch.)] [mm (inch.)] Auto Manual Auto Manual Decorative stitch N 31 31 31 28 28 28 - Decorative stitching, 6.0 (15/64) 1.6 (1/16) N 32 32 32 - - - - smocking stitching, heir- 1.5-7.0 1.0-4.0 No No Rfc. Set the...
... and plain weave fabrics, heirloom stitching, etc. 5.0 (3/16) 1.5-7.0 (1/16-1/4) 2.0 (1/16) 1.5-4.0 (1/16-3/16) No No Rfc. Application Stitch Width Stitch Length [mm (inch.)] [mm (inch.)] Auto Manual Auto Manual Decorative stitch N 31 31 31 28 28 28 - Decorative stitching, 6.0 (15/64) 1.6 (1/16) N 32 32 32 - - - - smocking stitching, heir- 1.5-7.0 1.0-4.0 No No Rfc. Set the...

Operation Manual
Page 74
... a stitch width of the needle from the front to "Replacing the needle" (page 30). For details, refer to plain weave fabrics. Attach monogramming foot "N". d 72 Manually pass the thread through the eye of 6.0 mm (15/64 inch) or less, otherwise the needle may be damaged. UTILITY STITCHES Heirloom stitching When sewing...
... a stitch width of the needle from the front to "Replacing the needle" (page 30). For details, refer to plain weave fabrics. Attach monogramming foot "N". d 72 Manually pass the thread through the eye of 6.0 mm (15/64 inch) or less, otherwise the needle may be damaged. UTILITY STITCHES Heirloom stitching When sewing...


