

Users Manual - English
Page 6
... ...9 Operation panel ...10 Spool pin ...10 USING YOUR SEWING MACHINE 12 Power supply precautions ...12 Power supply ...12 Foot controller ...13 Sewing speed controller (for models equipped with the start/stop button 13 Changing the needle stop position ...13 THREADING THE MACHINE 14 Winding the bobbin ...14 Lower threading ...19 Upper...
... ...9 Operation panel ...10 Spool pin ...10 USING YOUR SEWING MACHINE 12 Power supply precautions ...12 Power supply ...12 Foot controller ...13 Sewing speed controller (for models equipped with the start/stop button 13 Changing the needle stop position ...13 THREADING THE MACHINE 14 Winding the bobbin ...14 Lower threading ...19 Upper...

Users Manual - English
Page 7
... Incorrect thread tension ...85 Fabric is caught in the machine and cannot be removed 86 List of symptoms ...90 ERROR MESSAGES ...95 Operation beep (for models equipped with the operation beep 95 INDEX ...96 5
... Incorrect thread tension ...85 Fabric is caught in the machine and cannot be removed 86 List of symptoms ...90 ERROR MESSAGES ...95 Operation beep (for models equipped with the operation beep 95 INDEX ...96 5
Users Manual - English
Page 8
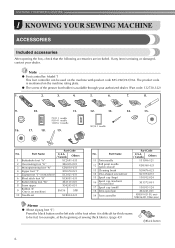
... YOUR SEWING MACHINE 1 KNOWING YOUR SEWING MACHINE ACCESSORIES Included accessories After opening the box, check that the following accessories are included. Note ● Foot controller: Model T This foot controller can be fed, for example, at the beginning of the presser foot holder is difficult for thick seams to be used on...
... YOUR SEWING MACHINE 1 KNOWING YOUR SEWING MACHINE ACCESSORIES Included accessories After opening the box, check that the following accessories are included. Note ● Foot controller: Model T This foot controller can be fed, for example, at the beginning of the presser foot holder is difficult for thick seams to be used on...
Users Manual - English
Page 10
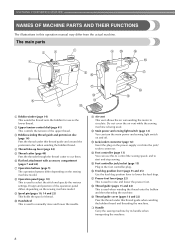
... thread. j Handwheel This is used to circulate. n Foot controller (page 13) You can turn the main power and sewing light switch on the sewing machine model. k Air vent This vent allows the air surrounding the motor to manually raise and lower the needle. Do not cover the air vent while the... under this thread guide when winding the bobbin thread and threading the machine. m Jack/socket connector (page 12) Insert the plug on the sewing machine model.
... thread. j Handwheel This is used to circulate. n Foot controller (page 13) You can turn the main power and sewing light switch on the sewing machine model. k Air vent This vent allows the air surrounding the motor to manually raise and lower the needle. Do not cover the air vent while the... under this thread guide when winding the bobbin thread and threading the machine. m Jack/socket connector (page 12) Insert the plug on the sewing machine model.

Users Manual - English
Page 11
... removing the needle plate cover. Use this button to "Sewing reinforcement stitches" (page 40). ■ Buttons provided on the sewing machine model. Attach the appropriate presser foot for detailed sewing in the fabric. c Presser foot holder The presser foot is depressed. Be sure to...button to adjust the sewing speed. 9 k Needle plate The needle plate is lowered in small areas. The operation buttons differ depending on some models b Start/stop button (for sewing straight seams. l Needle bar thread guide Pass the upper thread through the needle bar thread guide. d...
... removing the needle plate cover. Use this button to "Sewing reinforcement stitches" (page 40). ■ Buttons provided on the sewing machine model. Attach the appropriate presser foot for detailed sewing in the fabric. c Presser foot holder The presser foot is depressed. Be sure to...button to adjust the sewing speed. 9 k Needle plate The needle plate is lowered in small areas. The operation buttons differ depending on some models b Start/stop button (for sewing straight seams. l Needle bar thread guide Pass the upper thread through the needle bar thread guide. d...
Users Manual - English
Page 12
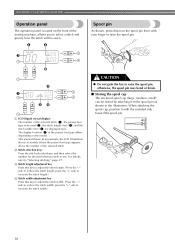
... key Press this key to adjust the stitch length. (Press the "-" side to reduce the stitch width; Spool pin As shown, press down on the model. a LCD (liquid crystal display) The number of the selected stitch (1), the presser foot type to the spool pin as an example, the LCD (illustration ...above) of models where the presser foot type appears above the number of the presser foot type differs depending on the spool pin lever with the rounded side...
... key Press this key to adjust the stitch length. (Press the "-" side to reduce the stitch width; Spool pin As shown, press down on the model. a LCD (liquid crystal display) The number of the selected stitch (1), the presser foot type to the spool pin as an example, the LCD (illustration ...above) of models where the presser foot type appears above the number of the presser foot type differs depending on the spool pin lever with the rounded side...

Users Manual - English
Page 15
.... Memo • Perform the same operation to change the needle stop button cannot be set to start sewing (only for models equipped with the start /stop . Sewing speed controller (for models equipped with the start /stop position Normally, the sewing machine is set using the sewing speed controller is plugged in use...
.... Memo • Perform the same operation to change the needle stop button cannot be set to start sewing (only for models equipped with the start /stop . Sewing speed controller (for models equipped with the start /stop position Normally, the sewing machine is set using the sewing speed controller is plugged in use...
Users Manual - English
Page 16
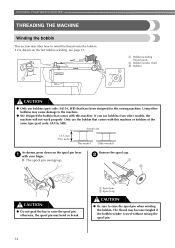
... use bobbins (part code: SA156, SFB) that have been designed for this sewing machine. Remove the spool cap. Actual size 11.5 mm (7/16 inch) This model Other models As shown, press down on the fast bobbin winding, see page 17. a Spool pin b Spool cap CAUTION ● Be sure to raise the spool... the bobbin that comes with this machine. b CAUTION ● Do not grab the bar to raise the spool pin when winding the bobbin. Using other models, the machine will not work properly. X The spool pin swings up.
... use bobbins (part code: SA156, SFB) that have been designed for this sewing machine. Remove the spool cap. Actual size 11.5 mm (7/16 inch) This model Other models As shown, press down on the fast bobbin winding, see page 17. a Spool pin b Spool cap CAUTION ● Be sure to raise the spool... the bobbin that comes with this machine. b CAUTION ● Do not grab the bar to raise the spool pin when winding the bobbin. Using other models, the machine will not work properly. X The spool pin swings up.
Users Manual - English
Page 18
... shaft h and slide the bobbin winder shaft to 3-15/16 inches) of the thread, gently j press the foot controller or press (start/ stop button) (for models equipped with the start /stop button) to wind the thread around the bobbin. i While holding the end of thread from the hole on the bobbin... bobbin. If the thread is too short, not pulled taut or held at an angle, injuries may not be used to start sewing (only for models equipped with the start/stop the machine.
... shaft h and slide the bobbin winder shaft to 3-15/16 inches) of the thread, gently j press the foot controller or press (start/ stop button) (for models equipped with the start /stop button) to wind the thread around the bobbin. i While holding the end of thread from the hole on the bobbin... bobbin. If the thread is too short, not pulled taut or held at an angle, injuries may not be used to start sewing (only for models equipped with the start/stop the machine.
Users Manual - English
Page 19
... winder shaft spring Slide the bobbin winder shaft to the left hand, use your foot off the foot controller or press (start /stop button) (for models equipped with your left and remove the bobbin. b Follow steps a through g of the thread clockwise around the d pre-tension disk with the sewing ...you slide the bobbin winding shaft to the right. Slide the sewing speed controller to the right l (to set the speed to fast). (For models CAUTION equipped with the sewing speed controller.) ● Not winding the bobbin properly may cause the thread tension to loosen, and may break the ...
... winder shaft spring Slide the bobbin winder shaft to the left hand, use your foot off the foot controller or press (start /stop button) (for models equipped with your left and remove the bobbin. b Follow steps a through g of the thread clockwise around the d pre-tension disk with the sewing ...you slide the bobbin winding shaft to the right. Slide the sewing speed controller to the right l (to set the speed to fast). (For models CAUTION equipped with the sewing speed controller.) ● Not winding the bobbin properly may cause the thread tension to loosen, and may break the ...
Users Manual - English
Page 20
...when you slide the bobbin winding shaft to cut to a suitable length. Slide the sewing speed controller back to its k original position (for models equipped with the sewing speed controller). Note ● If the sewing machine is to be used to start /stop button). If the bobbin is... will make a clicking sound; CAUTION ● Be sure to the right. 18 g Press the foot controller or press (start /stop button) (for models equipped with the sewing speed controller). CAUTION ● Not winding the bobbin properly may cause the thread tension to the right and pass it through...
...when you slide the bobbin winding shaft to cut to a suitable length. Slide the sewing speed controller back to its k original position (for models equipped with the sewing speed controller). Note ● If the sewing machine is to be used to start /stop button). If the bobbin is... will make a clicking sound; CAUTION ● Be sure to the right. 18 g Press the foot controller or press (start /stop button) (for models equipped with the sewing speed controller). CAUTION ● Not winding the bobbin properly may cause the thread tension to the right and pass it through...

Users Manual - English
Page 21
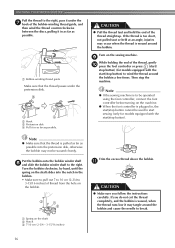
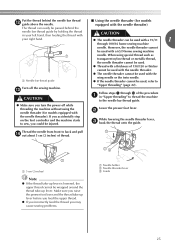
... lever. 1 CAUTION Turn off while threading the machine. Actual size 11.5 mm (7/16 inch) This model Other models CAUTION ● Make sure you (counterclockwise) or press (needle position button) (for models Install the bobbin wound with the needle position button), and • For more details on quick-set ... tension to thread the machine as indicated. If the thread unrolls in injury. Slide the button and open the cover. If bobbins from other models are used, the machine will not operate correctly. Use only the enclosed bobbin or bobbins of the same type (part code: SA156, SFB...
... lever. 1 CAUTION Turn off while threading the machine. Actual size 11.5 mm (7/16 inch) This model Other models CAUTION ● Make sure you (counterclockwise) or press (needle position button) (for models Install the bobbin wound with the needle position button), and • For more details on quick-set ... tension to thread the machine as indicated. If the thread unrolls in injury. Slide the button and open the cover. If bobbins from other models are used, the machine will not operate correctly. Use only the enclosed bobbin or bobbins of the same type (part code: SA156, SFB...

Users Manual - English
Page 22
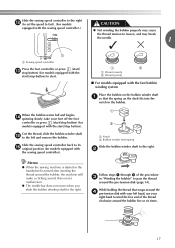
c 1 2 1 a Tension-adjusting spring Replace the bobbin cover. If the thread unrolls in the diagram). ■ For models equipped with the quick-set the bobbin so the thread unrolls in f place (see arrow a), and then press lightly on the right side (see arrow b) ... left hand as shown, lightly pull the thread to its highest position by turning a the handwheel toward you set bobbin Memo ● The direction for models equipped with the needle position button), and raise the presser foot lever. b Slide the button and open the cover. Raise the needle to guide it...
c 1 2 1 a Tension-adjusting spring Replace the bobbin cover. If the thread unrolls in the diagram). ■ For models equipped with the quick-set the bobbin so the thread unrolls in f place (see arrow a), and then press lightly on the right side (see arrow b) ... left hand as shown, lightly pull the thread to its highest position by turning a the handwheel toward you set bobbin Memo ● The direction for models equipped with the needle position button), and raise the presser foot lever. b Slide the button and open the cover. Raise the needle to guide it...
Users Manual - English
Page 24
... the presser foot b lever. Be sure to turn the handwheel so that the mark on the wheel points up , or press (needle position button) (for models equipped with the needle position button) once or twice to "Needle types and their uses" (page 28). For details on the sewing machine. a Spool pin...
... the presser foot b lever. Be sure to turn the handwheel so that the mark on the wheel points up , or press (needle position button) (for models equipped with the needle position button) once or twice to "Needle types and their uses" (page 28). For details on the sewing machine. a Spool pin...
Users Manual - English
Page 27
...; The needle threader cannot be used with the wing needle or the twin needle. Lower the presser foot lever. When using the needle threader (for models equipped with the needle threader) The thread can easily be passed behind the needle bar thread guide by holding the thread in your left hand... used with a 65/9 home sewing machine needle. Put the thread behind the needle bar thread l guide above the needle. ■ Using the needle threader (for models equipped with the needle threader).
...; The needle threader cannot be used with the wing needle or the twin needle. Lower the presser foot lever. When using the needle threader (for models equipped with the needle threader) The thread can easily be passed behind the needle bar thread guide by holding the thread in your left hand... used with a 65/9 home sewing machine needle. Put the thread behind the needle bar thread l guide above the needle. ■ Using the needle threader (for models equipped with the needle threader).
Users Manual - English
Page 29
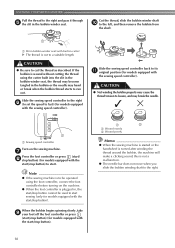
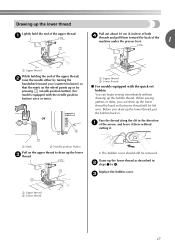
... or darts, you can begin sewing immediately without cutting it there without drawing up the bobbin thread. or a Upper thread b Lower thread ■ For models equipped with the needle position button) once or twice. Pass the thread along the slit in the direction a of the arrow, and leave it . Before... over. Drawing up the lower thread Lightly hold the end of the upper thread, b raise the needle either by pressing (needle position button) (for models equipped with the quick-set bobbin You can draw up the lower thread by hand so that the mark on the upper thread to 4.
... or darts, you can begin sewing immediately without cutting it there without drawing up the bobbin thread. or a Upper thread b Lower thread ■ For models equipped with the needle position button) once or twice. Pass the thread along the slit in the direction a of the arrow, and leave it . Before... over. Drawing up the lower thread Lightly hold the end of the upper thread, b raise the needle either by pressing (needle position button) (for models equipped with the quick-set bobbin You can draw up the lower thread by hand so that the mark on the upper thread to 4.
Users Manual - English
Page 31
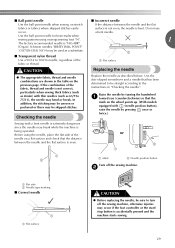
..., be used as described below. Do not use occur. Use the disc-shaped screwdriver and a needle that the mark on the wheel points up. (With models equipped with (needle position button), raise the needle by turning the handwheel a toward you (counterclockwise) so that has been determined to be skipped stitches. Raise...
..., be used as described below. Do not use occur. Use the disc-shaped screwdriver and a needle that the mark on the wheel points up. (With models equipped with (needle position button), raise the needle by turning the handwheel a toward you (counterclockwise) so that has been determined to be skipped stitches. Raise...
Users Manual - English
Page 34
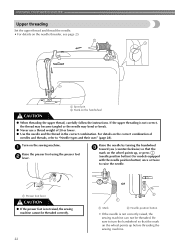
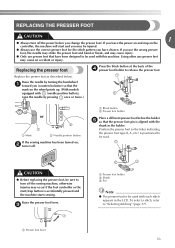
... on adjusting the stitch length, refer to "Replacing the presser foot" (page 33). k For details on starting to sew, refer to "Starting to back. Note Models equipped with the twin needle left side was threaded. Otherwise the needle may break or the machine may be sewn with the twin needle, refer...
... on adjusting the stitch length, refer to "Replacing the presser foot" (page 33). k For details on starting to sew, refer to "Starting to back. Note Models equipped with the twin needle left side was threaded. Otherwise the needle may break or the machine may be sewn with the twin needle, refer...
Users Manual - English
Page 35
... may cause an accident or injury. Raise the presser foot lever. If you leave the power on and step on the wheel points up. (With models equipped with the shank in the LCD.
... may cause an accident or injury. Raise the presser foot lever. If you leave the power on and step on the wheel points up. (With models equipped with the shank in the LCD.
Users Manual - English
Page 39
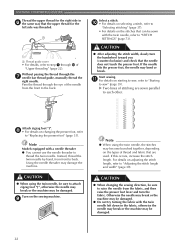
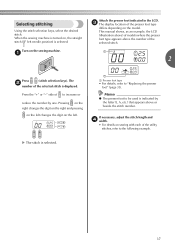
..., the straight stitch ( left . Press the "+" or "-" side of the presser foot type differs depending on the sewing machine. Turn on the model. The b number of the utility stitches, refer to "Replacing the presser foot" (page 33). Pressing on the right changes the digit on the ...following example. Memo ● The presser foot to increase or reduce the number by the letter (J, A, etc.) that appears above the number of models where the presser foot type appears above or beside the stitch number. If necessary, adjust the stitch length and d width. • For details ...
..., the straight stitch ( left . Press the "+" or "-" side of the presser foot type differs depending on the sewing machine. Turn on the model. The b number of the utility stitches, refer to "Replacing the presser foot" (page 33). Pressing on the right changes the digit on the ...following example. Memo ● The presser foot to increase or reduce the number by the letter (J, A, etc.) that appears above the number of models where the presser foot type appears above or beside the stitch number. If necessary, adjust the stitch length and d width. • For details ...


