

Accessory Catalog
Page 4
... needle does not hit the presser foot, and then tighten the clamp screw with just right pressure. 1. Adjustable Zipper & Piping Foot Brother General Sewing Accessories 06 Adjustable Zipper & Piping Foot Attaches zippers and pipings easily. Requires Low Shank Adapter for ULT series, PC-6500,... fits on the opening on the edge of zipper/piping, avoiding the non-flat parts of zipper/piping, and presses the fabric with a screwdriver. 5. SA161 All Brother home-use sewing machines www.brother.com Brother General Sewing Accessories 05 Sew as you like. Use these utility presser feet and...
... needle does not hit the presser foot, and then tighten the clamp screw with just right pressure. 1. Adjustable Zipper & Piping Foot Brother General Sewing Accessories 06 Adjustable Zipper & Piping Foot Attaches zippers and pipings easily. Requires Low Shank Adapter for ULT series, PC-6500,... fits on the opening on the edge of zipper/piping, avoiding the non-flat parts of zipper/piping, and presses the fabric with a screwdriver. 5. SA161 All Brother home-use sewing machines www.brother.com Brother General Sewing Accessories 05 Sew as you like. Use these utility presser feet and...

Accessory Catalog
Page 6
... 10 SA126 ABCDEFJKMN SA127 GHILOP Skirt Innov-is Project Book (See page 50 for details.) www.brother.com Hold the fabric from the back and front and roll it into the curled part of the fabric behind the needle and lower the presser foot. 6. Sews overcast seams to the... end of the fabric. Lower the presser foot so that the foot guide is rolling around the curled part of the fabric. 4. Select a desired stitch and sew. Raise the needle and the presser foot. 5. SA164 ABCDEFJKMN SA149 GHILOP SA114 ABCDEFGHJKLMNO SA122 ...
... 10 SA126 ABCDEFJKMN SA127 GHILOP Skirt Innov-is Project Book (See page 50 for details.) www.brother.com Hold the fabric from the back and front and roll it into the curled part of the fabric behind the needle and lower the presser foot. 6. Sews overcast seams to the... end of the fabric. Lower the presser foot so that the foot guide is rolling around the curled part of the fabric. 4. Select a desired stitch and sew. Raise the needle and the presser foot. 5. SA164 ABCDEFJKMN SA149 GHILOP SA114 ABCDEFGHJKLMNO SA122 ...
Users Manual - English
Page 3
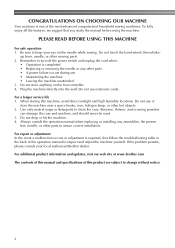
...store anything on the needle while sewing. Use only neutral soaps or detergents to keep your local authorized Brother dealer. Always consult the operation manual when replacing or installing any other parts • A power failure occurs during use • Maintaining the machine • Leaving the machine...the case and machine, and should never be used. 3. For additional product information and updates, visit our web site at www.brother.com The contents of this machine, avoid direct sunlight and high humidity locations. CONGRATULATIONS ON CHOOSING OUR MACHINE Your machine is completed ...
...store anything on the needle while sewing. Use only neutral soaps or detergents to keep your local authorized Brother dealer. Always consult the operation manual when replacing or installing any other parts • A power failure occurs during use • Maintaining the machine • Leaving the machine...the case and machine, and should never be used. 3. For additional product information and updates, visit our web site at www.brother.com The contents of this machine, avoid direct sunlight and high humidity locations. CONGRATULATIONS ON CHOOSING OUR MACHINE Your machine is completed ...
Users Manual - English
Page 4
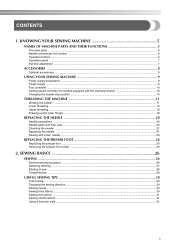
CONTENTS 1. KNOWING YOUR SEWING MACHINE 5 NAMES OF MACHINE PARTS AND THEIR FUNCTIONS 5 The main parts ...5 Needle and presser foot section ...6 Operation buttons ...6 Operation panel ...7 Flat bed attachment ...7 ACCESSORIES ...8 Optional accessories ...8 USING YOUR SEWING MACHINE 9 Power supply precautions ...9 Power supply ...9 Foot ...
CONTENTS 1. KNOWING YOUR SEWING MACHINE 5 NAMES OF MACHINE PARTS AND THEIR FUNCTIONS 5 The main parts ...5 Needle and presser foot section ...6 Operation buttons ...6 Operation panel ...7 Flat bed attachment ...7 ACCESSORIES ...8 Optional accessories ...8 USING YOUR SEWING MACHINE 9 Power supply precautions ...9 Power supply ...9 Foot ...
Users Manual - English
Page 6
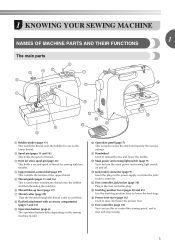
... to manually raise and lower the needle. j Operation panel (page 7) This is used to cut them. 1 KNOWING YOUR SEWING MACHINE 1 NAMES OF MACHINE PARTS AND THEIR FUNCTIONS The main parts a Bobbin winder (page 11) This winds the thread onto the bobbin for sewing with accessory compartment (pages 7 and 31) i Operation buttons (page...
... to manually raise and lower the needle. j Operation panel (page 7) This is used to cut them. 1 KNOWING YOUR SEWING MACHINE 1 NAMES OF MACHINE PARTS AND THEIR FUNCTIONS The main parts a Bobbin winder (page 11) This winds the thread onto the bobbin for sewing with accessory compartment (pages 7 and 31) i Operation buttons (page...
Users Manual - English
Page 9
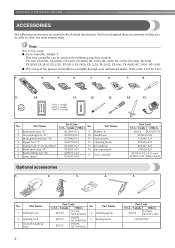
... 135793-001 8 We have designed these accessories to help you be used on machine) 6 Blind stitch foot "R" 7 Button fitting foot "M" 8 Seam ripper Part Code U.S.A. / Canada Others No. only) ● Foot controller: Model T This foot controller can be able to carry out most sewing tasks. KNOWING YOUR..., ES-2000, ES-2410, ES-2210, ES-2010, ES-2420, ES-2220, ES-2020, EX-660, CE-4000, BC-1000, HS-1000 ● The screw of the presser foot holder is available through your authorized dealer. (Part code: 132730-122) 1. 2. 3. 4. 5. 6. 7. 8. 9. 10. 11. 12. 13. 14. 15. 75/11 1 ...
... 135793-001 8 We have designed these accessories to help you be used on machine) 6 Blind stitch foot "R" 7 Button fitting foot "M" 8 Seam ripper Part Code U.S.A. / Canada Others No. only) ● Foot controller: Model T This foot controller can be able to carry out most sewing tasks. KNOWING YOUR..., ES-2000, ES-2410, ES-2210, ES-2010, ES-2420, ES-2220, ES-2020, EX-660, CE-4000, BC-1000, HS-1000 ● The screw of the presser foot holder is available through your authorized dealer. (Part code: 132730-122) 1. 2. 3. 4. 5. 6. 7. 8. 9. 10. 11. 12. 13. 14. 15. 75/11 1 ...
Users Manual - English
Page 12
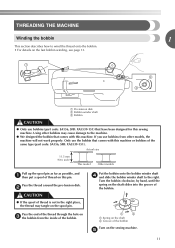
... to wind the thread onto the bobbin. • For details on the fast bobbin winding, see page 13. Pass the end of the same type (part code: SA156, SFB: XA5539-151). Turn the bobbin clockwise, by hand, until the spring on the shaft slides into the groove of the bobbin. 1 2 a ... to the machine. ● We designed the bobbin that comes with this pin. Using other models, the machine will not work properly. Only use bobbins (part code: SA156, SFB: XA5539-151) that comes with this machine. a Pre-tension disk b Bobbin winder shaft c Bobbin CAUTION ● Only use the bobbin that ...
... to wind the thread onto the bobbin. • For details on the fast bobbin winding, see page 13. Pass the end of the same type (part code: SA156, SFB: XA5539-151). Turn the bobbin clockwise, by hand, until the spring on the shaft slides into the groove of the bobbin. 1 2 a ... to the machine. ● We designed the bobbin that comes with this pin. Using other models, the machine will not work properly. Only use bobbins (part code: SA156, SFB: XA5539-151) that comes with this machine. a Pre-tension disk b Bobbin winder shaft c Bobbin CAUTION ● Only use the bobbin that ...
Users Manual - English
Page 15
... the bobbin, the machine will not operate correctly. Raise the needle to be injured. Use only the enclosed bobbin or bobbins of the same type (part code: SA156, SFB: XA5539-151). CAUTION ● Make sure you could be used , the machine will make a clicking sound; If you accidentally step on the...
... the bobbin, the machine will not operate correctly. Raise the needle to be injured. Use only the enclosed bobbin or bobbins of the same type (part code: SA156, SFB: XA5539-151). CAUTION ● Make sure you could be used , the machine will make a clicking sound; If you accidentally step on the...
Users Manual - English
Page 23
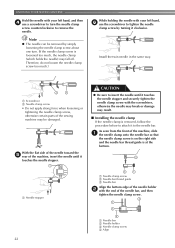
a Screwdriver b Needle clamp screw • Do not apply strong force when loosening or tightening the needle clamp screw, otherwise certain parts of the sewing machine may fall off. As seen from the front of the machine, insert the needle until it to tighten the needle clamp ...
a Screwdriver b Needle clamp screw • Do not apply strong force when loosening or tightening the needle clamp screw, otherwise certain parts of the sewing machine may fall off. As seen from the front of the machine, insert the needle until it to tighten the needle clamp ...

Users Manual - English
Page 24
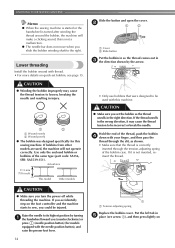
... needle may break or the machine may be sure to the thread take -up lever. c Needle bar thread guide Note Models equipped with this machine (part code: 131096-121). Thread the right needle from front to back. Thread the left needle from front to back. a First spool b Second spool Use the...
... needle may break or the machine may be sure to the thread take -up lever. c Needle bar thread guide Note Models equipped with this machine (part code: 131096-121). Thread the right needle from front to back. Thread the left needle from front to back. a First spool b Second spool Use the...
Users Manual - English
Page 27
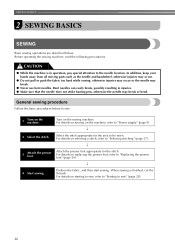
... appropriate for the stitch. For details on starting to sew, refer to "Starting to be sewn. In addition, keep your hands away from all moving parts such as the needle and handwheel, otherwise injuries may occur. ● Do not pull or push the fabric too hard while sewing, otherwise injuries may...
... appropriate for the stitch. For details on starting to sew, refer to "Starting to be sewn. In addition, keep your hands away from all moving parts such as the needle and handwheel, otherwise injuries may occur. ● Do not pull or push the fabric too hard while sewing, otherwise injuries may...
Users Manual - English
Page 37
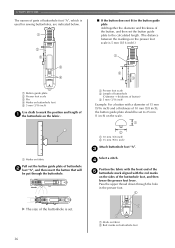
... with a diameter of 15 mm (9/16 inch) and a thickness of the buttonhole foot, and then lower the presser foot lever. UTILITY STITCHES The names of parts of buttonhole foot "A", which is used for sewing buttonholes, are indicated below. 1 2 5 ■ If the button does not fit in the presser foot. 1 X The size...
... with a diameter of 15 mm (9/16 inch) and a thickness of the buttonhole foot, and then lower the presser foot lever. UTILITY STITCHES The names of parts of buttonhole foot "A", which is used for sewing buttonholes, are indicated below. 1 2 5 ■ If the button does not fit in the presser foot. 1 X The size...
Users Manual - English
Page 39
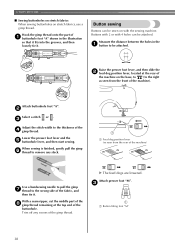
Hook the gimp thread onto the part of a buttonhole foot "A" shown in the a button to be attached. Raise the presser foot lever, and then slide the b feed dog position lever, located at ... any excess of the d gimp thread. Lower the presser foot lever and the e buttonhole lever, and then start sewing. With a seam ripper, cut the middle part of the h gimp thread remaining at the rear of the fabric, and then tie it . Measure the distance between the holes in the illustration so...
Hook the gimp thread onto the part of a buttonhole foot "A" shown in the a button to be attached. Raise the presser foot lever, and then slide the b feed dog position lever, located at ... any excess of the d gimp thread. Lower the presser foot lever and the e buttonhole lever, and then start sewing. With a seam ripper, cut the middle part of the h gimp thread remaining at the rear of the fabric, and then tie it . Measure the distance between the holes in the illustration so...
Users Manual - English
Page 59
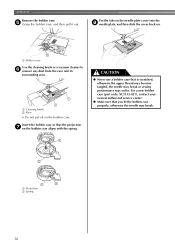
e Grasp the bobbin case, and then pull it out. For a new bobbin case (part code: XC3152-021), contact your nearest authorized service center. ● Make sure that is scratched, otherwise the upper thread may become tangled, the needle may ...
e Grasp the bobbin case, and then pull it out. For a new bobbin case (part code: XC3152-021), contact your nearest authorized service center. ● Make sure that is scratched, otherwise the upper thread may become tangled, the needle may ...
Users Manual - English
Page 64
i INDEX Numerics M 3-point zigzag stitch 32 main parts 5 main power switch 9 A , monogramming 49 51 accessories 8 appliqués 42 N needle 20 B bar tack 46 basic stitching 33 blind hem stitching 34 bobbin 14 , bobbin ...
i INDEX Numerics M 3-point zigzag stitch 32 main parts 5 main power switch 9 A , monogramming 49 51 accessories 8 appliqués 42 N needle 20 B bar tack 46 basic stitching 33 blind hem stitching 34 bobbin 14 , bobbin ...


