
Users Manual - English and Spanish
Page 2
... instructions before you change the light bulb. DANGER - Do not use the proper needle plate. It may deflect the needle, causing it is intended for examination, repair, electrical or mechanical adjustment. 4. Never drop or insert any object into water. Always unplug the machine from the electrical outlet when removing covers, lubricating, or when making any opening. 6. Do not use . 1 Replace the bulb with same type rated 15 watts. IMPORTANT SAFETY INSTRUCTIONS When using...
... instructions before you change the light bulb. DANGER - Do not use the proper needle plate. It may deflect the needle, causing it is intended for examination, repair, electrical or mechanical adjustment. 4. Never drop or insert any object into water. Always unplug the machine from the electrical outlet when removing covers, lubricating, or when making any opening. 6. Do not use . 1 Replace the bulb with same type rated 15 watts. IMPORTANT SAFETY INSTRUCTIONS When using...

Users Manual - English and Spanish
Page 4
...code: Blue Neutral Brown Live As the colours of the wiring in the main lead of this appliance may not correspond with the coloured markings identifying the terminals in your plug, proceed as follows: The wire which is coloured blue must be connected to the terminal which is marked with this machine... plugs an approved fuse must be destroyed as marked on plug. Always replace the fuse cover. FOR USERS IN THE UK, EIRE, MALTA AND CYPRUS ONLY If this equipment, it should be cut off and an appropriate three pin plug fitted. NOTE: The plug severed from the main leads must be...
...code: Blue Neutral Brown Live As the colours of the wiring in the main lead of this appliance may not correspond with the coloured markings identifying the terminals in your plug, proceed as follows: The wire which is coloured blue must be connected to the terminal which is marked with this machine... plugs an approved fuse must be destroyed as marked on plug. Always replace the fuse cover. FOR USERS IN THE UK, EIRE, MALTA AND CYPRUS ONLY If this equipment, it should be cut off and an appropriate three pin plug fitted. NOTE: The plug severed from the main leads must be...
Users Manual - English and Spanish
Page 5
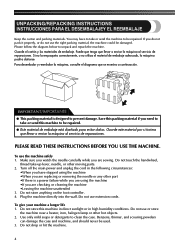
.../IMPORTANTE ● This packing material is a power failure while you are using the machine •When you are sewing. Save this packing material if you are replacing or removing the needle or any other part •If there is designed to unpack and repack the machine. Do not store anything on the foot controller. 4. UNPACKING/REPACKING INSTRUCTIONS INSTRUCCIONES PARA EL DESEMBALAJEY EL REEMBALAJE Keep the...
.../IMPORTANTE ● This packing material is a power failure while you are using the machine •When you are sewing. Save this packing material if you are replacing or removing the needle or any other part •If there is designed to unpack and repack the machine. Do not store anything on the foot controller. 4. UNPACKING/REPACKING INSTRUCTIONS INSTRUCCIONES PARA EL DESEMBALAJEY EL REEMBALAJE Keep the...
Users Manual - English and Spanish
Page 7
... the Presser Foot ...18 Flat Bed Attachment ...19 Using a Free-arm Style ...19 THE CONTROLS ...20 Pattern Selection Dial ...20 Patterns and Stitch Names ...21 Stitch Length Dial ...24 Stretch Stitching ...24 Stitch Width Dial ...25 Reverse Sewing Lever ...25 THREADING THE MACHINE 26 Winding the Bobbin ...26 Lower Threading ...28 Lower Threading (for models equipped with a quick-set bobbin 30 Upper Threading ...32 Using the Needle Threader (for models equipped with a needle threader 34 Drawing up the Lower Thread ...36 Sewing with a Twin Needle ...36 Thread Tension ...38 FABRIC, THREAD, AND...
... the Presser Foot ...18 Flat Bed Attachment ...19 Using a Free-arm Style ...19 THE CONTROLS ...20 Pattern Selection Dial ...20 Patterns and Stitch Names ...21 Stitch Length Dial ...24 Stretch Stitching ...24 Stitch Width Dial ...25 Reverse Sewing Lever ...25 THREADING THE MACHINE 26 Winding the Bobbin ...26 Lower Threading ...28 Lower Threading (for models equipped with a quick-set bobbin 30 Upper Threading ...32 Using the Needle Threader (for models equipped with a needle threader 34 Drawing up the Lower Thread ...36 Sewing with a Twin Needle ...36 Thread Tension ...38 FABRIC, THREAD, AND...

Users Manual - English and Spanish
Page 8
5. USING ATTACHMENTS AND APPLICATIONS 56 Zipper Insertion ...56 Gathering ...57 Darning ...58 Appliqués ...58 Monogramming and Embroidering ...59 OPTIONAL ACCESSORIES 62 Using the Walking Foot ...62 Using the Quilting Foot ...63 Using the 1/4-inch Quilting Foot ...65 Using the Narrow Hemmer Foot ...65 Using the Blind Stitch Foot ...67 6. APPENDIX ...69 MAINTENANCE ...69 Changing the Light Bulb ...69 Cleaning ...70 Troubleshooting ...72 INDEX ...79 7
5. USING ATTACHMENTS AND APPLICATIONS 56 Zipper Insertion ...56 Gathering ...57 Darning ...58 Appliqués ...58 Monogramming and Embroidering ...59 OPTIONAL ACCESSORIES 62 Using the Walking Foot ...62 Using the Quilting Foot ...63 Using the 1/4-inch Quilting Foot ...65 Using the Narrow Hemmer Foot ...65 Using the Blind Stitch Foot ...67 6. APPENDIX ...69 MAINTENANCE ...69 Changing the Light Bulb ...69 Cleaning ...70 Troubleshooting ...72 INDEX ...79 7
Users Manual - English and Spanish
Page 11
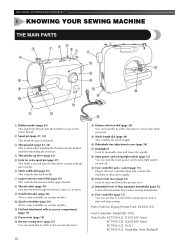
... this to stitch in the reverse direction. 10 D Pattern selection dial (page 20) You can turn the main power and sewing light switch on and off. F Buttonhole fine-adjustment screw (page 54) G Handwheel Used to choose the stitch you want. K Buttonhole lever (1-Step automatic buttonhole) (page 52) Lower the buttonhole lever when sewing buttonholes. KNOWING YOUR SEWING MACHINE 1 KNOWING YOUR SEWING MACHINE THE MAIN PARTS 1 Bobbin winder (page 26) This winds the thread onto the bobbin for use this in the foot controller plug and...
... this to stitch in the reverse direction. 10 D Pattern selection dial (page 20) You can turn the main power and sewing light switch on and off. F Buttonhole fine-adjustment screw (page 54) G Handwheel Used to choose the stitch you want. K Buttonhole lever (1-Step automatic buttonhole) (page 52) Lower the buttonhole lever when sewing buttonholes. KNOWING YOUR SEWING MACHINE 1 KNOWING YOUR SEWING MACHINE THE MAIN PARTS 1 Bobbin winder (page 26) This winds the thread onto the bobbin for use this in the foot controller plug and...

Users Manual - English and Spanish
Page 13
... have designed these accessories to help you easily perform most sewing tasks. Part Name 5 Buttonhole Foot (1 pc.) 6 Button Sewing Foot (1 pc.) 7 Extra Spool Pin (1 pc.) 8 Screwdriver (1 pc.) 9 Darning Plate (1pc.) Part Code USA Others XD1792-031 X59375-121 130920-021 X55467-021 XC6063-021 Nº Nombre de la pieza 1 Pie para cremalleras (1 unidad) Código de la pieza EE.UU. KNOWING YOUR SEWING MACHINE / CONOZCA SU MÁQUINA DE COSER ACCESSORIES...
... have designed these accessories to help you easily perform most sewing tasks. Part Name 5 Buttonhole Foot (1 pc.) 6 Button Sewing Foot (1 pc.) 7 Extra Spool Pin (1 pc.) 8 Screwdriver (1 pc.) 9 Darning Plate (1pc.) Part Code USA Others XD1792-031 X59375-121 130920-021 X55467-021 XC6063-021 Nº Nombre de la pieza 1 Pie para cremalleras (1 unidad) Código de la pieza EE.UU. KNOWING YOUR SEWING MACHINE / CONOZCA SU MÁQUINA DE COSER ACCESSORIES...

Users Manual - English and Spanish
Page 19
... power before you change the presser foot depending on the controller, the machine will have to sew and how. Using any other presser foot may be used with the slot on Type / Tipo de ajuste Raise the needle to release the presser foot. Press the black button at the back of the 2 presser foot holder to its highest position by 1 turning the handwheel toward you (counterclockwise), and then raise the presser foot lever...
... power before you change the presser foot depending on the controller, the machine will have to sew and how. Using any other presser foot may be used with the slot on Type / Tipo de ajuste Raise the needle to release the presser foot. Press the black button at the back of the 2 presser foot holder to its highest position by 1 turning the handwheel toward you (counterclockwise), and then raise the presser foot lever...
Users Manual - English and Spanish
Page 27
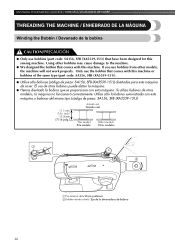
... (7/16 pulg.) Actual size Tamaño real This model Este modelo Other models Otros modelos 1 2 1Pre-tension disk/ Disco pretensor 2Bobbin winder shaft / Eje de la devanadora de bobina 26 KNOWING YOUR SEWING MACHINE / CONOZCA SU MÁQUINA DE COSER THREADING THE MACHINE / ENHEBRADO DE LA MÁQUINA Winding the Bobbin / Devanado de la bobina CAUTION/PRECAUCIÓN ● Only use bobbins (part code: SA156, SFB...
... (7/16 pulg.) Actual size Tamaño real This model Este modelo Other models Otros modelos 1 2 1Pre-tension disk/ Disco pretensor 2Bobbin winder shaft / Eje de la devanadora de bobina 26 KNOWING YOUR SEWING MACHINE / CONOZCA SU MÁQUINA DE COSER THREADING THE MACHINE / ENHEBRADO DE LA MÁQUINA Winding the Bobbin / Devanado de la bobina CAUTION/PRECAUCIÓN ● Only use bobbins (part code: SA156, SFB...
Users Manual - English and Spanish
Page 37
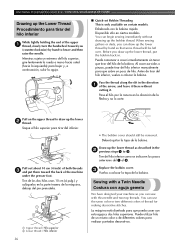
.... 1 Upper thread / Hilo superior 2 Lower thread / Hilo inferior 36 • The bobbin cover should still be left over. You can use the same color or two different colors of the arrow, and leave it there without drawing up the lower thread as described in the direction 1 of thread for making decorative stitches. Sewing with a Twin Needle Costura con aguja gemela We have designed your machine so you draw up the lower 2 thread...
.... 1 Upper thread / Hilo superior 2 Lower thread / Hilo inferior 36 • The bobbin cover should still be left over. You can use the same color or two different colors of the arrow, and leave it there without drawing up the lower thread as described in the direction 1 of thread for making decorative stitches. Sewing with a Twin Needle Costura con aguja gemela We have designed your machine so you draw up the lower 2 thread...
Users Manual - English and Spanish
Page 44
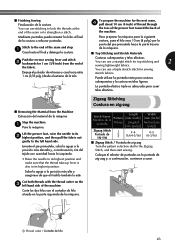
... both threads with the thread cutter on the 3 left hand side. ■ Finishing Sewing Finalización de la costura You can use a straight stitch for top stitching and 2 sewing lightweight fabrics. Stitch to the Zigzag Stitch, and then start sewing. You can use a triple stretch stitch for the next seam, 4 pull about 10 cm (4 inch) of thread through the toes of the presser foot toward the back of the machine Corte los dos hilos...
... both threads with the thread cutter on the 3 left hand side. ■ Finishing Sewing Finalización de la costura You can use a straight stitch for top stitching and 2 sewing lightweight fabrics. Stitch to the Zigzag Stitch, and then start sewing. You can use a triple stretch stitch for the next seam, 4 pull about 10 cm (4 inch) of thread through the toes of the presser foot toward the back of the machine Corte los dos hilos...

Users Manual - English and Spanish
Page 67
... lower thread to stick out from the front of the fabric, lower the presser foot, and then sew 2 or 3 stitches. Suba la aguja y el pie prensatela, sujete los extremos de los hilos superior e inferior para que no se salgan de la tela y, después, tire de ella desde la parte delantera del pie. Attach the Narrow Hemmer Foot and then set 2 the pattern selection dial to guide...
... lower thread to stick out from the front of the fabric, lower the presser foot, and then sew 2 or 3 stitches. Suba la aguja y el pie prensatela, sujete los extremos de los hilos superior e inferior para que no se salgan de la tela y, después, tire de ella desde la parte delantera del pie. Attach the Narrow Hemmer Foot and then set 2 the pattern selection dial to guide...
Users Manual - English and Spanish
Page 68
... amount of fabric wrapped in the presser foot curl. At the same time, carefully guide the extra fabric to be from the edge of the fabric, and then lower the needle in handy not only for blind hem stitching, but also for sewing fabric edges and seams. Este pie resulta útil no se podrá coser una costura triple Using the Blind Stitch Foot Utilización del pie para puntada invisible...
... amount of fabric wrapped in the presser foot curl. At the same time, carefully guide the extra fabric to be from the edge of the fabric, and then lower the needle in handy not only for blind hem stitching, but also for sewing fabric edges and seams. Este pie resulta útil no se podrá coser una costura triple Using the Blind Stitch Foot Utilización del pie para puntada invisible...
Users Manual - English and Spanish
Page 69
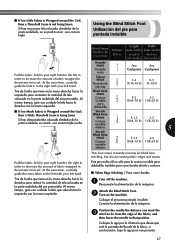
... the machine. Attach the Blind Stitch Foot. 2 Turn on Blind Hem Stitching, see page 45. Set the pattern selection dial to the Zigzag 4 Stitch. Ajuste el selector de puntadas en la puntada de zig-zag. Si desea información sobre la costura invisible para dobladillo, consulte la página 45. 1 2 3 1 Screw / Tornillo 2 Guide / Guía 3 Folded hem / Dobladillo 68 Lower the presser foot and begin sewing. 6 Baje el pie prensatela y comience a coser. 1 Screw / Tornillo 2 Guide / Gu...
... the machine. Attach the Blind Stitch Foot. 2 Turn on Blind Hem Stitching, see page 45. Set the pattern selection dial to the Zigzag 4 Stitch. Ajuste el selector de puntadas en la puntada de zig-zag. Si desea información sobre la costura invisible para dobladillo, consulte la página 45. 1 2 3 1 Screw / Tornillo 2 Guide / Guía 3 Folded hem / Dobladillo 68 Lower the presser foot and begin sewing. 6 Baje el pie prensatela y comience a coser. 1 Screw / Tornillo 2 Guide / Gu...

Users Manual - English and Spanish
Page 73
... the type of fabric, thread and needle. Contact your retailer or the nearest authorized service center. You have not used the foot controller properly. You are pulling the fabric too much. The main power switch is too tight. Replace the needle plate. Attach the presser foot that is too tight. Replace the presser foot. Symptom The sewing machine does not work properly. The upper thread tension is correct for this machine. The area around the hole in...
... the type of fabric, thread and needle. Contact your retailer or the nearest authorized service center. You have not used the foot controller properly. You are pulling the fabric too much. The main power switch is too tight. Replace the needle plate. Attach the presser foot that is too tight. Replace the presser foot. Symptom The sewing machine does not work properly. The upper thread tension is correct for this machine. The area around the hole in...
Users Manual - English and Spanish
Page 74
... this machine. Attach the presser foot holder properly. - Thread the upper thread and wind the bobbin thread properly. page 38 73 The upper The area around the hole in the presser foot is set incorrectly. page 70 page 26 Bobbin is scratched. Remove the tangled thread and clean the bobbin case. Choose a thread and needle that has been designed for the type of the upper thread. Fit the spool properly. page 32, 37 The fabric is incorrect. Incorrect bobbins will not work...
... this machine. Attach the presser foot holder properly. - Thread the upper thread and wind the bobbin thread properly. page 38 73 The upper The area around the hole in the presser foot is set incorrectly. page 70 page 26 Bobbin is scratched. Remove the tangled thread and clean the bobbin case. Choose a thread and needle that has been designed for the type of the upper thread. Fit the spool properly. page 32, 37 The fabric is incorrect. Incorrect bobbins will not work...
Users Manual - English and Spanish
Page 75
... threaded the upper thread properly. Attach the presser foot that has been designed for the type of fabric. The thread is tangled in the bobbin case, clean the bobbin case. Incorrect bobbins will not work properly. Remove the tangled thread. APPENDIX / ANEXO Symptom Possible cause How to sew. Contact your retailer or the nearest authorized service center. If the thread is tangled. Insert the needle properly. The needle threader can not be used a bobbin that is damaged. The sewing light bulb...
... threaded the upper thread properly. Attach the presser foot that has been designed for the type of fabric. The thread is tangled in the bobbin case, clean the bobbin case. Incorrect bobbins will not work properly. Remove the tangled thread. APPENDIX / ANEXO Symptom Possible cause How to sew. Contact your retailer or the nearest authorized service center. If the thread is tangled. Insert the needle properly. The needle threader can not be used a bobbin that is damaged. The sewing light bulb...
Users Manual - English and Spanish
Page 80
...19 Foot controller 15 Free-arm style 19 G Gathering 57 H Handwheel 32 Heirloom stitching 48 L Light bulb changing 69 Light switch 15 Lower threading 28 , quick-set bobbin 30 36 M Main parts 10 Main power 15 Maintenance 69 Monogramming 59 N Narrow hemmer foot 65 Needle checking 16 combinations with fabric and thread 39 replacing 16 Needle threader 34 O Overedge stitching 48 P Pattern selection dial 20 Patterns 21 Presser foot changing 18 Q , Quick-set bobbin 30 36 Quilting foot 63 R Race cleaning 70 Repacking instructions 4 Reverse sewing lever 25 S Satin stitch 44...
...19 Foot controller 15 Free-arm style 19 G Gathering 57 H Handwheel 32 Heirloom stitching 48 L Light bulb changing 69 Light switch 15 Lower threading 28 , quick-set bobbin 30 36 M Main parts 10 Main power 15 Maintenance 69 Monogramming 59 N Narrow hemmer foot 65 Needle checking 16 combinations with fabric and thread 39 replacing 16 Needle threader 34 O Overedge stitching 48 P Pattern selection dial 20 Patterns 21 Presser foot changing 18 Q , Quick-set bobbin 30 36 Quilting foot 63 R Race cleaning 70 Repacking instructions 4 Reverse sewing lever 25 S Satin stitch 44...

Users Manual - English and Spanish
Page 82
ENGLISH/SPANISH 885 -S28 /S29 XD1794-3213 Printed in China
ENGLISH/SPANISH 885 -S28 /S29 XD1794-3213 Printed in China


