Users Manual - English and Spanish
Page 2
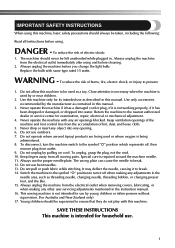
... threading needle, changing needle, threading bobbin, or changing presser foot, and the like. 15. Replace the bulb with any adjustments in the needle area, such as contained in . Use this manual. 3. Return the machine to be taken, including the following: Read all moving parts. Keep ventilation openings of the machine and foot control free from outlet. 9. The wrong plate can cause the needle to break. 14. It may deflect the needle, causing it to break. 12. This sewing machine...
... threading needle, changing needle, threading bobbin, or changing presser foot, and the like. 15. Replace the bulb with any adjustments in the needle area, such as contained in . Use this manual. 3. Return the machine to be taken, including the following: Read all moving parts. Keep ventilation openings of the machine and foot control free from outlet. 9. The wrong plate can cause the needle to break. 14. It may deflect the needle, causing it to break. 12. This sewing machine...

Users Manual - English and Spanish
Page 4
...this main lead are coloured in accordance with the following . Always replace the fuse cover. The wire which is coloured brown must be fitted in a...AND YELLOW. FOR USERS IN THE UK, EIRE, MALTA AND CYPRUS ONLY If this machine is fitted with this equipment, it should be cut off and an appropriate three pin plug fitted. ... a three-pin non-rewireable BS plug then please read the following code: Blue Neutral Brown Live As the colours of the wiring in the main lead of replacing the plug fuse, use plugs with... marked with bared flexible cords is marked with the fuse cover omitted.
...this main lead are coloured in accordance with the following . Always replace the fuse cover. The wire which is coloured brown must be fitted in a...AND YELLOW. FOR USERS IN THE UK, EIRE, MALTA AND CYPRUS ONLY If this machine is fitted with this equipment, it should be cut off and an appropriate three pin plug fitted. ... a three-pin non-rewireable BS plug then please read the following code: Blue Neutral Brown Live As the colours of the wiring in the main lead of replacing the plug fuse, use plugs with... marked with bared flexible cords is marked with the fuse cover omitted.
Users Manual - English and Spanish
Page 5
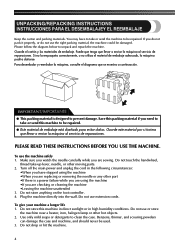
... foot controller. 4. Do not drop or hit the machine. 4 You may have stopped using the machine •If you are checking or cleaning the machine •Leaving the machine unattended 3. Plug the machine directly into the wall. Do not use extension cords. Please follow the diagram below to take -up lever, needle, or other part •If there is designed to clean the case. Turn off the main power and unplug the cord...
... foot controller. 4. Do not drop or hit the machine. 4 You may have stopped using the machine •If you are checking or cleaning the machine •Leaving the machine unattended 3. Plug the machine directly into the wall. Do not use extension cords. Please follow the diagram below to take -up lever, needle, or other part •If there is designed to clean the case. Turn off the main power and unplug the cord...
Users Manual - English and Spanish
Page 7
... the Presser Foot ...18 Flat Bed Attachment ...19 Using a Free-arm Style ...19 THE CONTROLS ...20 Pattern Selection Dial ...20 Patterns and Stitch Names ...21 Stitch Length Dial ...24 Stretch Stitching ...24 Stitch Width Dial ...25 Reverse Sewing Lever ...25 THREADING THE MACHINE 26 Winding the Bobbin ...26 Lower Threading ...28 Lower Threading (for models equipped with a quick-set bobbin 30 Upper Threading ...32 Using the Needle Threader (for models equipped with a needle threader 34 Drawing up the Lower Thread ...36 Sewing with a Twin Needle ...36 Thread Tension ...38 FABRIC, THREAD, AND...
... the Presser Foot ...18 Flat Bed Attachment ...19 Using a Free-arm Style ...19 THE CONTROLS ...20 Pattern Selection Dial ...20 Patterns and Stitch Names ...21 Stitch Length Dial ...24 Stretch Stitching ...24 Stitch Width Dial ...25 Reverse Sewing Lever ...25 THREADING THE MACHINE 26 Winding the Bobbin ...26 Lower Threading ...28 Lower Threading (for models equipped with a quick-set bobbin 30 Upper Threading ...32 Using the Needle Threader (for models equipped with a needle threader 34 Drawing up the Lower Thread ...36 Sewing with a Twin Needle ...36 Thread Tension ...38 FABRIC, THREAD, AND...

Users Manual - English and Spanish
Page 8
APPENDIX ...69 MAINTENANCE ...69 Changing the Light Bulb ...69 Cleaning ...70 Troubleshooting ...72 INDEX ...79 7 USING ATTACHMENTS AND APPLICATIONS 56 Zipper Insertion ...56 Gathering ...57 Darning ...58 Appliqués ...58 Monogramming and Embroidering ...59 OPTIONAL ACCESSORIES 62 Using the Walking Foot ...62 Using the Quilting Foot ...63 Using the 1/4-inch Quilting Foot ...65 Using the Narrow Hemmer Foot ...65 Using the Blind Stitch Foot ...67 6. 5.
APPENDIX ...69 MAINTENANCE ...69 Changing the Light Bulb ...69 Cleaning ...70 Troubleshooting ...72 INDEX ...79 7 USING ATTACHMENTS AND APPLICATIONS 56 Zipper Insertion ...56 Gathering ...57 Darning ...58 Appliqués ...58 Monogramming and Embroidering ...59 OPTIONAL ACCESSORIES 62 Using the Walking Foot ...62 Using the Quilting Foot ...63 Using the 1/4-inch Quilting Foot ...65 Using the Narrow Hemmer Foot ...65 Using the Blind Stitch Foot ...67 6. 5.
Users Manual - English and Spanish
Page 11
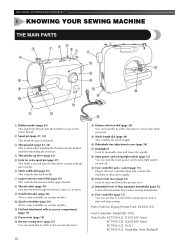
.... F Buttonhole fine-adjustment screw (page 54) G Handwheel Used to raise and lower the presser foot. H Main power and sewing light switch (page 15) You can turn the main power and sewing light switch on certain models.) A Flat bed attachment with accessory compartment (page 19) B Presser foot (page 18) C Reverse sewing lever (page 25) You can turn this to control the sewing speed, and to choose the stitch you want. KNOWING YOUR SEWING MACHINE 1 KNOWING YOUR SEWING MACHINE THE MAIN PARTS 1 Bobbin winder...
.... F Buttonhole fine-adjustment screw (page 54) G Handwheel Used to raise and lower the presser foot. H Main power and sewing light switch (page 15) You can turn the main power and sewing light switch on certain models.) A Flat bed attachment with accessory compartment (page 19) B Presser foot (page 18) C Reverse sewing lever (page 25) You can turn this to control the sewing speed, and to choose the stitch you want. KNOWING YOUR SEWING MACHINE 1 KNOWING YOUR SEWING MACHINE THE MAIN PARTS 1 Bobbin winder...

Users Manual - English and Spanish
Page 13
... máquina. 12 Part Name 5 Buttonhole Foot (1 pc.) 6 Button Sewing Foot (1 pc.) 7 Extra Spool Pin (1 pc.) 8 Screwdriver (1 pc.) 9 Darning Plate (1pc.) Part Code USA Others XD1792-031 X59375-121 130920-021 X55467-021 XC6063-021 Nº Nombre de la pieza 1 Pie para cremalleras (1 unidad) Código de la pieza EE.UU. Part Name 1 Zipper foot (1 pc.) 2 Bobbin (3 pcs.) 3 Needle Pack (Regular Single Needle HAX130 (3 pcs.)) 4 Twin Needle (1 pc.) Part Code USA Others X59370...
... máquina. 12 Part Name 5 Buttonhole Foot (1 pc.) 6 Button Sewing Foot (1 pc.) 7 Extra Spool Pin (1 pc.) 8 Screwdriver (1 pc.) 9 Darning Plate (1pc.) Part Code USA Others XD1792-031 X59375-121 130920-021 X55467-021 XC6063-021 Nº Nombre de la pieza 1 Pie para cremalleras (1 unidad) Código de la pieza EE.UU. Part Name 1 Zipper foot (1 pc.) 2 Bobbin (3 pcs.) 3 Needle Pack (Regular Single Needle HAX130 (3 pcs.)) 4 Twin Needle (1 pc.) Part Code USA Others X59370...

Users Manual - English and Spanish
Page 19
... bar should snap in line with this machine. Press the black button at the back of the 2 presser foot holder to be injured. ● Always use the wrong presser foot, the needle may strike the presser foot and bend or break, and may cause accident or injury. ● Antes de cambiar el pie prensatela, apague la máquina. Lower the presser foot lever and fix the 4 presser foot onto the shank...
... bar should snap in line with this machine. Press the black button at the back of the 2 presser foot holder to be injured. ● Always use the wrong presser foot, the needle may strike the presser foot and bend or break, and may cause accident or injury. ● Antes de cambiar el pie prensatela, apague la máquina. Lower the presser foot lever and fix the 4 presser foot onto the shank...
Users Manual - English and Spanish
Page 27
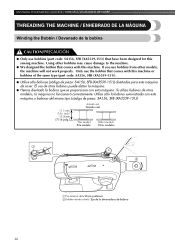
Only use the bobbin that comes with this sewing machine. Using other models, the machine will not work properly. KNOWING YOUR SEWING MACHINE / CONOZCA SU MÁQUINA DE COSER THREADING THE MACHINE / ENHEBRADO DE LA MÁQUINA Winding the Bobbin / Devanado de la bobina CAUTION/PRECAUCIÓN ● Only use bobbins (part code: SA156, SFB (XA5539-151)) that have been designed for this machine or bobbins of the same type (part code: SA156, SFB (XA5539-151)). ●...
Only use the bobbin that comes with this sewing machine. Using other models, the machine will not work properly. KNOWING YOUR SEWING MACHINE / CONOZCA SU MÁQUINA DE COSER THREADING THE MACHINE / ENHEBRADO DE LA MÁQUINA Winding the Bobbin / Devanado de la bobina CAUTION/PRECAUCIÓN ● Only use bobbins (part code: SA156, SFB (XA5539-151)) that have been designed for this machine or bobbins of the same type (part code: SA156, SFB (XA5539-151)). ●...
Users Manual - English and Spanish
Page 37
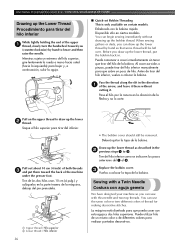
... lo corte. Pull on certain models. Tire del hilo inferior como se indica en los pasos anteriores del 1 al 3. Replace the bobbin cover. 3 Vuelva a colocar la tapa de la bobina. Sewing with a Twin Needle Costura con aguja gemela We have designed your machine so you can use the same color or two different colors of thread for making decorative stitches. La máquina está...
... lo corte. Pull on certain models. Tire del hilo inferior como se indica en los pasos anteriores del 1 al 3. Replace the bobbin cover. 3 Vuelva a colocar la tapa de la bobina. Sewing with a Twin Needle Costura con aguja gemela We have designed your machine so you can use the same color or two different colors of thread for making decorative stitches. La máquina está...
Users Manual - English and Spanish
Page 44
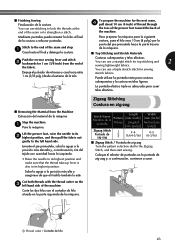
... hilo unos 10 cm (4 pulg.) por la punta del pie prensatela hacia la parte trasera de la máquina. ■ Top Stitching and Stretch Materials Push the reverse sewing lever and stitch 2 backwards for sewing stretch fabrics. You can use a triple stretch stitch for 1 cm (3/8 inch) from the Machine Extracción del material de la máquina Stop the machine. 1 Pare la máquina. Cut both threads...
... hilo unos 10 cm (4 pulg.) por la punta del pie prensatela hacia la parte trasera de la máquina. ■ Top Stitching and Stretch Materials Push the reverse sewing lever and stitch 2 backwards for sewing stretch fabrics. You can use a triple stretch stitch for 1 cm (3/8 inch) from the Machine Extracción del material de la máquina Stop the machine. 1 Pare la máquina. Cut both threads...

Users Manual - English and Spanish
Page 67
... the fabric to guide the material. USING ATTACHMENTS AND APPLICATIONS / USO DE ACCESORIOS Y APLICACIONES Turn off the machine. 1 Desconecte la alimentación de la máquina. Attach the Narrow Hemmer Foot and then set 2 the pattern selection dial to 3 cm (1 1/8 inch) 8 of the fabric, release the thread and guide the fabric from the edges of the fabric just behind the needle and lower the presser foot. Connect the foot controller so...
... the fabric to guide the material. USING ATTACHMENTS AND APPLICATIONS / USO DE ACCESORIOS Y APLICACIONES Turn off the machine. 1 Desconecte la alimentación de la máquina. Attach the Narrow Hemmer Foot and then set 2 the pattern selection dial to 3 cm (1 1/8 inch) 8 of the fabric, release the thread and guide the fabric from the edges of the fabric just behind the needle and lower the presser foot. Connect the foot controller so...
Users Manual - English and Spanish
Page 68
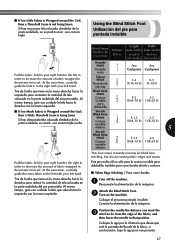
... en la parte ondulada del pie prensatela. Position the needle the distance you want the 3 stitch to be from the edge of the fabric, and then lower the needle in handy not only for blind hem stitching, but also for sewing fabric edges and seams. Este pie resulta útil no se podrá coser una costura triple Using the Blind Stitch Foot Utilización del pie para puntada invisible...
... en la parte ondulada del pie prensatela. Position the needle the distance you want the 3 stitch to be from the edge of the fabric, and then lower the needle in handy not only for blind hem stitching, but also for sewing fabric edges and seams. Este pie resulta útil no se podrá coser una costura triple Using the Blind Stitch Foot Utilización del pie para puntada invisible...
Users Manual - English and Spanish
Page 69
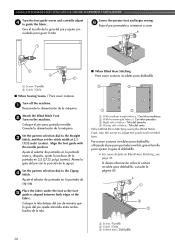
...) (center). Place the fabric under the foot so the foot 5 guide is aligned between both edges of fabric / Tela del revés When Blind Hem Stitching using the Blind Stitch Foot, turn the screw to adjust the guide to guide the fabric. Attach the Blind Stitch Foot. 2 Turn on Blind Hem Stitching, see page 45. Lower the presser foot and begin sewing. 6 Baje el pie prensatela y comience a coser. 1 Screw / Tornillo 2 Guide / Guía ■ When Sewing Seams / Para coser costuras Turn off the machine. 1 Desconecte la...
...) (center). Place the fabric under the foot so the foot 5 guide is aligned between both edges of fabric / Tela del revés When Blind Hem Stitching using the Blind Stitch Foot, turn the screw to adjust the guide to guide the fabric. Attach the Blind Stitch Foot. 2 Turn on Blind Hem Stitching, see page 45. Lower the presser foot and begin sewing. 6 Baje el pie prensatela y comience a coser. 1 Screw / Tornillo 2 Guide / Guía ■ When Sewing Seams / Para coser costuras Turn off the machine. 1 Desconecte la...

Users Manual - English and Spanish
Page 73
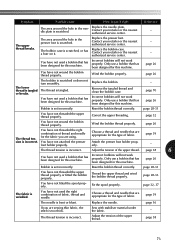
... the bobbin-winder shaft to the to firmly tighten the screw. You have not used the right combi- appropriate for the type of stitch. The upper thread tension is scratched. Lightly guide the fabric. Fit the spool properly. The area around the hole in the thread. Replace the presser foot. Remove any knots or tangles. Loosen the upper thread tension. Replace the needle. Plug the machine in the bobbin case, clean the bobbin case. Use the foot controller properly. You have not threaded the upper thread...
... the bobbin-winder shaft to the to firmly tighten the screw. You have not used the right combi- appropriate for the type of stitch. The upper thread tension is scratched. Lightly guide the fabric. Fit the spool properly. The area around the hole in the thread. Replace the presser foot. Remove any knots or tangles. Loosen the upper thread tension. Replace the needle. Plug the machine in the bobbin case, clean the bobbin case. Use the foot controller properly. You have not threaded the upper thread...
Users Manual - English and Spanish
Page 74
... bobbin case. Only use a bobbin that has been designed for the fabric you are appropriate for the type of thread and needle for this machine. - page 26 Bobbin is incorrect. Replace the needle. The thread tension is set incorrectly. Adjust the tension of the upper thread. page 32 You have not fitted the spool properly. You have not threaded the right combination of fabric. Contact your retailer or the nearest authorized service center. - Attach the presser foot holder...
... bobbin case. Only use a bobbin that has been designed for the fabric you are appropriate for the type of thread and needle for this machine. - page 26 Bobbin is incorrect. Replace the needle. The thread tension is set incorrectly. Adjust the tension of the upper thread. page 32 You have not fitted the spool properly. You have not threaded the right combination of fabric. Contact your retailer or the nearest authorized service center. - Attach the presser foot holder...
Users Manual - English and Spanish
Page 75
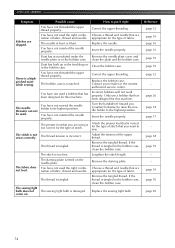
Correct the upper threading. Replace the needle. clean the plate and the bobbin case. You have not used the right combination of fabric, thread and needle. Incorrect bobbins will not work properly. You have not inserted the needle properly. Attach the presser foot that has been designed for this machine. The thread tension is damaged. If the thread is not correct for the type of the upper thread. The sewing light bulb does not The sewing light bulb is incorrect. Reference page 32 page...
Correct the upper threading. Replace the needle. clean the plate and the bobbin case. You have not used the right combination of fabric, thread and needle. Incorrect bobbins will not work properly. You have not inserted the needle properly. Attach the presser foot that has been designed for this machine. The thread tension is damaged. If the thread is not correct for the type of the upper thread. The sewing light bulb does not The sewing light bulb is incorrect. Reference page 32 page...
Users Manual - English and Spanish
Page 80
...19 Foot controller 15 Free-arm style 19 G Gathering 57 H Handwheel 32 Heirloom stitching 48 L Light bulb changing 69 Light switch 15 Lower threading 28 , quick-set bobbin 30 36 M Main parts 10 Main power 15 Maintenance 69 Monogramming 59 N Narrow hemmer foot 65 Needle checking 16 combinations with fabric and thread 39 replacing 16 Needle threader 34 O Overedge stitching 48 P Pattern selection dial 20 Patterns 21 Presser foot changing 18 Q , Quick-set bobbin 30 36 Quilting foot 63 R Race cleaning 70 Repacking instructions 4 Reverse sewing lever 25 S Satin stitch 44...
...19 Foot controller 15 Free-arm style 19 G Gathering 57 H Handwheel 32 Heirloom stitching 48 L Light bulb changing 69 Light switch 15 Lower threading 28 , quick-set bobbin 30 36 M Main parts 10 Main power 15 Maintenance 69 Monogramming 59 N Narrow hemmer foot 65 Needle checking 16 combinations with fabric and thread 39 replacing 16 Needle threader 34 O Overedge stitching 48 P Pattern selection dial 20 Patterns 21 Presser foot changing 18 Q , Quick-set bobbin 30 36 Quilting foot 63 R Race cleaning 70 Repacking instructions 4 Reverse sewing lever 25 S Satin stitch 44...

Users Manual - English and Spanish
Page 82
ENGLISH/SPANISH 885 -S28 /S29 XD1794-3213 Printed in China
ENGLISH/SPANISH 885 -S28 /S29 XD1794-3213 Printed in China


