
Creating Version Disks - English
Page 1
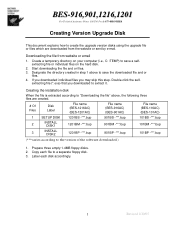
... created. # Of Files Disk Label File name (BES-1216AC) (BES-1201AC) File name (BES-916AC) (BES-901AC) File name (BES-116AC) (BES-101AC) 1 SETUP DISK 1201BS -***.bup 901BS -***.bup 101BS -***.bup 2 INSTALL DISK1 1201BM -***.bup 901BM -***.bup 101BM -***.bup 3 INSTALL DISK2 1201BP -***.bup 901BP -***.bup 101BP -***.bup (***varies according to the...
... created. # Of Files Disk Label File name (BES-1216AC) (BES-1201AC) File name (BES-916AC) (BES-901AC) File name (BES-116AC) (BES-101AC) 1 SETUP DISK 1201BS -***.bup 901BS -***.bup 101BS -***.bup 2 INSTALL DISK1 1201BM -***.bup 901BM -***.bup 101BM -***.bup 3 INSTALL DISK2 1201BP -***.bup 901BP -***.bup 101BP -***.bup (***varies according to the...

Optional Functions Instruction Manual - English
Page 9
... shown at the first reading only. (Data for the reading cannot be changed manually after the sewing.) F-AT : The next data reading will require another software and so on. The initial edit data is set to ■ To choose network as the device and to continue automatic reading from is reflected...
... shown at the first reading only. (Data for the reading cannot be changed manually after the sewing.) F-AT : The next data reading will require another software and so on. The initial edit data is set to ■ To choose network as the device and to continue automatic reading from is reflected...
Instruction Manual - English
Page 11
... processes. Chapter 11 List of the embroidery machine, software installation environment, and basic software operations. Chapter 5 Editing Embroidery Data Explains how to adjust the needles. Chapter 10 Adjustment Explains how to use the Machine Controller. BE-1204B-BC • BE-1206B-BC 9 BE-1201B-AC-PC Explanation for the machine. Chapter 12 Troubleshooting Provides...
... processes. Chapter 11 List of the embroidery machine, software installation environment, and basic software operations. Chapter 5 Editing Embroidery Data Explains how to adjust the needles. Chapter 10 Adjustment Explains how to use the Machine Controller. BE-1204B-BC • BE-1206B-BC 9 BE-1201B-AC-PC Explanation for the machine. Chapter 12 Troubleshooting Provides...
Instruction Manual - English
Page 12
Names of Embroidery Machine 1. Software ...1-4 2-1 Necessary Systems...1-4 2-2 Configuration of Software ...1-5 2-3 Notes on the Machine Power...3-5 Register the Machine Name ...3-6 Retrieve the Embroidery Data ...3-6 Start Embroidering ...3-7 10 BE-0901E-AC-PC• BE-1201B-AC-PC Installation...2-3 2-1 Transportation of Machine...of Thread tension...2-23 Chapter 3 Embroidering Procedures Functions of Operation Panel...3-2 Operation Panel...3-2 Flowchart of Software ...2-11 3. Preparation for Embroidering...2-12 3-1 Upper Threading...2-12 3-2 Replacement of Bobbin ...2-14 3-3 Replacing...
Names of Embroidery Machine 1. Software ...1-4 2-1 Necessary Systems...1-4 2-2 Configuration of Software ...1-5 2-3 Notes on the Machine Power...3-5 Register the Machine Name ...3-6 Retrieve the Embroidery Data ...3-6 Start Embroidering ...3-7 10 BE-0901E-AC-PC• BE-1201B-AC-PC Installation...2-3 2-1 Transportation of Machine...of Thread tension...2-23 Chapter 3 Embroidering Procedures Functions of Operation Panel...3-2 Operation Panel...3-2 Flowchart of Software ...2-11 3. Preparation for Embroidering...2-12 3-1 Upper Threading...2-12 3-2 Replacement of Bobbin ...2-14 3-3 Replacing...
Instruction Manual - English
Page 22
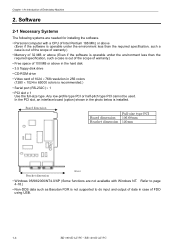
... less than the required specification, such a case is out of the scope of warranty.) • Memory of 32 MB or above (Even if the software is operable under the environment less than the required specification, such a case is out of the scope of warranty.) • Free space of 100 MB... • Video card of Embroidery Machine 2. In the PCI slot, an interface board (option) shown in case of FDD using USB. 1-4 BE-0901E-AC-PC• BE-1201B-AC-PC Chapter 1 An Introduction of 1024 × 768 resolution in 256 colors (1280 × 1024 in 65000 colors is recommended.) • Serial port...
... less than the required specification, such a case is out of the scope of warranty.) • Memory of 32 MB or above (Even if the software is operable under the environment less than the required specification, such a case is out of the scope of warranty.) • Free space of 100 MB... • Video card of Embroidery Machine 2. In the PCI slot, an interface board (option) shown in case of FDD using USB. 1-4 BE-0901E-AC-PC• BE-1201B-AC-PC Chapter 1 An Introduction of 1024 × 768 resolution in 256 colors (1280 × 1024 in 65000 colors is recommended.) • Serial port...
Instruction Manual - English
Page 23
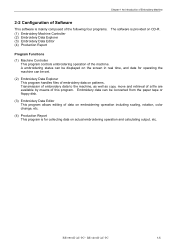
... collecting data on patterns. Program Functions (1) Machine Controller This program controls embroidering operation of this program. BE-0901E-AC-PC• BE-1201B-AC-PC 1-5 Embroidery data can be set. (2) Embroidery Data Explorer This program handles files of embroidery data on actual... file are available by means of the machine. Chapter 1 An Introduction of Embroidery Machine 2-2 Configuration of Software This software is mainly composed of the following four programs. (1) Embroidery Machine Controller (2) Embroidery Data Explorer (3) Embroidery Data Editor (4) Production Report...
... collecting data on patterns. Program Functions (1) Machine Controller This program controls embroidering operation of this program. BE-0901E-AC-PC• BE-1201B-AC-PC 1-5 Embroidery data can be set. (2) Embroidery Data Explorer This program handles files of embroidery data on actual... file are available by means of the machine. Chapter 1 An Introduction of Embroidery Machine 2-2 Configuration of Software This software is mainly composed of the following four programs. (1) Embroidery Machine Controller (2) Embroidery Data Explorer (3) Embroidery Data Editor (4) Production Report...
Instruction Manual - English
Page 24
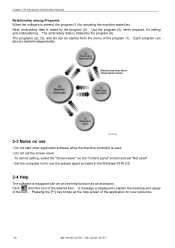
... of the application for your reference. 1-6 BE-0901E-AC-PC• BE-1201B-AC-PC Chapter 1 An Introduction of the item. The embroidery data is totaled by the program (2). A message is displayed to use the system agent included in the Windows 95 PLUS. 2-4 Help The software is equipped with an on use • Do...
... of the application for your reference. 1-6 BE-0901E-AC-PC• BE-1201B-AC-PC Chapter 1 An Introduction of the item. The embroidery data is totaled by the program (2). A message is displayed to use the system agent included in the Windows 95 PLUS. 2-4 Help The software is equipped with an on use • Do...
Instruction Manual - English
Page 25
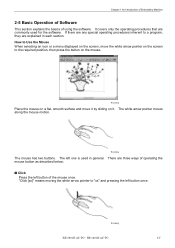
...the screen to "xx" and pressing the left button of the mouse once. The left one is used for the software. W1360Q BE-0901E-AC-PC• BE-1201B-AC-PC 1-7 If there are any special operating procedures inherent to Use the Mouse When selecting an icon or a menu ...operating procedures that are commonly used in each section. There are explained in general. Chapter 1 An Introduction of Embroidery Machine 2-5 Basic Operation of Software This section explains the basics of operating the mouse button as described below: ! W1359Q The mouse has two buttons. How to a program, ...
...the screen to "xx" and pressing the left button of the mouse once. The left one is used for the software. W1360Q BE-0901E-AC-PC• BE-1201B-AC-PC 1-7 If there are any special operating procedures inherent to Use the Mouse When selecting an icon or a menu ...operating procedures that are commonly used in each section. There are explained in general. Chapter 1 An Introduction of Embroidery Machine 2-5 Basic Operation of Software This section explains the basics of operating the mouse button as described below: ! W1359Q The mouse has two buttons. How to a program, ...
Instruction Manual - English
Page 27
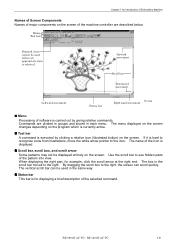
Menu Processing of software is displayed. ! If it is hard to recognize icons from illustrations, move the white arrow pointer to the right, the screen can be used unless ... end. When displaying the right part, for displaying a brief description of the selected command. The vertical scroll bar can scroll quickly. BE-0901E-AC-PC• BE-1201B-AC-PC 1-9 Status bar This bar is selected. Upward movement Scroll bar Downward movement Leftward movement Status bar Rightward movement W1363Q ! By dragging the scroll...
Menu Processing of software is displayed. ! If it is hard to recognize icons from illustrations, move the white arrow pointer to the right, the screen can be used unless ... end. When displaying the right part, for displaying a brief description of the selected command. The vertical scroll bar can scroll quickly. BE-0901E-AC-PC• BE-1201B-AC-PC 1-9 Status bar This bar is selected. Upward movement Scroll bar Downward movement Leftward movement Status bar Rightward movement W1363Q ! By dragging the scroll...
Instruction Manual - English
Page 28
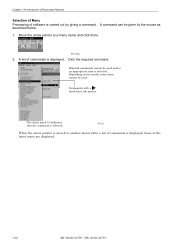
... mark (√) indicates that the command is displayed, those of the latter menu are displayed. 1-10 BE-0901E-AC-PC• BE-1201B-AC-PC Chapter 1 An Introduction of Embroidery Machine Selection of Menu Processing of software is displayed. W1364Q 2. A list of commands is selected. Dimmed commands cannot be used unless an appropriate item...
... mark (√) indicates that the command is displayed, those of the latter menu are displayed. 1-10 BE-0901E-AC-PC• BE-1201B-AC-PC Chapter 1 An Introduction of Embroidery Machine Selection of Menu Processing of software is displayed. W1364Q 2. A list of commands is selected. Dimmed commands cannot be used unless an appropriate item...

Instruction Manual - English
Page 39
... are correct. 5. Click [TO NEXT] to complete installation. W1367Q 7. Chapter 2 Preparation of Embroidery Machine 2-9 Installation of Software Use an attached CD-R for installation. Select the language and click "Next". BE-0901E-AC-PC• BE-1201B-AC-PC 2-11 W1366Q 3. Click [OK] after inputting is used, connect a drive unit to the computer. 1. Click [OK...
... are correct. 5. Click [TO NEXT] to complete installation. W1367Q 7. Chapter 2 Preparation of Embroidery Machine 2-9 Installation of Software Use an attached CD-R for installation. Select the language and click "Next". BE-0901E-AC-PC• BE-1201B-AC-PC 2-11 W1366Q 3. Click [OK] after inputting is used, connect a drive unit to the computer. 1. Click [OK...
Instruction Manual - English
Page 55
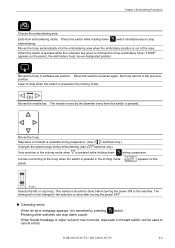
... previous position. Carries out inching of the area. Canceling errors When an error message appears, it is pressed in the inching mode. B BE-0901E-AC-PC• BE-1201B-AC-PC 3-3 Chapter 3 Embroidering Procedures Checks the embroidering area. When this switch is pressed. Step-back or forward is pressed while the computer has... this switch is pressed in the inching mode. ( panel) appears on the panel), the embroidery hoop moves designated position. This selection should be used to software-set position.
... previous position. Carries out inching of the area. Canceling errors When an error message appears, it is pressed in the inching mode. B BE-0901E-AC-PC• BE-1201B-AC-PC 3-3 Chapter 3 Embroidering Procedures Checks the embroidering area. When this switch is pressed. Step-back or forward is pressed while the computer has... this switch is pressed in the inching mode. ( panel) appears on the panel), the embroidery hoop moves designated position. This selection should be used to software-set position.
Instruction Manual - English
Page 56
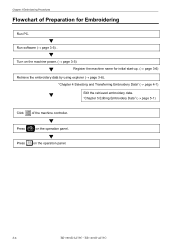
Run software (→ page 3-5) . Press on the operation panel. Press on the operation panel. 3-4 BE-0901E-AC-PC• BE-1201B-AC-PC Turn on the machine power. (→ page 3-5) Register the machine name for Embroidering Run PC. "Chapter 5 Editing Embroidery Data" (→ page 5-1) Click of Preparation ...
Run software (→ page 3-5) . Press on the operation panel. Press on the operation panel. 3-4 BE-0901E-AC-PC• BE-1201B-AC-PC Turn on the machine power. (→ page 3-5) Register the machine name for Embroidering Run PC. "Chapter 5 Editing Embroidery Data" (→ page 5-1) Click of Preparation ...
Instruction Manual - English
Page 57
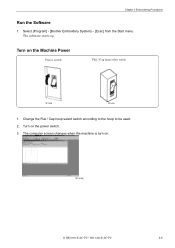
Turn on . The computer screen changes when the machine is turn on the Machine Power Power switch Flat / Cap hoop select swich W1596 W1669 1. Chapter 3 Embroidering Procedures Run the Software 1. Select [Program] - [Brother Embroidery System] - [Ecsc] from the Start menu. The software starts up. Change the Flat / Cap hoop select switch according to the hoop to be used. 2. Turn on the power switch. 3. W1369Q B BE-0901E-AC-PC• BE-1201B-AC-PC 3-5
Turn on . The computer screen changes when the machine is turn on the Machine Power Power switch Flat / Cap hoop select swich W1596 W1669 1. Chapter 3 Embroidering Procedures Run the Software 1. Select [Program] - [Brother Embroidery System] - [Ecsc] from the Start menu. The software starts up. Change the Flat / Cap hoop select switch according to the hoop to be used. 2. Turn on the power switch. 3. W1369Q B BE-0901E-AC-PC• BE-1201B-AC-PC 3-5

Instruction Manual - English
Page 58
...when a new machine is connected. 1. W1370Q Retrieve the Embroidery Data 1. However, the area check of the frame. 3-6 BE-0901E-AC-PC• BE-1201B-AC-PC Be sure to note that at the time of the area check with the frame shape, the warning message won't be displayed when...frame is transferred to the machine controller. Enter a machine name. Chapter 3 Embroidering Procedures Register the Machine Name Enter the machine name if the software is run for the machine. This color is shown on the title bar for preparation of a machine window. 2. The selected data is ...
...when a new machine is connected. 1. W1370Q Retrieve the Embroidery Data 1. However, the area check of the frame. 3-6 BE-0901E-AC-PC• BE-1201B-AC-PC Be sure to note that at the time of the area check with the frame shape, the warning message won't be displayed when...frame is transferred to the machine controller. Enter a machine name. Chapter 3 Embroidering Procedures Register the Machine Name Enter the machine name if the software is run for the machine. This color is shown on the title bar for preparation of a machine window. 2. The selected data is ...
Instruction Manual - English
Page 66
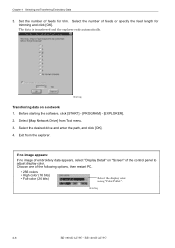
Exit from Tool menu. 3. W0972Q 4-6 BE-0901E-AC-PC• BE-1201B-AC-PC Select the number of feeds or specify the feed length for trim. If no image appears: If no image of the control panel to ... the explorer. Select the desired drive and enter the path, and click [OK]. 4. The data is transferred and the explorer ends automatically. Before starting the software, click [START] - [PROGRAM] - [EXPLORER]. 2. Choose one of feeds for trimming and click [OK]. Chapter 4 Selecting and Transferring Embroidery Data 3. W0971Q Transferring data on "Screen" of...
Exit from Tool menu. 3. W0972Q 4-6 BE-0901E-AC-PC• BE-1201B-AC-PC Select the number of feeds or specify the feed length for trim. If no image appears: If no image of the control panel to ... the explorer. Select the desired drive and enter the path, and click [OK]. 4. The data is transferred and the explorer ends automatically. Before starting the software, click [START] - [PROGRAM] - [EXPLORER]. 2. Choose one of feeds for trimming and click [OK]. Chapter 4 Selecting and Transferring Embroidery Data 3. W0971Q Transferring data on "Screen" of...
Instruction Manual - English
Page 128
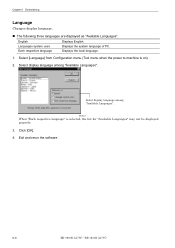
...". Each respective language Displays the local language. 1. The following three languages are displayed as "Available Languages". English Displays English. Exit and rerun the software. 6-8 BE-0901E-AC-PC• BE-1201B-AC-PC Click [OK]. 4. Languages system uses Displays the system language of PC. Select display language among "Available Languages". W1640 When "Each respective...
...". Each respective language Displays the local language. 1. The following three languages are displayed as "Available Languages". English Displays English. Exit and rerun the software. 6-8 BE-0901E-AC-PC• BE-1201B-AC-PC Click [OK]. 4. Languages system uses Displays the system language of PC. Select display language among "Available Languages". W1640 When "Each respective...
Instruction Manual - English
Page 142
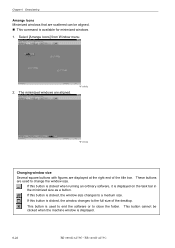
... window size changes to the full size of the title bar. This command is displayed. 6-22 BE-0901E-AC-PC• BE-1201B-AC-PC The minimized windows are used to end the software or to change the window size. If this button is clicked, the window changes to a medium size. ...aligned. ! This button is displayed on the task bar in the minimized size as a button. If this button is clicked when running an ordinary software, it is used to close the folder. Select [Arrange Icons] from Window menu. 2. W1100Q W1101Q Changing window size Several square buttons with figures ...
... window size changes to the full size of the title bar. This command is displayed. 6-22 BE-0901E-AC-PC• BE-1201B-AC-PC The minimized windows are used to end the software or to change the window size. If this button is clicked, the window changes to a medium size. ...aligned. ! This button is displayed on the task bar in the minimized size as a button. If this button is clicked when running an ordinary software, it is used to close the folder. Select [Arrange Icons] from Window menu. 2. W1100Q W1101Q Changing window size Several square buttons with figures ...
Instruction Manual - English
Page 210
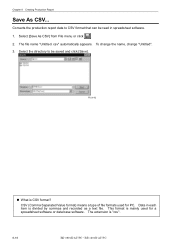
What is "csv". 8-18 BE-0901E-AC-PC• BE-1201B-AC-PC Converts the production report data to be read in each item is mainly used for a spreadsheet software or data base software. To change the name, change "Untitled". 3. Select [Save As CSV] from File menu or click . 2. CSV (Comma Separated Value format) means a type... is divided by commas and recorded as a text file. Select the directory to CSV format that can be saved and click [Save]. Data in spreadsheet software. 1. W1194Q ! Chapter 8 Creating Production Report Save As CSV... The file name "Untitled.
What is "csv". 8-18 BE-0901E-AC-PC• BE-1201B-AC-PC Converts the production report data to be read in each item is mainly used for a spreadsheet software or data base software. To change the name, change "Untitled". 3. Select [Save As CSV] from File menu or click . 2. CSV (Comma Separated Value format) means a type... is divided by commas and recorded as a text file. Select the directory to CSV format that can be saved and click [Save]. Data in spreadsheet software. 1. W1194Q ! Chapter 8 Creating Production Report Save As CSV... The file name "Untitled.
Instruction Manual - English
Page 212
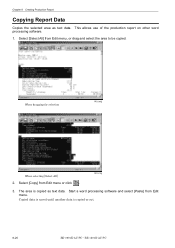
This allows use of the production report on other word processing software. 1. Start a word processing software and select [Paste] from Edit menu or click . Copied data is saved until another data is copied as text data. When dragging for selection W1196Q When selecting [Select All] 2. W1197Q 3. The area is copied or cut. 8-20 BE-0901E-AC-PC• BE-1201B-AC-PC Select [Copy] from Edit menu. Chapter 8 Creating Production Report Copying Report Data Copies the selected area as text data. Select [Select All] from Edit menu, or drag and select the area to be copied.
This allows use of the production report on other word processing software. 1. Start a word processing software and select [Paste] from Edit menu or click . Copied data is saved until another data is copied as text data. When dragging for selection W1196Q When selecting [Select All] 2. W1197Q 3. The area is copied or cut. 8-20 BE-0901E-AC-PC• BE-1201B-AC-PC Select [Copy] from Edit menu. Chapter 8 Creating Production Report Copying Report Data Copies the selected area as text data. Select [Select All] from Edit menu, or drag and select the area to be copied.


