

Accessory Catalog
Page 7
...edge of your next project! Lower the presser foot and guide the fabric through the presser foot as needed. 3. Stitch Guide Foot The scale in the seam line of the fabric. 2. Helpful for stitching heavy fabrics together. 1. Installing the Straight Stitch Needle Plate automatically sets ...the needle position to the center straight stitching position on the needle plate with all Brother presser feet. The side extension ruler on both straight and curved lines. Can be used with the thumbscrew of the foot guide plate. ...
...edge of your next project! Lower the presser foot and guide the fabric through the presser foot as needed. 3. Stitch Guide Foot The scale in the seam line of the fabric. 2. Helpful for stitching heavy fabrics together. 1. Installing the Straight Stitch Needle Plate automatically sets ...the needle position to the center straight stitching position on the needle plate with all Brother presser feet. The side extension ruler on both straight and curved lines. Can be used with the thumbscrew of the foot guide plate. ...
Users Manual - English
Page 37
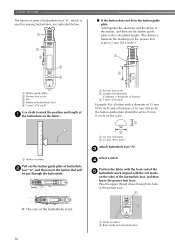
... hole in the button guide plate Add together the diameter and thickness of the button, and then set . 2 A 2 a Mark on fabric b Red marks on the scale. 1 2 a 10 mm (3/8 inch) b 15 mm (9/16 inch) Attach buttonhole foot "A". c Select a stitch. Pass the upper thread down through the buttonhole. d ...the buttonhole is set the button guide plate to the calculated length. (The distance between the markings on the presser foot scale is 5 mm (3/16 inch).) 1 3 4 A a Button guide plate b Presser foot scale c Pin d Marks on buttonhole foot e 5 mm (3/16 inch) Use chalk to 25 mm (1 inch) on ...
... hole in the button guide plate Add together the diameter and thickness of the button, and then set . 2 A 2 a Mark on fabric b Red marks on the scale. 1 2 a 10 mm (3/8 inch) b 15 mm (9/16 inch) Attach buttonhole foot "A". c Select a stitch. Pass the upper thread down through the buttonhole. d ...the buttonhole is set the button guide plate to the calculated length. (The distance between the markings on the presser foot scale is 5 mm (3/16 inch).) 1 3 4 A a Button guide plate b Presser foot scale c Pin d Marks on buttonhole foot e 5 mm (3/16 inch) Use chalk to 25 mm (1 inch) on ...
Users Manual - English
Page 47
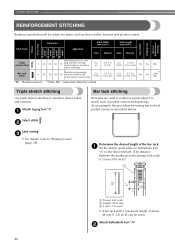
...Stitching Stitch Name Pattern No. As an example, the procedure for sewing bar tacks at pocket corners is 5 mm (3/16 inch).) 1 2 3 a Presser foot scale b Length of bar tack c 5 mm (3/16 inch) • A bar tack with a maximum length of the bar tack. a Set the button guide ...plate on buttonhole foot "A" to the desired length. (The distance between the markings on the presser foot scale is described below. J 02 02 02 02 ing inseams, sewing stretch fabrics and deco- 0.0 (0) rative stitching 0.0-7.0 (0-1/4) 2.5 (3/32) 1.5-4.0 (1/16-3/16) ...
...Stitching Stitch Name Pattern No. As an example, the procedure for sewing bar tacks at pocket corners is 5 mm (3/16 inch).) 1 2 3 a Presser foot scale b Length of bar tack c 5 mm (3/16 inch) • A bar tack with a maximum length of the bar tack. a Set the button guide ...plate on buttonhole foot "A" to the desired length. (The distance between the markings on the presser foot scale is described below. J 02 02 02 02 ing inseams, sewing stretch fabrics and deco- 0.0 (0) rative stitching 0.0-7.0 (0-1/4) 2.5 (3/32) 1.5-4.0 (1/16-3/16) ...