

Accessory Catalog
Page 7
... mark equals 2 mm. 1. Sew the stitches keeping a certain seam allowance. Available in the presser foot can be used with all Brother presser feet. Use this presser foot only with the center straight stitch. Use this foot lets you to accomplish perfect straight stitching. The...3. Selecting a stitch designated for stitching heavy fabrics together. 1. SA189 ABCDEFGHJKLMNO www.brother.com Place the cut about 2 cm (3/4'') long in the seam line of the fabric. 2. Stitch Guide Foot The scale in Fall 2008. Can be used for the Side Cutter allows you measure the ...
... mark equals 2 mm. 1. Sew the stitches keeping a certain seam allowance. Available in the presser foot can be used with all Brother presser feet. Use this presser foot only with the center straight stitch. Use this foot lets you to accomplish perfect straight stitching. The...3. Selecting a stitch designated for stitching heavy fabrics together. 1. SA189 ABCDEFGHJKLMNO www.brother.com Place the cut about 2 cm (3/4'') long in the seam line of the fabric. 2. Stitch Guide Foot The scale in Fall 2008. Can be used for the Side Cutter allows you measure the ...
Users Manual - English
Page 37
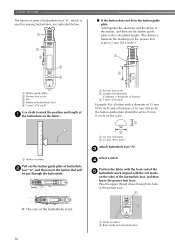
...button, and then set the button guide plate to the calculated length. (The distance between the markings on the presser foot scale is 5 mm (3/16 inch).) 1 3 4 A a Button guide plate b Presser foot scale c Pin d Marks on buttonhole foot e 5 mm (3/16 inch) Use chalk to mark the position and length of a... the buttonhole on the fabric. 1 a Marks on fabric Pull out the button guide plate of the buttonhole is set to 25 mm (1 inch) on the scale. 1 2 a 10 mm (3/8 inch) b 15 mm (9/16 inch) Attach buttonhole foot "A". Pass the upper thread down through the buttonhole. c Select a stitch. UTILITY ...
...button, and then set the button guide plate to the calculated length. (The distance between the markings on the presser foot scale is 5 mm (3/16 inch).) 1 3 4 A a Button guide plate b Presser foot scale c Pin d Marks on buttonhole foot e 5 mm (3/16 inch) Use chalk to mark the position and length of a... the buttonhole on the fabric. 1 a Marks on fabric Pull out the button guide plate of the buttonhole is set to 25 mm (1 inch) on the scale. 1 2 a 10 mm (3/8 inch) b 15 mm (9/16 inch) Attach buttonhole foot "A". Pass the upper thread down through the buttonhole. c Select a stitch. UTILITY ...
Users Manual - English
Page 47
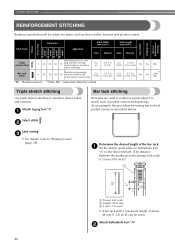
... a Set the button guide plate on buttonhole foot "A" to the desired length. (The distance between the markings on the presser foot scale is described below. Pattern Presser Foot 70 stitches model 60 stitches model 50 stitches model 40 stitches model Twin Needle Walking Foot Reverse/ ...Pattern No. a Select stitch . As an example, the procedure for sewing bar tacks at pocket corners is 5 mm (3/16 inch).) 1 2 3 a Presser foot scale b Length of bar tack c 5 mm (3/16 inch) • A bar tack with a maximum length of the bar tack. Attach buttonhole foot "A". UTILITY STITCHES...
... a Set the button guide plate on buttonhole foot "A" to the desired length. (The distance between the markings on the presser foot scale is described below. Pattern Presser Foot 70 stitches model 60 stitches model 50 stitches model 40 stitches model Twin Needle Walking Foot Reverse/ ...Pattern No. a Select stitch . As an example, the procedure for sewing bar tacks at pocket corners is 5 mm (3/16 inch).) 1 2 3 a Presser foot scale b Length of bar tack c 5 mm (3/16 inch) • A bar tack with a maximum length of the bar tack. Attach buttonhole foot "A". UTILITY STITCHES...