

Thread Tensions - English
Page 1
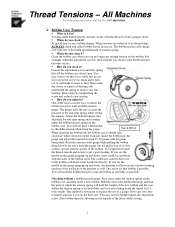
... not required on Brother embroidery machines today, they do make a difference and are items related to thread tensions and tension problems as possible all the way around the bobbin case. For best results, use genuine Brother parts. 1. What is strongly recommend when replacing one may need to replace it ? This helps slow down on the flat surface of the bobbin case. Thread Tensions - Also called the "No Backlash Spring". Install a brand new bobbin, (for the...
... not required on Brother embroidery machines today, they do make a difference and are items related to thread tensions and tension problems as possible all the way around the bobbin case. For best results, use genuine Brother parts. 1. What is strongly recommend when replacing one may need to replace it ? This helps slow down on the flat surface of the bobbin case. Thread Tensions - Also called the "No Backlash Spring". Install a brand new bobbin, (for the...
Thread Tensions - English
Page 2
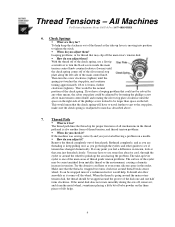
... to come off the bobbin case about 1mm. To keep under the bobbin tension spring on the bobbin. When tensions are not realistic speeds of the garment as well. It will not need to form a proper stitch. !" Adjust the bobbin tension after adjusting the anti-spin spring and cleaning under thread tension constant, works with a bobbin tension gauge. Insert the bobbin into account the pressure of a gauge, but to find the point at every bobbin change over a table...
... to come off the bobbin case about 1mm. To keep under the bobbin tension spring on the bobbin. When tensions are not realistic speeds of the garment as well. It will not need to form a proper stitch. !" Adjust the bobbin tension after adjusting the anti-spin spring and cleaning under thread tension constant, works with a bobbin tension gauge. Insert the bobbin into account the pressure of a gauge, but to find the point at every bobbin change over a table...

Thread Tensions - English
Page 3
All Machines For Technical Assistance Please Call Toll Free 1-877-4BROTHER 3. What are they for ? At install, then only after removing & cleaning them, and also as a last resort along with Thread Tree Tensioners for individual needle tail lengths by tightening the white knob one full turn at a time. At installation and for any tension problems after removing & cleaning them and as a last resort along with the...
All Machines For Technical Assistance Please Call Toll Free 1-877-4BROTHER 3. What are they for ? At install, then only after removing & cleaning them, and also as a last resort along with Thread Tree Tensioners for individual needle tail lengths by tightening the white knob one full turn at a time. At installation and for any tension problems after removing & cleaning them and as a last resort along with the...
Thread Tensions - English
Page 4
... machine was sewing correctly and you adjust it ? How do you are they for ? If at any other guides to tighten the stitch. !" Make sure that area just threaded closely. To help . Then turn the black screw inside the main tension control knob counterclockwise (loosen) until the check spring comes off the main rotary tension disk. !" What is moving into position to see if tension has changed...
... machine was sewing correctly and you adjust it ? How do you are they for ? If at any other guides to tighten the stitch. !" Make sure that area just threaded closely. To help . Then turn the black screw inside the main tension control knob counterclockwise (loosen) until the check spring comes off the main rotary tension disk. !" What is moving into position to see if tension has changed...

Thread Tensions - English
Page 5
... every needle. Clean the bobbin tension spring, set bobbin tension. Sew out the bobbin tension test most of thread 1/3, 1/3, 1/3. Check the thread path Step 4. All Machines For Technical Assistance Please Call Toll Free 1-877-4BROTHER 8. Is it , then all the needles are not wound exactly the same. Now that if its not functioning. Step 1. Look for the obvious. Thread Tensions - Usually you can adjust the top tensions. On rotary thread break sensors...
... every needle. Clean the bobbin tension spring, set bobbin tension. Sew out the bobbin tension test most of thread 1/3, 1/3, 1/3. Check the thread path Step 4. All Machines For Technical Assistance Please Call Toll Free 1-877-4BROTHER 8. Is it , then all the needles are not wound exactly the same. Now that if its not functioning. Step 1. Look for the obvious. Thread Tensions - Usually you can adjust the top tensions. On rotary thread break sensors...
Wiper Problems and Solutions - English
Page 1
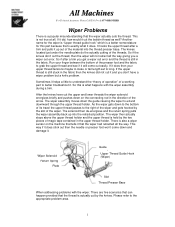
... fabric. As the wiper gets down the guide causing the wiper to the appropriate problem area. 1 So if after a trim and pulls it does then your finger between the bottom of the wiper. Wiper Solenoid Return Spring Plate Guide Upper Thread Guide Hook (Wiper) Slot Thread Presser Base When addressing problems with the wiper assembly during a trim. All Machines For Technical Assistance Please Call Toll Free...
... fabric. As the wiper gets down the guide causing the wiper to the appropriate problem area. 1 So if after a trim and pulls it does then your finger between the bottom of the wiper. Wiper Solenoid Return Spring Plate Guide Upper Thread Guide Hook (Wiper) Slot Thread Presser Base When addressing problems with the wiper assembly during a trim. All Machines For Technical Assistance Please Call Toll Free...

Wiper Problems and Solutions - English
Page 3
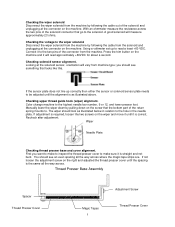
... checking wiper holder plate) Wiper comes down but does not grab the upper thread. • Nut on positioning spacer, B is not adjusted correctly. (See Wiper holder plate adjustment) 3 Apply black grease in thread presser base assembly are either missing or damaged. (See Wiper Assembly Parts Breakdown) • Thread presser base misadjusted or bent. (See checking thread presser base and cover alignment) • Spring is stretched, missing or not hooked correctly. (See Wiper Assembly Parts Breakdown...
... checking wiper holder plate) Wiper comes down but does not grab the upper thread. • Nut on positioning spacer, B is not adjusted correctly. (See Wiper holder plate adjustment) 3 Apply black grease in thread presser base assembly are either missing or damaged. (See Wiper Assembly Parts Breakdown) • Thread presser base misadjusted or bent. (See checking thread presser base and cover alignment) • Spring is stretched, missing or not hooked correctly. (See Wiper Assembly Parts Breakdown...
Wiper Problems and Solutions - English
Page 5
... to make to inspect the thread presser cover to the hole in the needle plate. You should look as illustrated above. Checking upper thread guide hook (wiper) alignment. If adjustment is required, loosen the two screws on the wiper and move it until the alignment is correct. Connect it is as illustrated below in relation to make sure it will vary from machine type; Using a voltmeter set up...
... to make to inspect the thread presser cover to the hole in the needle plate. You should look as illustrated above. Checking upper thread guide hook (wiper) alignment. If adjustment is required, loosen the two screws on the wiper and move it until the alignment is correct. Connect it is as illustrated below in relation to make sure it will vary from machine type; Using a voltmeter set up...
Maintenance Schedule - English
Page 1
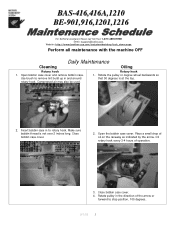
... forward to remove lint build up in to rotary hook. Close bobbin case cover. 4. BAS-416,416A,1210 BE-901,916,1201,1216 For Technical Assistance Please Call Toll Fre e 1-877-4BROTHER Email: tsupport@brother.com Website: http://www.brother-usa.com/industembroidery/tech_down.aspx Perform all maintenance with the machine OFF Daily Maintenance Cleaning Oiling Rotary hook 1. Use brush to stop position, 100 degrees. 9/1/05 1 Insert bobbin case in...
... forward to remove lint build up in to rotary hook. Close bobbin case cover. 4. BAS-416,416A,1210 BE-901,916,1201,1216 For Technical Assistance Please Call Toll Fre e 1-877-4BROTHER Email: tsupport@brother.com Website: http://www.brother-usa.com/industembroidery/tech_down.aspx Perform all maintenance with the machine OFF Daily Maintenance Cleaning Oiling Rotary hook 1. Use brush to stop position, 100 degrees. 9/1/05 1 Insert bobbin case in...
Maintenance Schedule - English
Page 2
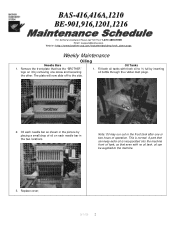
Replace cover. 9/1/05 2 Remove the front plate that even with fresh oil to ½ full by inserting oil bottle through the rubber dust plugs. 2. Fill both oil tanks with no oil tank, oil can keep extra oil is normal. A part that can be supplied to the side. BAS-416,416A,1210 BE-901,916,1201,...the machine front oil tank, so that has the "BROTHER" logo on each needle bar as shown in the picture by removing one or two hours of oil on it by placing a small drop of operation. Oil each needle bar in the front tank after one screw and loosening the other. The plate will ...
Replace cover. 9/1/05 2 Remove the front plate that even with fresh oil to ½ full by inserting oil bottle through the rubber dust plugs. 2. Fill both oil tanks with no oil tank, oil can keep extra oil is normal. A part that can be supplied to the side. BAS-416,416A,1210 BE-901,916,1201,...the machine front oil tank, so that has the "BROTHER" logo on each needle bar as shown in the picture by removing one or two hours of oil on it by placing a small drop of operation. Oil each needle bar in the front tank after one screw and loosening the other. The plate will ...
Motor Locks - English
Page 1
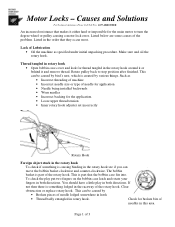
... under initial unpacking procedure. Lack of Lubrication • Oil the machine as • Incorrect threading of machine • Incorrect needle size or type of needle for application • Needle being installed backwards • Worn needles • Incorrect backing for the application. • Loose upper thread tension • Inner rotary hook adjuster set incorrectly Rotary Hook Foreign object stuck in the rotary hook To check if something lodged in the raceway...
... under initial unpacking procedure. Lack of Lubrication • Oil the machine as • Incorrect threading of machine • Incorrect needle size or type of needle for application • Needle being installed backwards • Worn needles • Incorrect backing for the application. • Loose upper thread tension • Inner rotary hook adjuster set incorrectly Rotary Hook Foreign object stuck in the rotary hook To check if something lodged in the raceway...

Upper Thread Breaks - English
Page 1
... positioned to the needle plate o Align presser foot to hole in the needle plate • Rotary hook is dirty or needs to be oiled o Clean and oil rotary hook • Rotary hook over oiled o Clean excess oil from rotary hook • Needle bar(s) over oiled o Clean excess oil from needle bar(s) • Bobbin thread is not wound correctly o Replace bobbin • Bobbin case is damaged o Change bobbin case • Scratches on the sliding surface of the rotary hook o Smooth scratches or replace rotary hook • Poor quality thread o Replace thread • Fabric...
... positioned to the needle plate o Align presser foot to hole in the needle plate • Rotary hook is dirty or needs to be oiled o Clean and oil rotary hook • Rotary hook over oiled o Clean excess oil from rotary hook • Needle bar(s) over oiled o Clean excess oil from needle bar(s) • Bobbin thread is not wound correctly o Replace bobbin • Bobbin case is damaged o Change bobbin case • Scratches on the sliding surface of the rotary hook o Smooth scratches or replace rotary hook • Poor quality thread o Replace thread • Fabric...
Parts Manual - English
Page 4
...53 b2. Needle bar flip-up mechanism • • 9 F. Feed guide mechanism 17 K. Upper threading mechanism 29 R. Power supply equipment mechanism < BAS-416 > 39 U. Needle bar and driving clutch mechanism 1 C. Feed guide mechanism 15 J. Control box mechanism 33 S2. Control box mechanism 35 T1. Machine head parts 43 X. Option parts 53 b3. Lower shaft mechanism 29 Q. Machine body 1 B. Bobbin winder mechanism 21 M. Synchronizer 41 V. Thread wiper mechanism 27 P. Presser foot lifter mechanism 13 H. Attachment set 61 Option...
...53 b2. Needle bar flip-up mechanism • • 9 F. Feed guide mechanism 17 K. Upper threading mechanism 29 R. Power supply equipment mechanism < BAS-416 > 39 U. Needle bar and driving clutch mechanism 1 C. Feed guide mechanism 15 J. Control box mechanism 33 S2. Control box mechanism 35 T1. Machine head parts 43 X. Option parts 53 b3. Lower shaft mechanism 29 Q. Machine body 1 B. Bobbin winder mechanism 21 M. Synchronizer 41 V. Thread wiper mechanism 27 P. Presser foot lifter mechanism 13 H. Attachment set 61 Option...

Parts Manual - English
Page 13
D .ii-4 1g / Needle bar mechanism / Nadelstangenvorrichtung / Mecanisme de la barre i3 aiguille / Mecanismo de la barra de aguja REF.NO. 1 2 3 4 5 6 7 8 9 10 11 12 13 14 15 16 17 18 ... 37 38 39 40 41 42 43 44 45 46 47 48 49 50 51 52 52-1 52-2 52-3 52-4 53 54 55 56 57 CODE Q•Ty t >1 I .-Ai 5 J-'4t7 18 t(4. 93X6.6 4 7i - /* S.4X6 1 ?> e- > 4z '2" i 1 5-> e>71' V>z9 5-> E> *5 9 4.711 a 4 MTh 1- 6X16 4 t 9 If ii **n. 0; 6 4 / 1 7 MA, f.t*tx 2 J--< m axe 2 enii*z/aeJa 1 72.n.1-/v7*> 9 1"V *err I, 7:t1...
D .ii-4 1g / Needle bar mechanism / Nadelstangenvorrichtung / Mecanisme de la barre i3 aiguille / Mecanismo de la barra de aguja REF.NO. 1 2 3 4 5 6 7 8 9 10 11 12 13 14 15 16 17 18 ... 37 38 39 40 41 42 43 44 45 46 47 48 49 50 51 52 52-1 52-2 52-3 52-4 53 54 55 56 57 CODE Q•Ty t >1 I .-Ai 5 J-'4t7 18 t(4. 93X6.6 4 7i - /* S.4X6 1 ?> e- > 4z '2" i 1 5-> e>71' V>z9 5-> E> *5 9 4.711 a 4 MTh 1- 6X16 4 t 9 If ii **n. 0; 6 4 / 1 7 MA, f.t*tx 2 J--< m axe 2 enii*z/aeJa 1 72.n.1-/v7*> 9 1"V *err I, 7:t1...
Parts Manual - English
Page 39
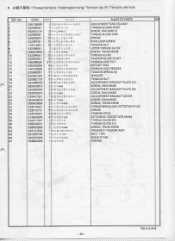
... ii 3, 9 008400806 2+ s 9 a m4x8 TENSION NUT UPPER THREAD GUIDE SCREW, TRUSS M4X8 10 532399001 9 4 1- 8*/ F7721-4 THREAD GUIDE 11 532400001 9 I F*8 0,9te, TENSION GUIDE SHAFT 12 536299000 271 s* a h!,sif 9 7 .T. .4, F TENSION DISC FELT 13 536300000 9 0 - 9 9 -79 ROTARY DISC 15 144103009 9 i Fne)fr 1/58ti TENSION DISC PRESSER 16 520680001 9 -f F*ar>f//14-8 TENSION SPRING (S) 17 520681000 *a 9 r)%/C*',I 4fii* WASHER 18 520682103 9 -I h*ar)"2 F TENSION NUT 19 532389000 2 f•arkrICIOII,u ADJUSTMENT BRACKET PLATE (U) 20 062400816 2 td...
... ii 3, 9 008400806 2+ s 9 a m4x8 TENSION NUT UPPER THREAD GUIDE SCREW, TRUSS M4X8 10 532399001 9 4 1- 8*/ F7721-4 THREAD GUIDE 11 532400001 9 I F*8 0,9te, TENSION GUIDE SHAFT 12 536299000 271 s* a h!,sif 9 7 .T. .4, F TENSION DISC FELT 13 536300000 9 0 - 9 9 -79 ROTARY DISC 15 144103009 9 i Fne)fr 1/58ti TENSION DISC PRESSER 16 520680001 9 -f F*ar>f//14-8 TENSION SPRING (S) 17 520681000 *a 9 r)%/C*',I 4fii* WASHER 18 520682103 9 -I h*ar)"2 F TENSION NUT 19 532389000 2 f•arkrICIOII,u ADJUSTMENT BRACKET PLATE (U) 20 062400816 2 td...
Service Manual
Page 37
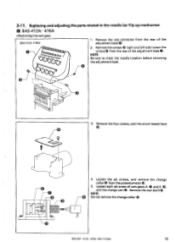
... the set screw of the adjustment base 0. Ua a3 2. NOTE Be sure to the needle bar flip-up mechanism ■ BAS-412A • 416A • Replacing the cam gear [BAS-412A • 416A1 1. NOTE Do not remove the change collar ® from the potentiometer O. 5. Replacing and adjusting the parts related to check the needle location before removing the adjustment base. Loosen each set screws, and remove the change collar 0. • BAS...
... the set screw of the adjustment base 0. Ua a3 2. NOTE Be sure to the needle bar flip-up mechanism ■ BAS-412A • 416A • Replacing the cam gear [BAS-412A • 416A1 1. NOTE Do not remove the change collar ® from the potentiometer O. 5. Replacing and adjusting the parts related to check the needle location before removing the adjustment base. Loosen each set screws, and remove the change collar 0. • BAS...

Service Manual
Page 58
... bobbin winder assembly 0. 2. Tighten the two screws ® so that the plate spring 0 is wound too loose, tighten the knob O. • The thread winder motor does not operate if the circuit protector activated. When winding more thread on the bobbin, loosen the screw 0, then move the thread guide 0 right and left. In that the proper amount of the bobbin winder claw O. 4-14-2. Positioning the bobbin winder claw ft) 1. Remove the three screws 0, and the bobbin winder cover...
... bobbin winder assembly 0. 2. Tighten the two screws ® so that the plate spring 0 is wound too loose, tighten the knob O. • The thread winder motor does not operate if the circuit protector activated. When winding more thread on the bobbin, loosen the screw 0, then move the thread guide 0 right and left. In that the proper amount of the bobbin winder claw O. 4-14-2. Positioning the bobbin winder claw ft) 1. Remove the three screws 0, and the bobbin winder cover...

Service Manual
Page 84
...; when the X-axis home position dog interrupts the sensor 0 light. 6. Remove the holder base 0 from the carriage 0, and then attach the XY-axis home position plate assembly ®. 2. Adjusting home position using home position plate NOTES • Use the XY-axis home position plate assembly (S36461-001 optional). • Before making this adjustment, turn on the power. 0 0 0 7. Remove the eight screws0 and table R 0. 3. While pressing the < 4 > key for the BAS-412A or the key...
...; when the X-axis home position dog interrupts the sensor 0 light. 6. Remove the holder base 0 from the carriage 0, and then attach the XY-axis home position plate assembly ®. 2. Adjusting home position using home position plate NOTES • Use the XY-axis home position plate assembly (S36461-001 optional). • Before making this adjustment, turn on the power. 0 0 0 7. Remove the eight screws0 and table R 0. 3. While pressing the < 4 > key for the BAS-412A or the key...

Service Manual
Page 123
...; Needle bar case locking • Improper needle bar case position P9 Not available P10 Main circuit board - P13 Main circuit board - • Rotary encoder • Timing pulse motor signal • Synchronize signal • Stop position sensor • Stop position signal • Hoop does not move during sewing. • Thread trimmer does not function correctly. • Pulley does not stop at all. • Pulse motor for the BAS...
...; Needle bar case locking • Improper needle bar case position P9 Not available P10 Main circuit board - P13 Main circuit board - • Rotary encoder • Timing pulse motor signal • Synchronize signal • Stop position sensor • Stop position signal • Hoop does not move during sewing. • Thread trimmer does not function correctly. • Pulley does not stop at all. • Pulse motor for the BAS...

Service Manual
Page 151
... thread trimming operation. • Remove needle plate and reset it . • Is position of a malfunction, diagnose the problem referring to the table below . Mechanical problem In case of needle bar clamp or stopper correct? Set bolt 9D. 'ThreadtaktoP opeetting lent * BAS-412 - 416 Thread take -up Upper case cover' Needle bar case la Innerthread guide' bolt °O. r Th rekalike• operfline liver Loosen the bolt of the thread take-up operating lever to adjust] Remove adjustment base. • BAS-401 Thread take -up Needle bar case...
... thread trimming operation. • Remove needle plate and reset it . • Is position of a malfunction, diagnose the problem referring to the table below . Mechanical problem In case of needle bar clamp or stopper correct? Set bolt 9D. 'ThreadtaktoP opeetting lent * BAS-412 - 416 Thread take -up Upper case cover' Needle bar case la Innerthread guide' bolt °O. r Th rekalike• operfline liver Loosen the bolt of the thread take-up operating lever to adjust] Remove adjustment base. • BAS-401 Thread take -up Needle bar case...


