

Instruction Manual - English
Page 1
SINGLE HEAD ELECTRONIC EMBROIDERY MACHINE INSTRUCTION MANUAL BAS-411
SINGLE HEAD ELECTRONIC EMBROIDERY MACHINE INSTRUCTION MANUAL BAS-411
Instruction Manual - English
Page 3
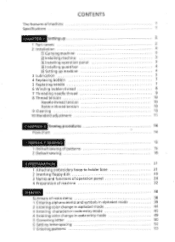
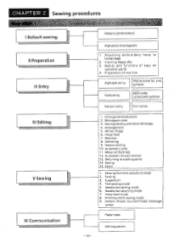
... Standard adjustment 11 CHAPTER 2 Sewing procedures 14 Flow chart 14 1 DEFAULT SEWING 15 1 Default sewing of patterns 15 2 Default sewing 18 II PREPARATION 21 1 Attaching embroidery hoop to holder base 21 2 Inserting floppy disk 23 3 Names and functions of operation panel 24 4 Preparation of machine 32 111 ENTRY 38 Summary of...
... Standard adjustment 11 CHAPTER 2 Sewing procedures 14 Flow chart 14 1 DEFAULT SEWING 15 1 Default sewing of patterns 15 2 Default sewing 18 II PREPARATION 21 1 Attaching embroidery hoop to holder base 21 2 Inserting floppy disk 23 3 Names and functions of operation panel 24 4 Preparation of machine 32 111 ENTRY 38 Summary of...

Instruction Manual - English
Page 4
11 EDITING 59 Editing function outline 59 Editing method 65 Data available in BAS-411 66 Editing function 67 1 Enlarging and reducing 67 2 Setting monogram area 78 3 Setting sewing density and letter thickness 80 4 Arranging 83 Arranging 93 5 Setting mirror ... Operating and preparing paper tape reader 156 What's needed? 157 IIlOTHER 158 1 Recommendation on embroidering 158 2 Error messages 159 3 Troubleshooting 162 4 DIP switch functions 166 5 Embroidery hoop types 169 6 Options 174
11 EDITING 59 Editing function outline 59 Editing method 65 Data available in BAS-411 66 Editing function 67 1 Enlarging and reducing 67 2 Setting monogram area 78 3 Setting sewing density and letter thickness 80 4 Arranging 83 Arranging 93 5 Setting mirror ... Operating and preparing paper tape reader 156 What's needed? 157 IIlOTHER 158 1 Recommendation on embroidering 158 2 Error messages 159 3 Troubleshooting 162 4 DIP switch functions 166 5 Embroidery hoop types 169 6 Options 174
Instruction Manual - English
Page 5
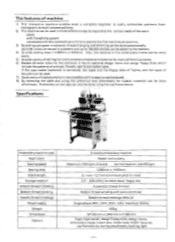
... 220V, 200V, 120V maximum 500VA 165kg W1050 mm x L940 mm x H1380 mm Paper tape reader, design floppy disks, design frame, embroidery hoops in each size, holder base, ML651 lamp set, cap framedevice, boring attachment, marking light -1- If the tape reader (optional)... Sewing speed Sewing area Stitch length Storage medium Bobbin thread trimming Bobbin thread winding Needle thread breakage Power supply Weight Dimensions Options 9 needle embroidery machine Pattern embroidery Maximum 1000 spm ( 6 levels) normal rotation rate 650 spm V285mm x H450mm 0.1 mm - 12.7 mm (minimum pitch 0.1 mm...
... 220V, 200V, 120V maximum 500VA 165kg W1050 mm x L940 mm x H1380 mm Paper tape reader, design floppy disks, design frame, embroidery hoops in each size, holder base, ML651 lamp set, cap framedevice, boring attachment, marking light -1- If the tape reader (optional)... Sewing speed Sewing area Stitch length Storage medium Bobbin thread trimming Bobbin thread winding Needle thread breakage Power supply Weight Dimensions Options 9 needle embroidery machine Pattern embroidery Maximum 1000 spm ( 6 levels) normal rotation rate 650 spm V285mm x H450mm 0.1 mm - 12.7 mm (minimum pitch 0.1 mm...
Instruction Manual - English
Page 6
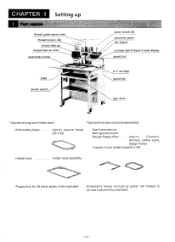
... board contrast dial of liquid crystal display speed dial X•Y carriage guard bar disc drive *Standard hoop and holder base *Optional accessories (sold separately) •Embroidery hoop plastic square hoop (45 x 32) •Cap frame device •Boring attachment •Design floppy disks sports, flowers, animals, zodiac signs, design frame &#...8226;Tubular frame holder base(24 x 30) •Holder base holder base assembly Floppy disk for 28 letter styles of the alphabet Embroidery hoops (including spider net hoops) in various sizes are also available.
... board contrast dial of liquid crystal display speed dial X•Y carriage guard bar disc drive *Standard hoop and holder base *Optional accessories (sold separately) •Embroidery hoop plastic square hoop (45 x 32) •Cap frame device •Boring attachment •Design floppy disks sports, flowers, animals, zodiac signs, design frame &#...8226;Tubular frame holder base(24 x 30) •Holder base holder base assembly Floppy disk for 28 letter styles of the alphabet Embroidery hoops (including spider net hoops) in various sizes are also available.
Instruction Manual - English
Page 18
Attaching embroidery hoop to starting point 14. Returning to holder base 2. Stitch by stitch sewing mode 9. Editing system Monogram area 3. Hoop feed 7. Material thickness 12. Stitch 1. Test ... entry ASCII code Letters and symbols Pattern entry File names 1. Centering 9. Boring 15. I Default sewing II Preparation III Entry x IV Editing 7?: V Sewing VI Communication Patterns (embroidery) Alphabets (monogram) 1. Suspension 4. CHAPTER 2 Sewing procedures it 12- Sewing density and letter thickness 4. Mirror image 6. Rotation 8.
Attaching embroidery hoop to starting point 14. Returning to holder base 2. Stitch by stitch sewing mode 9. Editing system Monogram area 3. Hoop feed 7. Material thickness 12. Stitch 1. Test ... entry ASCII code Letters and symbols Pattern entry File names 1. Centering 9. Boring 15. I Default sewing II Preparation III Entry x IV Editing 7?: V Sewing VI Communication Patterns (embroidery) Alphabets (monogram) 1. Suspension 4. CHAPTER 2 Sewing procedures it 12- Sewing density and letter thickness 4. Mirror image 6. Rotation 8.
Instruction Manual - English
Page 25
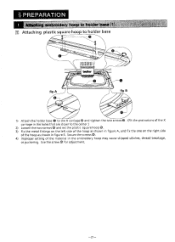
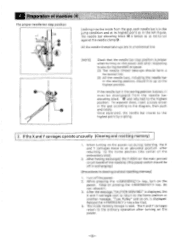
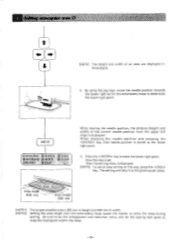
Secure the screws 0. 4) Improper setting of the hoop as shown in the embroidery hoop may cause skipped stitches, thread breakage, or puckering. Use the screw O for adjustment. -21 - II PREPARATION CI Attaching plastic square hoop to holder base ...
Secure the screws 0. 4) Improper setting of the hoop as shown in the embroidery hoop may cause skipped stitches, thread breakage, or puckering. Use the screw O for adjustment. -21 - II PREPARATION CI Attaching plastic square hoop to holder base ...
Instruction Manual - English
Page 26
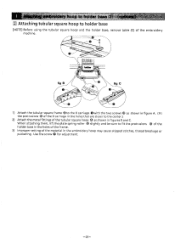
... @ as shown in figure A. (Fit the protrusions O of the X carriage in the holes that are closer to the center.) 2) Attach the metal fittings of the embroidery machine. E] Attaching tubular square hoop to holder base [NOTE] Before using the tubular square hoop and the holder base, remove table (C) of the tubular square...; slightly and be sure to fit the protrusions 0 of the holder base in the holes of the frame. 3) Improper setting of the material in the embroidery hoop may cause skipped stitches, thread breakage or puckering.
... @ as shown in figure A. (Fit the protrusions O of the X carriage in the holes that are closer to the center.) 2) Attach the metal fittings of the embroidery machine. E] Attaching tubular square hoop to holder base [NOTE] Before using the tubular square hoop and the holder base, remove table (C) of the tubular square...; slightly and be sure to fit the protrusions 0 of the holder base in the holes of the frame. 3) Improper setting of the material in the embroidery hoop may cause skipped stitches, thread breakage or puckering.

Instruction Manual - English
Page 31
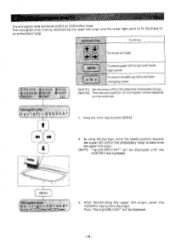
... '.. 2 Use this key to move X and Y carriages to attach or remove hoop or to superimpose material. * Only one hoop feed position can be set per embroidery cycle. ( NEEDLE SET 2 Use this key to set needle order when setting sewing start point and during suspension. * The maximum number of the bobbin thread...
... '.. 2 Use this key to move X and Y carriages to attach or remove hoop or to superimpose material. * Only one hoop feed position can be set per embroidery cycle. ( NEEDLE SET 2 Use this key to set needle order when setting sewing start point and during suspension. * The maximum number of the bobbin thread...

Instruction Manual - English
Page 32
... from stitch by pressing the key. But, if the power is turned off during sewing in order to restart the machine for the rest of embroidery. [NOTE] When the power is on and the rest of data of the command. When color change command can be set , a"*" is displayed indicating the.... Use this key to; • Display and check current editing data • Sew on the mask line of character or pattern without the function of embroidery by stitch to 100 stitches at a time. (when the machine is stopped during sewing.) • Set color change command to change color in data entry...
... from stitch by pressing the key. But, if the power is turned off during sewing in order to restart the machine for the rest of embroidery. [NOTE] When the power is on and the rest of data of the command. When color change command can be set , a"*" is displayed indicating the.... Use this key to; • Display and check current editing data • Sew on the mask line of character or pattern without the function of embroidery by stitch to 100 stitches at a time. (when the machine is stopped during sewing.) • Set color change command to change color in data entry...
Instruction Manual - English
Page 36
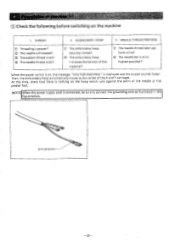
... proper? When the power switch is on, the message, "CAUTION MOVINGI" is connected, be sure to the center of the X and Y carriages . EMBROIDERY HOOP 3. E] Check the following before switching on the hoop which runs against the point of the material? © 0 The needle thread take-ups form... the machine 1. e The needle is threaded? © The bobbin thread is set? 0 The needle thread is set? 0 The embroidery hoop securely clamps? 0 The embroidery hoop increases the tension of the needle or the presser foot. [NOTE] When the power supply cord is displayed and the buzzer sounds...
... proper? When the power switch is on, the message, "CAUTION MOVINGI" is connected, be sure to the center of the X and Y carriages . EMBROIDERY HOOP 3. E] Check the following before switching on the hoop which runs against the point of the material? © 0 The needle thread take-ups form... the machine 1. e The needle is threaded? © The bobbin thread is set? 0 The needle thread is set? 0 The embroidery hoop securely clamps? 0 The embroidery hoop increases the tension of the needle or the presser foot. [NOTE] When the power supply cord is displayed and the buzzer sounds...
Instruction Manual - English
Page 38
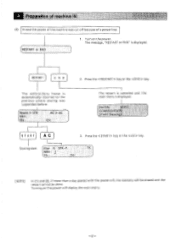
... stop position. The needle bar is not proper : 1. If it is displayed. -34- When the needle bar case comes to the home position of the embroidery area. 4. START (2) index 4. The X and Y carriages move the needle bar to the stop position. 3.
... stop position. The needle bar is not proper : 1. If it is displayed. -34- When the needle bar case comes to the home position of the embroidery area. 4. START (2) index 4. The X and Y carriages move the needle bar to the stop position. 3.
Instruction Manual - English
Page 39
..., the X and Y carriages start to return to the home position or another message, "Turn Pulley" and so on the main printed circuit board of the embroidery area). 2. Turn off in exchanging.) [Procedures in clearing and and resetting memory] 1. Once separated, the needle bar moves to the diagram, then push and rotate...
..., the X and Y carriages start to return to the home position or another message, "Turn Pulley" and so on the main printed circuit board of the embroidery area). 2. Turn off in exchanging.) [Procedures in clearing and and resetting memory] 1. Once separated, the needle bar moves to the diagram, then push and rotate...
Instruction Manual - English
Page 40
... In the following cases, the message will be resumed. TK" will be displayed and sewing can be displayed. Pressing the key will start sewing. The embroidery hoop is automatically suspended because of a power cut during sewing, or if the power switch is turned on after having been turned off during suspension...
... In the following cases, the message will be resumed. TK" will be displayed and sewing can be displayed. Pressing the key will start sewing. The embroidery hoop is automatically suspended because of a power cut during sewing, or if the power switch is turned on after having been turned off during suspension...
Instruction Manual - English
Page 41
..., "RESTART or END" is automatically returned to the position where sewing was cut off , the memory will display the main menu. -37- RESTART E ND The embroidery hoop is displayed. Press the key or the key. [NOTE] In (1) and (2), if more than a day passed with the power off because of the machine...
..., "RESTART or END" is automatically returned to the position where sewing was cut off , the memory will display the main menu. -37- RESTART E ND The embroidery hoop is displayed. Press the key or the key. [NOTE] In (1) and (2), if more than a day passed with the power off because of the machine...
Instruction Manual - English
Page 64
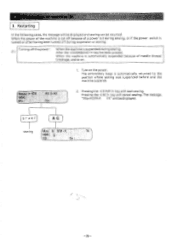
...; < CLEAR> • to input ratio to select the character (pattern) to be enlarged/reduced. [Each] to the editing menu 1-1. Enlargement/Reduction mode (1) Function: Setting the embroidery size by enlarging and reducing (2) Available keys: • < 1> to select "Ratio" • to select "Length" • to select "Auto" • to return to switch over...
...; < CLEAR> • to input ratio to select the character (pattern) to be enlarged/reduced. [Each] to the editing menu 1-1. Enlargement/Reduction mode (1) Function: Setting the embroidery size by enlarging and reducing (2) Available keys: • < 1> to select "Ratio" • to select "Length" • to select "Auto" • to return to switch over...

Instruction Manual - English
Page 70
...density: available set value Sewing density is not adjustable. 0.1-2.0 Enlargement/reduction: Enlargement/reduction: available set values available set to get fine embroidery. This may cause loose threads or thread breakage. -66- Enlarging size increases stitch number. and sewing density increases 4 times because ... from editing system Alphabet and Kanji floppy disks Data supplied by Brother TFD pattern floppy disk Brother design floppy disk Data in paper tape Data sent by editing system Data Block format of Brother patent type Stitch by stitch sewing as well as data in paper...
...density: available set value Sewing density is not adjustable. 0.1-2.0 Enlargement/reduction: Enlargement/reduction: available set values available set to get fine embroidery. This may cause loose threads or thread breakage. -66- Enlarging size increases stitch number. and sewing density increases 4 times because ... from editing system Alphabet and Kanji floppy disks Data supplied by Brother TFD pattern floppy disk Brother design floppy disk Data in paper tape Data sent by editing system Data Block format of Brother patent type Stitch by stitch sewing as well as data in paper...
Instruction Manual - English
Page 82
...store the origin. Then, "Dw-rigt-ORG >ENT" will be displayed until the key is set within the attached embroidery hoop. [NOTE2] The size and position of an embroidery hoop. .. By using the jog keys, move carriage . ., 2. After determining the upper left origin and the lower... right point to editing menu without changing value [NOTE1] Set the area within an embroidery hoop. To store upper left -ORG >ENT" will be set by determining the upper left origin, press the key to select [AREA]. 4- ...
...store the origin. Then, "Dw-rigt-ORG >ENT" will be displayed until the key is set within the attached embroidery hoop. [NOTE2] The size and position of an embroidery hoop. .. By using the jog keys, move carriage . ., 2. After determining the upper left origin and the lower... right point to editing menu without changing value [NOTE1] Set the area within an embroidery hoop. To store upper left -ORG >ENT" will be set by determining the upper left origin, press the key to select [AREA]. 4- ...
Instruction Manual - English
Page 83
.... Now the area is stored as the lower right point. 5. By using the jog keys, move the needle position towards the lower right within the embroidery hoop to keep the monogram within the hoop. -79- Then the editing menu is displayed. [NOTE] To cancel area setting on the way, press the... key. Setting the area larger than the embroidery hoop causes the needle to strike the hoop during sewing. ENTER D P3 While moving the needle position, the distance (height and width) of an area...
.... Now the area is stored as the lower right point. 5. By using the jog keys, move the needle position towards the lower right within the embroidery hoop to keep the monogram within the hoop. -79- Then the editing menu is displayed. [NOTE] To cancel area setting on the way, press the... key. Setting the area larger than the embroidery hoop causes the needle to strike the hoop during sewing. ENTER D P3 While moving the needle position, the distance (height and width) of an area...
Instruction Manual - English
Page 92
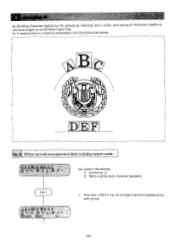
Ex. 4 explains how to arrange characters (patterns) by each group. -88- Icy By deviding characters (patterns) into groups by each character (pattern) EDIT 1. Press the key to create an embroidery like the illustration below. ?k% fry -k' IV %A\ 04 k',tV I t6S11 ti#-: 49 40, etiabe D E F When curved arrangement data includes return code: Set value in the editing: 1) Centering E 2) Ratio is set by inserting return codes, each group of characters (patterns) can be arranged on the different base lines.
Ex. 4 explains how to arrange characters (patterns) by each group. -88- Icy By deviding characters (patterns) into groups by each character (pattern) EDIT 1. Press the key to create an embroidery like the illustration below. ?k% fry -k' IV %A\ 04 k',tV I t6S11 ti#-: 49 40, etiabe D E F When curved arrangement data includes return code: Set value in the editing: 1) Centering E 2) Ratio is set by inserting return codes, each group of characters (patterns) can be arranged on the different base lines.


