
Instruction Manual - English
Page 65
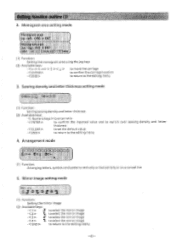
... 411W ZO Asti. .4. • tide, (1) Function: Setting the monogram area using the jog keys (2) Available keys: T > < y > • to move the carriage to confirm the carriage location • to return to select the mirror image - 1. Sewing density and letter thickness setting mode (1) Function: Setting sewing density and letter thickness (2) Available keys: •...
... 411W ZO Asti. .4. • tide, (1) Function: Setting the monogram area using the jog keys (2) Available keys: T > < y > • to move the carriage to confirm the carriage location • to return to select the mirror image - 1. Sewing density and letter thickness setting mode (1) Function: Setting sewing density and letter thickness (2) Available keys: •...
Instruction Manual - English
Page 66
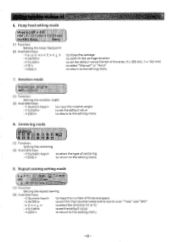
...- Hoop feed setting mode 5 9, (1) Function: Setting the hoop feed point (2) Available keys: ENTER> • < CLEAR END> iy to move the carriage to confirm the carriage location to set the default value • to return to the editing menu 7. 6. Rotation mode 04, (1) Function: Setting the rotation angle (2) Available keys: • to input...
...- Hoop feed setting mode 5 9, (1) Function: Setting the hoop feed point (2) Available keys: ENTER> • < CLEAR END> iy to move the carriage to confirm the carriage location to set the default value • to return to the editing menu 7. 6. Rotation mode 04, (1) Function: Setting the rotation angle (2) Available keys: • to input...
Instruction Manual - English
Page 93
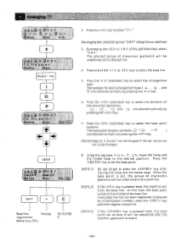
..., the base point comes to step 4. -89- Press the (alphabet) key to select the arrangement type. The base point location symbols ( IC - Press the (alphabet) key to select the base point location. By pressing the or of the base line. The selected group of characters (patterns) will trace the base line. I];] •...
..., the base point comes to step 4. -89- Press the (alphabet) key to select the arrangement type. The base point location symbols ( IC - Press the (alphabet) key to select the base point location. By pressing the or of the base line. The selected group of characters (patterns) will trace the base line. I];] •...
Instruction Manual - English
Page 94
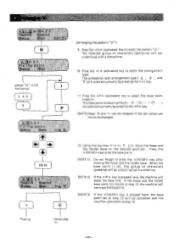
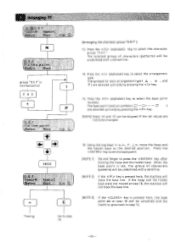
Press the (alphabet) key to select the base point location. The selected group of characters (patterns) will be changed. t [4- When the base point is set at step 12, the machine will not trace the base .... are selected cyclically by pressing the key. 11. The symbols for each arrangement type ( d6 , EIM , and ) are not to step 10. The base point location symbols ( O -El • • - ENTER ) 12. Press the (alphabet) key to select the arrangement type. Using the jog keys , move the hoop and the holder...
Press the (alphabet) key to select the base point location. The selected group of characters (patterns) will be changed. t [4- When the base point is set at step 12, the machine will not trace the base .... are selected cyclically by pressing the key. 11. The symbols for each arrangement type ( d6 , EIM , and ) are not to step 10. The base point location symbols ( O -El • • - ENTER ) 12. Press the (alphabet) key to select the arrangement type. Using the jog keys , move the hoop and the holder...
Instruction Manual - English
Page 95
The base point location symbols ( - Using the jog keys , >, move the hoop and the holder base to step 14. If the hoop and the holder base were not moved ... is pressed here, the base point set values are selected cyclically by pressing the key. 15. Press the (alphabet) key to select the base point location. 4 gs group " D E F" is set the base point. [NOTE 1] Do not forget to select the arrangement type. Press the (alphabet) key to select the character group...
The base point location symbols ( - Using the jog keys , >, move the hoop and the holder base to step 14. If the hoop and the holder base were not moved ... is pressed here, the base point set values are selected cyclically by pressing the key. 15. Press the (alphabet) key to select the base point location. 4 gs group " D E F" is set the base point. [NOTE 1] Do not forget to select the arrangement type. Press the (alphabet) key to select the character group...
Instruction Manual - English
Page 172
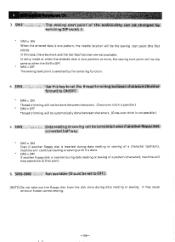
...). 3. hi 5W3= ON When the entered data is inserted during data reading or sewing. o SWS = OFF If another floppy disk is one pattern, the needle location will stop operation at that point. 6. In this case, the area check and the test feed function are not available.
...). 3. hi 5W3= ON When the entered data is inserted during data reading or sewing. o SWS = OFF If another floppy disk is one pattern, the needle location will stop operation at that point. 6. In this case, the area check and the test feed function are not available.


