
Brother International LS-2125i Support Question
Brother International LS-2125i Support Question
Find answers below for this question about Brother International LS-2125i - Basic Sewing And Mending Machine.Need a Brother International LS-2125i manual? We have 2 online manuals for this item!
Question posted by rudywjef on February 8th, 2014
Where Is The Lower Thread Located On A Ls-2125i
The person who posted this question about this Brother International product did not include a detailed explanation. Please use the "Request More Information" button to the right if more details would help you to answer this question.
Current Answers
Related Brother International LS-2125i Manual Pages
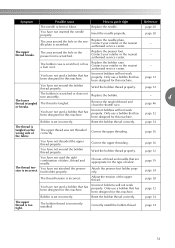
Users Manual - Multi - Page 54
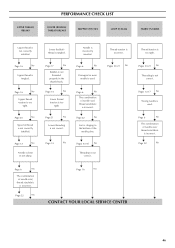
...
No
Bobbin is not correctly
installed. Page 21
No
Lower threading is incorrectly inserted. Page 14
No
Needle is not correct.
UPPER THREAD BREAKS
PERFORMANCE CHECK LIST
LOWER (BOBBIN) THREAD BREAKS
SKIPPED STITCHES
LOOP IN SEAM
FABRIC PUCKERS
Upper thread is not correct.
Pages 20-21 No
Threading is not correctly installed.
Page 12
No
Needle is...
Users Manual - Multi - Page 63
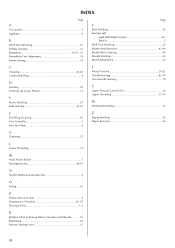
... 24 Stretch Blind Stitch 27
C
Cleaning 43-45 Connecting Plugs 4
D
Darning 38 Drawing Up Lower Thread 17
E
Elastic Stitching 27 Embroidering 40-41
T
Thread Tension 20-21 Troubleshooting 46, 47 Twin-Needle Sewing 18
U
Upper Tension Control Dial 20 Upper Threading 15-16
W
Winding the Bobbin 12
F
Feed Dog Cleaning 45 Foot Controller 5 Free-Arm...
Users Manual - English - Page 1
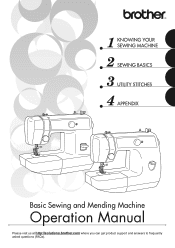
KNOWING YOUR SEWING MACHINE SEWING BASICS UTILITY STITCHES APPENDIX
Basic Sewing and Mending Machine
Operation Manual
Please visit us at http://solutions.brother.com where you can get product support and answers to frequently
asked questions (FAQs).
Users Manual - English - Page 6

... and presser foot section ...8 Flat bed attachment ...8
ACCESSORIES ...9 USING YOUR SEWING MACHINE 10
Power supply precautions ...10 Power supply ...10 Foot controller ...11 Steadying the machine ...11
THREADING THE MACHINE 12
Winding the bobbin ...12 Lower threading ...14 Upper threading ...16 Drawing up the lower thread ...18
REPLACING THE NEEDLE 19
Needle precautions ...19 Selecting the...
Users Manual - English - Page 9
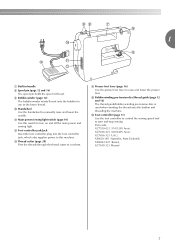
... winder (page 12) The bobbin winder winds thread onto the bobbin for use as the lower thread. m Thread cutter (page 28) Pass the threads through the thread cutter to turn on and off the main power and sewing light.
k Main power/sewing light switch (page 10) Use this machine. n Presser foot lever (page 16) Use the presser foot lever...
Users Manual - English - Page 16

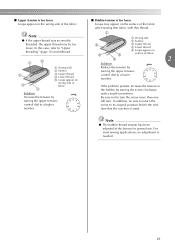
... evenly b Wound poorly
● The bobbin was designed specifically for this machine.
KNOWING YOUR SEWING MACHINE
Lower threading
Install the bobbin wound with this sewing machine.
a Bobbin case latch
Unwind about 10 cm (4 inches) of thread d from other models are used with thread. If the thread unrolls in the right direction.
CAUTION
● Winding the bobbin improperly...
Users Manual - English - Page 20
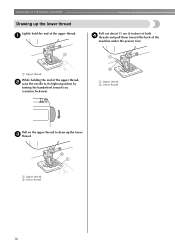
... toward the back of both d threads and pull them toward you (counterclockwise). a
Pull out about 15 cm (6 inches) of the
machine under the presser foot. a Upper thread b Lower thread
18 KNOWING YOUR SEWING MACHINE
Drawing up the lower thread
Lightly hold the end of the upper thread, b raise the needle to draw up the lower c thread. a Upper thread
While holding the end of...
Users Manual - English - Page 21

... on the thread and fabric types
The sewing machine needle that you wish to sew. REPLACING THE NEEDLE
This section provides information on sewing machine needles.
1
Needle precautions
Be sure to observe these precautions is purchased.
19 Failure to observe the following table when choosing the thread and needle appropriate for the upper (spool) and lower (bobbin) threads.
CAUTION...
Users Manual - English - Page 27
... are described below to sew.
1
Turn on the machine. Before operating the sewing machine, read the following precautions.
2
CAUTION
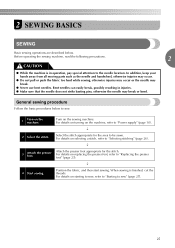
● While the machine is finished, cut the threads. General sewing procedure
Follow the basic procedures below .
Position the fabric, and then start sewing.
Attach the presser foot appropriate for the area to the needle location. For details on...
Users Manual - English - Page 30

...
c Upper thread
d Lower thread
e Loops appear on
5
surface of the seam or wherever reinforcement is used to lock the threads at the end of fabric
4
Solution Reduce the tension by
turning the upper tension-
control dial to cut them. a Thread cutter
Sewing in reverse
Reverse sewing is needed. SEWING BASICS
Pull the fabric to the left side of the machine...
Users Manual - English - Page 31
... of the fabric. Be sure not to "Upper threading" (page 16) and rethread.
1
5
2
3 4
a Wrong side b Surface c Upper thread d Lower thread e Loops appear on
3
5
surface of fabric
4
2
Solution Reduce the tension by turning the upper tensioncontrol dial to its original position before the next time that the machine is needed.
29 In addition, be too loose...
Users Manual - English - Page 32
... the number of layers of fabric and thread that will be achieved. Leave the needle lowered (in order to obtain a finer stitch. Sewing thick fabrics
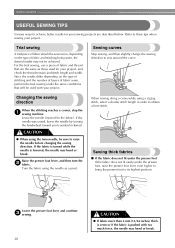
■ If the fabric does...sewing direction
When the stitching reaches a corner, stop the a sewing machine.
Raise the presser foot lever, and then turn the b fabric. For the trial sewing, use a piece of fabric sewn, perform the trial sewing...
Users Manual - English - Page 35

Number on stretch fabrics.
7
Straight stitch Basic stitching,
(Left needle position)
sewing gathers or pintucks, etc. b
• For details, refer to sew" (page 27). When sewing is finished, cut the thread. e
• For details, refer to "Starting to "Selecting stitching" (page 26). a Wrong side of fabric b Right side of the stitching. Lower the needle into the fabric...
Users Manual - English - Page 41
... to cut the upper and lower threads,
leaving a length of the fabric, and
then tie it with the bobbin thread. f
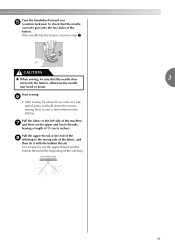
• After sewing for about 10 seconds at the beginning of the button. Start sewing.
Use scissors to the left side of the machine, g and then cut the upper thread and the bobbin thread at a low speed, press...
Users Manual - English - Page 44
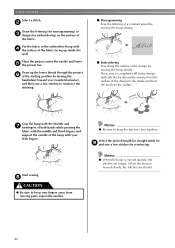
...) on the surface of the fabric facing up the lower thread through the project f at a constant speed by turning the
handwheel toward you (counterclockwise), and then sew a few stitches for straight stitch (6) i and sew a few stitches to the inside to keep your little fingers. Then, sew to keep the stitches close together. Memo
● Be...
Users Manual - English - Page 47
... your local sewing machine dealer or service center.
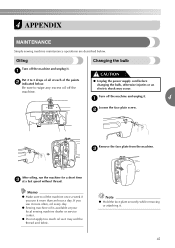
● Do not apply too much oil as it . b
Remove the face plate from the machine.
Be sure to oil the machine once a week if you use it more often, oil every day.
● Sewing machine oil is available at a fast speed without thread. Turn off the machine and unplug...
Users Manual - English - Page 50
...starting your next project.
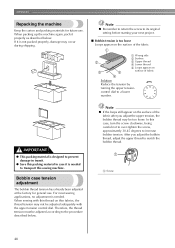
■ Bobbin tension is needed to transport this sewing machine.
In this packing material in case it is not packed properly, damage ...lower
number.
If it properly as described below . For most sewing applications, no adjustment is too loose Loops appear on the surface of the fabric.
1
2 3
a Wrong side
b Surface
c Upper thread
d Lower thread...
Users Manual - English - Page 51

... appear on the wrong side of the fabric.
1
5
2
3 4
a Wrong side b Surface c Upper thread d Lower thread e Loops appear on the wrong side of fabric
Solution
Increase the tension by turning the upper tension- In this
case... to a higher
number. a Screw
49 After you adjust the upper tension,
4
the bobbin thread may be too tight.
control dial to decrease
bobbin tension.
Users Manual - English - Page 53
... has been designed for this machine. The bobbin thread is scratched or does not turn smoothly.
The upper thread breaks. Contact your retailer or the nearest authorised service center.
- You have not wound the bobbin thread properly.
Replace the bobbin.
-
4
The lower thread is tangled The thread is incorrect.
Correct the upper threading.
Attach the presser-foot holder...
Users Manual - English - Page 55
... 9 appliqués 41
B
basic stitching 33 blind hem stitching 33 bobbin 14 bobbin case 14 bobbin winder 12 button sewing 38 buttonhole foot 36 buttonhole sewing 36
C
cleaning 46
D
darning...disk 12
R
relative chart of sewing fabrics, needles and threads ..... 19 repacking 48 reverse sewing lever 28
S
satin stitching 32 seam ripper 37 sewing machine needles 19 shell tuck stitching ...
Similar Questions

How Do I Draw The Lower Thread Of A Brother Sewing Machine
(Posted by rcgurt 9 years ago)

How To Lower Thread A Brother Lx 2500 Sewing Machine
(Posted by mhidmchug 9 years ago)
How To Thread A Ls-2125i
(Posted by blafe 10 years ago)

How To Thread A Ls-2125i Manual
(Posted by ddkennyi 10 years ago)
Do You Have A Video Showing How To Thread Brother Ls -2125
(Posted by grandkids 11 years ago)