

Parts Manual - English
Page 4
... prior notice. Feed mechanism 8 D . Power supply equipment mechanism 32 Q. Work clamp lifter mechanism 12 E . Lubrication 20 H : Threading mechanism 22 J . Thread trimmer mechanism 26 L . Thread nipper mechanism 30 P . Control box mechanism 34 R . Machine body 4 B . Feed guide mechanism 16 F . Synchronizer 28 N . Programmer device 36 T . CONTENTS Al. Upper shaft and needle bar mechanism 6 C . Bobbin winder mechanism 24 K . Notes for using this parts book 1. Machine body 2 A2. Power Table 38 Z . Accessories 40 Optional...
... prior notice. Feed mechanism 8 D . Power supply equipment mechanism 32 Q. Work clamp lifter mechanism 12 E . Lubrication 20 H : Threading mechanism 22 J . Thread trimmer mechanism 26 L . Thread nipper mechanism 30 P . Control box mechanism 34 R . Machine body 4 B . Feed guide mechanism 16 F . Synchronizer 28 N . Programmer device 36 T . CONTENTS Al. Upper shaft and needle bar mechanism 6 C . Bobbin winder mechanism 24 K . Notes for using this parts book 1. Machine body 2 A2. Power Table 38 Z . Accessories 40 Optional...
Parts Manual - English
Page 31
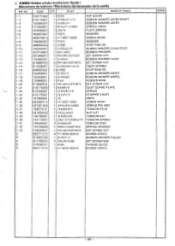
CODE QTY t:/?i-f NAME OF PARTS [ 1-1 1-2 1-3 1-4 1-5 1-6 1-7 1-8 1-9 1-10 1-11 1-12 1-13 1-14 1-15 1-16 1-17 1-18 1-19 1-20 1-21 1-22 1-23 1-24 1-25 1-26 1-27 1-28 1-29 1-30 1-31 1-32 1-33 2 3 4 5 6 S10171002 ... 048050342 152933001 154528001 1 20448001 014680422 S10174000 S10268001 S10175001 157968001 062680712 047201042 159574101 021680202 100136001 144110001 145446001 144105000 148294001 062711212 S18520100 014760622 115183101 062711012 N e- et s- I J. *WM/Bobbin winder mechanism/Spuler/ Mecanisme du bobineur/Mecanismo del devanador de la canilla REF.NO.
CODE QTY t:/?i-f NAME OF PARTS [ 1-1 1-2 1-3 1-4 1-5 1-6 1-7 1-8 1-9 1-10 1-11 1-12 1-13 1-14 1-15 1-16 1-17 1-18 1-19 1-20 1-21 1-22 1-23 1-24 1-25 1-26 1-27 1-28 1-29 1-30 1-31 1-32 1-33 2 3 4 5 6 S10171002 ... 048050342 152933001 154528001 1 20448001 014680422 S10174000 S10268001 S10175001 157968001 062680712 047201042 159574101 021680202 100136001 144110001 145446001 144105000 148294001 062711212 S18520100 014760622 115183101 062711012 N e- et s- I J. *WM/Bobbin winder mechanism/Spuler/ Mecanisme du bobineur/Mecanismo del devanador de la canilla REF.NO.
Parts Manual - English
Page 35
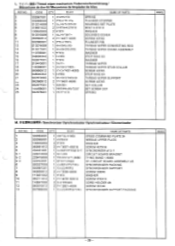
... 2 t""p357-40X6 1 1:i.3)av+tiiiiN"Y+:, NAME OF PARTS SPEED COMMAND PLATE 24 NEEDLE UPPER PLATE WASHER SCREW 437X16 SYNCRONIZER #13-7 CIRCUIT BOARD BRACKET TYING BAND 1.9X80 SY-CIRCUIT BOARD ASSEMBLY #3 SYNCHRONIZER PACKING SYNCHRONIZER SUPPORT SCREW 238X6 WAS SCREW 476X10 CORD HOLDER 4N SCREW 357X6 SYNCHRONIZER SUPPORT PACKING RMKS - 28 - SillattlaitillM /Synchronizer/Synchronisator/Synchronisateur/Sincronizador REF.NO. 1 2 3 4 5 5-1 5-2 5-3 6 7 8 9 10 11 12 13 CODE Q'TY ti.)14 S02684001 S02685001 100645003...
... 2 t""p357-40X6 1 1:i.3)av+tiiiiN"Y+:, NAME OF PARTS SPEED COMMAND PLATE 24 NEEDLE UPPER PLATE WASHER SCREW 437X16 SYNCRONIZER #13-7 CIRCUIT BOARD BRACKET TYING BAND 1.9X80 SY-CIRCUIT BOARD ASSEMBLY #3 SYNCHRONIZER PACKING SYNCHRONIZER SUPPORT SCREW 238X6 WAS SCREW 476X10 CORD HOLDER 4N SCREW 357X6 SYNCHRONIZER SUPPORT PACKING RMKS - 28 - SillattlaitillM /Synchronizer/Synchronisator/Synchronisateur/Sincronizador REF.NO. 1 2 3 4 5 5-1 5-2 5-3 6 7 8 9 10 11 12 13 CODE Q'TY ti.)14 S02684001 S02685001 100645003...
Programmer Instruction Manual - English
Page 6
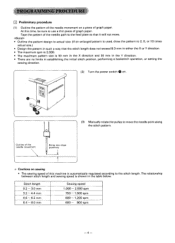
... time, be sure to use a thin piece of this machine is automatically regulated according to the stitch length. Outline of the needle movement Bring into close proximity Cautions on sewing • The sewing speed of graph paper. Tape the pattern of graph paper. The relationship between stitch length and sewing speed is shown in establishing the initial stitch position, performing a backstitch operation, or setting the sewing direction. (2) Turn the power switch Q on. /1 (3) Manually...
... time, be sure to use a thin piece of this machine is automatically regulated according to the stitch length. Outline of the needle movement Bring into close proximity Cautions on sewing • The sewing speed of graph paper. Tape the pattern of graph paper. The relationship between stitch length and sewing speed is shown in establishing the initial stitch position, performing a backstitch operation, or setting the sewing direction. (2) Turn the power switch Q on. /1 (3) Manually...

Programmer Instruction Manual - English
Page 7
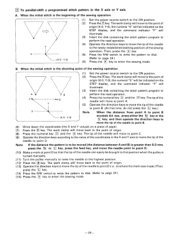
Final stitch a - 111- g (6) Use the direction keys and key to position the needle at sewing start position the Q on the patter • will make programming easier. 0 To program the pattern one stitch at 0, press numeral key 1 three times. stitch position • on the pattrn, and then press the key. As a 5-times enlargement is being used for 2, 5, or 10 times. The work clamp will move back to the initial stitch position. (7) Press the...
Final stitch a - 111- g (6) Use the direction keys and key to position the needle at sewing start position the Q on the patter • will make programming easier. 0 To program the pattern one stitch at 0, press numeral key 1 three times. stitch position • on the pattrn, and then press the key. As a 5-times enlargement is being used for 2, 5, or 10 times. The work clamp will move back to the initial stitch position. (7) Press the...

Programmer Instruction Manual - English
Page 8
... the pattern design, use the numeral keys to indicate "O3O" on the STEP display.) If the pitch is not indicated on the STEP display, or if it exceeds 8.O mm "O8O", it will automatically be indicated on the STEP display, and the command indicator "F" will illuminate. (2) Operate the direction keys to move the work clamp to the initial stitch position. (3) When...
... the pattern design, use the numeral keys to indicate "O3O" on the STEP display.) If the pitch is not indicated on the STEP display, or if it exceeds 8.O mm "O8O", it will automatically be indicated on the STEP display, and the command indicator "F" will illuminate. (2) Operate the direction keys to move the work clamp to the initial stitch position. (3) When...

Programmer Instruction Manual - English
Page 10
... to be sure to enter the sewing mode. This completes programming of interval ® - 0. "789" • • "111"• (Refer to page 24.) Press the [1) key to break the pattern. If the pattern is in the figure) as © and 0, be changed , specify the new stitch length before pressing the key.) (14) Use the direction keys and the [I) key to...
... to be sure to enter the sewing mode. This completes programming of interval ® - 0. "789" • • "111"• (Refer to page 24.) Press the [1) key to break the pattern. If the pattern is in the figure) as © and 0, be changed , specify the new stitch length before pressing the key.) (14) Use the direction keys and the [I) key to...

Programmer Instruction Manual - English
Page 12
The work clamp to the initial stitch position of pattern 2. (7) When the tip of the needle and the initial stitch position © of pattern 2 become aligned, press the 0 key. Thus, the initial stitch will illuminate. Pattern 1 (=> Feed key Pattern 1 Pattern 2 I -111 • (6) Operate the direction keys to move the work clamp will be indicated on the STEP display. Ij To program an intermittent stitch sewing operation • After the thread trimming operation is completed...
The work clamp to the initial stitch position of pattern 2. (7) When the tip of the needle and the initial stitch position © of pattern 2 become aligned, press the 0 key. Thus, the initial stitch will illuminate. Pattern 1 (=> Feed key Pattern 1 Pattern 2 I -111 • (6) Operate the direction keys to move the work clamp will be indicated on the STEP display. Ij To program an intermittent stitch sewing operation • After the thread trimming operation is completed...

Programmer Instruction Manual - English
Page 15
...-side half of the pattern design will slowly move back to the initial stitch position. (9) Press the R/W switch to write the pattern to disk. (Refer to page 24.) Press the El key to point (D. At this time, if the presser-lifter pedal is only required to program one-half of the pattern and use of the needle movement become aligned, press...
...-side half of the pattern design will slowly move back to the initial stitch position. (9) Press the R/W switch to write the pattern to disk. (Refer to page 24.) Press the El key to point (D. At this time, if the presser-lifter pedal is only required to program one-half of the pattern and use of the needle movement become aligned, press...

Programmer Instruction Manual - English
Page 16
At this time, if the presser-lifter pedal is only required to program one-half of the pattern and use of the numeral keys to program the remaining half of the design. Y-0), the numeral "0" will illuminate. (2) Operate the direction keys to move from point 0 to point ®, and the right side half of the pattern design will slowly move the work clamp will...
At this time, if the presser-lifter pedal is only required to program one-half of the pattern and use of the numeral keys to program the remaining half of the design. Y-0), the numeral "0" will illuminate. (2) Operate the direction keys to move from point 0 to point ®, and the right side half of the pattern design will slowly move the work clamp will...

Programmer Instruction Manual - English
Page 17
.... (Note that the feed data "666" on the STEP display refers to a split program input command.) (7) Press the El key. (8) At this time, press the presser-lifter pedal if the pattern on the STEP display. The command indicator "F" will move the work clamp will illuminate. (4) Operate the direction keys to move back to the initial stitch position of pattern CI (12) Press...
.... (Note that the feed data "666" on the STEP display refers to a split program input command.) (7) Press the El key. (8) At this time, press the presser-lifter pedal if the pattern on the STEP display. The command indicator "F" will move the work clamp will illuminate. (4) Operate the direction keys to move back to the initial stitch position of pattern CI (12) Press...

Programmer Instruction Manual - English
Page 18
... the sewing mode. (Operation) 0 Set the work clamp (inner clamp). [programmed method] (1) Set the power source switch to the ON position. (2) Press the E] key. E Split sewing without intermediate thread trimming • This unit was designed to cut at the division in the figure above, and press the starting pedal again. 0 The sewing machine will illuminate. (3) Use the feed key and program from ® to (D. However, continuous sewing of one stitch length...
... the sewing mode. (Operation) 0 Set the work clamp (inner clamp). [programmed method] (1) Set the power source switch to the ON position. (2) Press the E] key. E Split sewing without intermediate thread trimming • This unit was designed to cut at the division in the figure above, and press the starting pedal again. 0 The sewing machine will illuminate. (3) Use the feed key and program from ® to (D. However, continuous sewing of one stitch length...

Programmer Instruction Manual - English
Page 20
... areas designated for skip stitching or straight line sewing. (X-0, Y-O) "555" "030" Tracing operation •-111-•Ei g The El and keys can easily be programmed by tracing the design. • A stitch pattern can be used during programming. Then, press the key. (9) The work clamp to the initial stitch position. (3) Align the tip of the needle with the tip of the needle, starting from the initial stitch position ®...
... areas designated for skip stitching or straight line sewing. (X-0, Y-O) "555" "030" Tracing operation •-111-•Ei g The El and keys can easily be programmed by tracing the design. • A stitch pattern can be used during programming. Then, press the key. (9) The work clamp to the initial stitch position. (3) Align the tip of the needle with the tip of the needle, starting from the initial stitch position ®...

Programmer Instruction Manual - English
Page 21
... easily be repeated by operating the numeral keys. (X-0, Y-0) Feed key • "333" • Example: Program the pattern in the figure at left. (1) Press the II] key. The work clamp will be fastforwarded. (10) Press the 11 key at the final stitch position ® of the needle with recurring patterns • A pattern which the sewing operation © is pressed, the work clamp will be automatically performed.
... easily be repeated by operating the numeral keys. (X-0, Y-0) Feed key • "333" • Example: Program the pattern in the figure at left. (1) Press the II] key. The work clamp will be fastforwarded. (10) Press the 11 key at the final stitch position ® of the needle with recurring patterns • A pattern which the sewing operation © is pressed, the work clamp will be automatically performed.

Programmer Instruction Manual - English
Page 22
... a zigzag sewing operation • A zigzag sewing operation can be indicated on the STEP display. (7) Operate the direction keys so that areas corresponding to ( )number 0 to 9 are positive numbers. Example: Program the pattern in the figure above . Therefore, (Q) (P) - 1. Therefore, indicate "030" on the STEP display, and the command indicator "F" will illuminate. (2) Operate the direction keys to move the work clamp will move back to the initial stitch position. (11...
... a zigzag sewing operation • A zigzag sewing operation can be indicated on the STEP display. (7) Operate the direction keys so that areas corresponding to ( )number 0 to 9 are positive numbers. Example: Program the pattern in the figure above . Therefore, (Q) (P) - 1. Therefore, indicate "030" on the STEP display, and the command indicator "F" will illuminate. (2) Operate the direction keys to move the work clamp will move back to the initial stitch position. (11...

Programmer Instruction Manual - English
Page 29
... the initial stitch position. (5) Operate the direction keys to move the tip of the needle from the initial stitch position 1 to the newly-established initial stitch position 1'. The original initial stitch position 1 will be indicated on the STEP display, and the command indicator "F" will move to the initial stitch position of origin (X-0; The tip of the needle will illuminate. (3) Insert the disk containing the stitch pattern program...
... the initial stitch position. (5) Operate the direction keys to move the tip of the needle from the initial stitch position 1 to the newly-established initial stitch position 1'. The original initial stitch position 1 will be indicated on the STEP display, and the command indicator "F" will move to the initial stitch position of origin (X-0; The tip of the needle will illuminate. (3) Insert the disk containing the stitch pattern program...

Programmer Instruction Manual - English
Page 30
... (I) , and the 0 key in that work clamp would come into contact with the needle or the presser foot if it were lifted at the initial stitch position, a shunting point is to be added onto the program prior to perform the read operation. The tip of origin (X-0; The work clamp is used as an alternative point where the work clamp will move to the point...
... (I) , and the 0 key in that work clamp would come into contact with the needle or the presser foot if it were lifted at the initial stitch position, a shunting point is to be added onto the program prior to perform the read operation. The tip of origin (X-0; The work clamp is used as an alternative point where the work clamp will move to the point...
Programmer Instruction Manual - English
Page 32
... the needle to the ON position. (2) Press the El key. The work clamp will illuminate. (3) Insert the disk containing the stitch pattern program to enter the sewing mode. When the initial stitch is greater than 8.0 mm, press the al or key, press the feed key, and move to point D. Note If the distance the pattern is to be brought to this time...
... the needle to the ON position. (2) Press the El key. The work clamp will illuminate. (3) Insert the disk containing the stitch pattern program to enter the sewing mode. When the initial stitch is greater than 8.0 mm, press the al or key, press the feed key, and move to point D. Note If the distance the pattern is to be brought to this time...

Programmer Instruction Manual - English
Page 33
... the work clamp will now return the number of the needle will illuminate. (2) Operate the direction keys to point 2, and then press the El key. The needle tip should still be cancelled. El To set a constant sewing speed irrespective of the selected stitch length. to the selected stitch length. Maximum stitch number is in the diagram. Note If a third pattern "C" follows pattern B, pattern C will be indicated on this machine is normally controlled automatically...
... the work clamp will now return the number of the needle will illuminate. (2) Operate the direction keys to point 2, and then press the El key. The needle tip should still be cancelled. El To set a constant sewing speed irrespective of the selected stitch length. to the selected stitch length. Maximum stitch number is in the diagram. Note If a third pattern "C" follows pattern B, pattern C will be indicated on this machine is normally controlled automatically...

Programmer Instruction Manual - English
Page 34
... press Li . Program to position the needle at 0, and then press M. g When thread trimming is not used at the sewing end Basting can be performed at point 0. (5) Press EI at point ©. (6) Press numeral key I three times. Length of one stitch. (4) Feed to display "999" in the STEP display, and then press El. If the machine is not fed to add...
... press Li . Program to position the needle at 0, and then press M. g When thread trimming is not used at the sewing end Basting can be performed at point 0. (5) Press EI at point ©. (6) Press numeral key I three times. Length of one stitch. (4) Feed to display "999" in the STEP display, and then press El. If the machine is not fed to add...


