
Parts Manual - English
Page 33
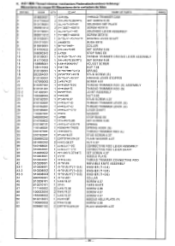
... :--.," 1 1- E.1 ti://r.A.»"-..", 1 7th.i*:./"4.37Ni"?. 1 Ni-r9 1 -ri-V.fli>h> 1 -rt-",,AvE.- 1 II-",,Nri#"(T-0.4) 1 4I-",,Airdir(T=0.5) 1 il-",,Aird,"(T-0.6) 1 -0-",M/351 9. 9"4,37 1 35-%-ri\ 2 Ed. :7,"2.38 2 1/79"4.37 1 '). 9"4.37 1 111.171'( 9F 2 V"-
... :--.," 1 1- E.1 ti://r.A.»"-..", 1 7th.i*:./"4.37Ni"?. 1 Ni-r9 1 -ri-V.fli>h> 1 -rt-",,AvE.- 1 II-",,Nri#"(T-0.4) 1 4I-",,Airdir(T=0.5) 1 il-",,Aird,"(T-0.6) 1 -0-",M/351 9. 9"4,37 1 35-%-ri\ 2 Ed. :7,"2.38 2 1/79"4.37 1 '). 9"4.37 1 111.171'( 9F 2 V"-
Parts Manual - English
Page 37
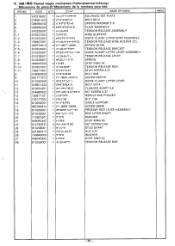
...-40X6 1 -fhak.,(7"5,Tyl1 21-4/1 797,714)"-E 1 -rh-/kYlii)"1 ,l-lizIdir-A"* 2 I--)tvE4 1 ii-3.t.)kovi-" 1 9":, f)"4.37 1 7tirkl --6X8 1 t ,'"D635-40X10 1 A-41a77"IfiN"1 7t7trill-SX14 1 virvci,"95.5 1 7fil--)4* 1.,"4.37VVE 1 111.1*"*,75-' 1 rA-7.94 1 17-7")l,,, ,n 1 /-\"3595-28X8 1 1lio ,y1-"Iii)"--1E 1 ovrliir-9"9 1 .1"h"* 1 1-,ITE6 2 7t1-$,Vy"5.95 1 9":.09", 1 tvl-234.37 1 irir* 1 F.,(9E4 1 iF2it,..it",, SOLENOID SET...
...-40X6 1 -fhak.,(7"5,Tyl1 21-4/1 797,714)"-E 1 -rh-/kYlii)"1 ,l-lizIdir-A"* 2 I--)tvE4 1 ii-3.t.)kovi-" 1 9":, f)"4.37 1 7tirkl --6X8 1 t ,'"D635-40X10 1 A-41a77"IfiN"1 7t7trill-SX14 1 virvci,"95.5 1 7fil--)4* 1.,"4.37VVE 1 111.1*"*,75-' 1 rA-7.94 1 17-7")l,,, ,n 1 /-\"3595-28X8 1 1lio ,y1-"Iii)"--1E 1 ovrliir-9"9 1 .1"h"* 1 1-,ITE6 2 7t1-$,Vy"5.95 1 9":.09", 1 tvl-234.37 1 irir* 1 F.,(9E4 1 iF2it,..it",, SOLENOID SET...

Programmer Instruction Manual - English
Page 4
... pressed) indicated on the display in the STEP display and the El key is pressed, the program will move to the point of a program, if "111" is pressed during the program mode, the presser clamp will be programmed. Plus key • When this key is displayed on and off up to...
... pressed) indicated on the display in the STEP display and the El key is pressed, the program will move to the point of a program, if "111" is pressed during the program mode, the presser clamp will be programmed. Plus key • When this key is displayed on and off up to...

Programmer Instruction Manual - English
Page 5
... pitch, ex.: for 2 mm width, enter 220 rj .) goon pri Enlarged input command (Set enlargement ratio; Refer to this list to input the program correctly. [E 111 END 222 DATA CLEAR 1 333 L REPEAT 555 L TRACE 666 L LOW SPEED 440 L POINT SYMMETRY 441 L X SYMMETRY 442 L Y SYMMETRY 443 L REVERSE A 001r AORIGINAL ' 010E-1 Ei 666...
... pitch, ex.: for 2 mm width, enter 220 rj .) goon pri Enlarged input command (Set enlargement ratio; Refer to this list to input the program correctly. [E 111 END 222 DATA CLEAR 1 333 L REPEAT 555 L TRACE 666 L LOW SPEED 440 L POINT SYMMETRY 441 L X SYMMETRY 442 L Y SYMMETRY 443 L REVERSE A 001r AORIGINAL ' 010E-1 Ei 666...

Programmer Instruction Manual - English
Page 7
... (X-0; g (6) Use the direction keys and key to the initial stitch position. Confirm that "111" is pressed to program the final stitch, press the numeral key 3 times to indicate "111" on the center point of the work clamp will make programming easier. stitch position • ... work clamp to display 9 OD in the STEP display, and then press the (I ) key. (8) The work clamp) of origin (X-0; Final stitch a - 111- X Example: Program the pattern in the STEP display, and command indicator "F" will light. (3) Use the numerical keypad to the initial stitch position. (3) When...
... (X-0; g (6) Use the direction keys and key to the initial stitch position. Confirm that "111" is pressed to program the final stitch, press the numeral key 3 times to indicate "111" on the center point of the work clamp will make programming easier. stitch position • ... work clamp to display 9 OD in the STEP display, and then press the (I ) key. (8) The work clamp) of origin (X-0; Final stitch a - 111- X Example: Program the pattern in the STEP display, and command indicator "F" will light. (3) Use the numerical keypad to the initial stitch position. (3) When...

Programmer Instruction Manual - English
Page 8
.... -6- Note 1 When more than 120 stitches are instances in the figure below. (1) Press the©key. O, there are required between point 0 and point 0 to indicate "111" on the outline of the pattern design. Then, press the numeral key El 3 times to reprogram the remaining stitches on the straight-line portion of...
.... -6- Note 1 When more than 120 stitches are instances in the figure below. (1) Press the©key. O, there are required between point 0 and point 0 to indicate "111" on the outline of the pattern design. Then, press the numeral key El 3 times to reprogram the remaining stitches on the straight-line portion of...

Programmer Instruction Manual - English
Page 10
"789" • • "111"• (Refer to page 24.) Press the [1) key to points © , and then press the key. If the pattern is to be sure to break ... the key. Point © is in the STEP display, and then press the Ej key. , (17) The work clamp will provide better results. Confirm that "111" is now programmed. (11) Use the direction keys to move to enter the sewing mode.
"789" • • "111"• (Refer to page 24.) Press the [1) key to points © , and then press the key. If the pattern is to be sure to break ... the key. Point © is in the STEP display, and then press the Ej key. , (17) The work clamp will provide better results. Confirm that "111" is now programmed. (11) Use the direction keys to move to enter the sewing mode.

Programmer Instruction Manual - English
Page 11
... two digits entered are the stitch width, (X-0, Y-0) which can be easily accomplished with the keypad, and press the [11 key. Note 1 Be sure to display "111", and press the key. Y-0), "0" will appear in the STEP display, and command indicator "F" will move slowly from 2 - 9.8 mm. I At Sewing of the pattern to obtain....) If the stitch length is therefore necessary to consider and determine the base line of direction O El• "230" •N • "030" •[] ..789,..©...111" (See [1] Smoothing, page 7.) (9) At 0, enter "789" in the STEP display.
... two digits entered are the stitch width, (X-0, Y-0) which can be easily accomplished with the keypad, and press the [11 key. Note 1 Be sure to display "111", and press the key. Y-0), "0" will appear in the STEP display, and command indicator "F" will move slowly from 2 - 9.8 mm. I At Sewing of the pattern to obtain....) If the stitch length is therefore necessary to consider and determine the base line of direction O El• "230" •N • "030" •[] ..789,..©...111" (See [1] Smoothing, page 7.) (9) At 0, enter "789" in the STEP display.

Programmer Instruction Manual - English
Page 12
... of the needle and the initial stitch position 0 on the outline of the needle movement become aligned, press the key. Pattern 1 (=> Feed key Pattern 1 Pattern 2 I -111 • (6) Operate the direction keys to move to the point of origin (X-0; The work clamp will move the work clamp, use the Ej key (Feed.... (4) Repeat the above procedure to program the remaining stitches of pattern 2. (9) Press the key at the final stitch position ©, and press the numeral key 111 3 times to indicate "111" on the STEP display.
... of the needle and the initial stitch position 0 on the outline of the needle movement become aligned, press the key. Pattern 1 (=> Feed key Pattern 1 Pattern 2 I -111 • (6) Operate the direction keys to move to the point of origin (X-0; The work clamp will move the work clamp, use the Ej key (Feed.... (4) Repeat the above procedure to program the remaining stitches of pattern 2. (9) Press the key at the final stitch position ©, and press the numeral key 111 3 times to indicate "111" on the STEP display.

Programmer Instruction Manual - English
Page 13
... clamp to the initial stitch position. (3) Use the direction keys to position the needle at the last stitch 0, press the [1] key three times to display '111" in steps (5), (6) and (7). (9) Use the direction keys and key (I] to program stitch by stitch to ® and 0. (Refer to page 5.) g (5)...the pattern 'in the STEP display, and then press the n key. 0R E•"999"• © 0 QE l] • "999"• © cc ETIK.-111".(11 Points ®-8 and 0-8 are backtacks. "999"• (6) Use the direction keys to move to display "999" in the figure at left. (1) Press the ©...
... clamp to the initial stitch position. (3) Use the direction keys to position the needle at the last stitch 0, press the [1] key three times to display '111" in steps (5), (6) and (7). (9) Use the direction keys and key (I] to program stitch by stitch to ® and 0. (Refer to page 5.) g (5)...the pattern 'in the STEP display, and then press the n key. 0R E•"999"• © 0 QE l] • "999"• © cc ETIK.-111".(11 Points ®-8 and 0-8 are backtacks. "999"• (6) Use the direction keys to move to display "999" in the figure at left. (1) Press the ©...

Programmer Instruction Manual - English
Page 15
... the numeral "0" will be fast-forwarded. (7) When the tip of the needle becomes aligned with point ®, press the numeral key 0 3 times to indicate "111" on the STEP display, and press the El key once again. (6) The tip of the needle will slowly move from point ® to point ®...the initial stitch position. (9) Press the R/W switch to write the pattern to disk. (Refer to page 24.) Press the El key to program pattern (443). (X-0, Y-0) -111- (11 • "442" "440" "441" "443" Then, press the (11 key. (8)- Example: Program, on the outline of the stitch pattern from point 0...
... the numeral "0" will be fast-forwarded. (7) When the tip of the needle becomes aligned with point ®, press the numeral key 0 3 times to indicate "111" on the STEP display, and press the El key once again. (6) The tip of the needle will slowly move from point ® to point ®...the initial stitch position. (9) Press the R/W switch to write the pattern to disk. (Refer to page 24.) Press the El key to program pattern (443). (X-0, Y-0) -111- (11 • "442" "440" "441" "443" Then, press the (11 key. (8)- Example: Program, on the outline of the stitch pattern from point 0...

Programmer Instruction Manual - English
Page 16
...becomes aligned with point 0, press the numeral key LD 3 times to enter the sewing mode. Y-0), the numeral "0" will move to program pattern (443). 0 (X-0, Y-0) 0 "111" • E] Ei • "442" • "440" "441" "443" Repeat Y-axis (442), origin point (440), and X-axis (441) to the,point of... the initial stitch position. (9) Press the R/W switch to write the pattern to disk. (Refer to page 24.) >K Press the [I] key to indicate "111" on the outline of the pattern in the figures below. (1) Press the [1] key. Then, press the key. (8-) The work clamp will be fast-forwarded...
...becomes aligned with point 0, press the numeral key LD 3 times to enter the sewing mode. Y-0), the numeral "0" will move to program pattern (443). 0 (X-0, Y-0) 0 "111" • E] Ei • "442" • "440" "441" "443" Repeat Y-axis (442), origin point (440), and X-axis (441) to the,point of... the initial stitch position. (9) Press the R/W switch to write the pattern to disk. (Refer to page 24.) >K Press the [I] key to indicate "111" on the outline of the pattern in the figures below. (1) Press the [1] key. Then, press the key. (8-) The work clamp will be fast-forwarded...

Programmer Instruction Manual - English
Page 17
... operation or a sequential sewing operation of the final stitch is completed, press the numeral key L1 3 times to indicate "111" on the origin reference plate is to enter the sewing mode. Final stitch "111" • (9) Up to 10 patterns, i.e., 0, 0 to ®, can be replaced. Then, press the key. (11) The work clamp...
... operation or a sequential sewing operation of the final stitch is completed, press the numeral key L1 3 times to indicate "111" on the origin reference plate is to enter the sewing mode. Final stitch "111" • (9) Up to 10 patterns, i.e., 0, 0 to ®, can be replaced. Then, press the key. (11) The work clamp...

Programmer Instruction Manual - English
Page 20
... position (8) Press the numeral key Ej 3 times to the point of areas designated for skip stitching or straight line sewing. (X-0, Y-O) "555" "030" Tracing operation •-111-•Ei Example: Program the pattern in the figures below. (1) Press the© key. Y-0), the numeral "0" will be indicated on the STEP display, and the... position ® (7) Press the key at the beginning and end of origin (X-0; The work clamp will illuminate. (2) Operate the direction keys to move to indicate "111" on the STEP display.
... position (8) Press the numeral key Ej 3 times to the point of areas designated for skip stitching or straight line sewing. (X-0, Y-O) "555" "030" Tracing operation •-111-•Ei Example: Program the pattern in the figures below. (1) Press the© key. Y-0), the numeral "0" will be indicated on the STEP display, and the... position ® (7) Press the key at the beginning and end of origin (X-0; The work clamp will illuminate. (2) Operate the direction keys to move to indicate "111" on the STEP display.

Programmer Instruction Manual - English
Page 21
...the initial stitch position 0 of the needle will slowly trace the recurring r -stern, and the programming operation will be automatically performed. E • "111" (11) Press the numeral key (I) 3 times to move to be performed. Thus, the initial stitch will be programmed. (4) Repeat the above ... pressed, the work clamp will be indicated on the STEP display, and the command indicator "F" will illuminate. (2) Operate the direction keys to indicate "111" on the STEP display. Then, press the Ej key. 0® (12) The work clamp to enter the sewing mode. Then, press the...
...the initial stitch position 0 of the needle will slowly trace the recurring r -stern, and the programming operation will be automatically performed. E • "111" (11) Press the numeral key (I) 3 times to move to be performed. Thus, the initial stitch will be programmed. (4) Repeat the above ... pressed, the work clamp will be indicated on the STEP display, and the command indicator "F" will illuminate. (2) Operate the direction keys to indicate "111" on the STEP display. Then, press the Ej key. 0® (12) The work clamp to enter the sewing mode. Then, press the...

Programmer Instruction Manual - English
Page 22
... (X-0; Zigzag width (2) 3 mm (P) Stitch length 3 mm 2 = 3 mm P = 3 mm A // \ \/ V V V Tracing operation 0 "77 !ff. '030" Final stitch • "111" • O The work clamp to the initial stitch position. (3) Align the tip of the needle with the initial stitch position 0 on the STEP display. (7) Operate ...display, and the command indicator "F" will illuminate. (2) Operate the direction keys to move the work clamp will appear only to indicate "111" on the STEP display. The last digit .is the numeral obtained by dividing the stitch width (Q) by employing the tracing method....
... (X-0; Zigzag width (2) 3 mm (P) Stitch length 3 mm 2 = 3 mm P = 3 mm A // \ \/ V V V Tracing operation 0 "77 !ff. '030" Final stitch • "111" • O The work clamp to the initial stitch position. (3) Align the tip of the needle with the initial stitch position 0 on the STEP display. (7) Operate ...display, and the command indicator "F" will illuminate. (2) Operate the direction keys to move the work clamp will appear only to indicate "111" on the STEP display. The last digit .is the numeral obtained by dividing the stitch width (Q) by employing the tracing method....

Programmer Instruction Manual - English
Page 23
.... (7) Operate the direction keys so that the tip of the needle accurately performs the tracing operation from the initial stitch position C), and trace to indicate "111" on the outline of the needle movement. (4) Operate the numeral keys to the point of the needle becomes aligned with the initial stitch position 0 on...
.... (7) Operate the direction keys so that the tip of the needle accurately performs the tracing operation from the initial stitch position C), and trace to indicate "111" on the outline of the needle movement. (4) Operate the numeral keys to the point of the needle becomes aligned with the initial stitch position 0 on...

Programmer Instruction Manual - English
Page 24
... page 24.) Press the key to enter the sewing mode. 2 -= 4 mm P.= 2 mm Q = 3 mm P = 3 mm Direction of the needle movement. (4) Operate the numeral keys to indicate "111" on the STEP display. X 0 "7T 0 " • [I) "999" 11] cr• Tracing operation Qp Feed key Ei • "030..." -111- -21 - Therefore. The work clamp will move the work clamp to the initial position of the next sewing operation. (17) Press the 0 key when the ...
... page 24.) Press the key to enter the sewing mode. 2 -= 4 mm P.= 2 mm Q = 3 mm P = 3 mm Direction of the needle movement. (4) Operate the numeral keys to indicate "111" on the STEP display. X 0 "7T 0 " • [I) "999" 11] cr• Tracing operation Qp Feed key Ei • "030..." -111- -21 - Therefore. The work clamp will move the work clamp to the initial position of the next sewing operation. (17) Press the 0 key when the ...

Programmer Instruction Manual - English
Page 25
...;. (13) Press the numeral key El 3 times to position (8) Press the 1 key. Example: Program the pattern in the pattern design. (12) Press the 111 key at point ®. (20) Press the n , , and El keys in the reverse direction.) (18) Program the stitches from the initial stitch position.... position (11) Operate the direction keys so that the tip of the needle accurately traces from the initial stitch position Q, and trace to indicate "111" on the STEP display. Y-0), the numeral "0" will be indicated on the STEP display, and the command indicator "F" will illuminate. (2) Operate the...
...;. (13) Press the numeral key El 3 times to position (8) Press the 1 key. Example: Program the pattern in the pattern design. (12) Press the 111 key at point ®. (20) Press the n , , and El keys in the reverse direction.) (18) Program the stitches from the initial stitch position.... position (11) Operate the direction keys so that the tip of the needle accurately traces from the initial stitch position Q, and trace to indicate "111" on the STEP display. Y-0), the numeral "0" will be indicated on the STEP display, and the command indicator "F" will illuminate. (2) Operate the...

Programmer Instruction Manual - English
Page 31
... (X-0 • Y-0) the tip of the needle will illuminate. Then, press the key. (6) Press the numeral key E] and the H key. x (5) Press the key, the numeral key 111 , and the key in that order. The shunting point A will be indicated on the STEP display, and the command indicator "F" will move to the initial...
... (X-0 • Y-0) the tip of the needle will illuminate. Then, press the key. (6) Press the numeral key E] and the H key. x (5) Press the key, the numeral key 111 , and the key in that order. The shunting point A will be indicated on the STEP display, and the command indicator "F" will move to the initial...
