

Programmer Instruction Manual - English
Page 3
... Presser Plate Blank, Presser Plate Holder and Work Clamp Crank (Option) 2 Other Optional Parts 2 Processing the Feed Plate 3 Sewing Examples 4 2. Button Sewing 20 Features 20 Sewing Patterns 20 Sewing Preparation 20 Replacement Parts 20 8. Table of Using the Work Clamp 24 Flap Seaming 12 Making the Clamp 12 Programming Procedure 13 Sewing 13 5. Bar Tacking 16 Programming Procedure 16 Work Clamp (Option) 16 One-touch Work Clamp (Option) 17 Other Stitching Patterns 18 7. Loop Sewing 22 Programming Procedure 22 Sewing Preparation 22 Work Clamp...
... Presser Plate Blank, Presser Plate Holder and Work Clamp Crank (Option) 2 Other Optional Parts 2 Processing the Feed Plate 3 Sewing Examples 4 2. Button Sewing 20 Features 20 Sewing Patterns 20 Sewing Preparation 20 Replacement Parts 20 8. Table of Using the Work Clamp 24 Flap Seaming 12 Making the Clamp 12 Programming Procedure 13 Sewing 13 5. Bar Tacking 16 Programming Procedure 16 Work Clamp (Option) 16 One-touch Work Clamp (Option) 17 Other Stitching Patterns 18 7. Loop Sewing 22 Programming Procedure 22 Sewing Preparation 22 Work Clamp...

Programmer Instruction Manual - English
Page 5
Basic Specifications Table for low and high speeds; spm) Stitch pitch and sewing speed Max. number of a problem Power supply Specifications Programmer Solenoid-type Air-type 1-phase:100V 3-phase:200V Solenoid-type Air-type Compressor (optional) YIN Programmer YIN Air-type Ift---(X)- '4 Sewing speed (max. Uses inner clamping device MAX 100 x 60 MIN 20 x 13 150 x 100 (L) 180 x 100 • Uses Inner clamping device MAX 150 x 90 MIN 20 x 13 X (L) MAX 180...
Basic Specifications Table for low and high speeds; spm) Stitch pitch and sewing speed Max. number of a problem Power supply Specifications Programmer Solenoid-type Air-type 1-phase:100V 3-phase:200V Solenoid-type Air-type Compressor (optional) YIN Programmer YIN Air-type Ift---(X)- '4 Sewing speed (max. Uses inner clamping device MAX 100 x 60 MIN 20 x 13 150 x 100 (L) 180 x 100 • Uses Inner clamping device MAX 150 x 90 MIN 20 x 13 X (L) MAX 180...
Programmer Instruction Manual - English
Page 11
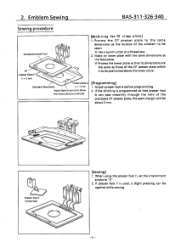
... the hole of the OT presser plate which is programmed so that its dimensions are the same as not to allow the lower plate to "0". 2. 2. presser plate C t = 2 mm Lower plate A Standard feed plate t = 1 mm Apply tape so as those of the processed OT presser plate, the seam margin will be applied while sewing. -5- When using the presser foot F, set the intermittent stroke to protrude. [Programming] 1. X Use a punch cutter or a thread saw. 2. Attach presser foot A before...
... the hole of the OT presser plate which is programmed so that its dimensions are the same as not to allow the lower plate to "0". 2. 2. presser plate C t = 2 mm Lower plate A Standard feed plate t = 1 mm Apply tape so as those of the processed OT presser plate, the seam margin will be applied while sewing. -5- When using the presser foot F, set the intermittent stroke to protrude. [Programming] 1. X Use a punch cutter or a thread saw. 2. Attach presser foot A before...

Programmer Instruction Manual - English
Page 18
... during sewing, sewing can be 5mm. Flap Seaming Making the Clamp BAS-326.340 1) When making the clamp, use the parts provided as cassette-type optional parts. • Cassette plate U-A (t = 1) 502968-001 • Cassette plate U-B (t = 2) 502971-001 1 Cassette plate D-A 502966-001 2 Butterfly program (right) 152632-001 3 Butterfly program (left) 152633-001 gar 2) When using presser foot A for processing. NOTE: Use a punch cutter or a thread saw for sewing, because the outside diameter of presser foot...
... during sewing, sewing can be 5mm. Flap Seaming Making the Clamp BAS-326.340 1) When making the clamp, use the parts provided as cassette-type optional parts. • Cassette plate U-A (t = 1) 502968-001 • Cassette plate U-B (t = 2) 502971-001 1 Cassette plate D-A 502966-001 2 Butterfly program (right) 152632-001 3 Butterfly program (left) 152633-001 gar 2) When using presser foot A for processing. NOTE: Use a punch cutter or a thread saw for sewing, because the outside diameter of presser foot...
Programmer Instruction Manual - English
Page 19
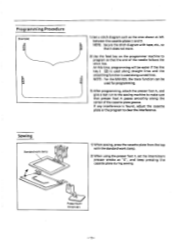
... not move. 2) Use the feed key on the programmer machine to make sure that the end of the cassette plate groove. NOTE: Secure the stitch diagram with the standard work clamp e e 1) Set a stitch diagram such as the ones shown at "0", and keep pressing the cassette plate during sewing. At this time, programming will be used along the center of the needle follows the stitch line. ti Presser foot F 157237.001...
... not move. 2) Use the feed key on the programmer machine to make sure that the end of the cassette plate groove. NOTE: Secure the stitch diagram with the standard work clamp e e 1) Set a stitch diagram such as the ones shown at "0", and keep pressing the cassette plate during sewing. At this time, programming will be used along the center of the needle follows the stitch line. ti Presser foot F 157237.001...

Programmer Instruction Manual - English
Page 21
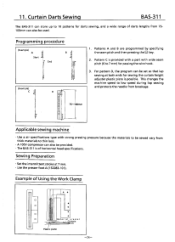
... reconfirm the position of the work clamp blank, then the material will be firmly clamped and sewing can be released from the final stitch position in seam A to the initial stitch position in the specified position. • If the foot switch is pressed to p. 6) -15- ........ End 0 0 0 0 0 A B Thin rubber [Sewing] 1) This program enables the presser foot to be lifted at A, it will stop the sewing machine. Seam B will be...
... reconfirm the position of the work clamp blank, then the material will be firmly clamped and sewing can be released from the final stitch position in seam A to the initial stitch position in the specified position. • If the foot switch is pressed to p. 6) -15- ........ End 0 0 0 0 0 A B Thin rubber [Sewing] 1) This program enables the presser foot to be lifted at A, it will stop the sewing machine. Seam B will be...
Programmer Instruction Manual - English
Page 26
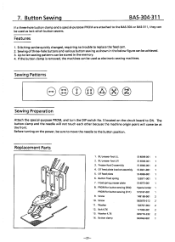
.... Button Sewing BAS-304.311 If a three-hole button clamp and a special-purpose PROM are attached to the BAS-304 or BAS-311, they can be quickly changed, requiring no trouble to the button position. Stitching can be sure to move the needle to replace the feed cam. 2. Sewing Patterns 0-0 0-0 0-0 z Sewing Preparation Attach the special-purpose PROM, and turn the DIP switch No. 5 located on the power, be used as lock stitch button sewers. Replacement Parts 0 0 0 C.. 0 1. BU presser foot UL 2. Presser foot D assembly 4. Button float spring...
.... Button Sewing BAS-304.311 If a three-hole button clamp and a special-purpose PROM are attached to the BAS-304 or BAS-311, they can be quickly changed, requiring no trouble to the button position. Stitching can be sure to move the needle to replace the feed cam. 2. Sewing Patterns 0-0 0-0 0-0 z Sewing Preparation Attach the special-purpose PROM, and turn the DIP switch No. 5 located on the power, be used as lock stitch button sewers. Replacement Parts 0 0 0 C.. 0 1. BU presser foot UL 2. Presser foot D assembly 4. Button float spring...

Programmer Instruction Manual - English
Page 27
Basting Programming Procedure (Example 1) 8 3 2 7 L 5 L. 999. F (Example 2) 1 2 999. F L 11 10 12 L. 999. Use the jog key to move the clamp to clear the display of the programming machine. After "999" is displayed in "111 E". 10. ork Clamp L 513091-001 Feed plate 513092-001 Work Clamp R 513090-001 -21- F 4 7 8 5 6 BAS-304.311 1. Program by pressing the E key. 4. Press the 0 key to the sewing start position. 11...
Basting Programming Procedure (Example 1) 8 3 2 7 L 5 L. 999. F (Example 2) 1 2 999. F L 11 10 12 L. 999. Use the jog key to move the clamp to clear the display of the programming machine. After "999" is displayed in "111 E". 10. ork Clamp L 513091-001 Feed plate 513092-001 Work Clamp R 513090-001 -21- F 4 7 8 5 6 BAS-304.311 1. Program by pressing the E key. 4. Press the 0 key to the sewing start position. 11...

Programmer Instruction Manual - English
Page 28
Prepare a stitching pattern, and program for easier programming. 2. 9. Turn the DIP switch No. 2 located on the circuit board to 4.0 mm. Use the presser foot A. Loop Sewing Programming procedure (Example) Start BAS-304-311 1. ti Work Clamp Feed plate S13098-001 5 e 0 e Work damp L 513097-001 Work clamp R 513096-001 Presser foot A 152283-101 2. The seam pitch for the linear part and the zigzag End part covered by cross stitching should preferably be 3.0 to ON, and...
Prepare a stitching pattern, and program for easier programming. 2. 9. Turn the DIP switch No. 2 located on the circuit board to 4.0 mm. Use the presser foot A. Loop Sewing Programming procedure (Example) Start BAS-304-311 1. ti Work Clamp Feed plate S13098-001 5 e 0 e Work damp L 513097-001 Work clamp R 513096-001 Presser foot A 152283-101 2. The seam pitch for the linear part and the zigzag End part covered by cross stitching should preferably be 3.0 to ON, and...
Programmer Instruction Manual - English
Page 30
... changes the machine speed to low speed during lap sewing and protects the needle from breakage. 75-100MM Applicable sewing machine • Use a air specifications type with wide seam pitch (6 to be sewed vary from 75100mm can also be set so that lap sewing at 7 mm. • Use the presser foot A (152283-101). Pattern C is provided with a part with strong pressing pressure because the materials to 7 mm) for passing the wire hook...
... changes the machine speed to low speed during lap sewing and protects the needle from breakage. 75-100MM Applicable sewing machine • Use a air specifications type with wide seam pitch (6 to be sewed vary from 75100mm can also be set so that lap sewing at 7 mm. • Use the presser foot A (152283-101). Pattern C is provided with a part with strong pressing pressure because the materials to 7 mm) for passing the wire hook...
Programmer Instruction Manual - English
Page 53
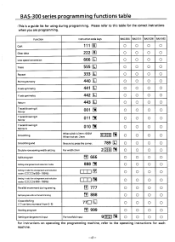
... N o o o 0 When pitch is a guide list for using during sewing E-1 El EI 777 O O O O o o o O O O O O Split program with no thread trimming M 888 O O O O Cross stitching (O can be a numeral from 0- 9) Basting program Setting enlargement input 77O RI O O O O El 999 O O O O For twofold input 902 N o o o o For instructions on operating the programming machine, refer to this table for the correct instructions when you are programming. BAS-300 series programming functions table • This is 3mm...
... N o o o 0 When pitch is a guide list for using during sewing E-1 El EI 777 O O O O o o o O O O O O Split program with no thread trimming M 888 O O O O Cross stitching (O can be a numeral from 0- 9) Basting program Setting enlargement input 77O RI O O O O El 999 O O O O For twofold input 902 N o o o o For instructions on operating the programming machine, refer to this table for the correct instructions when you are programming. BAS-300 series programming functions table • This is 3mm...
Programmer Instruction Manual - English
Page 6
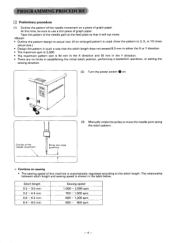
... 2, 5, or 10 times actual size.) • Design the pattern in the table below. Note • Outline the pattern design to actual size. (If an enlarged pattern is 50 mm in the X direction and 50 mm in the Y direction. • There are no limits in establishing the initial stitch position, performing a backstitch operation, or setting the sewing direction. (2) Turn the power switch Q on sewing • The sewing speed of graph paper. Stitch length 0.2 - 3.0 mm...
... 2, 5, or 10 times actual size.) • Design the pattern in the table below. Note • Outline the pattern design to actual size. (If an enlarged pattern is 50 mm in the X direction and 50 mm in the Y direction. • There are no limits in establishing the initial stitch position, performing a backstitch operation, or setting the sewing direction. (2) Turn the power switch Q on sewing • The sewing speed of graph paper. Stitch length 0.2 - 3.0 mm...

Programmer Instruction Manual - English
Page 7
... actual pattern. (1) Prepare the pattern used , the display should be set for programming. (This should read "9O5". (X-0, Y-0) (4) Press the 1 key. (5) Use the direction keys to the initial stitch position. (3) When the tip of the needle and the initial stitch position on the STEP display, and the command indicator "F" will illuminate. (2) Operate the direction keys to move the work clamp will move back to the initial stitch position...
... actual pattern. (1) Prepare the pattern used , the display should be set for programming. (This should read "9O5". (X-0, Y-0) (4) Press the 1 key. (5) Use the direction keys to the initial stitch position. (3) When the tip of the needle and the initial stitch position on the STEP display, and the command indicator "F" will illuminate. (2) Operate the direction keys to move the work clamp will move back to the initial stitch position...

Programmer Instruction Manual - English
Page 8
... the pattern in the figure below. (1) Press the©key. Y-0), the numeral "0" will be set the proper stitch length when the actual stitch length is 3 mm, use the LI key (Line key) to facilitate the programming operation. O• •® 8 OO 0 • El (6) Use the direction keys to move the work clamp to the final stitch position ©on the outline of the needle movement...
... the pattern in the figure below. (1) Press the©key. Y-0), the numeral "0" will be set the proper stitch length when the actual stitch length is 3 mm, use the LI key (Line key) to facilitate the programming operation. O• •® 8 OO 0 • El (6) Use the direction keys to move the work clamp to the final stitch position ©on the outline of the needle movement...

Programmer Instruction Manual - English
Page 12
... the sewing mode. Then, press the LJ key. (10) The work clamp will illuminate. (2) Operate the direction keys to move the work clamp to the initial stitch position. (3) When the tip of the needle and the initial stitch position 0 on the outline of the needle movement become aligned, press the key. Pattern 1 (=> Feed key Pattern 1 Pattern 2 I -111 • (6) Operate the direction keys to move the work clamp to the initial stitch position of pattern...
... the sewing mode. Then, press the LJ key. (10) The work clamp will illuminate. (2) Operate the direction keys to move the work clamp to the initial stitch position. (3) When the tip of the needle and the initial stitch position 0 on the outline of the needle movement become aligned, press the key. Pattern 1 (=> Feed key Pattern 1 Pattern 2 I -111 • (6) Operate the direction keys to move the work clamp to the initial stitch position of pattern...

Programmer Instruction Manual - English
Page 15
... time, if the presser-lifter pedal is only required to program one-half of the pattern and use of the numeral keys to program the remaining half of the needle becomes aligned with point ®, press the numeral key 0 3 times to program pattern (443). (X-0, Y-0) -111- (11 • "442" "440" "441" "443" To program a symmetrical pattern design, the operator is pressed, the work clamp...
... time, if the presser-lifter pedal is only required to program one-half of the pattern and use of the numeral keys to program the remaining half of the needle becomes aligned with point ®, press the numeral key 0 3 times to program pattern (443). (X-0, Y-0) -111- (11 • "442" "440" "441" "443" To program a symmetrical pattern design, the operator is pressed, the work clamp...

Programmer Instruction Manual - English
Page 20
... needle, starting from the initial stitch position ® (7) Press the key at the beginning and end of origin (X-0; Then, press the key. (9) The work clamp will illuminate. (2) Operate the direction keys to enter the sewing mode. Example: Program the pattern in the figures below. (1) Press the© key. g The El and keys can easily be set the proper stitch length when the actual stitch length...
... needle, starting from the initial stitch position ® (7) Press the key at the beginning and end of origin (X-0; Then, press the key. (9) The work clamp will illuminate. (2) Operate the direction keys to enter the sewing mode. Example: Program the pattern in the figures below. (1) Press the© key. g The El and keys can easily be set the proper stitch length when the actual stitch length...

Programmer Instruction Manual - English
Page 22
... proper pitch. To program a zigzag operation. The work clamp to the point of the sewing,material. The last digit .is necessary to establish the proper direction of the tracing operation according to indicate "77 " on the STEP display. Note Set the zigzag width and stitch length so that the tip of the needle accurately traces the pattern design, starting from the initial stitch position O. (8) Press the key...
... proper pitch. To program a zigzag operation. The work clamp to the point of the sewing,material. The last digit .is necessary to establish the proper direction of the tracing operation according to indicate "77 " on the STEP display. Note Set the zigzag width and stitch length so that the tip of the needle accurately traces the pattern design, starting from the initial stitch position O. (8) Press the key...

Programmer Instruction Manual - English
Page 30
... work clamp will move to the initial stitch position of the program. (5) Press the l key, and then operate the direction keys to move to the point of the needle to the initial stitch position. x (5) Press either the key, and then operate the direction keys to move to the initial stitch (X-0 • Y-0) position. Note Establish the number of the pattern which has already been programmed. (1) Set the power...
... work clamp will move to the initial stitch position of the program. (5) Press the l key, and then operate the direction keys to move to the point of the needle to the initial stitch position. x (5) Press either the key, and then operate the direction keys to move to the initial stitch (X-0 • Y-0) position. Note Establish the number of the pattern which has already been programmed. (1) Set the power...

Programmer Instruction Manual - English
Page 33
... results in zigzag patterns and with Pattern A Pattern B Pattern C the first stitch of the selected stitch length. Thus, point 8 and 7 will move the needle tip to point 3, and use the number keys to display that the needle tip aligns with extremely thick materials. (1 ) Input "112" [1] at a time. The work clamp will remain as in the middle of consecutively programmed patterns (1) Set the power source switch to a constant speed, however...
... results in zigzag patterns and with Pattern A Pattern B Pattern C the first stitch of the selected stitch length. Thus, point 8 and 7 will move the needle tip to point 3, and use the number keys to display that the needle tip aligns with extremely thick materials. (1 ) Input "112" [1] at a time. The work clamp will remain as in the middle of consecutively programmed patterns (1) Set the power source switch to a constant speed, however...


