
User Guide
Page 4
... American Express credit card, you can order accessories directly from Brother. (In the USA, you can get instant answers to common technical questions and product information for all Brother products. Brother fax back system (USA only) Brother has installed an easy-to-use fax back system, so ...available for purchase.) In USA: 1-888-879-3232 (voice) 1-800-947-1445 (fax) http://www.brothermall.com In Canada: 1-877-BROTHER (voice) Description Toner Cartridge Drum Unit IEEE-1284 Bi-directional Cable Paper Tray #2 (Option) User's Guide Quick Setup Guide Item TN-550 (Standard, Prints approx. ...
... American Express credit card, you can order accessories directly from Brother. (In the USA, you can get instant answers to common technical questions and product information for all Brother products. Brother fax back system (USA only) Brother has installed an easy-to-use fax back system, so ...available for purchase.) In USA: 1-888-879-3232 (voice) 1-800-947-1445 (fax) http://www.brothermall.com In Canada: 1-877-BROTHER (voice) Description Toner Cartridge Drum Unit IEEE-1284 Bi-directional Cable Paper Tray #2 (Option) User's Guide Quick Setup Guide Item TN-550 (Standard, Prints approx. ...

User Guide
Page 6
Brother® Three-Year Limited Warranty and Exchange Service For DCP-8060 and DCP-8065DN (USA only) Who is covered: „ This limited warranty ("warranty") is given only to the original end-use/retail purchaser (referred to in this warranty ... under normal conditions. „ This warranty applies only to products purchased and used (including but not limited to toner, drums, print heads and ink cartridges. „ Except as Paper Feeding Kit, Fuser and Laser Units. and, 5 Problems arising from use , misuse, neglect or accident (including but not limited to floor models or...
Brother® Three-Year Limited Warranty and Exchange Service For DCP-8060 and DCP-8065DN (USA only) Who is covered: „ This limited warranty ("warranty") is given only to the original end-use/retail purchaser (referred to in this warranty ... under normal conditions. „ This warranty applies only to products purchased and used (including but not limited to toner, drums, print heads and ink cartridges. „ Except as Paper Feeding Kit, Fuser and Laser Units. and, 5 Problems arising from use , misuse, neglect or accident (including but not limited to floor models or...

User Guide
Page 9
...proper packaging.) For ink-jet products: Do not remove the ink cartridges during shipping. For laser products: Failure to remove the Toner Cartridge (and Toner Drum Unit on applicable models) during shipping will cause severe damage to the MFC/Facsimile and will ... the development, production, or delivery of this warranty. Warranty Service is available at Brother Authorized Service Centers throughout Canada. Internet support: support@brother.ca or browse Brother's Web Site: www.brother.com Brother International Corporation (Canada) Ltd. 1 Rue Hôtel de Ville Dollard-Des-Ormeaux, ...
...proper packaging.) For ink-jet products: Do not remove the ink cartridges during shipping. For laser products: Failure to remove the Toner Cartridge (and Toner Drum Unit on applicable models) during shipping will cause severe damage to the MFC/Facsimile and will ... the development, production, or delivery of this warranty. Warranty Service is available at Brother Authorized Service Centers throughout Canada. Internet support: support@brother.ca or browse Brother's Web Site: www.brother.com Brother International Corporation (Canada) Ltd. 1 Rue Hôtel de Ville Dollard-Des-Ormeaux, ...

User Guide
Page 12
... Cleaning the outside of the machine 68 Cleaning the scanner glass 69 Cleaning the laser scanner window 70 Cleaning the corona wire 71 Cleaning the drum unit 72 Replacing the toner cartridge (TN-550/TN-580 73 Replacing the toner... cartridge 74 Replacing the drum unit (DR-520 76 Replacing periodic maintenance parts 78 Packing and shipping the machine 79 ... Scan...94 Print ...95 Interfaces ...95 Computer requirements 96 Consumable items 97 Ethernet wired network (DCP-8065DN only 98 F Glossary Glossary...99 G Index Index ...100 x
... Cleaning the outside of the machine 68 Cleaning the scanner glass 69 Cleaning the laser scanner window 70 Cleaning the corona wire 71 Cleaning the drum unit 72 Replacing the toner cartridge (TN-550/TN-580 73 Replacing the toner... cartridge 74 Replacing the drum unit (DR-520 76 Replacing periodic maintenance parts 78 Packing and shipping the machine 79 ... Scan...94 Print ...95 Interfaces ...95 Computer requirements 96 Consumable items 97 Ethernet wired network (DCP-8065DN only 98 F Glossary Glossary...99 G Index Index ...100 x
User Guide
Page 63
... or the primary corona wire for printing may be made from within that country. Right-click 'Brother DCP-XXXX (where XXXX is dirty. If you are installed properly. (See Replacing the drum unit (DR-520) on page 76.) „ Check the interface cable connection on page 59... that 'Use Printer Offline' is online. Clean your model name)'. C Troubleshooting and routine maintenance C Troubleshooting C IMPORTANT For technical help , the Brother Solutions Center offers the latest FAQs and troubleshooting tips. If the copy looks good, the problem is a problem with the way your PC, click...
... or the primary corona wire for printing may be made from within that country. Right-click 'Brother DCP-XXXX (where XXXX is dirty. If you are installed properly. (See Replacing the drum unit (DR-520) on page 76.) „ Check the interface cable connection on page 59... that 'Use Printer Offline' is online. Clean your model name)'. C Troubleshooting and routine maintenance C Troubleshooting C IMPORTANT For technical help , the Brother Solutions Center offers the latest FAQs and troubleshooting tips. If the copy looks good, the problem is a problem with the way your PC, click...
User Guide
Page 67
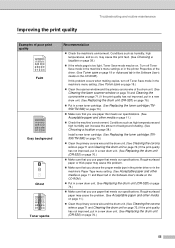
...environment. Turn off Toner Save mode in the machine's menu setting. (See Toner save on page 19 or Advanced tab in a new drum unit. (See Replacing the drum unit (DR-520) on page 76.) „ Make sure that meets our specifications. (See Acceptable paper and other media on page 11...Software User's Guide on the CD-ROM.) „ Put in a new drum unit. (See Replacing the drum unit (DR-520) on . Improving the print quality Troubleshooting and routine maintenance C Examples of the drum unit. (See Cleaning the laser scanner window on page 70 and Cleaning the corona wire on page 71.) If...
...environment. Turn off Toner Save mode in the machine's menu setting. (See Toner save on page 19 or Advanced tab in a new drum unit. (See Replacing the drum unit (DR-520) on page 76.) „ Make sure that meets our specifications. (See Acceptable paper and other media on page 11...Software User's Guide on the CD-ROM.) „ Put in a new drum unit. (See Replacing the drum unit (DR-520) on . Improving the print quality Troubleshooting and routine maintenance C Examples of the drum unit. (See Cleaning the laser scanner window on page 70 and Cleaning the corona wire on page 71.) If...

User Guide
Page 68
... documents after making multiple copies, clean the drum unit (see Cleaning the drum unit on page 11.) „ If you use label sheets for laser printers, the glue from the sheets may be damaged. „ The drum unit may stick to the surface of the photosensitive drum (OPC) and cause black or white spots... to the OPC drum surface. Put in the Software User's Guide on the CD...
... documents after making multiple copies, clean the drum unit (see Cleaning the drum unit on page 11.) „ If you use label sheets for laser printers, the glue from the sheets may be damaged. „ The drum unit may stick to the surface of the photosensitive drum (OPC) and cause black or white spots... to the OPC drum surface. Put in the Software User's Guide on the CD...

User Guide
Page 69
... other print media is at 1-800-284-4329 (in USA) or 1-877-BROTHER (in Canada). ABCDEFGH abcdefghijk ABCD abcde 01234 „ Clean the laser scanner window with a soft cloth. (See Cleaning the laser scanner window on page 70.) „ The drum unit may be damaged. Troubleshooting and routine maintenance Examples of poor print quality...
... other print media is at 1-800-284-4329 (in USA) or 1-877-BROTHER (in Canada). ABCDEFGH abcdefghijk ABCD abcde 01234 „ Clean the laser scanner window with a soft cloth. (See Cleaning the laser scanner window on page 70.) „ The drum unit may be damaged. Troubleshooting and routine maintenance Examples of poor print quality...

User Guide
Page 71
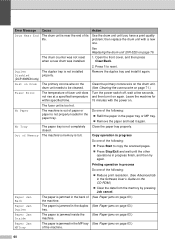
... machine spinning and that you will hear the cooling fan running while the LCD shows Cooling Down, and Wait for a while The temperature of the drum unit or toner cartridge is not closed completely. The document cover is any sophisticated office product, errors may occur. Remove jammed paper if there is...
... machine spinning and that you will hear the cooling fan running while the LCD shows Cooling Down, and Wait for a while The temperature of the drum unit or toner cartridge is not closed completely. The document cover is any sophisticated office product, errors may occur. Remove jammed paper if there is...
User Guide
Page 72
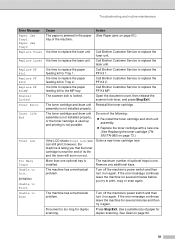
... Jam MPTray The paper is not installed Disabled properly. (DCP-8065DN only) Dust on Drum The primary corona wire on . The paper is jammed in progress Do one . Error Message Drum Near End Cause The drum unit is not completely closed. See Replacing the drum unit (DR-520) on again. Open the front cover... off, wait a few seconds, not rise at a specified temperature and then turn it on page 76 The drum counter was not reset when a new drum was installed. 1. Action Use the drum unit until the other operations in the MP tray (See Paper jams on the CD-ROM.) „ Clear ...
... Jam MPTray The paper is not installed Disabled properly. (DCP-8065DN only) Dust on Drum The primary corona wire on . The paper is jammed in progress Do one . Error Message Drum Near End Cause The drum unit is not completely closed. See Replacing the drum unit (DR-520) on again. Open the front cover... off, wait a few seconds, not rise at a specified temperature and then turn it on page 76 The drum counter was not reset when a new drum was installed. 1. Action Use the drum unit until the other operations in the MP tray (See Paper jams on the CD-ROM.) „ Clear ...
User Guide
Page 73
... error message continues leave the machine for duplex scanning. It is time to replace the PF Kit 1. Call Brother Customer Service to replace the laser unit. The toner cartridge and drum unit assembly is not installed properly, or the toner cartridge is used up and printing is near the end of... the machine. Reinstall the toner cartridge. The machine has a mechanical problem. It is time to replace the laser unit. however, ...
... error message continues leave the machine for duplex scanning. It is time to replace the PF Kit 1. Call Brother Customer Service to replace the laser unit. The toner cartridge and drum unit assembly is not installed properly, or the toner cartridge is used up and printing is near the end of... the machine. Reinstall the toner cartridge. The machine has a mechanical problem. It is time to replace the laser unit. however, ...

User Guide
Page 76
e Put the drum unit and toner cartridge assembly back in the illustration. CAUTION To prevent damage to open the front cover. The jammed paper may be pulled out with the toner cartridge and drum unit assembly, or this may release the paper so you can pull it out of the paper tray opening. d Slowly take out the drum unit and toner cartridge assembly. c Press the cover release lever to the machine from static electricity, DO NOT touch the electrodes shown in the machine. g Put the paper tray firmly back in the machine. 64 f Close the front cover.
e Put the drum unit and toner cartridge assembly back in the illustration. CAUTION To prevent damage to open the front cover. The jammed paper may be pulled out with the toner cartridge and drum unit assembly, or this may release the paper so you can pull it out of the paper tray opening. d Slowly take out the drum unit and toner cartridge assembly. c Press the cover release lever to the machine from static electricity, DO NOT touch the electrodes shown in the machine. g Put the paper tray firmly back in the machine. 64 f Close the front cover.

User Guide
Page 77
Paper is jammed at the left and right hand sides toward you to open the fuser cover (1). 1 b Take out the drum unit and toner cartridge assembly. e Using both hands, gently pull the jammed paper out of the machine C a Press the cover release lever to open the front cover. f Close the back cover. 65 c Open the back cover. Troubleshooting and routine maintenance d Pull the tabs at the back of the fuser unit.
Paper is jammed at the left and right hand sides toward you to open the fuser cover (1). 1 b Take out the drum unit and toner cartridge assembly. e Using both hands, gently pull the jammed paper out of the machine C a Press the cover release lever to open the front cover. f Close the back cover. 65 c Open the back cover. Troubleshooting and routine maintenance d Pull the tabs at the back of the fuser unit.

User Guide
Page 78
h Close the front cover. Paper is jammed in the duplex tray (DCP-8065DN only) C a Pull the duplex tray completely out of the machine or the duplex tray. b Pull the jammed paper out of the machine. c Put the duplex tray back in the machine. g Put the drum unit and toner cartridge assembly back in the machine. 66
h Close the front cover. Paper is jammed in the duplex tray (DCP-8065DN only) C a Pull the duplex tray completely out of the machine or the duplex tray. b Pull the jammed paper out of the machine. c Put the duplex tray back in the machine. g Put the drum unit and toner cartridge assembly back in the machine. 66

User Guide
Page 79
...on the right and take the toner cartridge out of the drum unit. f Close the front cover. 67 b Take out the drum unit and toner cartridge assembly. Take out the jammed paper if there is jammed inside the drum unit. Troubleshooting and routine maintenance d Put the toner cartridge ...back into the drum unit until you put it lock into place. Paper is any inside the drum unit and toner cartridge assembly C a Press the cover release ...
...on the right and take the toner cartridge out of the drum unit. f Close the front cover. 67 b Take out the drum unit and toner cartridge assembly. Take out the jammed paper if there is jammed inside the drum unit. Troubleshooting and routine maintenance d Put the toner cartridge ...back into the drum unit until you put it lock into place. Paper is any inside the drum unit and toner cartridge assembly C a Press the cover release ...

User Guide
Page 80
Routine maintenance C CAUTION The drum unit contains toner, so handle it off with a soft cloth to remove dirt from the control panel. Cleaning with volatile liquids such as follows: C a Pull ...
Routine maintenance C CAUTION The drum unit contains toner, so handle it off with a soft cloth to remove dirt from the control panel. Cleaning with volatile liquids such as follows: C a Pull ...

User Guide
Page 82
...NOT touch the electrodes shown in the illustration. 70 When you have just used the machine, some internal parts of the machine, DO NOT touch the shaded parts shown in the illustration. Cleaning the laser scanner window C CAUTION DO NOT use isopropyl alcohol. b Open the front cover and take out the... drum unit and toner cartridge assembly. HOT SURFACE 1 After you open the front cover of the machine ...
...NOT touch the electrodes shown in the illustration. 70 When you have just used the machine, some internal parts of the machine, DO NOT touch the shaded parts shown in the illustration. Cleaning the laser scanner window C CAUTION DO NOT use isopropyl alcohol. b Open the front cover and take out the... drum unit and toner cartridge assembly. HOT SURFACE 1 After you open the front cover of the machine ...

User Guide
Page 83
...machine's power cord back into the machine. b Clean the primary corona wire inside the drum unit by gently sliding the blue tab from right to left and left to right several times. 1 71 d Put the drum unit and toner cartridge assembly back into the AC power outlet. Turn on a piece ...of disposable paper or cloth in case you put the drum unit and toner cartridge assembly on the machine's power switch. Troubleshooting and routine maintenance Cleaning the corona wire C We recommend that you accidentally ...
...machine's power cord back into the machine. b Clean the primary corona wire inside the drum unit by gently sliding the blue tab from right to left and left to right several times. 1 71 d Put the drum unit and toner cartridge assembly back into the AC power outlet. Turn on a piece ...of disposable paper or cloth in case you put the drum unit and toner cartridge assembly on the machine's power switch. Troubleshooting and routine maintenance Cleaning the corona wire C We recommend that you accidentally ...

User Guide
Page 84
... and toner cartridge assembly back in front of the drum unit, and find the exact position of the OPC drum (1). 1 72 Cleaning the drum unit C a Take out the drum unit and toner cartridge assembly, and then take out the toner cartridge from the drum unit. e Close the front cover. c Turn the white gear on them... the machine. CAUTION If you do not return the blue tab to the home position (b) your printed pages may have vertical black stripes on the drum as you check the surface of the poor print.
... and toner cartridge assembly back in front of the drum unit, and find the exact position of the OPC drum (1). 1 72 Cleaning the drum unit C a Take out the drum unit and toner cartridge assembly, and then take out the toner cartridge from the drum unit. e Close the front cover. c Turn the white gear on them... the machine. CAUTION If you do not return the blue tab to the home position (b) your printed pages may have vertical black stripes on the drum as you check the surface of the poor print.

User Guide
Page 85
...Be sure to seal up the toner cartridge tightly so that you clean the machine and corona wire of the drum unit when you replace the toner cartridge. (See Cleaning the laser scanner window on page 70 and Cleaning the corona wire on your local waste disposal office. We recommend that... graphics). Discard the used toner cartridge according to keep a new toner cartridge ready for use a scrubbing or wiping motion because this might damage the drum. Do not use when you have questions, call your average type of the cartridge. The machine is a good idea to local regulations, keeping it...
...Be sure to seal up the toner cartridge tightly so that you clean the machine and corona wire of the drum unit when you replace the toner cartridge. (See Cleaning the laser scanner window on page 70 and Cleaning the corona wire on your local waste disposal office. We recommend that... graphics). Discard the used toner cartridge according to keep a new toner cartridge ready for use a scrubbing or wiping motion because this might damage the drum. Do not use when you have questions, call your average type of the cartridge. The machine is a good idea to local regulations, keeping it...


