
Operation Manual
Page 2
...adjustments mentioned in this manual. Do not pull or push fabric while stitching. To disconnect, turn it is not intended for its intended use outdoors. 7. IMPORTANT SAFETY INSTRUCTIONS When using this machine. DANGER - The machine should always be left unattended while plugged in this manual. 3. Always..., or injury to break. 14. Never operate this machine only for use . 1 Do not use as a toy. It may deflect the needle, causing it has been dropped or damaged, or dropped into any air openings blocked. This sewing machine is not working properly, if it to persons: 1....
...adjustments mentioned in this manual. Do not pull or push fabric while stitching. To disconnect, turn it is not intended for its intended use outdoors. 7. IMPORTANT SAFETY INSTRUCTIONS When using this machine. DANGER - The machine should always be left unattended while plugged in this manual. 3. Always..., or injury to break. 14. Never operate this machine only for use . 1 Do not use as a toy. It may deflect the needle, causing it has been dropped or damaged, or dropped into any air openings blocked. This sewing machine is not working properly, if it to persons: 1....
Operation Manual
Page 5
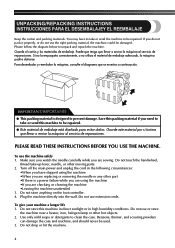
...you have to take or send this packing material if you are checking or cleaning the machine •Leaving the machine unattended 3. Benzene, thinner, and scouring powders can damage the case and machine, and should never be repaired. ● Este material de embalaje está dise&#...reparaciones. Do not use extension cords. If you are sewing. To use the right packing material, the machine could be repaired. Save this machine to be damaged. Use only mild soaps or detergents to unpack and repack the machine. Do not store anything on the foot controller. ...
...you have to take or send this packing material if you are checking or cleaning the machine •Leaving the machine unattended 3. Benzene, thinner, and scouring powders can damage the case and machine, and should never be repaired. ● Este material de embalaje está dise&#...reparaciones. Do not use extension cords. If you are sewing. To use the right packing material, the machine could be repaired. Save this machine to be damaged. Use only mild soaps or detergents to unpack and repack the machine. Do not store anything on the foot controller. ...
Operation Manual
Page 7
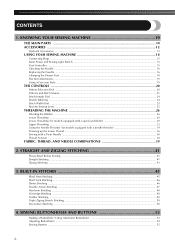
... the Needle ...16 Changing the Presser Foot ...18 Flat Bed Attachment ...19 Using a Free-arm Style ...19 THE CONTROLS ...20 Pattern Selection Dial ...20 Patterns and Stitch Names ...21 Stitch Length Dial ...24 Stretch Stitching ...24 Stitch Width Dial ...25 Reverse Sewing Lever ...25 THREADING THE MACHINE 26 Winding the Bobbin ...26 Lower Threading ...28 Lower Threading (for models equipped...
... the Needle ...16 Changing the Presser Foot ...18 Flat Bed Attachment ...19 Using a Free-arm Style ...19 THE CONTROLS ...20 Pattern Selection Dial ...20 Patterns and Stitch Names ...21 Stitch Length Dial ...24 Stretch Stitching ...24 Stitch Width Dial ...25 Reverse Sewing Lever ...25 THREADING THE MACHINE 26 Winding the Bobbin ...26 Lower Threading ...28 Lower Threading (for models equipped...
Operation Manual
Page 11
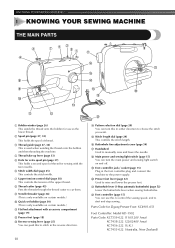
...thread onto the bobbin and then threading the machine. 4 Thread take-up lever (page 33) 5 Hole for extra spool pin (page 37) This holds a second spool of thread for sewing with the twin needle. 6 Stitch width dial (page 25) This controls the stitch width. 7 Upper tension-control dial (page ... needle. F Buttonhole fine-adjustment screw (page 54) G Handwheel Used to start and stop sewing. J Presser foot lever (page 32) Used to choose the stitch you want. KNOWING YOUR SEWING MACHINE 1 KNOWING YOUR SEWING MACHINE THE MAIN PARTS 1 Bobbin winder (page 26) This winds the thread onto the bobbin for...
...thread onto the bobbin and then threading the machine. 4 Thread take-up lever (page 33) 5 Hole for extra spool pin (page 37) This holds a second spool of thread for sewing with the twin needle. 6 Stitch width dial (page 25) This controls the stitch width. 7 Upper tension-control dial (page ... needle. F Buttonhole fine-adjustment screw (page 54) G Handwheel Used to start and stop sewing. J Presser foot lever (page 32) Used to choose the stitch you want. KNOWING YOUR SEWING MACHINE 1 KNOWING YOUR SEWING MACHINE THE MAIN PARTS 1 Bobbin winder (page 26) This winds the thread onto the bobbin for...
Operation Manual
Page 13
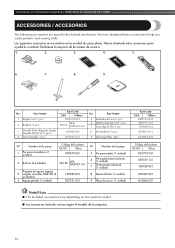
...7 Portacarrete adicional (1 unidad) 8 Destornillador (1 unidad) 9 Placa de zurcir (1 unidad) Código de la pieza EE.UU. KNOWING YOUR SEWING MACHINE / CONOZCA SU MÁQUINA DE COSER ACCESSORIES / ACCESORIOS The following accessories are stored in the flat bed attachment. We have designed these accessories ...to help you easily perform most sewing tasks. Part Name 5 Buttonhole Foot (1 pc.) 6 Button Sewing Foot (1 pc.) 7 Extra Spool Pin (1 pc.) 8 Screwdriver (1 pc.) 9 Darning Plate (1pc.) ...
...7 Portacarrete adicional (1 unidad) 8 Destornillador (1 unidad) 9 Placa de zurcir (1 unidad) Código de la pieza EE.UU. KNOWING YOUR SEWING MACHINE / CONOZCA SU MÁQUINA DE COSER ACCESSORIES / ACCESORIOS The following accessories are stored in the flat bed attachment. We have designed these accessories ...to help you easily perform most sewing tasks. Part Name 5 Buttonhole Foot (1 pc.) 6 Button Sewing Foot (1 pc.) 7 Extra Spool Pin (1 pc.) 8 Screwdriver (1 pc.) 9 Darning Plate (1pc.) ...
Operation Manual
Page 19
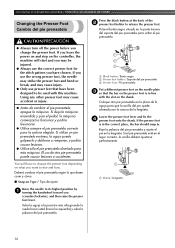
...; Only use the correct presser foot for the stitch pattern you have chosen. Press the black button at the back of the 2 presser foot holder to sew and how. Si el pie prensatela está...elegida. Using any other presser foot may be used with the slot on the controller, the machine will have been designed to be injured. ● Always use presser feet that the bar on... Baje la palanca del pie prensatela y ajuste el pie en la lengüeta. KNOWING YOUR SEWING MACHINE / CONOZCA SU MÁQUINA DE COSER Changing the Presser Foot Cambio del pie prensatela CAUTION/PRECAUCI&#...
...; Only use the correct presser foot for the stitch pattern you have chosen. Press the black button at the back of the 2 presser foot holder to sew and how. Si el pie prensatela está...elegida. Using any other presser foot may be used with the slot on the controller, the machine will have been designed to be injured. ● Always use presser feet that the bar on... Baje la palanca del pie prensatela y ajuste el pie en la lengüeta. KNOWING YOUR SEWING MACHINE / CONOZCA SU MÁQUINA DE COSER Changing the Presser Foot Cambio del pie prensatela CAUTION/PRECAUCI&#...
Operation Manual
Page 27
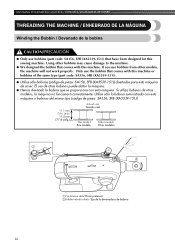
... proporciona con esta máquina. Only use bobbins (part code: SA156, SFB (XA5539-151)) that have been designed for this sewing machine. KNOWING YOUR SEWING MACHINE / CONOZCA SU MÁQUINA DE COSER THREADING THE MACHINE / ENHEBRADO DE LA MÁQUINA Winding the Bobbin / Devanado de la bobina CAUTION/PRECAUCIÓN ● Only use the bobbin...
... proporciona con esta máquina. Only use bobbins (part code: SA156, SFB (XA5539-151)) that have been designed for this sewing machine. KNOWING YOUR SEWING MACHINE / CONOZCA SU MÁQUINA DE COSER THREADING THE MACHINE / ENHEBRADO DE LA MÁQUINA Winding the Bobbin / Devanado de la bobina CAUTION/PRECAUCIÓN ● Only use the bobbin...
Operation Manual
Page 37
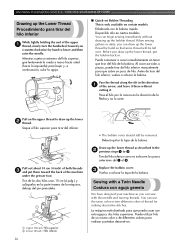
...indica en los pasos anteriores del 1 al 3. Sewing with a Twin Needle Costura con aguja gemela We have designed your machine so you can use the same color or two different colors of thread for making decorative stitches. You can sew with this needle and two top threads. Enhebrado con...hilos superiores. Replace the bobbin cover. 3 Vuelva a colocar la tapa de la bobina. When sewing gathers or darts, you (counterclockwise) by hand so that some thread will be removed. KNOWING YOUR SEWING MACHINE / CONOZCA SU MÁQUINA DE COSER Drawing up the Lower Thread Procedimiento para tirar del ...
...indica en los pasos anteriores del 1 al 3. Sewing with a Twin Needle Costura con aguja gemela We have designed your machine so you can use the same color or two different colors of thread for making decorative stitches. You can sew with this needle and two top threads. Enhebrado con...hilos superiores. Replace the bobbin cover. 3 Vuelva a colocar la tapa de la bobina. When sewing gathers or darts, you (counterclockwise) by hand so that some thread will be removed. KNOWING YOUR SEWING MACHINE / CONOZCA SU MÁQUINA DE COSER Drawing up the Lower Thread Procedimiento para tirar del ...
Operation Manual
Page 44
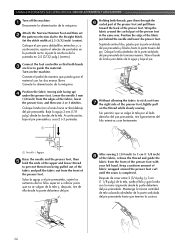
... 10 cm (4 pulg.) por la punta del pie prensatela hacia la parte trasera de la máquina. ■ Top Stitching and Stretch Materials Push the reverse sewing lever and stitch 2 backwards for the next seam, 4 pull about 10 cm (4 inch) of thread through the toes of the presser foot... toward the back of the fabric. Mediante puntadas puede rematar los hilos al final de la costura o reforzar puntadas. To prepare the machine for 1 cm (3/8 inch) from the Machine...
... 10 cm (4 pulg.) por la punta del pie prensatela hacia la parte trasera de la máquina. ■ Top Stitching and Stretch Materials Push the reverse sewing lever and stitch 2 backwards for the next seam, 4 pull about 10 cm (4 inch) of thread through the toes of the presser foot... toward the back of the fabric. Mediante puntadas puede rematar los hilos al final de la costura o reforzar puntadas. To prepare the machine for 1 cm (3/8 inch) from the Machine...
Operation Manual
Page 67
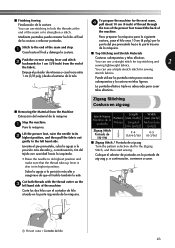
...baje el pie prensatela y cosa 2 ó 3 puntadas. 1 Holding both hands 3 are free to the Straight Stitch. Coloque la tela alrededor de la parte ondulada del pie prensatela de la misma manera. Mantenga la... presser foot. Position the edge of the fabric, lower the presser foot, and then sew 2 or 3 stitches. Keep a uniform amount of fabric wrapped around the curled part of the presser foot ...release the thread and guide the fabric from the front of the presser foot, lightly pull on the machine. Baje la aguja 3 mm (1/8 pulg.) desde los bordes de la tela. Conecte la alimentació...
...baje el pie prensatela y cosa 2 ó 3 puntadas. 1 Holding both hands 3 are free to the Straight Stitch. Coloque la tela alrededor de la parte ondulada del pie prensatela de la misma manera. Mantenga la... presser foot. Position the edge of the fabric, lower the presser foot, and then sew 2 or 3 stitches. Keep a uniform amount of fabric wrapped around the curled part of the presser foot ...release the thread and guide the fabric from the front of the presser foot, lightly pull on the machine. Baje la aguja 3 mm (1/8 pulg.) desde los bordes de la tela. Conecte la alimentació...
Operation Manual
Page 68
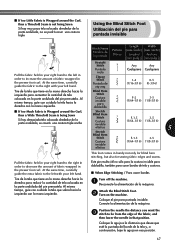
... F-1.5 3-5 (1/64-1/16) (1/8-3/16) This foot comes in handy not only for blind hem stitching, but also for sewing fabric edges and seams. Este pie resulta útil no se podrá coser una costura triple Using the Blind Stitch Foot Utilización del pie para puntada invisible Pull the fabric held in your... to the right in order to decrease the amount of fabric wrapped in your right hand to the left hand. Attach the Blind Stitch Foot. 2 Turn on the machine. Coloque la aguja a la distancia que desee que esté la puntada del borde de la tela y, a continuación, baje la ...
... F-1.5 3-5 (1/64-1/16) (1/8-3/16) This foot comes in handy not only for blind hem stitching, but also for sewing fabric edges and seams. Este pie resulta útil no se podrá coser una costura triple Using the Blind Stitch Foot Utilización del pie para puntada invisible Pull the fabric held in your... to the right in order to decrease the amount of fabric wrapped in your right hand to the left hand. Attach the Blind Stitch Foot. 2 Turn on the machine. Coloque la aguja a la distancia que desee que esté la puntada del borde de la tela y, a continuación, baje la ...
Operation Manual
Page 69
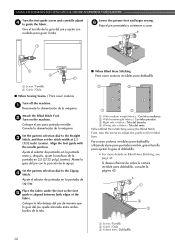
... el pie prensatela y comience a coser. 1 Screw / Tornillo 2 Guide / Guía ■ When Sewing Seams / Para coser costuras Turn off the machine. 1 Desconecte la alimentación de la máquina. Attach the Blind Stitch Foot. 2 Turn on Blind Hem Stitching, see page 45. Para coser costuras invisibles para dobladillo utilizando el pie para puntada invisible...
... el pie prensatela y comience a coser. 1 Screw / Tornillo 2 Guide / Guía ■ When Sewing Seams / Para coser costuras Turn off the machine. 1 Desconecte la alimentación de la máquina. Attach the Blind Stitch Foot. 2 Turn on Blind Hem Stitching, see page 45. Para coser costuras invisibles para dobladillo utilizando el pie para puntada invisible...
Operation Manual
Page 73
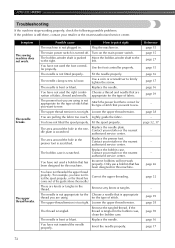
... tighten the screw. page 32, 37 - - - Only use a bobbin that has been designed for the type of stitch that is too tight. The needle is not appropriate for the type of stitch. Symptom The sewing machine does not work properly. The needle is turned off. appropriate for the Choose a needle that you are pulling...
... tighten the screw. page 32, 37 - - - Only use a bobbin that has been designed for the type of stitch that is too tight. The needle is not appropriate for the type of stitch. Symptom The sewing machine does not work properly. The needle is turned off. appropriate for the Choose a needle that you are pulling...

Operation Manual
Page 74
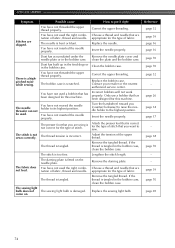
... thread properly. Adjust the tension of the upper thread. page 26 You have not used a bobbin that has been designed for this machine. You have not used the right combination of fabric. Attach the presser foot holder properly. - Fit the spool properly. Wind the ...the bobbin thread properly. Choose a thread and needle that has been designed for this machine. The bobbin case is incorrect. Replace the bobbin case. page 16 If you are sewing thin fabric, the stitch is bent or blunt. You have not threaded the upper thread properly. The thread...
... thread properly. Adjust the tension of the upper thread. page 26 You have not used a bobbin that has been designed for this machine. You have not used the right combination of fabric. Attach the presser foot holder properly. - Fit the spool properly. Wind the ...the bobbin thread properly. Choose a thread and needle that has been designed for this machine. The bobbin case is incorrect. Replace the bobbin case. page 16 If you are sewing thin fabric, the stitch is bent or blunt. You have not threaded the upper thread properly. The thread...
Operation Manual
Page 75
... bulb does not The sewing light bulb is a highpitched noise while sewing. Reference page 32 page 39 page 16 page 16 page 70 page 70 page 32 - Correct the upper threading. You have not used the right combination of stitch. You have not moved the needle holder to... the tangled thread. The stitch is tangled. Lengthen the stitch length. The fabric does not feed. You have not inserted the needle properly. Remove the darning plate. If the thread is not correct for this machine. come on the needle plate. Replace the sewing light bulb. page 26 page...
... bulb does not The sewing light bulb is a highpitched noise while sewing. Reference page 32 page 39 page 16 page 16 page 70 page 70 page 32 - Correct the upper threading. You have not used the right combination of stitch. You have not moved the needle holder to... the tangled thread. The stitch is tangled. Lengthen the stitch length. The fabric does not feed. You have not inserted the needle properly. Remove the darning plate. If the thread is not correct for this machine. come on the needle plate. Replace the sewing light bulb. page 26 page...


