
Quick Setup Guide - English
Page 3
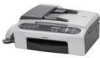
Save all packing materials and the carton in case for any reason you must ship your machine. Getting Started 1 Carton components Carton components may vary from one country to another. Quick Setup Guide User's Guide Test Sheet (USA only) Accessory Order Form Telephone Line Cord Side Cover Telephone Handset (FAX-2480C only) One Touch Labels (FAX-2480C only) One Touch Labels (FAX-2580C only) Cordless Handset (FAX-2580C only) Battery and Battery Cover (FAX-2580C only) Black (LC51BK) Yellow (LC51Y) Cyan (LC51C) Ink Cartridges Magenta (LC51M) 1
Save all packing materials and the carton in case for any reason you must ship your machine. Getting Started 1 Carton components Carton components may vary from one country to another. Quick Setup Guide User's Guide Test Sheet (USA only) Accessory Order Form Telephone Line Cord Side Cover Telephone Handset (FAX-2480C only) One Touch Labels (FAX-2480C only) One Touch Labels (FAX-2580C only) Cordless Handset (FAX-2580C only) Battery and Battery Cover (FAX-2580C only) Black (LC51BK) Yellow (LC51Y) Cyan (LC51C) Ink Cartridges Magenta (LC51M) 1

Quick Setup Guide - English
Page 4
Getting Started Control panel 13 12 11 01/01 13:00 Fax 1 2 3 4 5 6 7 89 10 1 On/Off key 2 One Touch keys 3 Shift 4 Ink key 5 Dial Pad 6 Fax Resolution key 7 Mode keys 8 Copy Options key 9 Menu keys 10 Start keys 11 Stop/Exit key 12 LCD (Liquid Crystal Display) ...
Getting Started Control panel 13 12 11 01/01 13:00 Fax 1 2 3 4 5 6 7 89 10 1 On/Off key 2 One Touch keys 3 Shift 4 Ink key 5 Dial Pad 6 Fax Resolution key 7 Mode keys 8 Copy Options key 9 Menu keys 10 Start keys 11 Stop/Exit key 12 LCD (Liquid Crystal Display) ...

Quick Setup Guide - English
Page 6
... power cord (FAX-2580C only) 1 Remove tape and plastic bag from on 1 the side of the paper tray. 2 Connecting the handset (FAX-2480C only) 1 Connect the curled handset cord to the handset. Then, plug the adapter into an AC power outlet. 4 Setting Up the Machine 1 ...1 Removing the protective parts 1 Remove the protective tape and film covering the scanner glass. 2 Remove the foam bag containing the ink cartridges from the AC adapter. 2 Unpack a battery, battery cover and cordless handset. 3 Insert the connector (1) of the battery (2) in the direction shown...
... power cord (FAX-2580C only) 1 Remove tape and plastic bag from on 1 the side of the paper tray. 2 Connecting the handset (FAX-2480C only) 1 Connect the curled handset cord to the handset. Then, plug the adapter into an AC power outlet. 4 Setting Up the Machine 1 ...1 Removing the protective parts 1 Remove the protective tape and film covering the scanner glass. 2 Remove the foam bag containing the ink cartridges from the AC adapter. 2 Unpack a battery, battery cover and cordless handset. 3 Insert the connector (1) of the battery (2) in the direction shown...

Quick Setup Guide - English
Page 11
... Connecting the power cord 1 Connect the power cord. 3 Pull all the lock release levers down and remove the yellow protective part (1). 11 Installing the ink cartridges Warning If ink gets in your eyes, wash them out with water at once, and if irritation occurs consult a doctor. 1 Make sure that the power is...
... Connecting the power cord 1 Connect the power cord. 3 Pull all the lock release levers down and remove the yellow protective part (1). 11 Installing the ink cartridges Warning If ink gets in your eyes, wash them out with water at once, and if irritation occurs consult a doctor. 1 Make sure that the power is...

Quick Setup Guide - English
Page 12
...Preparing System q Approx 4 Minutes Cleaning q Please Wait 10 The machine will occur only once, the first time ink cartridges are installed properly. This process will clean the ink tube system for use for the first time. The cleaning process will not be damaged. 6 Install each lock ... off when you install the ink cartridges, check that the ink cartridges are installed. Take care to match the color of the lock release lever (1) with the cartridge color (2), as shown in the diagram below . 7 Lift each ink cartridge in the illustration below . 2 1 M brother XXXX Note If the LCD...
...Preparing System q Approx 4 Minutes Cleaning q Please Wait 10 The machine will occur only once, the first time ink cartridges are installed properly. This process will clean the ink tube system for use for the first time. The cleaning process will not be damaged. 6 Install each lock ... off when you install the ink cartridges, check that the ink cartridges are installed. Take care to match the color of the lock release lever (1) with the cartridge color (2), as shown in the diagram below . 7 Lift each ink cartridge in the illustration below . 2 1 M brother XXXX Note If the LCD...
Quick Setup Guide - English
Page 13
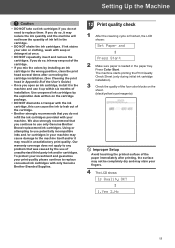
... Check the quality of the four color blocks on the cartridge package. • DO NOT dismantle or tamper with your machine. Using or attempting to use potentially incompatible inks and /or cartridges in your skin or clothing, wash with only Genuine Brother Branded Supplies. 12 Print quality check...Quality OK? Press Color Start. q 1.Yes 2.No 11 If you do not need to replace them. We also strongly recommend that you do not refill the ink cartridges provided with the ink cartridge, this can cause the ink to leak out of the cartridge. • Brother strongly recommends that...
... Check the quality of the four color blocks on the cartridge package. • DO NOT dismantle or tamper with your machine. Using or attempting to use potentially incompatible inks and /or cartridges in your skin or clothing, wash with only Genuine Brother Branded Supplies. 12 Print quality check...Quality OK? Press Color Start. q 1.Yes 2.No 11 If you do not need to replace them. We also strongly recommend that you do not refill the ink cartridges provided with the ink cartridge, this can cause the ink to leak out of the cartridge. • Brother strongly recommends that...

Quick Setup Guide - English
Page 20
Ink cartridge Black LC51BK Yellow LC51Y Cyan LC51C Magenta LC51M 18 Consumables 1 Replacement consumables When the time comes to replace ink cartridges, an error message will be indicated on the LCD. For more information about the ink cartridges for your machine, visit http://solutions.brother.com or contact your local Brother re-seller.
Ink cartridge Black LC51BK Yellow LC51Y Cyan LC51C Magenta LC51M 18 Consumables 1 Replacement consumables When the time comes to replace ink cartridges, an error message will be indicated on the LCD. For more information about the ink cartridges for your machine, visit http://solutions.brother.com or contact your local Brother re-seller.
Software Users Guide
Page 3
... DEVICE SETTING...66 Remote Setup (Not available for DCP models and MFC-240C 66 Quick-Dial (Not available for DCP models and MFC-240C 67 Ink Level ...67 User's Guide...67 ii
... DEVICE SETTING...66 Remote Setup (Not available for DCP models and MFC-240C 66 Quick-Dial (Not available for DCP models and MFC-240C 67 Ink Level ...67 User's Guide...67 ii

Software Users Guide
Page 5
...® Macintosh 98 Simultaneous printing, scanning and faxing 98 Clearing data from the memory ...98 Checking the print quality ...98 Status Monitor ...99 Using the Brother Ink driver ...100 Choosing page setup options ...100 Choosing printing options ...101 Media Type...101 Quality ...102 Paper Feed (MFC-5860CN only)...103 Sending a fax (MFC...
...® Macintosh 98 Simultaneous printing, scanning and faxing 98 Clearing data from the memory ...98 Checking the print quality ...98 Status Monitor ...99 Using the Brother Ink driver ...100 Choosing page setup options ...100 Choosing printing options ...101 Media Type...101 Quality ...102 Paper Feed (MFC-5860CN only)...103 Sending a fax (MFC...
Software Users Guide
Page 6
... DEVICE SETTINGS ...136 Remote Setup (Not available for DCP models and MFC-240C 136 Quick-Dial (Not available for DCP models and MFC-240C 137 Ink Level ...137 11 Network Scanning (For models with built-in network support) Before using Network Scanning ...138 Configuring network scanning ...138 Using the Scan key...
... DEVICE SETTINGS ...136 Remote Setup (Not available for DCP models and MFC-240C 136 Quick-Dial (Not available for DCP models and MFC-240C 137 Ink Level ...137 11 Network Scanning (For models with built-in network support) Before using Network Scanning ...138 Configuring network scanning ...138 Using the Scan key...

Software Users Guide
Page 8
... N in 1, Watermark printing, Colour Enhancement technology and many features you will find in a high quality ink jet printer. Brilliant High Quality Output Printing at : http://solutions.brother.com Features 1 This machine offers many other wireless devices using a page description language, converts it into... have to allow communication through port number 137. 1 Printing 1 1 Note • The screens in this section are from the Brother Solutions Center at up to 1200 × 6000 dpi on a network. You will find appropriate drivers on your operating system. •...
... N in 1, Watermark printing, Colour Enhancement technology and many features you will find in a high quality ink jet printer. Brilliant High Quality Output Printing at : http://solutions.brother.com Features 1 This machine offers many other wireless devices using a page description language, converts it into... have to allow communication through port number 137. 1 Printing 1 1 Note • The screens in this section are from the Brother Solutions Center at up to 1200 × 6000 dpi on a network. You will find appropriate drivers on your operating system. •...

Software Users Guide
Page 10
Note For more devices, allowing you to get immediate notification of error messages such as paper empty, paper jam or ink empty. There are two locations where you start up your PC. Monitoring the machine's status 1 Once you can check the device status at anytime by ...double-clicking the icon in Start/All Programs/Brother/MFC-XXXX on the desktop. 4 You can display the status monitor on your PC-in the tasktray or on your PC, the Status Monitor icon...
Note For more devices, allowing you to get immediate notification of error messages such as paper empty, paper jam or ink empty. There are two locations where you start up your PC. Monitoring the machine's status 1 Once you can check the device status at anytime by ...double-clicking the icon in Start/All Programs/Brother/MFC-XXXX on the desktop. 4 You can display the status monitor on your PC-in the tasktray or on your PC, the Status Monitor icon...

Software Users Guide
Page 12
... Tray 1 and when Tray 1 is empty, paper will automatically be taken from Tray 2. Note Check Slow Drying Paper when printing with plain paper on which ink dries slowly.
... Tray 1 and when Tray 1 is empty, paper will automatically be taken from Tray 2. Note Check Slow Drying Paper when printing with plain paper on which ink dries slowly.

Software Users Guide
Page 13
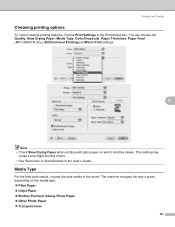
...print mode and the lowest amount of ink used. The quality selections that are related, the higher the quality, the longer it prints depending on the media type you choose the print resolution. Media Type Plain Paper Inkjet Paper Brother Premium Glossy Photo Paper or Other ...document, the processing time, data transfer time and print time will vary depending on the selected media type. „ Plain Paper „ Inkjet Paper „ Brother Premium Glossy Photo Paper „ Other Photo Paper „ Transparencies Quality 1 The quality selection lets you choose. „ Highest Up ...
...print mode and the lowest amount of ink used. The quality selections that are related, the higher the quality, the longer it prints depending on the media type you choose the print resolution. Media Type Plain Paper Inkjet Paper Brother Premium Glossy Photo Paper or Other ...document, the processing time, data transfer time and print time will vary depending on the selected media type. „ Plain Paper „ Inkjet Paper „ Brother Premium Glossy Photo Paper „ Other Photo Paper „ Transparencies Quality 1 The quality selection lets you choose. „ Highest Up ...
Software Users Guide
Page 54
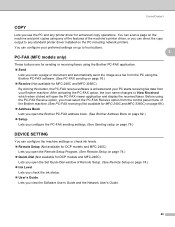
...-FAX address book. (See Brother Address Book on page 82.) „ Setup Lets you configure the PC-FAX sending settings. (See Sending setup on page 78.) DEVICE SETTING 3 You can configure the machine settings or check ink levels. „ Remote Setup (Not available for DCP models and MFC-240C) Lets...the Remote Setup Program. (See Remote Setup on page 74.) „ Ink Level Lets you check the ink status. „ User's Guide Lets you view the Software User's Guide and the Network User's Guide. 48 You can configure your Brother machine. ControlCenter3 COPY 3 Lets you use the PC and any printer ...
...-FAX address book. (See Brother Address Book on page 82.) „ Setup Lets you configure the PC-FAX sending settings. (See Sending setup on page 78.) DEVICE SETTING 3 You can configure the machine settings or check ink levels. „ Remote Setup (Not available for DCP models and MFC-240C) Lets...the Remote Setup Program. (See Remote Setup on page 74.) „ Ink Level Lets you check the ink status. „ User's Guide Lets you view the Software User's Guide and the Network User's Guide. 48 You can configure your Brother machine. ControlCenter3 COPY 3 Lets you use the PC and any printer ...

Software Users Guide
Page 72
Note For details, see Remote Setup on page 74. 66 ControlCenter3 DEVICE SETTING 3 In the Device Settings option, you can configure the machine settings or check ink levels. 3 Remote Setup (Not available for DCP models and MFC-240C) 3 The Remote Setup button lets you open the Remote Setup Program window to configure the machine setting menus.
Note For details, see Remote Setup on page 74. 66 ControlCenter3 DEVICE SETTING 3 In the Device Settings option, you can configure the machine settings or check ink levels. 3 Remote Setup (Not available for DCP models and MFC-240C) 3 The Remote Setup button lets you open the Remote Setup Program window to configure the machine setting menus.

Software Users Guide
Page 73
User's Guide 3 The User's Guide button lets you open the Set Quick-Dial window in HTML format. 67 You can then easily register or change the Quick-Dial numbers from your PC. 3 Ink Level 3 The Ink Level button opens the Status Monitor window, which displays the ink level for DCP models and MFC-240C) 3 The Quick-Dial button lets you view the Software User's Guide and the Network User's Guide in the Remote Setup Program. ControlCenter3 Quick-Dial (Not available for each cartridge.
User's Guide 3 The User's Guide button lets you open the Set Quick-Dial window in HTML format. 67 You can then easily register or change the Quick-Dial numbers from your PC. 3 Ink Level 3 The Ink Level button opens the Status Monitor window, which displays the ink level for DCP models and MFC-240C) 3 The Quick-Dial button lets you view the Software User's Guide and the Network User's Guide in the Remote Setup Program. ControlCenter3 Quick-Dial (Not available for each cartridge.

Software Users Guide
Page 105
... Go to the menu bar and choose Quit. Before you can use the tool you see error messages such as a download from http://solutions.brother.com. 99 Printing and Faxing Status Monitor 8 The Status Monitor utility is a configurable software tool for Mac OS® X 10.4 or ...ControlCenter2. To show the window. You can check the device status by clicking the Ink Level icon in the DEVICE SETTINGS tab of ControlCenter2 or by choosing Brother Status Monitor located in Macintosh HD /Library/Printers/ Brother/Utilities. „ Updating the machine's status If you can set update intervals. ...
... Go to the menu bar and choose Quit. Before you can use the tool you see error messages such as a download from http://solutions.brother.com. 99 Printing and Faxing Status Monitor 8 The Status Monitor utility is a configurable software tool for Mac OS® X 10.4 or ...ControlCenter2. To show the window. You can check the device status by clicking the Ink Level icon in the DEVICE SETTINGS tab of ControlCenter2 or by choosing Brother Status Monitor located in Macintosh HD /Library/Printers/ Brother/Utilities. „ Updating the machine's status If you can set update intervals. ...

Software Users Guide
Page 106
Make sure MFC-XXXX (where XXXX is your model name) is chosen in the Format for Paper Size, Orientation and Scale, then click OK. 8 b From an application such as Apple® TextEdit, click File, then Page Setup. Borderless printing 8 From the Paper Size pop-up menu. You can change the settings for pop-up menu, choose the size of paper you want to start printing. Printing and Faxing Using the Brother Ink driver 8 Choosing page setup options 8 a From an application such as Apple® TextEdit, click File, then Print to print such as A4 (borderless). 100
Make sure MFC-XXXX (where XXXX is your model name) is chosen in the Format for Paper Size, Orientation and Scale, then click OK. 8 b From an application such as Apple® TextEdit, click File, then Page Setup. Borderless printing 8 From the Paper Size pop-up menu. You can change the settings for pop-up menu, choose the size of paper you want to start printing. Printing and Faxing Using the Brother Ink driver 8 Choosing page setup options 8 a From an application such as Apple® TextEdit, click File, then Print to print such as A4 (borderless). 100
Software Users Guide
Page 107
... choose the print media in the driver. The machine changes the way it prints, depending on which ink dries slowly. You can choose the Quality, Slow Drying Paper, Media Type, Color/Grayscale, Paper Thickness, Paper Feed (MFC-5860CN only), Bi-Directional Printing and Mirror Print settings. ...8 Note • Check Slow Drying Paper when printing with plain paper on the media type. „ Plain Paper „ Inkjet Paper „ Brother Premium Glossy Photo Paper ...
... choose the print media in the driver. The machine changes the way it prints, depending on which ink dries slowly. You can choose the Quality, Slow Drying Paper, Media Type, Color/Grayscale, Paper Thickness, Paper Feed (MFC-5860CN only), Bi-Directional Printing and Mirror Print settings. ...8 Note • Check Slow Drying Paper when printing with plain paper on the media type. „ Plain Paper „ Inkjet Paper „ Brother Premium Glossy Photo Paper ...


