Users Manual - English and Spanish
Page 6
... Chapter Chapter Chapter Chapter Chapter Chapter CONTENTS 1 2 3 4 5 6 7 8 Chapter 1 Names of parts and their functions 1 Accessories included with your serger 3 Needle ...5 Turning direction of motor ...7 Opening and closing the front cover 7 Chapter 2 Operating ...8 Powering the machine ...8 Removing the Bed Extension for... ...14 Preparation before threading 14 How to use the thread spool cap 15 How to use the thread net ...15 Tension release button ...15 Before threading ...16 Threading the upperlooper ...17 Threading the lowerlooper ...19 Threading the right needle (on...
... Chapter Chapter Chapter Chapter Chapter Chapter CONTENTS 1 2 3 4 5 6 7 8 Chapter 1 Names of parts and their functions 1 Accessories included with your serger 3 Needle ...5 Turning direction of motor ...7 Opening and closing the front cover 7 Chapter 2 Operating ...8 Powering the machine ...8 Removing the Bed Extension for... ...14 Preparation before threading 14 How to use the thread spool cap 15 How to use the thread net ...15 Tension release button ...15 Before threading ...16 Threading the upperlooper ...17 Threading the lowerlooper ...19 Threading the right needle (on...
Users Manual - English and Spanish
Page 22
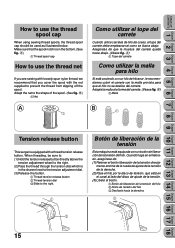
...be sure to: (1) Hold the tension release button directly above the tension adjustment wheel to the right. (2) Pass the thread through the tension disc which is in the channel next to the tension adjustment dial. (3) Release the button. 1 Thread tension release button 2 Thread tension dial 3 Slide to the shape ... debe emplearse tal como se ilustra abajo. B) 1 Malla A B 1 1 5 6 7 8 9 10 11 12 13 14 15 16 17 18 Tension release button This serger is equipped with the net supplied to prevent the thread from slipping off the spool. Adapt the net to the right. 1 6 5 4 2 Botó...
...be sure to: (1) Hold the tension release button directly above the tension adjustment wheel to the right. (2) Pass the thread through the tension disc which is in the channel next to the tension adjustment dial. (3) Release the button. 1 Thread tension release button 2 Thread tension dial 3 Slide to the shape ... debe emplearse tal como se ilustra abajo. B) 1 Malla A B 1 1 5 6 7 8 9 10 11 12 13 14 15 16 17 18 Tension release button This serger is equipped with the net supplied to prevent the thread from slipping off the spool. Adapt the net to the right. 1 6 5 4 2 Botó...


