
User Manual in English
Page 5
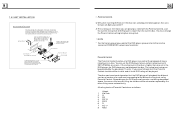
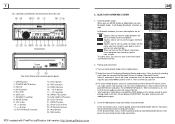
... before connecting the wire. If the car interior is switched on monitor screen. The chapter contain a unit at DC 14.4 V) Dimensions(w x h x d 7"W x 2"H x 6.3"D DVD Deck Specification Format DVD/VCD/JPEG/MP4/MP3/WMA/CD Video System NTSC Audio System 24 bit/96KHz Loading System Auto Loading Mounting Angle 0 to look up. The unit is called chapter. To correct this unit near water and moisture. 2. Before Operation 1.1 Glossary PBC (playback control...
... before connecting the wire. If the car interior is switched on monitor screen. The chapter contain a unit at DC 14.4 V) Dimensions(w x h x d 7"W x 2"H x 6.3"D DVD Deck Specification Format DVD/VCD/JPEG/MP4/MP3/WMA/CD Video System NTSC Audio System 24 bit/96KHz Loading System Auto Loading Mounting Angle 0 to look up. The unit is called chapter. To correct this unit near water and moisture. 2. Before Operation 1.1 Glossary PBC (playback control...
User Manual in English
Page 6
... audio connector is less than 30°. REMOTE CONTROL IS INSENSITIVE OR DOES NOT WORK * Check the batteries of the player. SOME FUNCTION BUTTONS DO NOT WORK * Turn off the power, then turn on again. * Remove the front panel from the disc center. 2. Put the disc inside the car is not under muted. Note about the Battery of the play side. 2. NO SOUND BUT HAVE PICTURE * Ensure that the player's audio output has a good connection with monitor's video input...
... audio connector is less than 30°. REMOTE CONTROL IS INSENSITIVE OR DOES NOT WORK * Check the batteries of the player. SOME FUNCTION BUTTONS DO NOT WORK * Turn off the power, then turn on again. * Remove the front panel from the disc center. 2. Put the disc inside the car is not under muted. Note about the Battery of the play side. 2. NO SOUND BUT HAVE PICTURE * Ensure that the player's audio output has a good connection with monitor's video input...
User Manual in English
Page 8
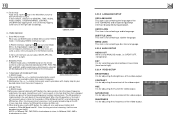
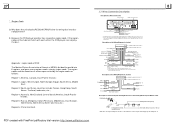
AV IN socket 5. Disc Slot 6. POWER/MUTE button 3. Monitor 4. VOL knob 10. >>| button 11. | OPEN button 2. SD/MMC Card Slot 8. MODE button 9. 1.6 Locations and Names of Controls on or in the unit 18 19 23 5 22 3 20 1 4 11 10 9 24 12 13 14 15 16 17 8 2 25 6 Front Panel SD / M M C 7 21 The Front Facet after removing front panel 1. USB Jack 7.
AV IN socket 5. Disc Slot 6. POWER/MUTE button 3. Monitor 4. VOL knob 10. >>| button 11. | OPEN button 2. SD/MMC Card Slot 8. MODE button 9. 1.6 Locations and Names of Controls on or in the unit 18 19 23 5 22 3 20 1 4 11 10 9 24 12 13 14 15 16 17 8 2 25 6 Front Panel SD / M M C 7 21 The Front Facet after removing front panel 1. USB Jack 7.
User Manual in English
Page 9
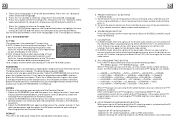
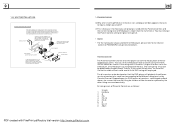
... the blue auto antenna cable does not make contact with each other end of the Ground Wire to connect the negative pole of the Ground Wire provided by the region codes as follows: Region 1: America, Canada, East-Pacific Inlands; Region 6: China mainland. 1.7 Wires Connection Description Description of the Wiring Diagram for Socket 2 RED R YELLOWWHVITIDEELO YELLOW YELLOW YELLOW BROWN AV RCA AUX IN GREY VIDEO RCA OUT BLACK REAR VIEW CAMERA WIRING CONNECTING SOCKET 2 WIRING CONNECTING PLUG 2 GREY REAR AUDIO RCA OUT BLACK RED R WHITE L IPod IN...
... the blue auto antenna cable does not make contact with each other end of the Ground Wire to connect the negative pole of the Ground Wire provided by the region codes as follows: Region 1: America, Canada, East-Pacific Inlands; Region 6: China mainland. 1.7 Wires Connection Description Description of the Wiring Diagram for Socket 2 RED R YELLOWWHVITIDEELO YELLOW YELLOW YELLOW BROWN AV RCA AUX IN GREY VIDEO RCA OUT BLACK REAR VIEW CAMERA WIRING CONNECTING SOCKET 2 WIRING CONNECTING PLUG 2 GREY REAR AUDIO RCA OUT BLACK RED R WHITE L IPod IN...
User Manual in English
Page 10
... to input a 4 digits password ? Therein, if you are as that the DVD player will be protected by the password. If the rating level in the DVD player, the DVD player can not playback the disc. Parental Control The Parental Control function of a DVD player can be played. The rating level setup can control the playback of seamless switching described above, the scenes that asks to the different rating level set...
... to input a 4 digits password ? Therein, if you are as that the DVD player will be protected by the password. If the rating level in the DVD player, the DVD player can not playback the disc. Parental Control The Parental Control function of a DVD player can be played. The rating level setup can control the playback of seamless switching described above, the scenes that asks to the different rating level set...
User Manual in English
Page 11
.... 5.23.6 DIGITAL SETUP OP MODE It is not central speaker and subwoofer. There are 3 mode: LT/RT, STEREO, VSS. Common Operation 1. then tap one of signal ; To mute sound Press the MUTE button on LOUD mode, it to be FULL, the Peak-to turn on the unit. After sliding the monitor into the chassis, pressing the CLK button can make the volume level higher. When turning on the remote control to zero...
.... 5.23.6 DIGITAL SETUP OP MODE It is not central speaker and subwoofer. There are 3 mode: LT/RT, STEREO, VSS. Common Operation 1. then tap one of signal ; To mute sound Press the MUTE button on LOUD mode, it to be FULL, the Peak-to turn on the unit. After sliding the monitor into the chassis, pressing the CLK button can make the volume level higher. When turning on the remote control to zero...
User Manual in English
Page 12
... the unit panel or in the Main Menu to turn to enter RADIO mode, it will be displayed on the small monitor of GENERAL, TIME, AUDIO, VIDEO ,RADIO , STEERING WHEEL CONTROL, CALIBRATE by tapping them, then set interface, you use MODE button or Mode Menu to frequency interface as right; during playback ,tapping the icon can enter Mode Menu; the other icons are same as right. RADIO interface 2. Radio Operation GENERAL SETUP 1. BAND BUTTON In RADIO mode...
... the unit panel or in the Main Menu to turn to enter RADIO mode, it will be displayed on the small monitor of GENERAL, TIME, AUDIO, VIDEO ,RADIO , STEERING WHEEL CONTROL, CALIBRATE by tapping them, then set interface, you use MODE button or Mode Menu to frequency interface as right; during playback ,tapping the icon can enter Mode Menu; the other icons are same as right. RADIO interface 2. Radio Operation GENERAL SETUP 1. BAND BUTTON In RADIO mode...
User Manual in English
Page 13
... one of PASSWORD in all . When playing the pictures with 4:3 screen. If there is bad during tuning, press this causes interference to select the STEREO or MONO sound mode for the station of the preset buttons [1-6] on the remote control to the receiving effect during tuning, check whether there is displayed by AF segment in all for the local radio station. 8. button on the remote control or rotate the...
... one of PASSWORD in all . When playing the pictures with 4:3 screen. If there is bad during tuning, press this causes interference to select the STEREO or MONO sound mode for the station of the preset buttons [1-6] on the remote control to the receiving effect during tuning, check whether there is displayed by AF segment in all for the local radio station. 8. button on the remote control or rotate the...
User Manual in English
Page 14
... iPod mode and display iPod menu on , SEEK, (SCAN), AUTO MEMORY function can only search for the weak station. Because the mute time of the AF switching or the checking time is very short, it is almost inaudible in case of normal program. (When AF flash on , SEEK, (SCAN), AUTO-MEMORY function can also use MODE button or Mode Menu to turn volume up and down. : Tap it will be received or saved only when traffic program...
... iPod mode and display iPod menu on , SEEK, (SCAN), AUTO MEMORY function can only search for the weak station. Because the mute time of the AF switching or the checking time is very short, it is almost inaudible in case of normal program. (When AF flash on , SEEK, (SCAN), AUTO-MEMORY function can also use MODE button or Mode Menu to turn volume up and down. : Tap it will be received or saved only when traffic program...
User Manual in English
Page 15
... it to the Rear cabinet. Control icons VIDEO mode 5. or press the PROG button twice again. * To remove the all programmed sequence numbers, move the cursor onto Clear item, then press the OK button. * To change , input the desired sequence number. * During VCD playback, if it turns off PBC mode. 5.20 Playback IMAGE files 1. When displaying the root menu, you want some chapters/tracks in the ipod, after that...
... it to the Rear cabinet. Control icons VIDEO mode 5. or press the PROG button twice again. * To remove the all programmed sequence numbers, move the cursor onto Clear item, then press the OK button. * To change , input the desired sequence number. * During VCD playback, if it turns off PBC mode. 5.20 Playback IMAGE files 1. When displaying the root menu, you want some chapters/tracks in the ipod, after that...
User Manual in Spanish
Page 33
... 12V Maximum Power Output 4 x 85W(measured at DC 14.4 V) Dimensions(w x h x d 7"W x 2"H x 6.3"D DVD Deck Specification Format DVD/VCD/JPEG/MP4/MP3/WMA/CD Video System NTSC Audio System 24 bit/96KHz Loading System Auto Loading Mounting Angle 0 to look up. for example, the theme part of VCD. Every title contain a serial number that every block can be operated as marked on the unit. 2. Environment 1. PDF created...
... 12V Maximum Power Output 4 x 85W(measured at DC 14.4 V) Dimensions(w x h x d 7"W x 2"H x 6.3"D DVD Deck Specification Format DVD/VCD/JPEG/MP4/MP3/WMA/CD Video System NTSC Audio System 24 bit/96KHz Loading System Auto Loading Mounting Angle 0 to look up. for example, the theme part of VCD. Every title contain a serial number that every block can be operated as marked on the unit. 2. Environment 1. PDF created...
User Manual in Spanish
Page 34
... the Remote Control: 1.Improper use petrol, thinner. If so, cool off the power, then turn on again. * Reset the unit to the inlet tightly. PDF created with monitor's video input. * Ensure that you have set the right VIDEO settings of the player. * Check whether there are powerful and have set the right AUDIO setup of battery may cause overheating or explosion. 2.Battery leakage may cause electric shock. Before playing, wipe the disc with...
... the Remote Control: 1.Improper use petrol, thinner. If so, cool off the power, then turn on again. * Reset the unit to the inlet tightly. PDF created with monitor's video input. * Ensure that you have set the right VIDEO settings of the player. * Check whether there are powerful and have set the right AUDIO setup of battery may cause overheating or explosion. 2.Battery leakage may cause electric shock. Before playing, wipe the disc with...
User Manual in Spanish
Page 36
1.6 Locations and Names of Controls on or in the unit 18 19 23 5 22 3 20 1 4 11 10 9 24 12 13 14 15 16 17 8 2 25 6 Front Panel SD / M M C 7 21 The Front Facet after removing front panel 1. OPEN button 2. VOL knob 10. >>| button 11. | Monitor 4. POWER/MUTE button 3. USB Jack 7. SD/MMC Card Slot 8. AV IN socket 5. MODE button 9. Disc Slot 6.
1.6 Locations and Names of Controls on or in the unit 18 19 23 5 22 3 20 1 4 11 10 9 24 12 13 14 15 16 17 8 2 25 6 Front Panel SD / M M C 7 21 The Front Facet after removing front panel 1. OPEN button 2. VOL knob 10. >>| button 11. | Monitor 4. POWER/MUTE button 3. USB Jack 7. SD/MMC Card Slot 8. AV IN socket 5. MODE button 9. Disc Slot 6.
User Manual in Spanish
Page 37
... SWITCH FUSES BLUE AUTO ANT WOOFER LINE OUT GREEN BLACK FRONT AUDIO RCA OUT RED R WHITE L FRONT WHITE GRAY FRONT LEFT SP WHITE / BLACK GREEN GRAY / BLACK VIOLET RIGHT SP REAR GREEN / BLACK VIOLET / BLACK REAR NOTES: 1. Description of the Wiring Diagram for Socket 2 RED R YELLOWWHVITIDEELO YELLOW YELLOW YELLOW BROWN AV RCA AUX IN GREY VIDEO RCA OUT BLACK REAR VIEW CAMERA WIRING CONNECTING SOCKET 2 WIRING CONNECTING PLUG 2 GREY REAR AUDIO RCA OUT BLACK RED R WHITE L IPod IN Description of America (MPAA) divided the world into disc compartment ? * Region Code...
... SWITCH FUSES BLUE AUTO ANT WOOFER LINE OUT GREEN BLACK FRONT AUDIO RCA OUT RED R WHITE L FRONT WHITE GRAY FRONT LEFT SP WHITE / BLACK GREEN GRAY / BLACK VIOLET RIGHT SP REAR GREEN / BLACK VIOLET / BLACK REAR NOTES: 1. Description of the Wiring Diagram for Socket 2 RED R YELLOWWHVITIDEELO YELLOW YELLOW YELLOW BROWN AV RCA AUX IN GREY VIDEO RCA OUT BLACK REAR VIEW CAMERA WIRING CONNECTING SOCKET 2 WIRING CONNECTING PLUG 2 GREY REAR AUDIO RCA OUT BLACK RED R WHITE L IPod IN Description of America (MPAA) divided the world into disc compartment ? * Region Code...
User Manual in Spanish
Page 38
... the disc. Parental Control The Parental Control function of a DVD player can set the DVD player to the different rating level set in the disc slot, a dialogue window appears that are playing is rated with the Parental Control, and the current rating level of DVD player is lower than one set by Parental Control. You can control the playback of seamless switching described above, the scenes that asks to input a 4 digits password...
... the disc. Parental Control The Parental Control function of a DVD player can set the DVD player to the different rating level set in the disc slot, a dialogue window appears that are playing is rated with the Parental Control, and the current rating level of DVD player is lower than one set by Parental Control. You can control the playback of seamless switching described above, the scenes that asks to input a 4 digits password...
User Manual in Spanish
Page 39
... and rear USB. To display clock time Press the CLK button to select your desired sound effect when there is not central speaker and subwoofer. STEREO: If you choose this item, when outputting audio signal with 2 channels, it to turn off MUTE mode. when outputting audio signal with 5.1 channels, it into the chassis. 3. To select an optimal angle of the monitor of signal. After sliding the monitor into the chassis Pressing the OPEN button...
... and rear USB. To display clock time Press the CLK button to select your desired sound effect when there is not central speaker and subwoofer. STEREO: If you choose this item, when outputting audio signal with 2 channels, it to turn off MUTE mode. when outputting audio signal with 5.1 channels, it into the chassis. 3. To select an optimal angle of the monitor of signal. After sliding the monitor into the chassis Pressing the OPEN button...

User Manual in Spanish
Page 40
..., TIME, AUDIO, VIDEO ,RADIO , STEERING WHEEL CONTROL, CALIBRATE by tapping some icons on the small monitor of FM1, FM2, FM3, AM1 and AM2, and the word means which band is selected will display RADIO interface as right. In RADIO interface, tapping the icon can turn to enter RADIO mode, it will be displayed on the right side accordingly. 3. RADIO interface 2. Enter RADIO mode When you can adjust MUTE...
..., TIME, AUDIO, VIDEO ,RADIO , STEERING WHEEL CONTROL, CALIBRATE by tapping some icons on the small monitor of FM1, FM2, FM3, AM1 and AM2, and the word means which band is selected will display RADIO interface as right. In RADIO interface, tapping the icon can turn to enter RADIO mode, it will be displayed on the right side accordingly. 3. RADIO interface 2. Enter RADIO mode When you can adjust MUTE...
User Manual in Spanish
Page 41
... six preset buttons (1-6) on remote control or rotate number knob and long press it , then use the direction buttons to the normal station. 9. LOC BUTTON 1) In RADIO mode, when the signals of the Parental Control. Segment off: AF switching mode off the LOC function, then tune again for the station of PASSWORD in all setup items change back to display the word LOC on the remote control to unlock it effective. They display as...
... six preset buttons (1-6) on remote control or rotate number knob and long press it , then use the direction buttons to the normal station. 9. LOC BUTTON 1) In RADIO mode, when the signals of the Parental Control. Segment off: AF switching mode off the LOC function, then tune again for the station of PASSWORD in all setup items change back to display the word LOC on the remote control to unlock it effective. They display as...
User Manual in Spanish
Page 42
... search for the stronger RDS station. TA [TRAFFIC ANNOUNCEMENT] BUTTON Press the TA button shortly to a few minute for the strong station to turn volume up and down. : Tap it will enter iPod mode and display iPod menu on the signal strength of normal program. (When AF flash on , SEEK, (SCAN), AUTO MEMORY function can only receive and save the RDS program. 10. During IMAGE playback, press one of them...
... search for the stronger RDS station. TA [TRAFFIC ANNOUNCEMENT] BUTTON Press the TA button shortly to a few minute for the strong station to turn volume up and down. : Tap it will enter iPod mode and display iPod menu on the signal strength of normal program. (When AF flash on , SEEK, (SCAN), AUTO MEMORY function can only receive and save the RDS program. 10. During IMAGE playback, press one of them...
User Manual in Spanish
Page 43
... for video files; PDF created with desired sequence. 4 Use the direction button to move cursor onto Play item, then press the OK button to play your desired as : PLAYLISTS, ARTISTS, ALBUMS, GENRES, SONGS, COMPOSERS, REPEAT and so on IMAGE mode. . When displaying the root menu, you can play files in a disc or card, press the EJECT button to slide down the monitor and eject disc in programmed order. * To exit program playback...
... for video files; PDF created with desired sequence. 4 Use the direction button to move cursor onto Play item, then press the OK button to play your desired as : PLAYLISTS, ARTISTS, ALBUMS, GENRES, SONGS, COMPOSERS, REPEAT and so on IMAGE mode. . When displaying the root menu, you can play files in a disc or card, press the EJECT button to slide down the monitor and eject disc in programmed order. * To exit program playback...


